C++ to Java

:

This book chapter assumes you are familiar with basic C++ programming. It provides a crash course to help you migrate from C++ to Java.

This chapter borrows heavily from the excellent book ThinkJava by Allen Downey and Chris Mayfield. As required by the terms of reuse of that book, this chapter is released under the Creative Commons Attribution-NonCommercial-ShareAlike 3.0 Unported License and not under the MIT license as the rest of this book.

Some conventions used in this chapter:

icon marks the description of an aspect of Java that works mostly similar to C++

icon marks the description of an aspect of Java that is distinctly different from C++

Other resources used:

The Java World

: Can explain what Java is

Java was conceived by James Gosling and his team at Sun Microsystems in 1991.

Java is directly related to both C and C++. Java inherits its syntax from C. Its object model is adapted from C++. --Java: A Beginner’s Guide, by Oracle

Fun fact: The language was initially called Oak after an oak tree that stood outside Gosling's office. Later the project went by the name Green and was finally renamed Java, from Java coffee. --Wikipedia

Oracle became the owner of Java in 2010, when it acquired Sun Microsystems.

Java has remained the most popular language in the world for several years now (as at July 2018), according to the TIOBE index.

: Can explain how Java works at a higher-level

Java is both compiled and interpreted. Instead of translating programs directly into machine language, the Java compiler generates byte code. Byte code is portable, so it is possible to compile a Java program on one machine, transfer the byte code to another machine, and run the byte code on the other machine. That’s why Java is considered a platform independent technology, aka WORA (Write Once Run Anywhere). The interpreter that runs byte code is called a “Java Virtual Machine” (JVM).

Java technology is both a programming language and a platform. The Java programming language is a high-level object-oriented language that has a particular syntax and style. A Java platform is a particular environment in which Java programming language applications run. --Oracle

: Can explain Java editions

According to the Official Java documentation, there are four platforms of the Java programming language:

  • Java Platform, Standard Edition (Java SE): Contains the core functionality of the Java programming language.

  • Java Platform, Enterprise Edition (Java EE): For developing and running large-scale enterprise applications. Built on top of Java SE.

  • Java Platform, Micro Edition (Java ME): For Java programming language applications meant for small devices, like mobile phones. A subset of Java SE.

  • JavaFX: For creating applications with graphical user interfaces. Can work with the other three above.

This book chapter uses the Java SE edition unless stated otherwise.

Getting Started

: Can install Java

To run Java programs, you only need to have a recent version of the Java Runtime Environment (JRE) installed in your device.

If you want to develop applications for Java, download and install a recent version of the Java Development Kit (JDK), which includes the JRE as well as additional resources needed to develop Java applications.

: Can explain the Java HelloWorld program

In Java, the HelloWorld program looks like this:

public class HelloWorld {

    public static void main(String[] args) {
        // generate some simple output
        System.out.println("Hello, World!");
    }
}

For reference, the equivalent C++ code is given below:

#include <iostream>
using namespace std;

int main() {
    // generate some simple output
    cout << "Hello, World!";
    return 0;
}

This HelloWorld Java program defines one method named main: public static void main(String[] args)

System.out.println displays results on the screen.

Some similarities:

  • Java programs are made up of class and method definitions, and methods are made up of statements.
  • Java is “case-sensitive”, which means SYSTEM is different from System.
  • public is an access modifier that indicates the method is accessible from outside this class. Similarly, private access modifier indicates that a method/attribute is not accessible outside the class.
  • static indicates this method is defined as a class-level member. Do not worry if you don’t know what that means. It will be explained later.
  • void indicates that the method does not return anything.
  • The name and format of the main method is special as it is the method that Java executes when you run a Java program.
  • A class is a collection of methods. This program defines a class named HelloWorld.
  • Java uses squiggly braces ({ and }) to group things together.
  • The line starting with // is a comment. You can use // for single line comments and /* ... */ for multi-line comments in Java code.
 

A statement is a line of code that performs a basic operation. In the HelloWorld program, this line is a print statement that displays a message on the screen:

System.out.println("Hello, World!");

Some differences:

  • Java use the term method instead of function. In particular, Java doesn’t have stand-alone functions. Every method should belong to a class. The main method will not work unless it is inside the HelloWorld class.
  • A Java class definition does not end with a semicolon, but most Java statements do.
  • In most cases (i.e., there are exceptions), the name of the class has to match the name of the file it is in, so this class has to be in a file named HelloWorld.java.
  • There is no need for the HelloWorld code to have something like #include <iostream>. The library files needed by the HelloWorld code is available by default without having to "include" them explicitly.
  • There is no need to return 0 at the end of the main method to indicate the execution was successful. It is considered as a successful execution unless an error is signalled specifically.
: Can compile a simple Java program

To compile the HelloWorld program, open a command console, navigate to the folder containing the file, and run the following command.

>_ javac HelloWorld.java

If the compilation is successful, you should see a file HelloWorld.class. That file contains the byte code for your program. If the compilation is unsuccessful, you will be notified of the compile-time errors.


Compile-time errors (aka compile errors) occur when you violate the syntax rules of the Java language. For example, parentheses and braces have to come in matching pairs.

Error messages from the compiler usually indicate where in the program the error occurred, and sometimes they can tell you exactly what the error is.

Notes:

  • javac is the java compiler that you get when you install the JDK.
  • For the above command to work, your console program should be able to find the javac executable (e.g., the location of the javac.exe should be in the PATH system variable).
: Can run a simple Java program

To run the HelloWorld program, in a command console, run the following command from the folder containing HelloWorld.class file.

>_ java HelloWorld

Notes:

  • java in the command above refers to the Java interpreter installed in your computer.
  • Similar to javac, your console should be able to find the java executable.

When you run a Java program, you can encounter a run-time error. These errors are also called "exceptions" because they usually indicate that something exceptional (and bad) has happened. When a run-time error occurs, the interpreter displays an error message that explains what happened and where.

For example, modify the HelloWorld code to include the following line, compile it again, and run it.

System.out.println(5/0);

You should get a message like this:

Exception in thread "main" java.lang.ArithmeticException: / by zero
    at Hello.main(Hello.java:5)

Integrated Development Environments (IDEs) can automate the intermediate step of compiling. They usually have a Run button which compiles the code first and then runs it.

Example IDEs:

  • Intellij IDEA
  • Eclipse
  • NetBeans
  • Install Java in your Computer, if you haven't done so already.
  • Write, compile and run a small Java program (e.g., a HelloWorld program) in your Computer. You can use any code editor to write the program but use the command prompt to compile and run the program.
  • Modify the code and run the program again.

Data Types

: Can use primitive data types

Here are the primitive data types in Java:

  • byte: an integer in the range -128 to 127 (inclusive).
  • short: an integer in the range -32,768 to 32,767 (inclusive).
  • int: an integer in the range -231 to 231-1.
  • long: An integer in the range -263 to 263-1.
  • float: a single-precision 32-bit IEEE 754 floating point. This data type should never be used for precise values, such as currency. For that, you will need to use the java.math.BigDecimal class instead.
  • double: a double-precision 64-bit IEEE 754 floating point. For decimal values, this data type is generally the default choice. This data type should never be used for precise values, such as currency.
  • boolean: has only two possible values: true and false.
  • char: The char data type is a single 16-bit Unicode character. It has a minimum value of '\u0000' (or 0) and a maximum value of '\uffff' (or 65,535 inclusive).

String (a peek)

Java has a built-in type called String to represent strings. While String is not a primitive type, they are used as often, if not more. String values are demarcated by enclosing in a pair of double quotes. You can use the plus operator to concatenate strings. E.g.,

String name = "John Doe";
System.out.println("Hello " + name + "!");

String is not a primitive type. You’ll learn more about strings in a later section.

: Can use variables

Java is a statically-typed language in that variables have a fixed type. Here are some examples of declaring variables and assigning values to them.

int x;
x = 5;
int hour = 11;
boolean isCorrect = true;
char capitalC = 'C';
byte b = 100;
short s = 10000;
int i = 100000;

You can use any name starting with a letter, underscore, or $ as a variable name but you cannot use Java keywords as variables names. You can display the value of a variable using System.out.print or System.out.println (the latter goes to the next line after printing). To output multiple values on the same line, it’s common to use several print statements followed by println at the end.

int hour = 11;
int mintue = 59;
System.out.print("The current time is ");
System.out.print(hour);
System.out.print(":");
System.out.print(minute);
System.out.println("."); //use println here to complete the line
System.out.println("done");

The current time is 11:59.
done

Use the keyword final to indicate that the variable value, once assigned, should not be allowed to change later i.e., act like a ‘constant’. By convention, names for constants are all uppercase, with the underscore character (_) between words.

final double CM_PER_INCH = 2.54;
: Can use operators

Java has the following arithmetic operators:

Operator Description Examples
+ Additive operator 2 + 3 5
- Subtraction operator 4 - 1 3
* Multiplication operator 2 * 3 6
/ Division operator 5 / 2 2 but 5.0 / 2 2.5
% Remainder operator 5 % 2 1

The following program uses some operators as part of an expression hour * 60 + minute:

int hour = 11;
int minute = 59;
System.out.print("Number of minutes since midnight: ");
System.out.println(hour * 60 + minute);

Number of minutes since midnight: 719

When an expression has multiple operators, normal operator precedence rules apply. Furthermore, you can use parentheses to specify a precise precedence.

Examples:

  • 4 * 5 - 1 19 (* has higher precedence than -)
  • 4 * (5 - 1) 16 (parentheses ( ) have higher precedence than *)

Java does not allow operator overloading.

The unary operators require only one operand; they perform various operations such as incrementing/decrementing a value by one, negating an expression, or inverting the value of a boolean.-- Java Tutorial

Operator Description -- Java Tutorial example
+ Unary plus operator; indicates positive value
(numbers are positive without this, however)
x = 5; y = +x y is 5
- Unary minus operator; negates an expression x = 5; y = -x y is -5
++ Increment operator; increments a value by 1 i = 5; i++ i is 6
-- Decrement operator; decrements a value by 1 i = 5; i-- i is 4
! Logical complement operator; inverts the value of a boolean foo = true; bar = !foo bar is false

Relational operators are used to check conditions like whether two values are equal, or whether one is greater than the other. The following expressions show how they are used:

Operator Description example true example false
x == y x is equal to y 5 == 5 5 == 6
x != y x is not equal to y 5 != 6 5 != 5
x > y x is greater than y 7 > 6 5 > 6
x < y x is less than y 5 < 6 7 < 6
x >= y x is greater than or equal to y 5 >= 5 4 >= 5
x <= y x is less than or equal to y 4 <= 5 6 <= 5

The result of a relational operator is a boolean value.

Java has three conditional operators that are used to operate on boolean values.

Operator Description example true example false
&& and true && true true true && false false
|| or true || false true false || false false
! not not false not true
: Can use arrays

Arrays are indicated using square brackets ([]). To create the array itself, you have to use the new operator. Here are some example array declarations:

int[] counts;
counts = new int[4]; // create an int array of size 4

int size = 5;
double[] values;
values = new double[size]; //use a variable for the size

double[] prices = new double[size]; // declare and create at the same time
Alternatively, you can use the shortcut syntax to create and initialize an array:
int[] values = {1, 2, 3, 4, 5, 6};

int[] anArray = {
    100, 200, 300,
    400, 500, 600,
    700, 800, 900, 1000
};

-- Java Tutorial

The [] operator selects elements from an array. Array elements indices start from 0.

int[] counts = new int[4];

System.out.println("The first element is " + counts[0]);

counts[0] = 7; // set the element at index 0 to be 7
counts[1] = counts[0] * 2;
counts[2]++; // increment value at index 2

A Java array is aware of its size. A Java array prevents a programmer from indexing the array out of bounds. If the index is negative or not present in the array, the result is an error named ArrayIndexOutOfBoundsException.

int[] scores = new int[4];
System.out.println(scores.length) // prints 4
scores[5] = 0; // causes an exception

4
Exception in thread "main" java.lang.ArrayIndexOutOfBoundsException: 5
	at Main.main(Main.java:6)

It is also possible to create arrays of more than one dimension:

String[][] names = {
    {"Mr. ", "Mrs. ", "Ms. "},
    {"Smith", "Jones"}
};

System.out.println(names[0][0] + names[1][0]); // Mr. Smith
System.out.println(names[0][2] + names[1][1]); // Ms. Jones

-- Java Tutorial

Passing arguments to a program

The args parameter of the main method is an array of Strings containing command line arguments supplied (if any) when running the program.

public class Foo{
    public static void main(String[] args) {
        System.out.println(args[0]);
    }
}

You can run this program (after compiling it first) from the command line by typing:

>_ java Foo abc

abc

Write a Java program that takes two command line arguments and prints true or false to indicate if the two arguments have the same value. Follow the sample output given below.

class WordComparator {
  public static void main(String[] args) {
      // add your code here
  }
}

>_ java WordComparator adam eve

Words given: adam, eve
They are the same: false

>_ java WordComparator eve eve

Words given: eve, eve
They are the same: true

💡 Use the following technique to compare two Strings(i.e., don't use ==). Reason: to be covered in a later topic.

String x = "foo";
boolean isSame = x.equals("bar") // false
isSame = x.equals("foo") // true
  • The two command line arguments can be accessed inside the main method using args[0] and args[1].
  • When using multiple operators in the same expression, you might need to use parentheses to specify operator precedence. e.g., "foo" + x == y vs "foo" + (x == y)
class WordComparator {
  public static void main(String[] args) {
      String first = args[0];
      String second = args[1];
      System.out.println("Words given: " + first + ", " + second);
      // ...
  }
}

Control Flow

: Can use branching

if-else statements

Java supports the usual forms of if statements:

if (x > 0) {
    System.out.println("x is positive");
}
if (x % 2 == 0) {
    System.out.println("x is even");
} else {
    System.out.println("x is odd");
}
if (x > 0) {
    System.out.println("x is positive");
} else if (x < 0) {
    System.out.println("x is negative");
} else {
    System.out.println("x is zero");
}
if (x == 0) {
    System.out.println("x is zero");
} else {
    if (x > 0) {
        System.out.println("x is positive");
    } else {
        System.out.println("x is negative");
    }
}

The braces are optional (but recommended) for branches that have only one statement. So we could have written the previous example this way ( Bad):

if (x % 2 == 0)
    System.out.println("x is even");
else
    System.out.println("x is odd");
switch statements

The switch statement can have a number of possible execution paths. A switch works with the byte, short, char, and int primitive data types. It also works with enums, String.

Here is an example (adapted from -- Java Tutorial):

public class SwitchDemo {
    public static void main(String[] args) {

        int month = 8;
        String monthString;
        switch (month) {
        case 1:  monthString = "January";
            break;
        case 2:  monthString = "February";
            break;
        case 3:  monthString = "March";
            break;
        case 4:  monthString = "April";
            break;
        case 5:  monthString = "May";
            break;
        case 6:  monthString = "June";
            break;
        case 7:  monthString = "July";
            break;
        case 8:  monthString = "August";
            break;
        case 9:  monthString = "September";
            break;
        case 10: monthString = "October";
            break;
        case 11: monthString = "November";
            break;
        case 12: monthString = "December";
            break;
        default: monthString = "Invalid month";
            break;
        }
        System.out.println(monthString);
    }
}

August

Write a Java program that takes several command line arguments that describe a person or a family | and prints out a greeting. The parameters can be one of two formats.

arguments format explanation expected output
NAME GENDER Indicates a single person. GENDER can be M or F Smith M Dear Mr. Smith
Lee F Dear Mdm. Lee
NAME MULTIPLE_GENDERS Indicates a family. Tan M M F Dear Tan family

Follow the sample output given below.

>_ java Greeter Smith M Dear Mr. Smith

>_ java Greeter Lee F Dear Mdm. Lee

>_ java Greeter Tan M M F Dear Tan family

You can assume that the input is always in the correct format i.e., no need to handle invalid input cases.

Partial solution:

public class Greeter {
    public static void main(String[] args) {
        String first = args[0];
        String second = args[1];
        if (args.length == 2) {
            if (second.equals("M")) {
                // ...
            }
        } else {
            // ...
        }
    }
}

Write a Java program that takes a letter grade e.g., A+ as a command line argument and prints the CAP value for that grade.

💡 Use a switch statement in your code.

A+ A A- B+ B B- C Else
5.0 5.0 4.5 4.0 3.5 3.0 2.5 0

Follow the sample output given below.

>_ java GradeHelper B CAP for grade B is 3.5

You can assume that the input is always in the correct format i.e., no need to handle invalid input cases.

Partial solution:

public class GradeHelper {
    public static void main(String[] args) {
        String grade = args[0];
        double cutoff = 0;
        switch (grade) {
        case "A+":
            // ...
        }
        System.out.println("CAP for grade " + grade + " is " + cutoff);
    }
}
: Can use methods

Defining methods

Here’s an example of adding more methods to a class:

public class PrintTwice {

    public static void printTwice(String s) {
        System.out.println(s);
        System.out.println(s);
    }

    public static void main(String[] args) {
        String sentence = “Polly likes crackers”
        printTwice(sentence);

    }
}

Polly likes crackers

By convention, method names should be named in the camelCase format.


CamelCase is named after the "humps" of its capital letters, similar to the humps of a Bactrian camel. Camel case (stylized as camelCase) is the practice of writing compound words or phrases such that each word or abbreviation in the middle of the phrase begins with a capital letter, with no intervening spaces or punctuation.

-- adapted from Wikipedia

e.g., createEmptyList, listOfIntegers, htmlText, dvdPlayer. This book defines camelCase style as requiring the first letter to be lower case. If the first letter is upper case instead e.g., CreateEmptyList, it is called UpperCamelCase or PascalCase.

Similar to the main method, the printTwice method is public (i.e., it can be invoked from other classes) static and void.

Parameters

A method can specify parameters. The printTwice method above specifies a parameter of String type. The main method passes the argument "Polly likes crackers" to that parameter.

The value provided as an argument must have the same type as the parameter. Sometimes Java can convert an argument from one type to another automatically. For example, if the method requires a double, you can invoke it with an int argument 5 and Java will automatically convert the argument to the equivalent value of type double 5.0.

Because variables only exist inside the methods where they are defined, they are often called local variables. Parameters and other variables declared inside a method only exist inside their own methods. Inside main, there is no such thing as s. If you try to use it there, you’ll get a compiler error. Similarly, inside printTwice there is no such thing as sentence. That variable belongs to main.

return statements

The return statement allows you to terminate a method before you reach the end of it:

public static void printLogarithm(double x) {
    if (x <= 0.0) {
        System.out.println("Error: x must be positive.");
        return;
    }
    double result = Math.log(x);
    System.out.println("The log of x is " + result);
}

It can be used to return a value from a method too:

public class AreaCalculator{

    public static double calculateArea(double radius) {
        double result = 3.14 * radius * radius;
        return result;
    }

    public static void main(String[] args) {
        double area = calculateArea(12.5);
        System.out.println(area);
    }
}
Overloading

Java methods can be overloaded. If two methods do the same thing, it is natural to give them the same name. Having more than one method with the same name is called overloading, and it is legal in Java as long as each version takes different parameters.

public static double calculateArea(double radius) {
    //...
}

public static double calculateArea(double height, double width) {
    //...
}
Recursion

Methods can be recursive. Here is an example in which the nLines method calls itself recursively:

public static void nLines(int n) {
    if (n > 0) {
        System.out.println();
        nLines(n - 1);
    }
}

Add the following method to the class given below.

  • public static double getGradeCap(String grade): Returns the CAP value of the given grade. The mapping from grades to CAP is given below.
A+ A A- B+ B B- C Else
5.0 5.0 4.5 4.0 3.5 3.0 2.5 0
public class Main {

    // ADD YOUR CODE HERE

    public static void main(String[] args) {
        System.out.println("A+: " + getGradeCap("A+"));
        System.out.println("B : " + getGradeCap("B"));
    }
}

A+: 5.0
B : 3.5

Partial solution:

    public static double getGradeCap(String grade) {
        double cap = 0;
        switch (grade) {
        case "A+":
        case "A":
            cap = 5.0;
            break;
        case "A-":
            cap = 4.5;
            break;
        case "B+":
            cap = 4.0;
            break;
        case "B":
            cap = 3.5;
            break;
        case "B-":
            cap = 3.0;
            break;
        default:
        }
        return cap;
    }
: Can use loops

while loops

Here is an example while loop:

public static void countdown(int n) {
    while (n > 0) {
        System.out.println(n);
        n = n - 1;
    }
    System.out.println("Blastoff!");
}
for loops

for loops have the form:

for (initializer; condition; update) {
    statement(s);
}

Here is an example:

public static void printTable(int rows) {
    for (int i = 1; i <= rows; i = i + 1) {
        printRow(i, rows);
    }
}
do-while loops

The while and for statements are pretest loops; that is, they test the condition first and at the beginning of each pass through the loop. Java also provides a posttest loop: the do-while statement. This type of loop is useful when you need to run the body of the loop at least once.

Here is an example (from -- Java Tutorial):

class DoWhileDemo {
    public static void main(String[] args){
        int count = 1;
        do {
            System.out.println("Count is: " + count);
            count++;
        } while (count < 11);
    }
}
break and continue

A break statement exits the current loop.

Here is an example (from -- Java Tutorial):

class Main {
    public static void main(String[] args) {
        int[] numbers = new int[] { 1, 2, 3, 0, 4, 5, 0 };
        for (int i = 0; i < numbers.length; i++) {
            if (numbers[i] == 0) {
                break;
            }
            System.out.print(numbers[i]);
        }
    }
}

123

[Try the above code on Repl.it]

A continue statement skips the remainder of the current iteration and moves to the next iteration of the loop.

Here is an example (from -- Java Tutorial):

public static void main(String[] args) {
    int[] numbers = new int[] { 1, 2, 3, 0, 4, 5, 0 };
    for (int i = 0; i < numbers.length; i++) {
        if (numbers[i] == 0) {
            continue;
        }
        System.out.print(numbers[i]);
    }
}

12345

[Try the above code on Repl.it]

Enhanced for loops

Since traversing arrays is so common, Java provides an alternative for-loop syntax that makes the code more compact. For example, consider a for loop that displays the elements of an array on separate lines:

for (int i = 0; i < values.length; i++) {
    int value = values[i];
    System.out.println(value);
}

We could rewrite the loop like this:

for (int value : values) {
    System.out.println(value);
}

This statement is called an enhanced for loop. You can read it as, “for each value in values”. Notice how the single line for (int value : values) replaces the first two lines of the standard for loop.

Add the following method to the class given below.

  • public static double[] getMultipleGradeCaps(String[] grades): Returns the CAP values of the given grades. e.g., if the input was the array ["A+", "B"], the method returns [5.0, 3.5]. The mapping from grades to CAP is given below.
A+ A A- B+ B B- C Else
5.0 5.0 4.5 4.0 3.5 3.0 2.5 0
public class Main {

    // ADD YOUR CODE HERE

    public static double getGradeCap(String grade) {
        double cap = 0;
        switch (grade) {
        case "A+":
        case "A":
            cap = 5.0;
            break;
        case "A-":
            cap = 4.5;
            break;
        case "B+":
            cap = 4.0;
            break;
        case "B":
            cap = 3.5;
            break;
        case "B-":
            cap = 3.0;
            break;
        case "C":
            cap = 2.5;
            break;
        default:
        }
        return cap;
    }

    public static void main(String[] args) {
        String[] grades = new String[]{"A+", "A", "A-"};
        double[] caps = getMultipleGradeCaps(grades);
        for (int i = 0; i < grades.length; i++) {
            System.out.println(grades[i] + ":" + caps[i]);
        }
    }
}

A+:5.0
A:5.0
A-:4.5

Partial solution:

    public static double[] getMultipleGradeCaps(String[] grades) {
        double[] caps = new double[grades.length];
        for (int i = 0; i < grades.length; i++) {
           // ...
        }
        return caps;
    }

Java Objects

: Can use in-built Java objects

Java is an "object-oriented" language, which means that it uses objects to represent data and provide methods related to them. Object types are called classes e.g., you can use String objects in Java and those objects belong to the String class.

importing

Java comes with many inbuilt classes which are organized into packages. Here are some examples:

package Some example classes in the package
java.lang String, Math, System

Before using a class in your code, you need to import the class. import statements appear at the top of the code.

This example imports the java.awt.Point (i.e., the Point class in the java.awt package) class -- which can be used to represent the coordinates of a location in a Cartesian plane -- and use it in the main method.


In mathematical notation, points are often written in parentheses with a comma separating the coordinates. For example, (0,0) indicates the origin, and (x,y) indicates the point x units to the right and y units up from the origin.  

import java.awt.Point;

public class Main{
    public static void main(String[] args) {
        Point spot = new Point(3, 4);
        int x = spot.x;
        System.out.println(x);
   }
}

💡 You might wonder why we can use the System class without importing it. System belongs to the java.lang package, which is imported automatically.

new operator

To create a new object, you have to use the new operator

This line shows how to create a new Point object using the new operator:

Point spot = new Point(3, 4);

Update the code below to create a new Rectangle object as described in the code comments, to produce the given output.

  • The Rectangle class is found in the java.awt package.
  • The parameters you need to supply when creating new Rectangle objects are (int x, int y, int width, int height).
public class Main {
    public static void main(String[] args) {
        Rectangle r;

        // TODO create a Rectangle object that has the properties x=0, y=0, width=5, height=10
        // assign it to r

        System.out.println(r);
    }
}

java.awt.Rectangle[x=0,y=0,width=5,height=10]
  • Import the java.awt.Rectangle class
  • This is how you create the required object new Rectangle(0, 0, 5, 10)
: Can use instance members of objects

Variables that belong to an object are called attributes (or fields).

To access an attribute of an object, Java uses dot notation.

The code below uses spot.x which means "go to the object spot refers to, and get the value of the attribute x."

Point spot = new Point(3, 4);
int sum = spot.x * spot.x + spot.y * spot.y;
System.out.println(spot.x + ", " + spot.y + ", " + sum);

3, 4, 25

You can mutate an object by assigning a different values to its attributes.

This example changes the x value of the Point object to 5.

Point spot = new Point(3, 4);
spot.x = 5;
System.out.println(spot.x + ", " + spot.y);

5, 4

Java uses the dot notation to invoke methods on an object too.

This example invokes the translate method on a Point object so that it moves to a different location.

Point spot = new Point(3, 4);
System.out.println(spot.x + ", " + spot.y);
spot.translate(5,5);
System.out.println(spot.x + ", " + spot.y);

3, 4
8, 9

Update the code below as described in code comments, to produce the given output.

import java.awt.Rectangle;

public class Main {
    public static void main(String[] args) {
        Rectangle r = new Rectangle(0, 0, 4, 6);
        System.out.println(r);

        int area;
        //TODO: add a line below to calculate the area using width and height properties of r
        // and assign it to the variable area

        System.out.println("Area: " + area);

        //TODO: add a line here to set the size of r to 8x10 (width x height)
        //Recommended: use the setSize(int height, int width) method of the Rectangle object

        System.out.println(r);
    }

}

java.awt.Rectangle[x=0,y=0,width=4,height=6]
Area: 24
java.awt.Rectangle[x=0,y=0,width=8,height=10]
  • Area can be calculated as r.width * r.height
  • Setting the size can be done as r.setSize(8, 10)
: Can pass objects between methods

You can pass objects as parameters to a method in the usual way.

The printPoint method below takes a Point object as an argument and displays its attributes in (x,y) format.

public static void printPoint(Point p) {
    System.out.println("(" + p.x + ", " + p.y + ")");
}

public static void main(String[] args) {
    Point spot = new Point(3, 4);
    printPoint(spot);
}

3, 4

You can return an object from a method too.

The java.awt package also provides a class called Rectangle. Rectangle objects are similar to points, but they have four attributes: x, y, width, and height. The findCenter method below takes a Rectangle as an argument and returns a Point that corresponds to the center of the rectangle:

public static Point findCenter(Rectangle box) {
    int x = box.x + box.width / 2;
    int y = box.y + box.height / 2;
    return new Point(x, y);
}

The return type of this method is Point. The last line creates a new Point object and returns a reference to it.

null and NullPointerException

null is a special value that means "no object". You can assign null to a variable to indicate that the variable is 'empty' at the moment. However, if you try to use a null value, either by accessing an attribute or invoking a method, Java throws a NullPointerException.

In this example, the variable spot is assigned a null value. As a result, trying to access spot.x attribute or invoke spot.translate method results in a NullPointerException.

Point spot = null;
int x = spot.x;          // NullPointerException
spot.translate(50, 50);  // NullPointerException

On the other hand, it is legal return null from a method or to pass a null reference as an argument to a method.

Returning null from a method.

public static Point createCopy(Point p) {
    if (p == null) {
        return null; // return null if p is null
    }

    // create a new object with same x,y values
    return new Point(p.x, p.y);
}

Passing null as the argument.

Point result = createCopy(null);
System.out.println(result);

null

It is possible to have multiple variables that refer to the same object.

Notice how p1 and p2 are aliases for the same object. When the object is changed using the variable p1, the changes are visible via p2 as well (and vice versa), because they both point to the same Point object.

Point p1 = new Point(0,0);
Point p2 = p1;
System.out.println("p1: " + p1.x + ", " + p1.y);
System.out.println("p2: " + p2.x + ", " + p2.y);
p1.x = 1;
p2.y = 2;
System.out.println("p1: " + p1.x + ", " + p1.y);
System.out.println("p2: " + p2.x + ", " + p2.y);

p1: 0, 0
p2: 0, 0
p1: 1, 2
p2: 1, 2

Java does not have explicit pointers (and other related things such as pointer de-referencing, pointer arithmetic). When an object is passed into a method as an argument, the method gains access to the original object. If the method changes the object it received, the changes are retained in the object even after the method is completed.

Note how p3 retains changes done to it by the method swapCoordinates even after the method call.

public static void swapCoordinates(Point p){
    int temp = p.x;
    p.x = p.y;
    p.y = temp;
}

public static void main(String[] args) {
    Point p3 = new Point(2,3);
    System.out.println("p3: " + p3.x + ", " + p3.y);
    swapCoordinates(p3);
    System.out.println("p3: " + p3.x + ", " + p3.y);
}
p3: 2, 3
p3: 3, 2

Add a method move(Point p, Rectangle r) to the code below, to produce the given output. The behavior of the method is as follows:

  • Returns a new Point object that has attributes x and y that match those of r
  • Does not modify p
  • Updates r so that its attributes x and y match those of p
  • Returns null and does nothing if either p or r is null
import java.awt.Point;
import java.awt.Rectangle;

public class Main {

    //TODO add your method here

    public static void main(String[] args) {
        Point p1 = new Point(0, 0);
        Rectangle r1 = new Rectangle(2, 3, 5, 6);
        System.out.println("arguments: " + p1 + ", " + r1);

        Point p2 = move(p1, r1);
        System.out.println("argument point after method call: " + p1);
        System.out.println("argument rectangle after method call: " + r1);
        System.out.println("returned point: " + p2);

        System.out.println(move(null, null));
    }
}

arguments: java.awt.Point[x=0,y=0], java.awt.Rectangle[x=2,y=3,width=5,height=6]
argument point after method call: java.awt.Point[x=0,y=0]
argument rectangle after method call: java.awt.Rectangle[x=0,y=0,width=5,height=6]
returned point: java.awt.Point[x=2,y=3]
null

Partial solution:

public static Point move(Point p, Rectangle r){
    if (p == null || r == null){
        // ...
    }
    Point newPoint = new Point(r.x, r.y);
    r.x = p.x;
    // ...
    return newPoint;
}
: Can explain Java garbage collection

What happens when no variables refer to an object?

Point spot = new Point(3, 4);
spot = null;

The first line creates a new Point object and makes spot refer to it. The second line changes spot so that instead of referring to the object, it refers to nothing. If there are no references to an object, there is no way to access its attributes or invoke a method on it. From the programmer’s view, it ceases to exist. However it’s still present in the computer’s memory, taking up space.

In Java, you don’t have to delete objects you create when they are no longer needed. As your program runs, the system automatically looks for stranded objects and reclaims them; then the space can be reused for new objects. This process is called garbage collection. You don’t have to do anything to make garbage collection happen, and in general don’t have to be aware of it. But in high-performance applications, you may notice a slight delay every now and then when Java reclaims space from discarded objects.

Java Classes

: Can define Java classes

As you know,

  • Defining a class creates a new object type with the same name.
  • Every object belongs to some object type; that is, it is an instance of some class.
  • A class definition is like a template for objects: it specifies what attributes the objects have and what methods can operate on them.
  • The new operator instantiates objects, that is, it creates new instances of a class.
  • The methods that operate on an object type are defined in the class for that object.

Here's a class called Time, intended to represent a moment in time. It has three attributes and no methods.

public class Time {
    private int hour;
    private int minute;
    private int second;
}

You can give a class any name you like. The Java convention is to use PascalCase format for class names.

The code should be in a file whose name matches the class e.g., the Time class should be in a file named Time.java.

When a class is public (e.g., the Time class in the above example) it can be used in other classes. But the instance variables that are private (e.g., the hour, minute and second attributes of the Time class) can only be accessed from inside the Time class.

Constructos

The syntax for constructors is similar to that of other methods, except:

  • The name of the constructor is the same as the name of the class.
  • The keyword static is omitted.
  • Do not return anything. A constructor returns the created object by default.

When you invoke new, Java creates the object and calls your constructor to initialize the instance variables. When the constructor is done, new returns a reference to the new object.

Here is an example constructor for the Time class:

public Time() {
    hour = 0;
    minute = 0;
    second = 0;
}

This constructor does not take any arguments. Each line initializes an instance variable to zero (which in this example means midnight). Now you can create Time objects.

Time time = new Time();

Like other methods, constructors can be overloaded, which means you can provide multiple constructors with different parameters.

You can add another constructor to the Time class to allow creating Time objects that are initialized to a specific time:

public Time(int h, int m, int s) {
    hour = h;
    minute = m;
    second = s;
}

Here's how you can invoke the new constructor:

Time justBeforeMidnight = new Time(11, 59, 59);
this keyword

The this keyword is a reference variable in Java that refers to the current object. You can use this the same way you use the name of any other object. For example, you can read and write the instance variables of this, and you can pass this as an argument to other methods. But you do not declare this, and you can’t make an assignment to it.

In the following version of the constructor, the names and types of the parameters are the same as the instance variables (parameters don’t have to use the same names, but that’s a common style). As a result, the parameters shadow (or hide) the instance variables, so the keyword this is necessary to tell them apart.

public Time(int hour, int minute, int second) {
    this.hour = hour;
    this.minute = minute;
    this.second = second;
}

this can be used to refer to a constructor of a class within the same class too.

In this example the constructor Time() uses the this keyword to call its own overloaded constructor Time(int, int, int)

public Time() {
    this(0, 0, 0); // call the overloaded constructor
}

public Time(int hour, int minute, int second) {
    // ...
}

Instance methods

You can add methods to a class which can then be used from the objects of that class. These instance methods do not have the static keyword in the method signature. Instance methods can access attributes of the class.

Here's how you can add a method to the Time class to get the number of seconds passed till midnight.

public int secondsSinceMidnight() {
    return hour*60*60 + minute*60 + second;
}

Here's how you can use that method.

Time t = new Time(0, 2, 5);
System.out.println(t.secondsSinceMidnight() + " seconds since midnight!");

Define a Circle class so that the code given below produces the given output. The nature of the class is a follows:

  • Attributes(all private):
    • int x, int y: represents the location of the circle
    • double radius: the radius of the circle
  • Constructors:
    • Circle(): initializes x, y, radius to 0
    • Circle(int x, int y, double radius): initializes the attributes to the given values
  • Methods:
    • getArea(): int
      Returns the area of the circle as an int value (not double). Calculated as 2xPIx(radius)2
      💡 You can convert to double to an int using (int) e.g., x = (int)2.25 gives x the value 2.
      💡 You can use Math.PI to get the value of Pi
      💡 You can use Math.pow() to raise a number to a specific power e.g., Math.pow(3, 2) calculates 32
public class Main {
    public static void main(String[] args) {
        Circle c = new Circle();

        System.out.println(c.getArea());
        c = new Circle(1, 2, 5);
        System.out.println(c.getArea());

    }
}

0
78
  • Put the Circle class in a file called Circle.java

Partial solution:

public class Circle {
    private int x;
    // ...

    public Circle(){
        this(0, 0, 0);
    }

    public Circle(int x, int y, double radius){
        this.x = x;
        // ...
    }

    public int getArea(){
        double area = Math.PI * Math.pow(radius, 2);
        return (int)area;
    }

}
: Can define getters and setters

As the instance variables of Time are private, you can access them from within the Time class only. To compensate, you can provide methods to access attributes:

public int getHour() {
    return hour;
}

public int getMinute() {
    return minute;
}

public int getSecond() {
    return second;
}

Methods like these are formally called “accessors”, but more commonly referred to as getters. By convention, the method that gets a variable named something is called getSomething.

Similarly, you can provide setter methods to modify attributes of a Time object:

public void setHour(int hour) {
    this.hour = hour;
}

public void setMinute(int minute) {
    this.minute = minute;
}

public void setSecond(int second) {
    this.second = second;
}

Consider the Circle class below:

public class Circle {
    private int x;
    private int y;
    private double radius;

    public Circle(){
        this(0, 0, 0);
    }

    public Circle(int x, int y, double radius){
        this.x = x;
        this.y = y;
        this.radius = radius;
    }

    public int getArea(){
        double area = Math.PI * Math.pow(radius, 2);
        return (int)area;
    }

}

Update it as follows so that code given below produces the given output.

  • Add getter/setter methods for all three attributes
  • Update the setters and constructors such that if the radius supplied is negative, the code automatically set the radius to 0 instead.
public class Main {
    public static void main(String[] args) {
        Circle c = new Circle(1,2, 5);

        c.setX(4);
        c.setY(5);
        c.setRadius(6);
        System.out.println("x      : " + c.getX());
        System.out.println("y      : " + c.getY());
        System.out.println("radius : " + c.getRadius());
        System.out.println("area   : " + c.getArea());

        c.setRadius(-5);
        System.out.println("radius : " + c.getRadius());
        c = new Circle(1, 1, -4);
        System.out.println("radius : " + c.getRadius());

    }
}

x      : 4
y      : 5
radius : 6.0
area   : 113
radius : 0.0
radius : 0.0

Partial solution:

public Circle(int x, int y, double radius){
    setX(x);
    setY(y);
    setRadius(radius);
}

public void setRadius(double radius) {
    this.radius = Math.max(radius, 0);
}
: Can use class-level members

The content below is an extract from -- Java Tutorial, with slight adaptations.

When a number of objects are created from the same class blueprint, they each have their own distinct copies of instance variables. In the case of a Bicycle class, the instance variables are gear, and speed. Each Bicycle object has its own values for these variables, stored in different memory locations.

Sometimes, you want to have variables that are common to all objects. This is accomplished with the static modifier. Fields that have the static modifier in their declaration are called static fields or class variables. They are associated with the class, rather than with any object. Every instance of the class shares a class variable, which is in one fixed location in memory. Any object can change the value of a class variable, but class variables can also be manipulated without creating an instance of the class.

Suppose you want to create a number of Bicycle objects and assign each a serial number, beginning with 1 for the first object. This ID number is unique to each object and is therefore an instance variable. At the same time, you need a field to keep track of how many Bicycle objects have been created so that you know what ID to assign to the next one. Such a field is not related to any individual object, but to the class as a whole. For this you need a class variable, numberOfBicycles, as follows:

public class Bicycle {

    private int gear;
    private int speed;

    // an instance variable for the object ID
    private int id;

    // a class variable for the number of Bicycle objects instantiated
    private static int numberOfBicycles = 0;
        ...
}

Class variables are referenced by the class name itself, as in Bicycle.numberOfBicycles This makes it clear that they are class variables.

The Java programming language supports static methods as well as static variables. Static methods, which have the static modifier in their declarations, should be invoked with the class name, without the need for creating an instance of the class, as in ClassName.methodName(args)

The static modifier, in combination with the final modifier, is also used to define constants. The final modifier indicates that the value of this field cannot change.For example, the following variable declaration defines a constant named PI, whose value is an approximation of pi (the ratio of the circumference of a circle to its diameter): static final double PI = 3.141592653589793;

Here is an example with class-level variables and class-level methods:

public class Bicycle {

    private int gear;
    private int speed;

    private int id;

    private static int numberOfBicycles = 0;


    public Bicycle(int startSpeed, int startGear) {
        gear = startGear;
        speed = startSpeed;

        numberOfBicycles++;
        id = numberOfBicycles;
    }

    public int getID() {
        return id;
    }

    public static int getNumberOfBicycles() {
        return numberOfBicycles;
    }

    public int getGear(){
        return gear;
    }

    public void setGear(int newValue) {
        gear = newValue;
    }

    public int getSpeed() {
        return speed;
    }

    // ...

}

💡 Explanation of System.out.println(...):

  • out is a class-level public attribute of the System class.
  • println is a instance level method of the out object.

Consider the Circle class below:

public class Circle {
    private int x;
    private int y;
    private double radius;

    public Circle(){
        this(0, 0, 0);
    }

    public Circle(int x, int y, double radius){
        setX(x);
        setY(y);
        setRadius(radius);
    }

    public int getX() {
        return x;
    }

    public void setX(int x) {
        this.x = x;
    }

    public int getY() {
        return y;
    }

    public void setY(int y) {
        this.y = y;
    }

    public double getRadius() {
        return radius;
    }

    public void setRadius(double radius) {
        this.radius = Math.max(radius, 0);
    }

    public int getArea(){
        double area = Math.PI * Math.pow(radius, 2);
        return (int)area;
    }
}

Update it as follows so that code given below produces the given output.

  • Add a class-level getMaxRadius method that returns the maximum radius that has been used in all Circle objects created thus far.
public class Main {
    public static void main(String[] args) {
        Circle c = new Circle();
        System.out.println("max radius used so far : " + Circle.getMaxRadius());
        c = new Circle(0, 0, 10);
        System.out.println("max radius used so far : " + Circle.getMaxRadius());
        c = new Circle(0, 0, -15);
        System.out.println("max radius used so far : " + Circle.getMaxRadius());
        c.setRadius(12);
        System.out.println("max radius used so far : " + Circle.getMaxRadius());
    }
}

max radius used so far : 0.0
max radius used so far : 10.0
max radius used so far : 12.0

You can use a static variable maxRadius to track the maximum value used for the radius attribute so far.

Partial solution:

public void setRadius(double radius) {
    this.radius = Math.max(radius, 0);
    if (maxRadius < this.radius){
        // ...
    }
}

Some Useful Classes

: Can use Java API documentation about classes

Java comes with a rich collection of classes that you can use. They form what is known as the Java API (Application Programming Interface). Each class in the API comes with documentation in a standard format.

: Can use the String class

String is a built-in Java class that you can use without importing. Given below are some useful String methods:

Any class in the java.lang package can be used without importing.

Find characters of a string

Strings provide a method named charAt, which extracts a character. It returns a char, a primitive type that stores an individual character (as opposed to strings of them).

String fruit = "banana";
char letter = fruit.charAt(0);

The argument 0 means that we want the letter at position 0. Like array indexes, string indexes start at 0, so the character assigned to letter is 'b'.

You can convert a string to an array of characters using the toCharArray method.

char[] fruitChars = fruit.toCharArray()
Change a string to upper/lower case

Strings provide methods, toUpperCase and toLowerCase, that convert from uppercase to lowercase and back.

After these statements run, upperName refers to the string "ALAN TURING" but name still refers to "Alan Turing".

String name = "Alan Turing";
String upperName = name.toUpperCase();
System.out.println(name);
System.out.println(upperName);

Alan Turing
ALAN TURING

Note that a string method cannot change the string object on which the method is invoked, because strings are immutable. For example, when you invoke toUpperCase on a string "abc", you get a new string object "ABC" as the return value rather than the string "abc" being changed to "ABC". As a result, for such string methods that seemingly modify the string but actually return a new string instead e.g., toLowerCase, invoking the method has no effect if you don’t assign the return value to a variable.

String s = "Ada";
s.toUpperCase(); // no effect
s = s.toUpperCase(); // the correct way
Replacing parts of a string

Another useful method is replace, which finds and replaces instances of one string within another.

This example replaces "Computer Science" with "CS".

String text = "Computer Science is fun!";
text = text.replace("Computer Science", "CS");
System.out.println(text);

CS is fun!
Accessing substrings

The substring method returns a new string that copies letters from an existing string, starting at the given index.

  • "banana".substring(0) "banana"
  • "banana".substring(2) "nana"
  • "banana".substring(6) ""

If it’s invoked with two arguments, they are treated as a start and end index:

  • "banana".substring(0, 3) "ban"
  • "banana".substring(2, 5) "nan"
  • "banana".substring(6, 6) ""
Searching within strings

The indexOf method searches for a single character (or a substring) in a string and returns the index of the first occurrence. The method returns -1 if there are no occurrences.

  • "banana".indexOf('a') 1
  • "banana".indexOf('a', 2) 3 searches for 'a', starting from position 2
  • "banana".indexOf('x') -1
  • "banana".indexOf("nan") 2 searches for the substring "nan"
Comparing Strings

To compare two strings, it may be tempting to use the == and != operators.

String name1 = "Alan Turing";
String name2 = "Ada Lovelace";
if (name1 == name2) {                 // wrong!
    System.out.println("The names are the same.");
}

This code compiles and runs, and most of the time it gets the answer right. But it is not correct, and sometimes it gets the answer wrong. The problem is that the == operator checks whether the two variables refer to the same object (by comparing the references). If you give it two different strings that contain the same letters, it yields false. The right way to compare strings is with the equals method.

This example invokes equals on name1 and passes name2 as an argument. The equals method returns true if the strings contain the same characters; otherwise it returns false.

if (name1.equals(name2)) {
    System.out.println("The names are the same.");
}

If the strings differ, we can use compareTo to see which comes first in alphabetical order. The return value from compareTo is the difference between the first characters in the strings that differ. If the strings are equal, their difference is zero. If the first string (the one on which the method is invoked) comes first in the alphabet, the difference is negative. Otherwise, the difference is positive.

In this example, compareTo returns positive 8, because the second letter of "Ada" comes before the second letter of "Alan" by 8 letters.

int diff = name1.compareTo(name2);
if (diff == 0) {
    System.out.println("The names are the same.");
} else if (diff < 0) {
    System.out.println("name1 comes before name2.");
} else if (diff > 0) {
    System.out.println("name2 comes before name1.");
}

Both equals and compareTo are case-sensitive. The uppercase letters come before the lowercase letters, so "Ada" comes before "ada". To check if two strings are similar irrespective of the differences in case, you can use the equalsIgnoreCase method.

String s1 = "Apple";
String s2 = "apple";
System.out.println(s1.equals(s2)); //false
System.out.println(s1.equalsIgnoreCase(s2)); //true

Some more comparison-related String methods:

  • contains: checks if one string is a sub-string of the other e.g., Snapple and app
  • startsWith: checks if one string has the other as a substring at the beginning e.g., Apple and App
  • endsWith: checks if one string has the other as a substring at the end e.g., Crab and ab
Printing special characters (line breaks, tabs, ...)

You can embed a special character e.g., line break, tab, backspace, etc. in a string using an escape sequence.

Escape sequence meaning
\n newline character
\t tab character
\b backspace character
\f form feed character
\r carriage return character
\" " (double quote) character
\' ' (single quote) character
\\ \ (back slash) character
\uDDDD character from the Unicode character set, by specifying the Unicode as four hex digits in the place of DDDD

An example of using escape sequences to printing some special characters.

System.out.println("First line\nSecond \"line\"");

First line
Second "line"

💡 As the behavior of the \n depends on the platform, the recommended way to print a line break is using the System.lineSeparator() as it works the same in all platforms.

Using System.lineSeparator() to print a line break.

System.out.println("First line" + System.lineSeparator() + "Second line");

First line
Second line
String formatting

Sometimes programs need to create strings that are formatted a certain way. String.format takes a format specifier followed by a sequence of values and returns a new string formatted as specified.

The following method returns a time string in 12-hour format. The format specifier \%02d means “two digit integer padded with zeros”, so timeString(19, 5) returns the string "07:05 PM".

public static String timeString(int hour, int minute) {
    String ampm;
    if (hour < 12) {
        ampm = "AM";
        if (hour == 0) {
            hour = 12;  // midnight
        }
    } else {
        ampm = "PM";
        hour = hour - 12;
    }
    return String.format("%02d:%02d %s", hour, minute, ampm); // returns "07:05 PM"
}

Implement the printPrice method in the code below to produce the given output. Its behavior:

  • The parameter item is a string in the format name--$price i.e., a name and a price of an item separated using a -- e.g., banana--$3/50
  • It prints the NAME: price where the name is in upper case. The price does not have a $ sign and has . in place of the /
    e.g., banana--$3/50 BANANA: 3.50
  • The name part of the input can have trailing/leading spaces which should be omitted from the output.
    e.g., banana --$3/50 BANANA: 3.50

💡 Do a Web search to find how to remove leading/trailing spaces. Suggested search terms java string remove leading trailing spaces

public class Main {


    public static void printPrice(String item) {
        // TODO: add your code here

    }

    public static void main(String[] args) {
        printPrice("sandwich  --$4/50");
        printPrice("  soda --$10/00");
        printPrice("  fries --$0/50");
    }
}

SANDWICH: 4.50
SODA: 10.00
FRIES: 0.50

Partial solution:

public static void printPrice(String item) {
    int dividerPosition = item.indexOf("--");
    String itemName = item.substring(0, dividerPosition);
    //...
    System.out.println(itemName.trim().toUpperCase() + ...);

}
: Can use wrapper classes for primitive

Primitive values (like int, double, and char) do not provide methods.

For example, you can’t call equals on an int:

int i = 5;
System.out.println(i.equals(5));  // compiler error

But for each primitive type, there is a corresponding class in the Java library, called a wrapper class. The wrapper class for char is called Character; for int it’s called Integer. Other wrapper classes include Boolean, Long, and Double. They are in the java.lang package, so you can use them without importing them.

Double d = new Double(2.5);
int i = d.intValue();
System.out.println(d);
System.out.println(i);

2.5
2

Each wrapper class defines constants MIN_VALUE and MAX_VALUE. Because these constants are available in wrapper classes, you don’t have to remember them, and you don’t have to include them in your programs.

Accessing max and min values for integers:

System.out.println(Integer.MIN_VALUE + " : " + Integer.MAX_VALUE);

-2147483648 : 2147483647

Wrapper classes provide methods for converting strings to other types. In this context, parse means something like “read and translate”. Integer.parseInt converts a string to (you guessed it) an integer. The other wrapper classes provide similar methods, like Double.parseDouble and Boolean.parseBoolean.

Integer.parseInt("12345") 1234

Wrapper classes also provide toString, which returns a string representation of a value.

Integer.toString(12345) "1234"

Implement the printTotalScore method in the code below to produce the given output. Its behavior:

  • values is an array of strings, each string representing an integer e.g., ["5", "-1"]
  • The method prints the total of the numbers represented by the strings in the array
    ["5", "-1"] 4
public class Main {

    public static void printTotalScore(String[] values){
        // TODO: add your code here
    }

    public static void main(String[] args) {
        printTotalScore(new String[]{});
        printTotalScore(new String[]{"0", "124", "-15"});
    }
}

0
109

💡 You can use the Integer.parseInt() method to convert a String to the equivalent int value.

Partial solution:

public static void printTotalScore(String[] values){
    int total = 0;
    for (String value: values){
        // convert the value to an int and add to the total
    }
    System.out.println(total);
}
: Can use the Arrays class

java.util.Arrays provides methods for working with arrays. One of them, toString, returns a string representation of an array. It also provides a copyOf that copies an array.

Using Arrays.copyOf and Arrays.toString:

int[] a = new int[]{1,2,3,4};

int[] b = Arrays.copyOf(a, 3); // copy first three elements
System.out.println(Arrays.toString(b));

int[] c = Arrays.copyOf(a, a.length); // copy all elements
System.out.println(Arrays.toString(c));

[1, 2, 3]
[1, 2, 3, 4]

Implement the following two methods in the code below to produce the given output.

  • filterEmailsfilterEmails(String[] items): String[]
    • items is an array of strings each of which may be an email address or some other random string
    • Returns a String[] containing email addresses that were in items. Any string containing @ is considered as an email.
      ["aaa@bbb", "xyz"] ["aaa@bbb"]
  • printItems(String[] items)
    • Prints items in the standard array format. e.g., ["aaa", "bbb"] [aaa, bbb]
import java.util.Arrays;

public class Main {
    public static String[] filterEmails(String[] items){
        // TODO: add your code here
    }

    public static void printItems(String[] items){
        // TODO: add your code here
    }

    public static void main(String[] args) {
        printItems(filterEmails(new String[]{}));
        printItems(filterEmails(new String[]{"abc"}));
        printItems(filterEmails(new String[]{"adam@example.com", "aab", "john@example.com", "some@"}));
        printItems(filterEmails(new String[]{"xyz", "@bee.com", "aab"}));
    }
}

[]
[]
[adam@example.com, john@example.com, some@]
[@bee.com]

  • filterEmailsfilterEmails(String[] items): String[]
    1. create a new array (say emails) of the same size as items
    2. go through the elements in the items and add to emails if the element contains @ (you can use the contains method of the String class here)
    3. Use Arrays.copyOf method to return the filled part of emails.
  • printItems(String[] items)
    • 💡 You can use the Arrays.toString() method for this.
public static String[] filterEmails(String[] items){
    String[] results = new String[items.length];
    int matchCount = 0;
    for(String item: items){
        if (item.contains("@")){
           //...
        }
    }
    return Arrays.copyOf(results, matchCount);
}

public static void printItems(String[] items){
    System.out.println(Arrays.toString(items));
}
: Can use the Scanner class

Scanner is a class that provides methods for inputting words, numbers, and other data. Scanner provides a method called nextLine that reads a line of input from the keyboard and returns a String. The following example reads two lines and repeats them back to the user:

import java.util.Scanner;

public class Echo {

    public static void main(String[] args) {
        String line;
        Scanner in = new Scanner(System.in);

        System.out.print("Type something: ");
        line = in.nextLine();
        System.out.println("You said: " + line);

        System.out.print("Type something else: ");
        line = in.nextLine();
        System.out.println("You also said: " + line);
    }
}

Scanner class normally reads inputs as strings but it can read in a specific type of input too.

The code below uses the nextInt method of the Scanner class to read an input as an integer.


Scanner in = new Scanner(System.in);

System.out.print("What is your age? ");
int age = in.nextInt();
in.nextLine();  // read the newline character the user enters following the integer
System.out.print("What is your name? ");
String name = in.nextLine();
System.out.printf("Hello %s, age %d\n", name, age);

💡 Note the use of printf method for formatting the output.

Write a program to ask the user for a description of overseas expenses (presumably, the user has just returned from an overseas trip) and calculate the total in local currency.

  • The conversion rate from overseas currency to local currency : overseas $1.0 = local $1.70
  • The user can describe expenses is in free form text, as one line. The program takes all amounts mentioned in the format $amount e.g., $1.50

Here is one example output:

Your expenses while overseas?beer $4.50 books $3.00 $5.00 for food, that's all
Expenses in overseas currency:[$4.50, $3.00, $5.00]
Total in local currency: $21.25

Here is another:

Your expenses while overseas?nothing. I lived off my friends all the time.
Expenses in overseas currency:[]
Total in local currency: $0.00

One more:

Your expenses while overseas? Just $10
Expenses in overseas currency:[$10]
Total in local currency: $17.00

Here's the skeleton code to use as the starting point:

public class Main {

    // You can add more methods here

    public static void main(String[] args) {
        String line;
        Scanner in = new Scanner(System.in);

        System.out.print("Your expenses while overseas?");
       // TODO: add your code here
    }
}

💡 You can use the split method of the String class to convert a sentence into an array of words. e.g.,

String sentence = "hello my dear";
String[] words = sentence.split(" "); // split using the space as the delimiter
System.out.println(Arrays.toString(words));

[hello, my, dear]

💡 You can use String.format("%.2f", doubleValue) to format doubleValue to two decimal points.
e.g., String.format("%.2f", 1.3334) 1.33

import java.util.Arrays;
import java.util.Scanner;

public class Main {

    public static String[] filterAmounts(String sentence) {
        String[] words = sentence.split(" ");
        String[] result = new String[words.length];
        int wordCount = 0;
        for (String word : words) {
            if (word.startsWith("$")) {
                result[wordCount] = word;
                wordCount++;
            }
        }
        return Arrays.copyOf(result, wordCount);
    }

    public static void main(String[] args) {
        String line;
        Scanner in = new Scanner(System.in);

        System.out.print("Your expenses while overseas?");
        line = in.nextLine();

        String[] amounts = filterAmounts(line);
        System.out.println("Expenses in overseas currency:" + Arrays.toString(amounts));
        double total = 0;
        for (String amount : amounts) {
            // convert amount to double, multiply by currency conversion rate, and add to total
        }
        System.out.println("Total in local currency: $" + String.format("%.2f", total));

    }
}

In this first version of the TaskManager, the task list is not saved to the disk i.e., the task list does not persist between multiple runs of the program

Here is an example output:

Welcome to TaskManager-Level1!
Your task? add submit report
Tasks in the list: 1
Your task? add return library book
Tasks in the list: 2
Your task? add remind boss about meeting
Tasks in the list: 3
Your task? xyz
Unknown command! please try again
Your task? print
[1] submit report
[2] return library book
[3] remind boss about meeting
Your task? add set up meeting with boss
Tasks in the list: 4
Your task? print
[1] submit report
[2] return library book
[3] remind boss about meeting
[4] set up meeting with boss
Your task? exit
Bye!

Summary of behavior:

  • Task Manager prompts for user input with the message Your task?
  • add task description: adds the task description to the task list
  • print: prints the tasks added so far
  • exit or empty input: terminates the program

If you are new to programming, we recommend you to build the program in small steps, as follows:

  1. Write a program that reads any user input, prints it back to the user, and exits.
  2. Update the program to do the above in a loop until user types exit.
  3. Add greetings printed at the start and the end.
  4. If the first word is not add or exit, print an error message. Suggestion: use a switch statement to choose between multiple actions.
  5. Create a Task class to represent tasks and add an Task[] to store tasks.
  6. If the first word of the user input is add, add the whole line (no need to omit the first word) to the task list.
  7. Update the code in the previous step to omit the word add from the task description.
  8. Add support for the print command.
  9. Add support for terminating if the user input is empty
  10. and so on ...
import java.util.Scanner;

public class Main {
    static Scanner in = new Scanner(System.in);
    static Task[] tasks = new Task[100];
    static int count = 0;  // to keep track of number of tasks in the list

    public static void main(String[] args) {
        printWelcome();
        String line;
        boolean isExit = false;
        while (!isExit) {
            line = getInput();
            String command = line.split(" ")[0]; //extract the first word of the user input
            switch (command) {
                case "exit":
                case "": // exit if user input is empty
                    isExit = true;
                    break;
                case "add":
                    // todo: add code here
                default:
                    printError();
            }
        }
        exit();

    }

    private static void printWelcome() {
        System.out.println("Welcome to TaskManager-Level1!");
    }

    private static void printTasks() {
        for (int i = 0; i < count; i++) {
            System.out.println("[" + (i + 1) + "] " + tasks[i].getDescription());
        }
    }

    // todo: add missing methods
}
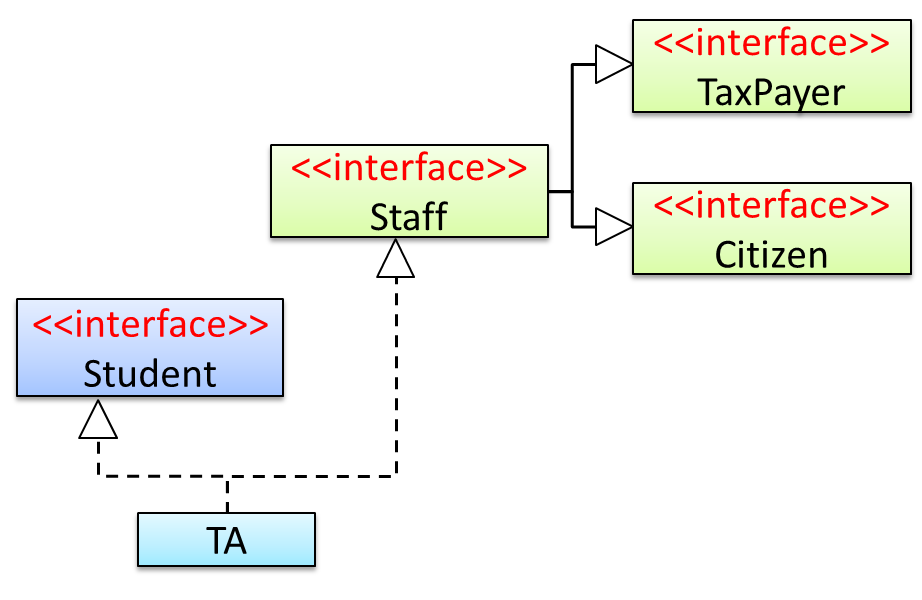
Inheritance

: Can use basic inheritance

Given below is an extract from the -- Java Tutorial, with slight adaptations.

A class that is derived from another class is called a subclass (also a derived class, extended class, or child class). The class from which the subclass is derived is called a superclass (also a base class or a parent class).

A subclass inherits all the members (fields, methods, and nested classes) from its superclass. Constructors are not members, so they are not inherited by subclasses, but the constructor of the superclass can be invoked from the subclass.

Every class has one and only one direct superclass (single inheritance), except the Object class, which has no superclass, . In the absence of any other explicit superclass, every class is implicitly a subclass of Object. Classes can be derived from classes that are derived from classes that are derived from classes, and so on, and ultimately derived from the topmost class, Object. Such a class is said to be descended from all the classes in the inheritance chain stretching back to Object. Java does not support multiple inheritance among classes.

The java.lang.Object class defines and implements behavior common to all classes—including the ones that you write. In the Java platform, many classes derive directly from Object, other classes derive from some of those classes, and so on, forming a hierarchy of classes.

The keyword extends indicates one class inheriting from another.

Here is the sample code for a possible implementation of a Bicycle class and a MountainBike class that is a subclass of the Bicycle:

public class Bicycle {

    public int gear;
    public int speed;

    public Bicycle(int startSpeed, int startGear) {
        gear = startGear;
        speed = startSpeed;
    }

    public void setGear(int newValue) {
        gear = newValue;
    }

    public void applyBrake(int decrement) {
        speed -= decrement;
    }

    public void speedUp(int increment) {
        speed += increment;
    }

}
public class MountainBike extends Bicycle {

    // the MountainBike subclass adds one field
    public int seatHeight;

    // the MountainBike subclass has one constructor
    public MountainBike(int startHeight, int startSpeed, int startGear) {
        super(startSpeed, startGear);
        seatHeight = startHeight;
    }

    // the MountainBike subclass adds one method
    public void setHeight(int newValue) {
        seatHeight = newValue;
    }
}

A subclass inherits all the fields and methods of the superclass. In the example above, MountainBike inherits all the fields and methods of Bicycle and adds the field seatHeight and a method to set it.

Accessing Superclass Members

If your method overrides one of its superclass's methods, you can invoke the overridden method through the use of the keyword super. You can also use super to refer to a hidden field (although hiding fields is discouraged).

Consider this class, Superclass and a subclass, called Subclass, that overrides printMethod():

public class Superclass {

    public void printMethod() {
        System.out.println("Printed in Superclass.");
    }
}
public class Subclass extends Superclass {

    // overrides printMethod in Superclass
    public void printMethod() {
        super.printMethod();
        System.out.println("Printed in Subclass");
    }
    public static void main(String[] args) {
        Subclass s = new Subclass();
        s.printMethod();
    }
}

Printed in Superclass.
Printed in Subclass

Within Subclass, the simple name printMethod() refers to the one declared in Subclass, which overrides the one in Superclass. So, to refer to printMethod() inherited from Superclass, Subclass must use a qualified name, using super as shown. Compiling and executing Subclass prints the following:

Subclass Constructors

A subclass constructor can invoke the superclass constructor. Invocation of a superclass constructor must be the first line in the subclass constructor. The syntax for calling a superclass constructor is super() (which invokes the no-argument constructor of the superclass) or super(parameter list) (to invoke the superclass constructor with a matching parameter list).

The following example illustrates how to use the super keyword to invoke a superclass's constructor. Recall from the Bicycle example that MountainBike is a subclass of Bicycle. Here is the MountainBike (subclass) constructor that calls the superclass constructor and then adds initialization code of its own:

public MountainBike(int startHeight, int startSpeed, int startGear) {
    super(startSpeed, startGear);
    seatHeight = startHeight;
}

Note: If a constructor does not explicitly invoke a superclass constructor, the Java compiler automatically inserts a call to the no-argument constructor of the superclass. If the superclass does not have a no-argument constructor, you will get a compile-time error. Object does have such a constructor, so if Object is the only superclass, there is no problem.

Access Modifiers (simplified)

Access level modifiers determine whether other classes can use a particular field or invoke a particular method. Given below is a simplified version of Java access modifiers, assuming you have not yet started placing your classes in different packages i.e., all classes are places in the root level. A full explanation of access modifiers is given in a later topic.

There are two levels of access control:

  1. At the class level:

    • public: the class is visible to all other classes
    • no modifier: same as public

  2. At the member level:

    • public : the class is visible to all other classes
    • no modifier: same as public
    • protected: same as public
    • private: the member can only be accessed in its own class

Background: Suppose we are creating a software to manage various tasks a person has to do. Two types of such tasks are,

  • Todos: i.e., things that needs to be done some day e.g., 'Read the book Lord of the Rings'
  • Deadlines: i.e., things to be done by a specific date/time e.g., 'Read the text book by Nov 25th'

The Task class is given below:

public class Task {
    protected String description;

    public Task(String description) {
        this.description = description;
    }

    public String getDescription() {
        return description;
    }
}
  1. Write a Todo class that inherits from the Task class.
    • It should have an additional boolean field isDone to indicate whether the todo is done or not done.
    • It should have a isDone() method to access the isDone field and a setDone(boolean) method to set the isDone field.
  2. Write a Deadline class that inherits from the Todo class that you implemented in the previous step. It should have,
    • an additional String field by to store the details of when the task to be done e.g., Jan 25th 5pm
    • a getBy() method to access the value of the by field, and a corresponding setBy(String) method.
    • a constructor of the form Deadline(String description, String by)

The expected behavior of the two classes is as follows:

public class Main {
    public static void main(String[] args) {
        // create a todo task and print details
        Todo t = new Todo("Read a good book");
        System.out.println(t.getDescription());
        System.out.println(t.isDone());

        // change todo fields and print again
        t.setDone(true);
        System.out.println(t.isDone());

        // create a deadline task and print details
        Deadline d = new Deadline("Read textbook", "Nov 16");
        System.out.println(d.getDescription());
        System.out.println(d.isDone());
        System.out.println(d.getBy());

        // change deadline details and print again
        d.setDone(true);
        d.setBy("Postponed to Nov 18th");
        System.out.println(d.isDone());
        System.out.println(d.getBy());
    }
}

Read a good book
false
true
Read textbook
false
Nov 16
true
Postponed to Nov 18th

Todo class is given below. You can follow a similar approach for the Deadline class.

public class Todo extends Task {
    protected boolean isDone;

    public Todo(String description) {
        super(description);
        isDone = false;
    }
}
: Can use Object class

As you know, all Java objects inherit from the Object class. Let us look at some of the useful methods in the Object class that can be used by other classes.

The toString method

Every class inherits a toString method from the Object class that is used by Java to get a string representation of the object e.g., for printing. By default it simply returns the type of the object and its address (in hexadecimal).

Suppose you defined a class called Time, to represent a moment in time. If you create a Time object and display it with println:

class Time {
    int hours;
    int minutes;
    int seconds;

    Time(int hours, int minutes, int seconds) {
        this.hours = hours;
        this.minutes = minutes;
        this.seconds = seconds;
    }
}
 Time t = new Time(5, 20, 13);
 System.out.println(t);

Time@80cc7c0 (the address part can vary)

You can override the toString method in your classes to provide a more meaningful string representation of the objects of that class.

Here's an example of overriding the toString method of the Time class:

class Time{

   //...

   @Override
   public String toString() {
       return String.format("%02d:%02d:%02d\n", this.hours, this.minutes, this.seconds);
   }
}
 Time t = new Time(5, 20, 13);
 System.out.println(t);

05:20:13

💡 @Override is an optional annotation you can use to indicate that the method is overriding a method from the parent class.

The equals method

There are two ways to check whether values are equal: the == operator and the equals method. With objects you can use either one, but they are not the same.

  • The == operator checks whether objects are identical; that is, whether they are the same object.
  • The equals method checks whether they are equivalent; that is, whether they have the same value.

The definition of identity is always the same, so the == operator always does the same thing.

Consider the following variables:

Time time1 = new Time(9, 30, 0);
Time time2 = time1;
Time time3 = new Time(9, 30, 0);
  • The assignment operator copies references, so time1 and time2 refer to the same object. Because they are identical, time1 == time2 is true.
  • But time1 and time3 refer to different objects. Because they are not identical, time1 == time3 is false.

By default, the equals method inherited from the Object class does the same thing as ==. As the definition of equivalence is different for different classes, you can override the equals method to define your own criteria for equivalence of objects of your class.

Here's how you can override the equals method of the Time class to provide an equals method that considers two Time objects equivalent as long as they represent the same time of the day:

public class Time {
    int hours;
    int minutes;
    int seconds;

    // ...

    @Override
    public boolean equals(Object o) {
        Time other = (Time) o;
        return this.hours == other.hours
                && this.minutes == other.minutes
                && this.seconds == other.seconds;
    }
}
Time t1 = new Time(5, 20, 13);
Time t2 = new Time(5, 20, 13);
System.out.println(t1 == t2);
System.out.println(t1.equals(t2));

false
true

Note that a proper equals method implementation is more complex than the example above. See the article How to Implement Java’s equals Method Correctly by Nicolai Parlog for a detailed explanation before you implement your own equals method.

Suppose you have the following classes Task, Todo, Deadline:

public class Task {
    protected String description;

    public Task(String description) {
        this.description = description;
    }

    public String getDescription() {
        return description;
    }
}
public class Todo extends Task {
    protected boolean isDone;

    public Todo(String description) {
        super(description);
        isDone = false;
    }

    public void setDone(boolean done) {
        isDone = done;
    }

    public boolean isDone() {
        return isDone;
    }
}
public class Deadline extends Todo {

    protected String by;

    public Deadline(String description, String by) {
        super(description);
        this.by = by;
    }

    public void setBy(String by) {
        this.by = by;
    }

    public String getBy() {
        return by;
    }
}

Override the toString method of the three classes to produce the following behavior.

public class Main {
    public static void main(String[] args) {
        // create a todo task and print it
        Todo t = new Todo("Read a good book");
        System.out.println(t);

        // change todo fields and print again
        t.setDone(true);
        System.out.println(t);

        // create a deadline task and print it
        Deadline d = new Deadline("Read textbook", "Nov 16");
        System.out.println(d);

        // change deadline details and print again
        d.setDone(true);
        d.setBy("Postponed to Nov 18th");
        System.out.println(d);
    }
}

description: Read a good book
is done? No
description: Read a good book
is done? Yes
description: Read textbook
is done? No
do by: Nov 16
description: Read textbook
is done? Yes
do by: Postponed to Nov 18th

💡 You can use the super.toString from the subclass to invoke the behavior of the method you are overriding. This is useful here because the overriding method is simply adding onto the behavior of the overridden method.

toString() method of Task class and Todo class are given below. You can follow a similar approach for the Deadline class.

public class Task {
    // ...

    @Override
    public String toString() {
        return "description: " + description;
    }
}
public class Todo extends Task {
    // ...

    @Override
    public String toString() {
        String status = null;
        if (isDone){
            status = "Yes";
        } else {
            status = "No";
        }
        return super.toString() + System.lineSeparator() + "is done? " + status;
    }
}
: Can use interfaces in Java

The text given in this section borrows some explanations and code examples from the -- Java Tutorial.

In Java, an interface is a reference type, similar to a class, mainly containing method signatures. Defining an interface is similar to creating a new class except it uses the keyword interface in place of class.

Here is an interface named DrivableVehicle that defines methods needed to drive a vehicle.

public interface DrivableVehicle {
    void turn(Direction direction);
    void changeLanes(Direction direction);
    void signalTurn(Direction direction, boolean signalOn);
    // more method signatures
}

Note that the method signatures have no braces and are terminated with a semicolon.

Interfaces cannot be instantiated—they can only be implemented by classes. When an instantiable class implements an interface, indicated by the keyword implements, it provides a method body for each of the methods declared in the interface.

Here is how a class CarModelX can implement the DrivableVehicle interface.

public class CarModelX implements DrivableVehicle {

    @Override
    public void turn(Direction direction) {
       // implementation
    }

    // implementation of other methods
}

An interface can be used as a type e.g., DrivableVechile dv = new CarModelX();.

Interfaces can inherit from other interfaces using the extends keyword, similar to a class inheriting another.

Here is an interface named SelfDrivableVehicle that inherits the DrivableVehicle interface.

public interface SelfDrivableVehicle extends DrivableVehicle {
   void goToAutoPilotMode();
}

Note that the method signatures have no braces and are terminated with a semicolon.

Furthermore, Java allows multiple inheritance among interfaces. A Java interface can inherit multiple other interfaces. A Java class can implement multiple interfaces (and inherit from one class).

The design below is allowed by Java. In case you are not familiar with UML notation used: solid lines indicate normal inheritance; dashed lines indicate interface inheritance; the triangle points to the parent.

  1. Staff interface inherits (note the solid lines) the interfaces TaxPayer and Citizen.
  2. TA class implements both Student interface and the Staff interface.
  3. Because of point 1 above, TA class has to implement all methods in the interfaces TaxPayer and Citizen.
  4. Because of points 1,2,3, a TA is a Staff, is a TaxPayer and is a Citizen.

Interfaces can also contain constants and static methods.


C++ to Java → Miscellaneous Topics →

Constants

Java does not directly support constants. The convention is to use a static final variable where a constant is needed. The static modifier causes the variable to be available without instantiating an object. The final modifier causes the variable to be unchangeable. Java constants are normally declared in ALL CAPS separated by underscores.

Here is an example of a constant named MAX_BALANCE which can be accessed as Account.MAX_BALANCE.

public class Account{

  public static final double MAX_BALANCE = 1000000.0;

}

Math.PI is an example constant that comes with Java.

This example adds a constant MAX_SPEED and a static method isSpeedAllowed to the interface DrivableVehicle.

public interface DrivableVehicle {

    int MAX_SPEED = 150;

    static boolean isSpeedAllowed(int speed){
        return speed <= MAX_SPEED;
    }

    void turn(Direction direction);
    void changeLanes(Direction direction);
    void signalTurn(Direction direction, boolean signalOn);
    // more method signatures
}

Interfaces can contain default method implementations and nested types. They are not covered here.

The Main class below passes a list of Printable objects (i.e., objects that implement the Printable interface) for another method to be printed.

public class Main {

    public static void printObjects(Printable[] items) {
        for (Printable p : items) {
            p.print();
        }
    }

    public static void main(String[] args) {
        Printable[] printableItems = new Printable[]{
                new Circle(5),
                new Rectangle(3, 4),
                new Person("James Cook")};

        printObjects(printableItems);
    }
}

Circle of area 78
Rectangle of area 12
Person of name James Cook

Classes Shape, Circle, and Rectangle are given below:

public abstract class Shape {

    public abstract int area();
}
public class Circle extends Shape implements Printable {

    private int radius;

    public Circle(int radius) {
        this.radius = radius;
    }

    @Override
    public int area() {
        return (int)(Math.PI * radius * radius);
    }

    @Override
    public void print() {
        System.out.println("Circle of area " + area());
    }
}
public class Rectangle extends Shape implements Printable {
    private int height;
    private int width;

    public Rectangle(int height, int width){
        this.height = height;
        this.width = width;
    }

    @Override
    public int area() {
        return height * width;
    }

    @Override
    public void print() {
        System.out.println("Rectangle of area " + area());
    }
}

Add the missing Printable interface. Add the missing methods of the Person class given below.

public class Person implements Printable {

    private String name;

    // todo: add missing methods
}
public interface Printable {
    //...
}
: Can use polymorphism in Java

Java is a strongly-typed language which means the code works with only the object types that it targets.

The following code PetShelter keeps a list of Cat objects and make them speak. The code will not work with any other type, for example, Dog objects.

public class PetShelter {
    private static Cat[] cats = new Cat[]{
            new Cat("Mittens"),
            new Cat("Snowball")};

    public static void main(String[] args) {
        for (Cat c: cats){
            System.out.println(c.speak());
        }
    }
}

Mittens: Meow
Snowball: Meow
public class Cat {
    public Cat(String name) {
        super(name);
    }

    public String speak() {
        return name + ": Meow";
    }
}

This strong-typing can lead to unnecessary verbosity caused by repetitive similar code that do similar things with different object types.

If the PetShelter is to keep both cats and dogs, you'll need two arrays and two loops:

public class PetShelter {
    private static Cat[] cats = new Cat[]{
            new Cat("Mittens"),
            new Cat("Snowball")};
    private static Dog[] dogs = new Dog[]{
            new Dog("Spot")};

    public static void main(String[] args) {
        for (Cat c: cats){
            System.out.println(c.speak());
        }
        for(Dog d: dogs){
            System.out.println(d.speak());
        }
    }
}

Mittens: Meow
Snowball: Meow
Spot: Woof
public class Dog {
    public Dog(String name) {
        super(name);
    }

    public String speak() {
        return name + ": Woof";
    }
}

A better way is to take advantage of polymorphism to write code that targets a superclass but works with any subclass objects.

The PetShelter2 use one data structure to keep both types of animals and one loop to make them speak. The code targets the Animal superclass (assuming Cat and Dog inherits from the Animal class) instead of repeating the code for each animal type.

public class PetShelter2 {
    private static Animal[] animals = new Animal[]{
            new Cat("Mittens"),
            new Cat("Snowball"),
            new Dog("Spot")};

    public static void main(String[] args) {
        for (Animal a: animals){
            System.out.println(a.speak());
        }
    }
}

Mittens: Meow
Snowball: Meow
Spot: Woof
public class Animal {

    protected String name;

    public Animal(String name){
        this.name = name;
    }
    public String speak(){
        return name;
    }
}
public class Cat extends Animal {
    public Cat(String name) {
        super(name);
    }

    @Override
    public String speak() {
        return name + ": Meow";
    }
}
public class Dog extends Animal {
    public Dog(String name) {
        super(name);
    }

    @Override
    public String speak() {
        return name + ": Woof";
    }
}

Explanation: Because Java supports polymorphism, you can store both Cat and Dog objects in an array of Animal objects. Similarly, you can call the speak method on any Animal object (as done in the loop) and yet get different behavior from Cat objects and Dog objects.

💡 Suggestion: try to add an Animal object (e.g., new Animal("Unnamed")) to the animals array and see what happens.

Polymorphic code is better in several ways:

  • It is shorter.
  • It is simpler.
  • It is more flexible (in the above example, the main method will work even if we add more animal types).

The Main class below keeps a list of Circle and Rectangle objects and prints the area (as an int value) of each shape when requested.

Add the missing variables/methods to the code below so that it produces the output given.

public class Main {
    //TODO add your methods here

    public static void main(String[] args) {
        addShape(new Circle(5));
        addShape(new Rectangle(3, 4));
        addShape(new Circle(10));
        printAreas();
        addShape(new Rectangle(4, 4));
        printAreas();
    }
}

78
12
314
78
12
314
16

Circle class and Rectangle class is given below but you'll need to add a parent class Shape:

public class Circle {

    private int radius;

    public Circle(int radius) {
        this.radius = radius;
    }

    public int area() {
        return (int)(Math.PI * radius * radius);
    }
}
public class Rectangle {
    private int height;
    private int width;

    public Rectangle(int height, int width){
        this.height = height;
        this.width = width;
    }

    public int area() {
        return height * width;
    }
}

💡 You may use an array of size 100 to store the shapes.

public class Main {
    private static Shape[] shapes = new Shape[100];
    private static int shapeCount = 0;

    public static void addShape(Shape s){
        shapes[shapeCount] = s;
        shapeCount++;
    }

    // ...

}

This exercise continues from the TaskManager Level1 exercise quoted above.

Enhance your TaskManager program in the following ways.

A. Add support for two types of tasks:

  • ToDo : a task to do someday
  • Deadline: a task to be done by a specific deadline

Both types keeps an internal flag to indicate if the task is done. The flag is initially set to false.

Here is an example output:

Welcome to TaskManager-Level2!
Your task? todo submit report
Tasks in the list: 1
Your task? deadline write report /by this Friday 4pm
Tasks in the list: 2
Your task? todo read textbook
Tasks in the list: 3
Your task? deadline return textbook /by Sunday
Tasks in the list: 4
Your task? print
Tasks:
[1] description: submit report
    is done? No
[2] description: write report
    is done? No
do by: this Friday 4pm
[3] description: read textbook
    is done? No
[4] description: return textbook
    is done? No
    do by: Sunday
Your task? exit
Bye!

Changes to the behavior:

  • add task description: adds the task description to the task list
  • todo task description: adds to the task list a todo task with the given task description
  • deadline task description /by deadline description: adds to the task list a deadline task with the given task description and with the deadline description

Suggestion:

  • Make the Todo class inherit from Task class, and make Deadline task inherit from Todo class.
  • Use polymorphism to store both types of tasks in an array of Task type and use one loop to print both types of tasks.

B. Add support for semi-automated regression testing using input/output redirection.


Quality Assurance → Testing → Test Automation →

Automated Testing of CLI Apps

A simple way to semi-automate testing of a CLI(Command Line Interface) app is by using input/output re-direction.

  • First, we feed the app with a sequence of test inputs that is stored in a file while redirecting the output to another file.
  • Next, we compare the actual output file with another file containing the expected output.

Let us assume we are testing a CLI app called AddressBook. Here are the detailed steps:

  1. Store the test input in the text file input.txt.

    add Valid Name p/12345 valid@email.butNoPrefix
    add Valid Name 12345 e/valid@email.butPhonePrefixMissing
    
  2. Store the output we expect from the SUT in another text file expected.txt.

    Command: || [add Valid Name p/12345 valid@email.butNoPrefix]
    Invalid command format: add 
    
    Command: || [add Valid Name 12345 e/valid@email.butPhonePrefixMissing]
    Invalid command format: add 
    
  3. Run the program as given below, which will redirect the text in input.txt as the input to AddressBook and similarly, will redirect the output of AddressBook to a text file output.txt. Note that this does not require any code changes to AddressBook.

    java AddressBook < input.txt > output.txt
    
    • 💡 The way to run a CLI program differs based on the language.
      e.g., In Python, assuming the code is in AddressBook.py file, use the command
      python AddressBook.py < input.txt > output.txt

    • 💡 If you are using Windows, use a normal command window to run the app, not a Power Shell window.

    More on the > operator and the < operator. tangential

    A CLI program takes input from the keyboard and outputs to the console. That is because those two are default input and output streams, respectively. But you can change that behavior using < and > operators. For example, if you run AddressBook in a command window, the output will be shown in the console, but if you run it like this,

    java AddressBook > output.txt 
    

    the Operating System then creates a file output.txt and stores the output in that file instead of displaying it in the console. No file I/O coding is required. Similarly, adding < input.txt (or any other filename) makes the OS redirect the contents of the file as input to the program, as if the user typed the content of the file one line at a time.

    Resources:

  4. Next, we compare output.txt with the expected.txt. This can be done using a utility such as Windows FC (i.e. File Compare) command, Unix diff command, or a GUI tool such as WinMerge.

    FC output.txt expected.txt
    

Note that the above technique is only suitable when testing CLI apps, and only if the exact output can be predetermined. If the output varies from one run to the other (e.g. it contains a time stamp), this technique will not work. In those cases we need more sophisticated ways of automating tests.

CLI App: An application that has a Command Line Interface. i.e. user interacts with the app by typing in commands.

import java.util.Scanner;

public class Main {
    static Scanner in = new Scanner(System.in);
    static Task[] tasks = new Task[100];
    static int taskCount = 0;

    public static void main(String[] args) {
        printWelcome();
        String line;

        boolean isExit = false;
        while (!isExit) {
            line = getInput();
            String command = line.split(" ")[0];
            switch (command) {
                case "exit":
                case "":
                    isExit = true;
                    break;
                case "todo":
                    addTodo(line);
                    break;
                case "deadline":
                    addDeadline(line);
                    break;
                case "print":
                    printTasks();
                    break;
                default:
                    printError();
            }
        }
        exit();

    }

    private static void addTodo(String line) {
        tasks[taskCount] = new Todo(line.substring("todo".length()).trim());
        taskCount++;
        System.out.println("Tasks in the list: " + taskCount);
    }

  // ...

    private static void printTasks() {
        System.out.println("Tasks:");
        for (int i = 0; i < taskCount; i++) {
            System.out.println("[" + (i + 1) + "] " + tasks[i]);
        }
    }
}
: Can use abstract classes and methods

In Java, an abstract method is declared with the keyword abstract and given without an implementation. If a class includes abstract methods, then the class itself must be declared abstract.

The speak method in this Animal class is abstract. Note how the method signature ends with a semicolon and there is no method body. This makes sense as the implementation of the speak method depends on the type of the animal and it is meaningless to provide a common implementation for all animal types.

public abstract class Animal {

    protected String name;

    public Animal(String name){
        this.name = name;
    }
    public abstract String speak();
}

As one method of the class is abstract, the class itself is abstract.

An abstract class is declared with the keyword abstract. Abstract classes can be used as reference type but cannot be instantiated.

This Account class has been declared as abstract although it does not have any abstract methods. Attempting to instantiate Account objects will result in a compile error.

public abstract class Account {

    int number;

    void close(){
        //...
    }
}

Account a; OK to use as a type
a = new Account(); Compile error!

When an abstract class is subclassed, the subclass should provides implementations for all of the abstract methods in its superclass or else the subclass must also be declared abstract.

The Feline class below inherits from the abstract class Animal but it does not provide an implementation for the abstract method speak. As a result, the Feline class needs to be abstract too.

public abstract class Feline extends Animal {
    public Feline(String name) {
        super(name);
    }

}

The DomesticCat class inherits the abstract Feline class and provides the implementation for the abstract method speak. As a result, it need not be declared abstract.

public class DomesticCat extends Feline {
    public DomesticCat(String name) {
        super(name);
    }

    @Override
    public String speak() {
        return "Meow";
    }
}

Animal a = new Feline("Mittens"); Compile error! Feline is abstract.

Animal a = new DomesticCat("Mittens"); OK. DomesticCat can be instantiated and assigned to a variable of Animal type (the assignment is allowed by polymorphism).

The Main class below keeps a list of Circle and Rectangle objects and prints the area (as an int value) of each shape when requested.

public class Main {
    private static Shape[] shapes = new Shape[100];
    private static int shapeCount = 0;

    public static void addShape(Shape s){
        shapes[shapeCount] = s;
        shapeCount++;
    }

    public static void printAreas(){
        for (int i = 0; i < shapeCount; i++){
            shapes[i].print();
        }
    }

    public static void main(String[] args) {
        addShape(new Circle(5));
        addShape(new Rectangle(3, 4));
        addShape(new Circle(10));
        addShape(new Rectangle(4, 4));
        printAreas();
    }
}

Circle of area 78
Rectangle of area 12
Circle of area 314
Rectangle of area 16

Circle class and Rectangle class is given below:

public class Circle extends Shape {

    private int radius;

    public Circle(int radius) {
        this.radius = radius;
    }

    @Override
    public int area() {
        return (int)(Math.PI * radius * radius);
    }

    @Override
    public void print() {
        System.out.println("Circle of area " + area());
    }
}
public class Rectangle extends Shape {
    private int height;
    private int width;

    public Rectangle(int height, int width){
        this.height = height;
        this.width = width;
    }

    @Override
    public int area() {
        return height * width;
    }

    @Override
    public void print() {
        System.out.println("Rectangle of area " + area());
    }
}

Add the missing Shape class as an abstract class with two abstract methods.

public abstract class Shape {

    public abstract int area();
    // ...
}

Choose the correct statements about Java abstract classes and concrete classes.

  • a. A concrete class can contain an abstract method.
  • b. An abstract class can contain concrete methods.
  • c. An abstract class need not contain any concrete methods.
  • d. An abstract class cannot be instantiated.

(b)(c)(d)

Explanation: A concrete class cannot contain even a single abstract method.

Exceptions

: Can explain Java Exceptions

Given below is an extract from the -- Java Tutorial, with some adaptations.

There are three basic categories of exceptions In Java:

  • Checked exceptions: exceptional conditions that a well-written application should anticipate and recover from. All exceptions are checked exceptions, except for Error, RuntimeException, and their subclasses.

Suppose an application prompts a user for an input file name, then opens the file by passing the name to the constructor for java.io.FileReader. Normally, the user provides the name of an existing, readable file, so the construction of the FileReader object succeeds, and the execution of the application proceeds normally. But sometimes the user supplies the name of a nonexistent file, and the constructor throws java.io.FileNotFoundException. A well-written program will catch this exception and notify the user of the mistake, possibly prompting for a corrected file name.

  • Errors: exceptional conditions that are external to the application, and that the application usually cannot anticipate or recover from. Errors are those exceptions indicated by Error and its subclasses.

Suppose that an application successfully opens a file for input, but is unable to read the file because of a hardware or system malfunction. The unsuccessful read will throw java.io.IOError. An application might choose to catch this exception, in order to notify the user of the problem — but it also might make sense for the program to print a stack trace and exit.

  • Runtime exceptions: conditions that are internal to the application, and that the application usually cannot anticipate or recover from. Runtime exceptions are those indicated by RuntimeException and its subclasses. These usually indicate programming bugs, such as logic errors or improper use of an API.

Consider the application described previously that passes a file name to the constructor for FileReader. If a logic error causes a null to be passed to the constructor, the constructor will throw NullPointerException. The application can catch this exception, but it probably makes more sense to eliminate the bug that caused the exception to occur.

Errors and runtime exceptions are collectively known as unchecked exceptions.

: Can use Java Exceptions

The content below uses extracts from the -- Java Tutorial, with some adaptations.

A program can catch exceptions by using a combination of the try, catch blocks.

  • The try block identifies a block of code in which an exception can occur.
  • The catch block identifies a block of code, known as an exception handler, that can handle a particular type of exception.

The writeList() method below calls a method process() that can cause two type of exceptions. It uses a try-catch construct to deal with each exception.

public void writeList() {
    print("starting method");
    try {
        print("starting process");
        process();
        print("finishing process");

    } catch (IndexOutOfBoundsException e) {
        print("caught IOOBE");

    } catch (IOException e) {
        print("caught IOE");

    }
    print("finishing method");
}

Some possible outputs:

No exceptions IOException IndexOutOfBoundsException
starting method
starting process
finishing process
finishing method
starting method
starting process
finishing process
caught IOE
finishing method
starting method
starting process
finishing process
caught IOOBE
finishing method

You can use a finally block to specify code that is guaranteed to execute with or without the exception. This is the right place to close files, recover resources, and otherwise clean up after the code enclosed in the try block.

The writeList() method below has a finally block:

public void writeList() {
    print("starting method");
    try {
        print("starting process");
        process();
        print("finishing process");

    } catch (IndexOutOfBoundsException e) {
        print("caught IOOBE");

    } catch (IOException e) {
        print("caught IOE");

    } finally {
        // clean up
        print("cleaning up");
    }
    print("finishing method");
}

Some possible outputs:

No exceptions IOException IndexOutOfBoundsException
starting method
starting process
finishing process
cleaning up
finishing method
starting method
starting process
finishing process
caught IOE
cleaning up
finishing method
starting method
starting process
finishing process
caught IOOBE
cleaning up
finishing method
  • The try statement should contain at least one catch block or a finally block and may have multiple catch blocks.

  • The class of the exception object indicates the type of exception thrown. The exception object can contain further information about the error, including an error message.

You can use the throw statement to throw an exception. The throw statement requires a throwable object as the argument.

Here's an example of a throw statement.

if (size == 0) {
    throw new EmptyStackException();
}

In Java, Checked exceptions are subject to the Catch or Specify Requirement: code that might throw checked exceptions must be enclosed by either of the following:

  • A try statement that catches the exception. The try must provide a handler for the exception.
  • A method that specifies that it can throw the exception. The method must provide a throws clause that lists the exception.

Unchecked exceptions are not required to follow to the Catch or Specify Requirement but you can apply the requirement to them too.

Here's an example of a method specifying that it throws certain checked exceptions:

public void writeList() throws IOException, IndexOutOfBoundsException {
    print("starting method");
    process();
    print("finishing method");
}
Some possible outputs:
No exceptions IOException IndexOutOfBoundsException
starting method
finishing method
starting method
finishing method
starting method
finishing method

Java comes with a collection of built-in exception classes that you can use. When they are not enough, it is possible to create your own exception classes.

The Main class below parses a string descriptor of a rectangle of the format "WIDTHxHEIGHT" e.g., "3x4" and prints the area of the rectangle.

public class Main {

    public static void printArea(String descriptor){
        //TODO: modify the code below
        System.out.println(descriptor + "=" + calculateArea(descriptor));
    }

    private static int calculateArea(String descriptor) {
        //TODO: modify the code below
        String[] dimensions = descriptor.split("x");
        return Integer.parseInt(dimensions[0]) * Integer.parseInt(dimensions[1]);
    }

    public static void main(String[] args) {
        printArea("3x4");
        printArea("5x5");
    }
}

3x4=12
5x5=25
  1. Update the code of printArea to print an error message if WIDTH and/or HEIGHT are not numbers e.g., "Ax4"
    💡 calculateArea will throw the unchecked exception NumberFormatException if the code tries to parse a non-number to an integer.

  2. Update the code of printArea to print an error message if the descriptor is missing WIDTH and/or HEIGHT e.g., "x4"
    💡 calculateArea will throw the unchecked exception IndexOutOfBoundsException if one or both dimensions are missing.

  3. Update the code of calculateArea to throw the checked exception IllegalShapeException if there are more than 2 dimensions e.g., "5x4x3" and update the printArea to print an error message for those cases. Here is the code for the IllegalShapeException.java

public class IllegalShapeException extends Exception {
  //no other code needed
}

Here is the expected behavior after you have done the above changes:

public class Main {

    //...

    public static void main(String[] args) {
        printArea("3x4");
        printArea("3xy");
        printArea("3x");
        printArea("3");
        printArea("3x4x5");
    }
}

3x4=12
WIDTH or HEIGHT is not a number: 3xy
WIDTH or HEIGHT is missing: 3x
WIDTH or HEIGHT is missing: 3
Too many dimensions: 3x4x5
public class Main {

    public static void printArea(String descriptor){
        try {
            System.out.println(descriptor + "=" + calculateArea(descriptor));
        } catch (NumberFormatException e) {
            System.out.println("WIDTH or HEIGHT is not a number: " + descriptor);
        } // add more catch blocks here
    }

    private static int calculateArea(String descriptor) throws IllegalShapeException {
        String[] dimensions = descriptor.split("x");

        //throw IllegalShapeException here if dimensions.length > 2

        return Integer.parseInt(dimensions[0]) * Integer.parseInt(dimensions[1]);
    }


}

This exercise continues from the TaskManager Level 1-2 exercises quoted above.

Enhance the TaskManager to print an error message if a command is missing parts. Use exceptions so that error detection and printing of error message happen at different places of code and the error information is passed between the two places using an Exception object.

Here is an example output:

Welcome to TaskManager-Level3!
Your task? todo
Error: Empty description for TODO
Your task? todo read book
Tasks in the list: 1
Your task? print
Tasks:
[1] description: read book
is done? No
Your task?

Suggested approach:

  • Create a TaskManagerException class that inherits the Exception class. Override the constructor that takes a String parameter so that you can specify the error information when you create a TaskManagerException object.
  • Throw a new TaskManagerException object when you detect some necessary information is missing in the command.
  • Catch that exception somewhere else and print the message inside the exception object.
public class TaskManagerException extends Exception{
    public TaskManagerException(String message) {
        super(message);
    }
}
    public static void main(String[] args) {
        // ...
        while (!isExit) {
            try {
                line = getInput();
                String command = line.split(" ")[0];
                switch (command) {
                    case "todo":
                        addTodo(line);
                        break;
                    // ...
                }
            } catch (TaskManagerException e) {
                printError(e.getMessage());
            }
        }
        // ...

    }

    private static void addTodo(String line) throws TaskManagerException {
        String description = line.substring("todo".length()).trim();
        if (description.isEmpty()){
            throw new TaskManagerException("Empty description for TODO");
        }
        // ...
    }

Generics

: Can explain Java Generics

Given below is an extract from the -- Java Tutorial, with some adaptations.

You can use polymorphism to write code that can work with multiple types, but that approach has some shortcomings.

Consider the following Box class. It can be used only for storing Integer objects.

public class BoxForIntegers {
    private Integer x;

    public void set(Integer x) {
        this.x = x;
    }
    public Integer get() {
        return x;
    }
}

To store String objects, another similar class is needed, resulting in the duplication of the entire class. As you can see, if you need to store many different types of objects, you could end up writing many similar classes.

public class BoxForString {
    private String x;

    public void set(String x) {
        this.x = x;
    }
    public String get() {
        return x;
    }
}

One solution for this problem is to use polymorphism i.e., write the Box class to store Object objects.

public class Box {
    private Object x;

    public void set(Object x) {
        this.x = x;
    }
    public Object get() {
        return x;
    }
}

The problem with this solution is, since its methods accept or return an Object, you are free to pass in whatever you want, provided that it is not one of the primitive types. There is no way to verify, at compile time, how the class is used. One part of the code may place an Integer in the box and expect to get Integers out of it, while another part of the code may mistakenly pass in a String, resulting in a runtime error.

Generics enable types (classes and interfaces) to be parameters when defining classes, interfaces and methods. Much like the more familiar formal parameters used in method declarations, type parameters provide a way for you to re-use the same code with different inputs. The difference is that the inputs to formal parameters are values, while the inputs to type parameters are types.

A generic Box class allows you to define what type of elements will be put in the Box. For example, you can instantiate a Box object to keep Integer elements so that any attempt to put a non-Integer object in that Box object will result in a compile error.

: Can use Java Generics

This section includes extract from the -- Java Tutorial, with some adaptations.

The definition of a generic class includes a type parameter section, delimited by angle brackets (<>). It specifies the type parameters (also called type variables) T1, T2, ..., and Tn. A generic class is defined with the following format:

class name<T1, T2, ..., Tn> { /* ... */ }

Here is a generic Box class. The class declaration Box<T> introduces the type variable, T, which is also used inside the class to refer to the same type.

Using Object as the type:

public class Box {
    private Object x;

    public void set(Object x) {
        this.x = x;
    }

    public Object get() {
        return x;
    }
}

A generic Box using type parameter T:

public class Box<T> {
    private T x;

    public void set(T x) {
        this.x = x;
    }

    public T get() {
        return x;
    }
}

As you can see, all occurrences of Object are replaced by T.

To reference the generic Box class from within your code, you must perform a generic type invocation, which replaces T with some concrete value, such as Integer. It is similar to an ordinary method invocation, but instead of passing an argument to a method, you are passing a type argument enclosed within angle brackets — e.g., <Integer> or <String, Integer> — to the generic class itself. Note that in some cases you can omit the type parameter i.e., <> if the type parameter can be inferred from the context.

Using the generic Box class to store Integer objects:

Box<Integer> integerBox;
integerBox = new Box<>(); // type parameter omitted as it can be inferred
integerBox.set(Integer.valueOf(4));
Integer i = integerBox.get(); // returns an Integer
  • Box<Integer> integerBox; simply declares that integerBox will hold a reference to a "Box of Integer", which is how Box<Integer> is read.
  • integerBox = new Box<>(); instantiates a Box<Integer> class. Note the <> (an empty pair of angle brackets, also called the diamond operator) between the class name and the parenthesis.

The compiler is able to check for type errors when using generic code.

The code below will fail because it creates a Box<String> and then tries to pass Double objects into it.

Box<String> stringBox = new Box<>();
stringBox.set(Double.valueOf(5.0)); //compile error!

A generic class can have multiple type parameters.

The generic OrderedPair class, which implements the generic Pair interface:

public interface Pair<K, V> {
    public K getKey();
    public V getValue();
}
public class OrderedPair<K, V> implements Pair<K, V> {

    private K key;
    private V value;

    public OrderedPair(K key, V value) {
        this.key = key;
        this.value = value;
    }

    public K getKey()	{ return key; }
    public V getValue() { return value; }
}

The following statements create two instantiations of the OrderedPair class:

Pair<String, Integer> p1 = new OrderedPair<>("Even", 8);
Pair<String, String>  p2 = new OrderedPair<>("hello", "world");

The code, new OrderedPair<String, Integer>, instantiates K as a String and V as an Integer. Therefore, the parameter types of OrderedPair's constructor are String and Integer, respectively.

A type variable can be any non-primitive type you specify: any class type, any interface type, any array type, or even another type variable.

By convention, type parameter names are single, uppercase letters. The most commonly used type parameter names are:

  • E - Element (used extensively by the Java Collections Framework)
  • K - Key
  • N - Number
  • T - Type
  • V - Value
  • S, U, V etc. - 2nd, 3rd, 4th types

Collections

: Can explain the Collections framework

This section uses extracts from the -- Java Tutorial, with some adaptations.

A collection — sometimes called a container — is simply an object that groups multiple elements into a single unit. Collections are used to store, retrieve, manipulate, and communicate aggregate data.

Typically, collections represent data items that form a natural group, such as a poker hand (a collection of cards), a mail folder (a collection of letters), or a telephone directory (a mapping of names to phone numbers).

The collections framework is a unified architecture for representing and manipulating collections. It contains the following:

  • Interfaces: These are abstract data types that represent collections. Interfaces allow collections to be manipulated independently of the details of their representation.
    Example: the List<E> interface can be used to manipulate list-like collections which may be implemented in different ways such as ArrayList<E> or LinkedList<E>.

  • Implementations: These are the concrete implementations of the collection interfaces. In essence, they are reusable data structures.
    Example: the ArrayList<E> class implements the List<E> interface while the HashMap<K, V> class implements the Map<K, V> interface.

  • Algorithms: These are the methods that perform useful computations, such as searching and sorting, on objects that implement collection interfaces. The algorithms are said to be polymorphic: that is, the same method can be used on many different implementations of the appropriate collection interface.
    Example: the sort(List<E>) method can sort a collection that implements the List<E> interface.

A well-known example of collections frameworks is the C++ Standard Template Library (STL). Although both are collections frameworks and the syntax look similar, note that there are important philosophical and implementation differences between the two.

The following list describes the core collection interfaces:

  • Collection — the root of the collection hierarchy. A collection represents a group of objects known as its elements. The Collection interface is the least common denominator that all collections implement and is used to pass collections around and to manipulate them when maximum generality is desired. Some types of collections allow duplicate elements, and others do not. Some are ordered and others are unordered. The Java platform doesn't provide any direct implementations of this interface but provides implementations of more specific subinterfaces, such as Set and List. Also see the Collection API.

  • Set — a collection that cannot contain duplicate elements. This interface models the mathematical set abstraction and is used to represent sets, such as the cards comprising a poker hand, the courses making up a student's schedule, or the processes running on a machine. Also see the Set API.

  • List — an ordered collection (sometimes called a sequence). Lists can contain duplicate elements. The user of a List generally has precise control over where in the list each element is inserted and can access elements by their integer index (position). Also see the List API.

  • Queue — a collection used to hold multiple elements prior to processing. Besides basic Collection operations, a Queue provides additional insertion, extraction, and inspection operations. Also see the Queue API.

  • Map — an object that maps keys to values. A Map cannot contain duplicate keys; each key can map to at most one value. Also see the Map API.

  • Others: Deque, SortedSet, SortedMap

: Can use the ArrayList class

The ArrayList class is a resizable-array implementation of the List interface. Unlike a normal array, an ArrayList can grow in size as you add more items to it. The example below illustrate some of the useful methods of the ArrayList class using an ArrayList of String objects.

import java.util.ArrayList;

public class ArrayListDemo {

    public static void main(String args[]) {
        ArrayList<String> items = new ArrayList<>();

        System.out.println("Before adding any items:" + items);

        items.add("Apple");
        items.add("Box");
        items.add("Cup");
        items.add("Dart");
        print("After adding four items: " + items);

        items.remove("Box"); // remove item "Box"
        print("After removing Box: " + items);

        items.add(1, "Banana"); // add "Banana" at index 1
        print("After adding Banana: " + items);

        items.add("Egg"); // add "Egg", will be added to the end
        items.add("Cup"); // add another "Cup"
        print("After adding Egg: " + items);

        print("Number of items: " + items.size());

        print("Index of Cup: " + items.indexOf("Cup"));
        print("Index of Zebra: " + items.indexOf("Zebra"));

        print("Item at index 3 is: " + items.get(2));

        print("Do we have a Box?: " + items.contains("Box"));
        print("Do we have an Apple?: " + items.contains("Apple"));

        items.clear();
        print("After clearing: " + items);
    }

    private static void print(String text) {
        System.out.println(text);
    }
}

Before adding any items:[]
After adding four items: [Apple, Box, Cup, Dart]
After removing Box: [Apple, Cup, Dart]
After adding Banana: [Apple, Banana, Cup, Dart]
After adding Egg: [Apple, Banana, Cup, Dart, Egg, Cup]
Number of items: 6
Index of Cup: 2
Index of Zebra: -1
Item at index 3 is: Cup
Do we have a Box?: false
Do we have an Apple?: true
After clearing: []

[Try the above code on Repl.it]

Add the missing methods to the class given below so that it produces the output given.

💡 Use an ArrayList to store the numbers.

public class Main {

    //TODO: add your methods here

    public static void main(String[] args) {
        System.out.println("Adding numbers to the list");
        addNumber(3);
        addNumber(8);
        addNumber(24);
        System.out.println("The total is: " + getTotal());
        System.out.println("8 in the list : " + isFound(8) );
        System.out.println("5 in the list : " + isFound(5) );
        removeNumber(8);
        System.out.println("The total is: " + getTotal());
    }

}

Adding numbers to the list
[3]
[3, 8]
[3, 8, 24]
The total is: 35
8 in the list : true
5 in the list : false
[3, 24]
The total is: 27

Partial solution:

import java.util.ArrayList;

public class Main {
    private static ArrayList<Integer> numbers = new ArrayList<>();

    private static void addNumber(int i) {
        numbers.add(Integer.valueOf(i));
        System.out.println(numbers);
    }

    // ...

}

This exercise continues from the TaskManager Level 1-3 exercises quoted above.

Enhance the TaskManager in the following ways:

  1. Use a suitable Collection class to store tasks, instead of using an array.
  2. Introduce a done n command to mark the task at index n as done.

Here is an example output:

Welcome to TaskManager-Level4!
Your task? todo read book
Tasks in the list: 1
Your task? deadline return book /by Friday
Tasks in the list: 2
Your task? print
Tasks:
[1] description: read book
is done? No
[2] description: return book
is done? No
do by: Friday
Your task? done 1
Tasks in the list: 2
Your task? print
Tasks:
[1] description: read book
is done? Yes
[2] description: return book
is done? No
do by: Friday
Your task?

Suggestions:

  • Move the isDone variable to the Task class and provide a setDone(boolean) method.
public class Task {
    protected String description;
    protected boolean isDone;

    // ...

    public void setDone(boolean isDone){
        this.isDone = isDone;
    }
}
import java.util.ArrayList;
import java.util.List;
import java.util.Scanner;

public class Main {
    static Scanner in = new Scanner(System.in);
    static List<Task> tasks = new ArrayList<>();

    public static void main(String[] args) {
        // ...
    }

    private static void addTodo(String line) throws TaskManagerException {
        //...
        tasks.add(new Todo(description));
        //...
    }

    private static void markAsDone(String line) {
        int index = Integer.parseInt(line.substring("done".length()).trim());
        tasks.get(index - 1).setDone(true);
        System.out.println("Tasks in the list: " + tasks.size());
    }

    private static void printTasks() {
        // ...
        for (int i = 0; i < tasks.size(); i++) {
            System.out.println("[" + (i + 1) + "] " + tasks.get(i));
        }
    }
}
: Can use the HashMap class

HashMap is an implementation of the Map interface. It allows you to store a collection of key-value pairs. The example below illustrates how to use a HashMap<String, Point> to maintain a list of coordinates and their identifiers e.g., the identifier x1 is used to identify the point 0,0 where x1 is the key and 0,0 is the value.

import java.awt.Point;
import java.util.HashMap;
import java.util.Map;

public class HashMapDemo {
    public static void main(String[] args) {
        HashMap<String, Point> points = new HashMap<>();

        // put the key-value pairs in the HashMap
        points.put("x1", new Point(0, 0));
        points.put("x2", new Point(0, 5));
        points.put("x3", new Point(5, 5));
        points.put("x4", new Point(5, 0));

        // retrieve a value for a key using the get method
        print("Coordinates of x1: " + pointAsString(points.get("x1")));

        // check if a key or a value exists
        print("Key x1 exists? " + points.containsKey("x1"));
        print("Key x1 exists? " + points.containsKey("y1"));
        print("Value (0,0) exists? " + points.containsValue(new Point(0, 0)));
        print("Value (1,2) exists? " + points.containsValue(new Point(1, 2)));

        // update the value of a key to a new value
        points.put("x1", new Point(-1,-1));

        // iterate over the entries
        for (Map.Entry<String, Point> entry : points.entrySet()) {
            print(entry.getKey() + " = " + pointAsString(entry.getValue()));
        }

        print("Number of keys: " + points.size());
        points.clear();
        print("Number of keys after clearing: " + points.size());

    }

    public static String pointAsString(Point p) {
        return "[" + p.x + "," + p.y + "]";
    }

    public static void print(String s) {
        System.out.println(s);
    }
}

Coordinates of x1: [0,0]
Key x1 exists? true
Key x1 exists? false
Value (0,0) exists? true
Value (1,2) exists? false
x1 = [-1,-1]
x2 = [0,5]
x3 = [5,5]
x4 = [5,0]
Number of keys: 4
Number of keys after clearing: 0

[Try the above code on Repl.it]

The class given below keeps track of how many people signup to attend an event on each day of the week. Add the missing methods so that it produces the output given.

💡 Use an HashMap to store the number of entries for each day.

public class Main {
    private static HashMap<String, Integer> roster = new HashMap<>();

    //TODO: add your methods here

    public static void main(String[] args) {
        addToRoster("Monday"); // i.e., one person signed up for Monday
        addToRoster("Wednesday"); // i.e., one person signed up for Wednesday
        addToRoster("Wednesday"); // i.e., another person signed up for Wednesday
        addToRoster("Friday");
        addToRoster("Monday");
        printRoster();
    }

}

Monday => 2
Friday => 1
Wednesday => 2

Partial solution:

import java.util.HashMap;
import java.util.Map;

public class Main {
    private static HashMap<String, Integer> roster = new HashMap<>();

    private static void addToRoster(String day) {
        if (roster.containsKey(day)){
            Integer newValue = Integer.valueOf(roster.get(day).intValue() + 1);
            roster.put(day, newValue);
        } else {
            roster.put(day, Integer.valueOf(1));
        }
    }

    // ...
}

Miscellaneous Topics

: Can use Java enumerations

You can define an enum type by using the enum keyword. Because they are constants, the names of an enum type's fields are in uppercase letters e.g., FLAG_SUCCESS.

Defining an enumeration to represent days of a week (code to be put in the Day.java file):

public enum Day {
    SUNDAY, MONDAY, TUESDAY, WEDNESDAY,
    THURSDAY, FRIDAY, SATURDAY
}

Some examples of using the Day enumeration defined above:

Day today = Day.MONDAY;
Day[] holidays = new Day[]{Day.SATURDAY, Day.SUNDAY};

switch (today) {
case SATURDAY:
case SUNDAY:
    System.out.println("It's the weekend");
    break;
default:
    System.out.println("It's a week day");
}

Note that while enumerations are usually a simple set of fixed values, Java enumerations can have behaviors too, as explained in this tutorial from -- Java Tutorial

Define an enumeration named Priority. Add the missing describe method to the code below so that it produces the output given.

public class Main {

    // Add your method here

    public static void main(String[] args) {
        describe("Red", Priority.HIGH);
        describe("Orange", Priority.MEDIUM);
        describe("Blue", Priority.MEDIUM);
        describe("Green", Priority.LOW);
    }
}

Red indicates high priority
Orange indicates medium priority
Blue indicates medium priority
Green indicates low priority

Use a switch statement to select between possible values for Priority.

    public static void describe(String color, Priority p) {
        switch (p) {
            case LOW:
                System.out.println(color + " indicates low priority");
                break;
            // ...
        }
    }

Code for the enumeration is given below:

public enum Priority {
    HIGH, MEDIUM, LOW
}
: Can use Java packages

You can organize your types (i.e., classes, interfaces, enumerations, etc.) into packages for easier management (among other benefits).

To create a package, you put a package statement at the very top of every source file in that package. The package statement must be the first line in the source file and there can be no more than one package statement in each source file.

The Formatter class below (in Formatter.java file) is in the package seedu.tojava.util:

package seedu.tojava.util;

public class Formatter {
    public static final String PREFIX = ">>";

    public static String format(String s){
        return PREFIX + s;
    }
}

Package names are written in all lower case (not camelCase), using the dot as a separate. Companies use their reversed Internet domain name to begin their package names. Packages in the Java language itself begin with java. or javax.

For example, com.foobar.doohickey.util can be the name of a package created by a company with a domain name foobar.com

To use a public package member from outside its package, you must do one of the following:

  1. Use the fully qualified name to refer to the member
  2. Import the package or the specific package member

The Main class below has two import statements:

  • import seedu.tojava.util.StringParser: imports the class StringParser in the seedu.tojava.util package
  • import seedu.tojava.frontend.*: imports all the classes in the seedu.tojava.frontend package
package seedu.tojava;

import seedu.tojava.util.StringParser;
import seedu.tojava.frontend.*;

public class Main {

    public static void main(String[] args) {

        // Using the fully qualified name to access the Processor class
        String status = seedu.tojava.logic.Processor.getStatus();

        // Using the StringParser previously imported
        StringParser sp = new StringParser();

        // Using classes from the tojava.frontend package
        Ui ui = new Ui();
        Message m = new Message();

    }
}

Note how the class can still use the Processor without importing it first, by using its fully qualified name seedu.tojava.logic.Processor

Importing a package does not import its sub-packages, as packages do not behave as hierarchies despite appearances.

import seedu.tojava.frontend.* does not import the classes in the sub-package seedu.tojava.frontend.widget.

If you do not use a package statement, your type doesn't have a package -- a practice not recommended (except for small code examples) as it is not possible for a type in a package to import a type that is not in a package.

Optionally, a static import can be used to import static members of a type so that the imported members can be used without specifying the type name.

The class below uses static imports to import the constant PREFIX and the method format() from the seedu.tojava.util.Formatter class.

import static seedu.tojava.util.Formatter.PREFIX;
import static seedu.tojava.util.Formatter.format;

public class Main {

    public static void main(String[] args) {

        String formatted = format("Hello");
        boolean isFormatted = formatted.startsWith(PREFIX);
        System.out.println(formatted);
    }
}
package seedu.tojava.util;

public class Formatter {
    public static final String PREFIX = ">>";

    public static String format(String s){
        return PREFIX + s;
    }
}

Note how the class can use PREFIX and format (instead of Formatter.PREFIX and Formatter.format()).

The package of a type should match the folder path of the source file. Similarly, the compiler will put the .class files in a folder structure that matches the package names.

If the seedu.tojava.Main class in defined in the file Main.java,

  • the file should be in the location <source folder>/seedu/tojava/
  • when it is compiled, the Main.class file will be in the location <compiler output folder>/seedu/tojava/

When using the commandline to compile/run Java, you should take the package into account.

If the seedu.tojava.Main class in defined in the file Main.java,

  • when compiling from the <source folder>, the command is:
    javac seedu/tojava/Main.java
  • when running it from the <compiler output folder>, the command is:
    java seedu.tojava.Main

This exercise continues from the TaskManager Level 1-7 exercises quoted above.

Move the classes in your TaskManager into a package. For example, assuming your name in John Doe, you can move it to a pacakge johndoe.tojava.taskmanager. Optionally, you can add sub-packages too.

: Can read/write text files using Java

You can use the java.io.File class to represent a file object. It can be used to access properties of the file object.

This code creates a File object to represent a file fruits.txt that exists in the data directory relative to the current working directory and uses that object to print some properties of the file.

import java.io.File;

public class FileClassDemo {

    public static void main(String[] args) {
        File f = new File("data/fruits.txt");
        System.out.println("full path: " + f.getAbsolutePath());
        System.out.println("file exists?: " + f.exists());
        System.out.println("is Directory?: " + f.isDirectory());
    }

}

full path: C:\sample-code\data\fruits.txt
file exists?: true
is Directory?: false

If you use backslash to specify the file path in a Windows Computer, you need to use an additional backslash as an escape character because the backslash by itself has a special meaning. e.g., use "data\\fruits.txt", not "data\fruits.txt". Alternatively, you can use forward slash "data/fruits.txt" (even on Windows).

You can read from a file using a Scanner object that uses a File object as the source of data.

This code uses a Scanner object to read (and print) contents of a text file line-by-line:

import java.io.File;
import java.io.FileNotFoundException;
import java.util.Scanner;

public class FileReadingDemo {

    private static void printFileContents(String filePath) throws FileNotFoundException {
        File f = new File(filePath); // create a File for the given file path
        Scanner s = new Scanner(f); // create a Scanner using the File as the source
        while (s.hasNext()) {
            System.out.println(s.nextLine());
        }
    }

    public static void main(String[] args) {
        try {
            printFileContents("data/fruits.txt");
        } catch (FileNotFoundException e) {
            System.out.println("File not found");
        }
    }

}

i.e., contents of the data/fruits.txt

5 Apples
3 Bananas
6 Cherries

You can use a java.io.FileWriter object to write to a file.

The writeToFile method below uses a FileWrite object to write to a file. The method is being used to write two lines to the file temp/lines.txt.

import java.io.FileWriter;
import java.io.IOException;

public class FileWritingDemo {

    private static void writeToFile(String filePath, String textToAdd) throws IOException {
        FileWriter fw = new FileWriter(filePath);
        fw.write(textToAdd);
        fw.close();
    }

    public static void main(String[] args) {
        String file2 = "temp/lines.txt";
        try {
            writeToFile(file2, "first line" + System.lineSeparator() + "second line");
        } catch (IOException e) {
            System.out.println("Something went wrong: " + e.getMessage());
        }
    }

}

Contents of the temp/lines.txt:

first line
second line

Note that you need to call the close() method of the FileWriter object for the writing operation to be completed.

You can create a FileWriter object that appends to the file (instead of overwriting the current content) by specifying an additional boolean parameter to the constructor.

The method below appends to the file rather than overwrites.

private static void appendToFile(String filePath, String textToAppend) throws IOException {
    FileWriter fw = new FileWriter(filePath, true); // create a FileWriter in append mode
    fw.write(textToAppend);
    fw.close();
}

The java.nio.file.Files is a utility class provides several useful file operations. It relies on the java.nio.file.Paths file to generate Path objects that represent file paths.

This example uses the Files class to copy a file and delete a file.

import java.io.IOException;
import java.nio.file.Files;
import java.nio.file.Paths;

public class FilesClassDemo {

    public static void main(String[] args) throws IOException{
        Files.copy(Paths.get("data/fruits.txt"), Paths.get("temp/fruits2.txt"));
        Files.delete(Paths.get("temp/fruits2.txt"));
    }

}

The techniques above are good enough to manipulate simple text files. Note that it is also possible to perform file I/O operations using other classes.

This exercise continues from the TaskManager Level 1-4 exercises quoted above.

Enhance the TaskManager to store tasks in a text file between runs:

  1. The text file can follow a format of your choice. For example, each line can represent one task. The attributes can be separated using a suitable delimiter.
    Here is an example format:
    T | 1 | read book
    D | 0 | return book | June 6th
    T | 1 | join sports club
    
    • In the above example | is used as a delimiter, T → Todo, D → Deadline, 1 → task done, 0 → task not done.
    • 💡 If you use | as the delimiter, use split("\\|") to split the line into its parts. split("|") will not work because | has a special meaning when used in this context.
  2. Load all tasks in the text file to the memory (i.e., convert to Task objects) at the start up of TaskManager. You can assume the data are in a predetermined file e.g., data/tasks.txt.
  3. Save all tasks to the text file every time there is a change to the data. Alternatively, you can introduce a new command to save tasks to the text file.

Here's an example method for loading data from the text file. Use this method at the start of your main method to load the tasks from the text file.

    private static List<Task> getTasksFromFile() {
        List<Task> loadedTasks = new ArrayList<>();
        try {
            List<String> lines = getLines("data/tasks.txt");
            for (String line : lines) {
                if (line.trim().isEmpty()) { //ignore empty lines
                    continue;
                }
                loadedTasks.add(createTask(line)); //convert the line to a task and add to the list
            }
        } catch (FileNotFoundException e) {
            printError("problem encountered while loading data: " + e.getMessage());
        }
        return loadedTasks;
    }
: Can explain access modifiers

Access level modifiers determine whether other classes can use a particular field or invoke a particular method.

There are two levels of access control:

  1. At the class level:

    • public: the class is visible to all classes everywhere
    • no modifier (the default, also known as package-private): it is visible only within its own package

  2. At the member level:

    • public or no modifier (package-private): same meaning as when used with top-level classes
    • private: the member can only be accessed in its own class
    • protected: the member can only be accessed within its own package (as with package-private) and, in addition, by a subclass of its class in another package

The following table shows the access to members permitted by each modifier.

Modifier Class Package Subclass World
public
protected
no modifier
private

Access levels affect you in two ways:

  1. When you use classes that come from another source, such as the classes in the Java platform, access levels determine which members of those classes your own classes can use.
  2. When you write a class, you need to decide what access level every member variable and every method in your class should have.
: Can use Java constants

Java does not directly support constants. The convention is to use a static final variable where a constant is needed. The static modifier causes the variable to be available without instantiating an object. The final modifier causes the variable to be unchangeable. Java constants are normally declared in ALL CAPS separated by underscores.

Here is an example of a constant named MAX_BALANCE which can be accessed as Account.MAX_BALANCE.

public class Account{

  public static final double MAX_BALANCE = 1000000.0;

}

Math.PI is an example constant that comes with Java.

: Can use Java casting

Casting is the action of converting from one type to another. You can use the (newType) syntax to cast a value to a new type.

When you cast a primitive value to another type, there may be a loss of precision.

The code below cast a double value to an int value and cast it back to a double. Note the loss of precision.

double d = 5.3;
System.out.println("Before casting to an int: " + d);
int i = (int)d; // cast d to an int
System.out.println("After casting to an int: " + i);
d = (double)i; // cast i back to a double
System.out.println("After casting back a double: " + d);

Before casting to an int: 5.3
After casting to an int: 5
After casting back a double: 5.0

Downcasting is when you cast an object reference from a superclass to a subclass.

Assume the following class hierarchy:

class Animal{
    void speak(){
        System.out.println("I'm an animal");
    }
}

class Cat extends Animal{
    @Override
    void speak() {
        System.out.println("I'm a Cat");
    }
}

class DomesticCat extends Cat{
    @Override
    void speak() {
        System.out.println("I'm a DomesticCat");
    }
}

The foo method below downcasts an Animal object to its subclasses.

public static void foo(Animal a){
    a.speak();
    Cat c = (Cat)a; // downcast a to a Cat
    c.speak();
    DomesticCat dc = (DomesticCat)a; // downcast a to a DomesticCat
    dc.speak();
}

Upcasting is when you cast an object reference from a subclass to a superclass. However, upcasting is done automatically by the compiler even if you do not specify it explicitly.

This example upcasts a Cat object to its superclass Animal:

Cat c = new Cat();
Animal a1 = (Animal)c; //upcasting c to the Animal class
Animal a2 = c; //upcasting is implicit

Note that due to polymorphism, the behavior of the object will reflect the actual type of the object irrespective of the type of the variable holding a reference to it.

The call to the speak() method in the code below always executes the speak() method of the DomesticCat class because the actual type of the object remains DomesticCat although the reference to it is being downcast/upcast to various other types.

Animal a = new DomesticCat(); //implicit upcast
a.speak();
Cat c = (Cat)a; //downcast
c.speak();
DomesticCat dc = (DomesticCat)a; //downcast
dc.speak();

I'm a DomesticCat
I'm a DomesticCat
I'm a DomesticCat

Casting to an incompatible type can result in a ClassCastException at runtime.

This code will cause a ClassCastException:

Object o = new Animal();
Integer x = (Integer)o;

Exception in thread "main" java.lang.ClassCastException: misc.casting.Animal cannot be cast to java.lang.Integer
	at misc.casting.CastingExamples.main(CastingExamples.java:14)

You can use the instanceof operator to check if a cast is safe to perform.

This code checks if the object a is an instance of the Cat class before casting it to a Cat.

Cat c;
if (a instanceof Cat){
    c = (Cat)a;
}
: Can use JAR files

Java applications are typically delivered as JAR (short for Java Archive) files. A JAR contains Java classes and other resources (icons, media files, etc.).

An executable JAR file can be launched using the java -jar command.

java -jar foo.jar launches the foo.jar file.

You can delete the Collate-GUI.jar from https://se-edu.github.io/collate/ and run it using the commandjava -jar Collate-GUI.jar command.

The IDE can help you to package your application as a JAR file.

Creating a JAR file in Intellij - A video by Artur Spirin:

This exercise continues from the TaskManager Level 1-11 exercises quoted above.

Package your TaskManager as a JAR file.

Practice Projects

: Can use Java to create a small app from scratch

In this practice project, you will create a small TaskManager program that can store a list of tasks. It is a CLI program. You will start with a very simple version (aka TaskManager Level 1) and grow its functionality in small steps.

TaskManager Level 1

In this first version of the TaskManager, the task list is not saved to the disk i.e., the task list does not persist between multiple runs of the program

Here is an example output:

Welcome to TaskManager-Level1!
Your task? add submit report
Tasks in the list: 1
Your task? add return library book
Tasks in the list: 2
Your task? add remind boss about meeting
Tasks in the list: 3
Your task? xyz
Unknown command! please try again
Your task? print
[1] submit report
[2] return library book
[3] remind boss about meeting
Your task? add set up meeting with boss
Tasks in the list: 4
Your task? print
[1] submit report
[2] return library book
[3] remind boss about meeting
[4] set up meeting with boss
Your task? exit
Bye!

Summary of behavior:

  • Task Manager prompts for user input with the message Your task?
  • add task description: adds the task description to the task list
  • print: prints the tasks added so far
  • exit or empty input: terminates the program

If you are new to programming, we recommend you to build the program in small steps, as follows:

  1. Write a program that reads any user input, prints it back to the user, and exits.
  2. Update the program to do the above in a loop until user types exit.
  3. Add greetings printed at the start and the end.
  4. If the first word is not add or exit, print an error message. Suggestion: use a switch statement to choose between multiple actions.
  5. Create a Task class to represent tasks and add an Task[] to store tasks.
  6. If the first word of the user input is add, add the whole line (no need to omit the first word) to the task list.
  7. Update the code in the previous step to omit the word add from the task description.
  8. Add support for the print command.
  9. Add support for terminating if the user input is empty
  10. and so on ...
import java.util.Scanner;

public class Main {
    static Scanner in = new Scanner(System.in);
    static Task[] tasks = new Task[100];
    static int count = 0;  // to keep track of number of tasks in the list

    public static void main(String[] args) {
        printWelcome();
        String line;
        boolean isExit = false;
        while (!isExit) {
            line = getInput();
            String command = line.split(" ")[0]; //extract the first word of the user input
            switch (command) {
                case "exit":
                case "": // exit if user input is empty
                    isExit = true;
                    break;
                case "add":
                    // todo: add code here
                default:
                    printError();
            }
        }
        exit();

    }

    private static void printWelcome() {
        System.out.println("Welcome to TaskManager-Level1!");
    }

    private static void printTasks() {
        for (int i = 0; i < count; i++) {
            System.out.println("[" + (i + 1) + "] " + tasks[i].getDescription());
        }
    }

    // todo: add missing methods
}


TaskManager Level 2

Enhance your TaskManager program in the following ways.

A. Add support for two types of tasks:

  • ToDo : a task to do someday
  • Deadline: a task to be done by a specific deadline

Both types keeps an internal flag to indicate if the task is done. The flag is initially set to false.

Here is an example output:

Welcome to TaskManager-Level2!
Your task? todo submit report
Tasks in the list: 1
Your task? deadline write report /by this Friday 4pm
Tasks in the list: 2
Your task? todo read textbook
Tasks in the list: 3
Your task? deadline return textbook /by Sunday
Tasks in the list: 4
Your task? print
Tasks:
[1] description: submit report
    is done? No
[2] description: write report
    is done? No
do by: this Friday 4pm
[3] description: read textbook
    is done? No
[4] description: return textbook
    is done? No
    do by: Sunday
Your task? exit
Bye!

Changes to the behavior:

  • add task description: adds the task description to the task list
  • todo task description: adds to the task list a todo task with the given task description
  • deadline task description /by deadline description: adds to the task list a deadline task with the given task description and with the deadline description

Suggestion:

  • Make the Todo class inherit from Task class, and make Deadline task inherit from Todo class.
  • Use polymorphism to store both types of tasks in an array of Task type and use one loop to print both types of tasks.

B. Add support for semi-automated regression testing using input/output redirection.


Quality Assurance → Testing → Test Automation →

Automated Testing of CLI Apps

A simple way to semi-automate testing of a CLI(Command Line Interface) app is by using input/output re-direction.

  • First, we feed the app with a sequence of test inputs that is stored in a file while redirecting the output to another file.
  • Next, we compare the actual output file with another file containing the expected output.

Let us assume we are testing a CLI app called AddressBook. Here are the detailed steps:

  1. Store the test input in the text file input.txt.

    add Valid Name p/12345 valid@email.butNoPrefix
    add Valid Name 12345 e/valid@email.butPhonePrefixMissing
    
  2. Store the output we expect from the SUT in another text file expected.txt.

    Command: || [add Valid Name p/12345 valid@email.butNoPrefix]
    Invalid command format: add 
    
    Command: || [add Valid Name 12345 e/valid@email.butPhonePrefixMissing]
    Invalid command format: add 
    
  3. Run the program as given below, which will redirect the text in input.txt as the input to AddressBook and similarly, will redirect the output of AddressBook to a text file output.txt. Note that this does not require any code changes to AddressBook.

    java AddressBook < input.txt > output.txt
    
    • 💡 The way to run a CLI program differs based on the language.
      e.g., In Python, assuming the code is in AddressBook.py file, use the command
      python AddressBook.py < input.txt > output.txt

    • 💡 If you are using Windows, use a normal command window to run the app, not a Power Shell window.

    More on the > operator and the < operator. tangential

    A CLI program takes input from the keyboard and outputs to the console. That is because those two are default input and output streams, respectively. But you can change that behavior using < and > operators. For example, if you run AddressBook in a command window, the output will be shown in the console, but if you run it like this,

    java AddressBook > output.txt 
    

    the Operating System then creates a file output.txt and stores the output in that file instead of displaying it in the console. No file I/O coding is required. Similarly, adding < input.txt (or any other filename) makes the OS redirect the contents of the file as input to the program, as if the user typed the content of the file one line at a time.

    Resources:

  4. Next, we compare output.txt with the expected.txt. This can be done using a utility such as Windows FC (i.e. File Compare) command, Unix diff command, or a GUI tool such as WinMerge.

    FC output.txt expected.txt
    

Note that the above technique is only suitable when testing CLI apps, and only if the exact output can be predetermined. If the output varies from one run to the other (e.g. it contains a time stamp), this technique will not work. In those cases we need more sophisticated ways of automating tests.

CLI App: An application that has a Command Line Interface. i.e. user interacts with the app by typing in commands.

import java.util.Scanner;

public class Main {
    static Scanner in = new Scanner(System.in);
    static Task[] tasks = new Task[100];
    static int taskCount = 0;

    public static void main(String[] args) {
        printWelcome();
        String line;

        boolean isExit = false;
        while (!isExit) {
            line = getInput();
            String command = line.split(" ")[0];
            switch (command) {
                case "exit":
                case "":
                    isExit = true;
                    break;
                case "todo":
                    addTodo(line);
                    break;
                case "deadline":
                    addDeadline(line);
                    break;
                case "print":
                    printTasks();
                    break;
                default:
                    printError();
            }
        }
        exit();

    }

    private static void addTodo(String line) {
        tasks[taskCount] = new Todo(line.substring("todo".length()).trim());
        taskCount++;
        System.out.println("Tasks in the list: " + taskCount);
    }

  // ...

    private static void printTasks() {
        System.out.println("Tasks:");
        for (int i = 0; i < taskCount; i++) {
            System.out.println("[" + (i + 1) + "] " + tasks[i]);
        }
    }
}

TaskManager Level 3

Enhance the TaskManager to print an error message if a command is missing parts. Use exceptions so that error detection and printing of error message happen at different places of code and the error information is passed between the two places using an Exception object.

Here is an example output:

Welcome to TaskManager-Level3!
Your task? todo
Error: Empty description for TODO
Your task? todo read book
Tasks in the list: 1
Your task? print
Tasks:
[1] description: read book
is done? No
Your task?

Suggested approach:

  • Create a TaskManagerException class that inherits the Exception class. Override the constructor that takes a String parameter so that you can specify the error information when you create a TaskManagerException object.
  • Throw a new TaskManagerException object when you detect some necessary information is missing in the command.
  • Catch that exception somewhere else and print the message inside the exception object.
public class TaskManagerException extends Exception{
    public TaskManagerException(String message) {
        super(message);
    }
}
    public static void main(String[] args) {
        // ...
        while (!isExit) {
            try {
                line = getInput();
                String command = line.split(" ")[0];
                switch (command) {
                    case "todo":
                        addTodo(line);
                        break;
                    // ...
                }
            } catch (TaskManagerException e) {
                printError(e.getMessage());
            }
        }
        // ...

    }

    private static void addTodo(String line) throws TaskManagerException {
        String description = line.substring("todo".length()).trim();
        if (description.isEmpty()){
            throw new TaskManagerException("Empty description for TODO");
        }
        // ...
    }

TaskManager Level 4

Enhance the TaskManager in the following ways:

  1. Use a suitable Collection class to store tasks, instead of using an array.
  2. Introduce a done n command to mark the task at index n as done.

Here is an example output:

Welcome to TaskManager-Level4!
Your task? todo read book
Tasks in the list: 1
Your task? deadline return book /by Friday
Tasks in the list: 2
Your task? print
Tasks:
[1] description: read book
is done? No
[2] description: return book
is done? No
do by: Friday
Your task? done 1
Tasks in the list: 2
Your task? print
Tasks:
[1] description: read book
is done? Yes
[2] description: return book
is done? No
do by: Friday
Your task?

Suggestions:

  • Move the isDone variable to the Task class and provide a setDone(boolean) method.
public class Task {
    protected String description;
    protected boolean isDone;

    // ...

    public void setDone(boolean isDone){
        this.isDone = isDone;
    }
}
import java.util.ArrayList;
import java.util.List;
import java.util.Scanner;

public class Main {
    static Scanner in = new Scanner(System.in);
    static List<Task> tasks = new ArrayList<>();

    public static void main(String[] args) {
        // ...
    }

    private static void addTodo(String line) throws TaskManagerException {
        //...
        tasks.add(new Todo(description));
        //...
    }

    private static void markAsDone(String line) {
        int index = Integer.parseInt(line.substring("done".length()).trim());
        tasks.get(index - 1).setDone(true);
        System.out.println("Tasks in the list: " + tasks.size());
    }

    private static void printTasks() {
        // ...
        for (int i = 0; i < tasks.size(); i++) {
            System.out.println("[" + (i + 1) + "] " + tasks.get(i));
        }
    }
}

TaskManager Level 5

Enhance the TaskManager to store tasks in a text file between runs:

  1. The text file can follow a format of your choice. For example, each line can represent one task. The attributes can be separated using a suitable delimiter.
    Here is an example format:
    T | 1 | read book
    D | 0 | return book | June 6th
    T | 1 | join sports club
    
    • In the above example | is used as a delimiter, T → Todo, D → Deadline, 1 → task done, 0 → task not done.
    • 💡 If you use | as the delimiter, use split("\\|") to split the line into its parts. split("|") will not work because | has a special meaning when used in this context.
  2. Load all tasks in the text file to the memory (i.e., convert to Task objects) at the start up of TaskManager. You can assume the data are in a predetermined file e.g., data/tasks.txt.
  3. Save all tasks to the text file every time there is a change to the data. Alternatively, you can introduce a new command to save tasks to the text file.

Here's an example method for loading data from the text file. Use this method at the start of your main method to load the tasks from the text file.

    private static List<Task> getTasksFromFile() {
        List<Task> loadedTasks = new ArrayList<>();
        try {
            List<String> lines = getLines("data/tasks.txt");
            for (String line : lines) {
                if (line.trim().isEmpty()) { //ignore empty lines
                    continue;
                }
                loadedTasks.add(createTask(line)); //convert the line to a task and add to the list
            }
        } catch (FileNotFoundException e) {
            printError("problem encountered while loading data: " + e.getMessage());
        }
        return loadedTasks;
    }

TaskManager Level 6

Refactor the TaskManager to have classes such as the below so that your code is more Object-Oriented:

  1. A Parser class containing methods that deals with parsing the user command to extract meaningful details from it. Some example methods:

    • public static getCommandWord(String fullCommand): Returns a the command word i.e., the first word of the given fullCommand
      e.g., Parser.getCommandWord("todo read book") "todo"
    • public static createTodo(String fullCommand): Returns a Todo object to match the fullCommand. Assumption: the fullCommand is for creating a Todo object.
      e.g., Parser.createTodo("todo read book") a Todo object containing the description "read book"
  2. A Storage class that will help to load Tasks from the hard disk and save tasks to the hard disk. Some example usage:

    Storage storage = new Storage("data/tasks.txt");
    List<Task> tasks = storage.load();
    ...
    storage.save(tasks);
    
  3. A Ui class that will be responsible for interacting with the user. Ideally, only this class should interact with the user. Some example usage:

    ui = new Ui();
    ...
    ui.showWelcomeMessage();
    ...
    String fullCommand = ui.readUserCommand();
    

    Note: The Scanner object should be inside the Ui class.

  4. A TaskList class that is responsible for keeping the in-memory task list. Most likely this class will use an ArrayList inside it. Some example usage:

    private TaskList tasks = new TaskList(storage.load());
    ...
    t = Parser.createTodo(fullCommand);
    tasks.addTask(t);
    ...
    String taskListDescription = tasks.getDescription();
    ui.showToUser(taskListDescription);
    
  5. Tweak the main class (you can name it TaskManager) class so that the main method can be simplified as follows:

    public static void main(String[] args) {
        new TaskManager("data/tasks.txt").run();
    }
    

    Note: As a result of the above, you will have to convert most of the static methods in the TaskManager class to non-static methods, which is more OO.

public class TaskManager {

    private Storage storage;
    private TaskList tasks;
    private Ui ui;

    public TaskManager(String filePath) {
        ui = new Ui();
        storage = new Storage(filePath);
        try {
            tasks = new TaskList(storage.load());
        } catch (TaskManagerException e) {
            ui.showToUser("Problem reading file. Starting with an empty task list");
            tasks = new TaskList();
        }
    }

    public void run() {
        ui.printWelcome();

        boolean isExit = false;
        while (!isExit) {
            try {
                String fullCommand = ui.readUserCommand();
                String commandWord = Parser.getCommandWord(fullCommand);
                switch (commandWord) {
                    case "exit":
                    case "":
                    // ...
                }
            } catch (TaskManagerException e) {
                ui.printError(e.getMessage());
            }
        }
        exit();
    }

    // ...

    public static void main(String[] args) {
        new TaskManager("data/tasks.txt").run();
    }
}
import java.util.Scanner;

public class Ui {

    private Scanner in;

    public Ui() {
        in = new Scanner(System.in);
    }

    public String readUserCommand() {
        System.out.print("Your task? ");
        return in.nextLine().trim();
    }

    // ...
}

TaskManager Level 7

Add JUnit tests for some of the methods in your code.

import org.junit.Test;

import static junit.framework.TestCase.assertEquals;

public class ParserTest {

    @Test
    public void getCommandWord(){
        assertEquals("todo", Parser.getCommandWord("todo read book"));
        assertEquals("deadline", Parser.getCommandWord("deadline return book /by next Friday"));
        assertEquals("exit", Parser.getCommandWord("exit"));
        assertEquals("xyz", Parser.getCommandWord("   xyz   ")); // leading and trailing spaces
        // ...
    }

    @Test
    public void createTodo() throws TaskManagerException {
        Todo actual = Parser.createTodo("todo read book");
        Todo expected = new Todo("read book");
        assertEquals(expected.toString(), actual.toString());
        //...
    }

    // more test methods
}

TaskManager Level 8

Move the classes in your TaskManager into a package. For example, assuming your name in John Doe, you can move it to a pacakge johndoe.tojava.taskmanager. Optionally, you can add sub-packages too.


TaskManager Level 9

Add javadoc comments to all non-trivial public classes and methods. Follow the format of the minimal javadoc comment examples given below.


TaskManager Level 10

Ensure the code follows the basic rules (optional to apply intermediate/advanced rules) specified in the provided Java coding standard.


TaskManager Level 11

Add some assertions (i.e., Java asserts, not JUnit assertions) to your code.


TaskManager Level 12

Package your TaskManager as a JAR file.