Week 11 [Apr 1]
Project
- This week, you need to create a a release for your product, with a JAR.
- Ensure that the product is user testable.
- Update the documents to reflect the state the product.
- Mark irrelevant sections as
coming in v2.0.
- Mark irrelevant sections as
Demo during tutorial
- Two members do a timed demo in the tutorial this week. (Come prepared for demo!)
(Mock) Submissions this week
- Submit the following documents on LumiNUS.
- Ensure that the file names are accurate. There is penalty for non-complying with the requirements for v1.4 submission (final submission).
- The submission folder
Milestone v1.3 submissionwill be open from April 1, 2019 12:00 am to April 2, 2019 11:59 pm
| Team/Individual Item | Name format | Upload to |
|---|---|---|
| User Guide | [TEAM_ID][product Name]UserGuide.pdfe.g.[W09-1][Contacts Plus]UserGuide.pdf |
LumiNUS |
| Developer Guide | [TEAM_ID][product Name]DeveloperGuide.pdfe.g. [W09-1][Contacts Plus]DeveloperGuide.pdf |
LumiNUS |
| Project Portfolio Page | [TEAM_ID][Your Name]Portfolio.pdfe.g.[W09-1][John Doe]Portfolio.pdf html version of PPP page on the product website |
LumiNUS github.io |
PE Dry-run
Time/venue: week 11, 5 Apr, 2pm at the lecture
What: The v1.3 is subjected to a round of peer acceptance/system testing, also called the Practical Exam Dry Run as this round of testing will be similar to the graded
When, where: week 11 at lecture
Objectives:
- The primary objective of the PE is to increase the rigor of project assessment. Assessing most aspects of the project involves an element subjectivity. As the project counts for 50% of the final grade, it is not prudent to rely on evaluations of tutors alone as there can be significant variations between how different tutors assess projects. That is why we collect more data points via the PE so as to minimize the chance of your project being affected by evaluator-bias.
- Note that none of the significant project grade components are calculated solely based on peer ratings. Rather, PE data are mostly used to cross-validate tutor assessments and identify cases that need further investigation. When peer inputs are used for grading, usually they are combined with tutor evaluations with appropriate weight for each. In some cases ratings from team members are given a higher weight compared to ratings from other teams, if that is appropriate.
- As a bonus, PE also gives us an opportunity to evaluate your manual testing skills, product evaluation skills, effort estimation skills etc.
- Note that the PE is not a means of pitting you against each other. Developers and testers play for the same side; they need to push each other to improve the quality of their work -- not bring down each other.
When, where: Week 13 lecture
Grading:
- Your performance in the practical exam will affect your final grade and your peers, as explained in Admin: Project Assessment section.
- As your submissions can affect the grades of peers, note that we have put in measures to identify insincere/random evaluations and penalize accordingly.
Preparation:
-
Ensure that you can access the relevant issue tracker given below:
-- for PE Dry Run (at v1.3): nus-cs2103-AY1819S2/pe-dry-run
-- for PE (at v1.4): nus-cs2103-AY1819S2/pe (will open only near the actual PE)- These are private repos!. If you cannot access the relevant repo, you may not have accepted the invitation to join the GitHub org used by the module. Go to https://github.com/orgs/nus-cs2103-AY1819S2/invitation to accept the invitation.
- If you cannot find the invitation, post in our forum.
-
Ensure you have access to a computer that is able to run module projects e.g. has the right Java version.
-
Have a good screen grab tool with annotation features so that you can quickly take a screenshot of a bug, annotate it, and post in the issue tracker.
- 💡 You can use Ctrl+V to paste a picture from the clipboard into a text box in GitHub issue tracker.
-
Charge your computer before coming to the PE session. The testing venue may not have enough charging points.
During:
- Take note of your team to test. It will be given to you by the teaching team (distributed via LumiNUS gradebook).
- Download from LumiNUS all files submitted by the team (i.e. jar file, User Guide, Developer Guide, and Project Portfolio Pages) into an empty folder.
- [60 minutes] Test the product and report bugs as described below:
Testing instructions for PE and PE Dry Run
-
What to test:
- PE Dry Run (at v1.3):
- Test the product based on the User Guide (the UG is most likely accessible using the
helpcommand). - Do system testing first i.e., does the product work as specified by the documentation?. If there is time left, you can do acceptance testing as well i.e., does the product solve the problem it claims to solve?.
- Test the product based on the User Guide (the UG is most likely accessible using the
- PE (at v1.4):
- Test based on the Developer Guide (Appendix named Instructions for Manual Testing) and the User Guide. The testing instructions in the Developer Guide can provide you some guidance but if you follow those instructions strictly, you are unlikely to find many bugs. You can deviate from the instructions to probe areas that are more likely to have bugs.
- As before, do both system testing and acceptance testing but give priority to system testing as system testing bugs can earn you more credit.
- PE Dry Run (at v1.3):
-
These are considered bugs:
- Behavior differs from the User Guide
- A legitimate user behavior is not handled e.g. incorrect commands, extra parameters
- Behavior is not specified and differs from normal expectations e.g. error message does not match the error
- The feature does not solve the stated problem of the intended user i.e., the feature is 'incomplete'
- Problems in the User Guide e.g., missing/incorrect info
-
Where to report bugs: Post bug in the following issue trackers (not in the team's repo):
- PE Dry Run (at v1.3): nus-cs2103-AY1819S2/pe-dry-run.
- PE (at v1.4): nus-cs2103-AY1819S2/pe.
-
Bug report format:
- Post bugs as you find them (i.e., do not wait to post all bugs at the end) because the issue tracker will close exactly at the end of the allocated time.
- Do not use team ID in bug reports. Reason: to prevent others copying your bug reports
- Write good quality bug reports; poor quality or incorrect bug reports will not earn credit.
- Use a descriptive title.
- Give a good description of the bug with steps to reproduce and screenshots.
- Assign a severity to the bug report. Bug report without a priority label are considered
severity.Low(lower severity bugs earn lower credit): - Each bug should be a separate issue. The issue will be initialized with one of the following templates:
Bug report
Describe the bug A clear and concise description of what the bug is.
To Reproduce Steps to reproduce the behavior:
- Go to '...'
- Click on '....'
- Scroll down to '....'
- See error
Expected behavior A clear and concise description of what you expected to happen.
Screenshots If applicable, add screenshots to help explain your problem.
Additional context Add any other context about the problem here.
Suggestions for improving the product
Please describe the problem A clear and concise description of what the problem is. Eg. I have to scroll three times to find [...]
Describe the improvement you'd like to suggest A clear and concise description of what you want to happen. Eg., Better to sort based on [...] for quick access
Additional context Add any other context or screenshots about the feature request here.
Bug Severity labels:
severity.Low: A flaw that is unlikely to affect normal operations of the product. Appears only in very rare situations and causes a minor inconvenience only.severity.Medium: A flaw that causes occasional inconvenience to some users but they can continue to use the product.severity.High: A flaw that affects most users and causes major problems for users. i.e., makes the product almost unusable for most users.
-
About posting suggestions:
- PE Dry Run (at v1.3): You can also post suggestions on how to improve the product. 💡 Be diplomatic when reporting bugs or suggesting improvements. For example, instead of criticising the current behavior, simply suggest alternatives to consider.
- PE (at v1.4): Do not post suggestions. But if a feature is missing a critical functionality that makes the feature less useful to the intended user, it can be reported as a bug.
-
If the product doesn't work at all: If the product fails catastrophically e.g., cannot even launch, you can test the fallback team allocated to you. But in this case you must inform us immediately after the session so that we can send your bug reports to the correct team.
- [Remainder of the session] Evaluate the following aspects. Note down your evaluation in a hard copy (as a backup). Submit via TEAMMATES. You are recommended to complete this during the PE session but you have until the end of the day to submit (or revise) your submissions.
- A. Product Design []:
Evaluate the product design based on how the product V2.0 (not V1.4) is described in the User Guide.
-
unable to judge: You are unable to judge this aspect for some reason e.g., UG is not available or does not have enough information. -
Target user:
-
target user specified and appropriate: The target user is clearly specified, prefers typing over other modes of input, and not too general (should be narrowed to a specific user group with certain characteristics). -
value specified and matching: The value offered by the product is clearly specified and matches the target user.
-
-
Value to the target user:
-
value: low: The value to target user is low. App is not worth using. -
value: medium: Some small group of target users might find the app worth using. -
value: high: Most of the target users are likely to find the app worth using.
-
-
Feature-fit:
-
feature-fit: low: Features don't seem to fit together. -
feature-fit: medium: Some features fit together but some don't. -
feature-fit: high: All features fit together.
-
-
polished: The product looks well-designed.
- B. Quality of user docs []:
Evaluate the quality of user documentation based on the parts of the user guide written by the person, as reproduced in the project portfolio. Evaluate from an end-user perspective.
-
UG/ unable to judge: Less than 1 page worth of UG content written by the student or cannot find PPP -
UG/ good use of visuals: Uses visuals e.g., screenshots. -
UG/ good use of examples: Uses examples e.g., sample inputs/outputs. -
UG/ just enough information: Not too much information. All important information is given. -
UG/ easy to understand: The information is easy to understand for the target audience. -
UG/ polished: The document looks neat, well-formatted, and professional.
- C. Quality of developer docs []:
Evaluate the quality of developer documentation based on the developer docs cited/reproduced in the respective project portfolio page. Evaluate from the perspective of a new developer trying to understand how the features are implemented.
-
DG/ unable to judge: Less than 0.5 pages worth of content OR other problems in the document e.g. looks like included wrong content. -
DG/ too little: 0.5 - 1 page of documentation - Diagrams:
-
DG/ types of UML diagrams: 1: Only one type of diagram used (types: Class Diagrams, Object Diagrams, Sequence Diagrams, Activity Diagrams, Use Case Diagrams) -
DG/ types of UML diagrams: 2: Two types of diagrams used -
DG/ types of UML diagrams: 3+: Three or more types of diagrams used -
DG/ UML diagrams suitable: The diagrams used for the right purpose -
DG/ UML notation correct: No more than one minor error in the UML notation -
DG/ diagrams not repetitive: No evidence of repeating the same diagram with minor differences -
DG/ diagrams not too complicated: Diagrams don't cram too much information into them -
DG/ diagrams integrates with text: Diagrams are well integrated into the textual explanations
-
-
DG/ easy to understand: The document is easy to understand/follow -
DG/ just enough information: Not too much information. All important information is given. -
DG/ polished: The document looks neat, well-formatted, and professional.
- D. Feature Quality []:
Evaluate the biggest feature done by the student for difficulty, completeness, and testability. Note: examples given below assume that AB4 did not have the commands edit, undo, and redo.
- Difficulty
-
Feature/ difficulty: unable to judge: You are unable to judge this aspect for some reason. -
Feature/ difficulty: low: e.g. make the existing find command case insensitive. -
Feature/ difficulty: medium: e.g. an edit command that requires the user to type all fields, even the ones that are not being edited. -
Feature/ difficulty: high: e.g., undo/redo command
-
- Completeness
-
Feature/ completeness: unable to judge: You are unable to judge this aspect for some reason. -
Feature/ completeness: low: A partial implementation of the feature. Barely useful. -
Feature/ completeness: medium: The feature has enough functionality to be useful for some of the users. -
Feature/ completeness: high: The feature has all functionality to be useful to almost all users.
-
- Other
-
Feature/ not hard to test: The feature was not too hard to test manually. -
Feature/ polished: The feature looks polished (as if done by a professional programmer).
-
- E. Amount of work []:
Evaluate the amount of work, on a scale of 0 to 30.
- Consider this PR (
historycommand) as 5 units of effort which means this PR (undo/redocommand) is about 15 points of effort. Given that 30 points matches an effort twice as that needed for theundo/redofeature (which was given as an example of anAgrade project), we expect most students to be have efforts lower than 20. - Count all implementation/testing/documentation work as mentioned in that person's PPP. Also look at the actual code written by the person.
- Do not give a high value just to be nice. You will be asked to provide a brief justification for your effort estimates.
Processing PE Bug Reports:
There will be a review period for you to respond to the bug reports you received.
Duration: The review period will start around 1 day after the PE (exact time to be announced) and will last until the following Monday midnight. However, you are recommended to finish this task ASAP, to minimize cutting into your exam preparation work.
Bug reviewing is recommended to be done as a team as some of the decisions need team consensus.
Instructions for Reviewing Bug Reports
-
First, don't freak out if there are lot of bug reports. Many can be duplicates and some can be false positives. In any case, we anticipate that all of these products will have some bugs and our penalty for bugs is not harsh. Furthermore, it depends on the severity of the bug. Some bug may not even be penalized.
-
Do not edit the subject or the description. Your response (if any) should be added as a comment.
-
You may (but not required to) close the bug report after you are done processing it, as a convenient means of separating the 'processed' issues from 'not yet processed' issues.
-
If the bug is reported multiple times, mark all copies EXCEPT one as duplicates using the
duplicatetag (if the duplicates have different severity levels, you should keep the one with the highest severity). In addition, use this technique to indicate which issue they are duplicates of. Duplicates can be omitted from processing steps given below. -
If a bug seems to be for a different product (i.e. wrongly assigned to your team), let us know (email prof).
-
Decide if it is a real bug and apply ONLY one of these labels.
Response Labels:
response.Accepted: You accept it as a bug.response.NotInScope: It is a valid issue but not something the team should be penalized for e.g., it was not related to features delivered in v1.4.response.Rejected: What tester treated as a bug is in fact the expected behavior. You can reject bugs that you inherited from AB4.response.CannotReproduce: You are unable to reproduce the behavior reported in the bug after multiple tries.response.IssueUnclear: The issue description is not clear. Don't post comments asked the tester to give more info. The tester will not be able to see those comments because the bug reports are anonymized.
- If applicable, decide the type of bug. Bugs without
type.*are consideredtype.FunctionalityBugby default (which are liable to a heavier penalty).
Bug Type Labels:
type.FeatureFlaw: some functionality missing from a feature delivered in v1.4 in a way that the feature becomes less useful to the intended target user for normal usage. i.e., the feature is not 'complete'. In other words, an acceptance testing bug that falls within the scope of v1.4 features. These issues are counted against the 'depth and completeness' of the feature.type.FunctionalityBug: the bug is a flaw in how the product works.type.DocTypo: A minor spelling/grammar error in the documentation. Does not affect the user.type.DocumentationBug: A flaw in the documentation that can potentially affect the user e.g., a missing step, a wrong instruction
- If you disagree with the original severity assigned to the bug, you may change it to the correct level.
For all cases of downgrading severity or non-acceptance of a bug, you must add a comment justifying your stance. All such cases will be double-checked by the teaching team and indiscriminate downgrading/non-acceptance of bugs without a good justification, if deemed as a case of trying to game the system, may be penalized as it is unfair to the tester.
Bug Severity labels:
severity.Low: A flaw that is unlikely to affect normal operations of the product. Appears only in very rare situations and causes a minor inconvenience only.severity.Medium: A flaw that causes occasional inconvenience to some users but they can continue to use the product.severity.High: A flaw that affects most users and causes major problems for users. i.e., makes the product almost unusable for most users.
-
Decide who should fix the bug. Use the
Assigneesfield to assign the issue to that person(s). There is no need to actually fix the bug though. It's simply an indication/acceptance of responsibility. If there is no assignee, we will distribute the penalty for that bug (if any) among all team members. -
We recommend (but not enforce) that the feature owner should be assigned bugs related to the feature, even if the bug was caused indirectly by someone else. Reason: The feature owner should have defended the feature against bugs using automated tests and defensive coding techniques.
-
Add an explanatory comment explaining your choice of labels and assignees.
-
We recommend choosing
type.*,severity.*and assignee even for bugs you are not accepting. Reason: your non-acceptance may be rejected by the tutor later, in which case we need to grade it as an accepted bug.
Grading: Taking part in the PE dry run is strongly encouraged as it can affect your grade in the following ways.
- If the product you are allocated to test in the Practical Exam (at v1.4) had a very low bug count, we will consider your performance in PE dry run as well when grading the PE.
- PE dry run will help you practice for the actual PE.
- Taking part in the PE dry run will earn you participation points.
- There is no penalty for bugs reported in your product. Every bug you find is a win-win for you and the team whose product you are testing.
Objectives:
- To train you to do manual testing, bug reporting, bug
triaging, bug fixing, communicating with users/testers/developers, evaluating products etc. - To help you improve your product before the final submission.
Preparation:
-
Ensure that you can access the relevant issue tracker given below:
-- for PE Dry Run (at v1.3): nus-cs2103-AY1819S2/pe-dry-run
-- for PE (at v1.4): nus-cs2103-AY1819S2/pe (will open only near the actual PE)- These are private repos!. If you cannot access the relevant repo, you may not have accepted the invitation to join the GitHub org used by the module. Go to https://github.com/orgs/nus-cs2103-AY1819S2/invitation to accept the invitation.
- If you cannot find the invitation, post in our forum.
-
Ensure you have access to a computer that is able to run module projects e.g. has the right Java version.
-
Have a good screen grab tool with annotation features so that you can quickly take a screenshot of a bug, annotate it, and post in the issue tracker.
- 💡 You can use Ctrl+V to paste a picture from the clipboard into a text box in GitHub issue tracker.
-
Charge your computer before coming to the PE session. The testing venue may not have enough charging points.
During the session:
- Take note of your team to test. Distributed via LumiNUS gradebook.
- Download the latest jar file from the team's GitHub page. Copy it to an empty folder.
Testing instructions for PE and PE Dry Run
-
What to test:
- PE Dry Run (at v1.3):
- Test the product based on the User Guide (the UG is most likely accessible using the
helpcommand). - Do system testing first i.e., does the product work as specified by the documentation?. If there is time left, you can do acceptance testing as well i.e., does the product solve the problem it claims to solve?.
- Test the product based on the User Guide (the UG is most likely accessible using the
- PE (at v1.4):
- Test based on the Developer Guide (Appendix named Instructions for Manual Testing) and the User Guide. The testing instructions in the Developer Guide can provide you some guidance but if you follow those instructions strictly, you are unlikely to find many bugs. You can deviate from the instructions to probe areas that are more likely to have bugs.
- As before, do both system testing and acceptance testing but give priority to system testing as system testing bugs can earn you more credit.
- PE Dry Run (at v1.3):
-
These are considered bugs:
- Behavior differs from the User Guide
- A legitimate user behavior is not handled e.g. incorrect commands, extra parameters
- Behavior is not specified and differs from normal expectations e.g. error message does not match the error
- The feature does not solve the stated problem of the intended user i.e., the feature is 'incomplete'
- Problems in the User Guide e.g., missing/incorrect info
-
Where to report bugs: Post bug in the following issue trackers (not in the team's repo):
- PE Dry Run (at v1.3): nus-cs2103-AY1819S2/pe-dry-run.
- PE (at v1.4): nus-cs2103-AY1819S2/pe.
-
Bug report format:
- Post bugs as you find them (i.e., do not wait to post all bugs at the end) because the issue tracker will close exactly at the end of the allocated time.
- Do not use team ID in bug reports. Reason: to prevent others copying your bug reports
- Write good quality bug reports; poor quality or incorrect bug reports will not earn credit.
- Use a descriptive title.
- Give a good description of the bug with steps to reproduce and screenshots.
- Assign a severity to the bug report. Bug report without a priority label are considered
severity.Low(lower severity bugs earn lower credit): - Each bug should be a separate issue. The issue will be initialized with one of the following templates:
Bug report
Describe the bug A clear and concise description of what the bug is.
To Reproduce Steps to reproduce the behavior:
- Go to '...'
- Click on '....'
- Scroll down to '....'
- See error
Expected behavior A clear and concise description of what you expected to happen.
Screenshots If applicable, add screenshots to help explain your problem.
Additional context Add any other context about the problem here.
Suggestions for improving the product
Please describe the problem A clear and concise description of what the problem is. Eg. I have to scroll three times to find [...]
Describe the improvement you'd like to suggest A clear and concise description of what you want to happen. Eg., Better to sort based on [...] for quick access
Additional context Add any other context or screenshots about the feature request here.
Bug Severity labels:
severity.Low: A flaw that is unlikely to affect normal operations of the product. Appears only in very rare situations and causes a minor inconvenience only.severity.Medium: A flaw that causes occasional inconvenience to some users but they can continue to use the product.severity.High: A flaw that affects most users and causes major problems for users. i.e., makes the product almost unusable for most users.
-
About posting suggestions:
- PE Dry Run (at v1.3): You can also post suggestions on how to improve the product. 💡 Be diplomatic when reporting bugs or suggesting improvements. For example, instead of criticising the current behavior, simply suggest alternatives to consider.
- PE (at v1.4): Do not post suggestions. But if a feature is missing a critical functionality that makes the feature less useful to the intended user, it can be reported as a bug.
-
If the product doesn't work at all: If the product fails catastrophically e.g., cannot even launch, you can test the fallback team allocated to you. But in this case you must inform us immediately after the session so that we can send your bug reports to the correct team.
At the end of the project each student is required to submit a Project Portfolio Page.
-
Objective:
- For you to use (e.g. in your resume) as a well-documented data point of your SE experience
- For us to use as a data point to evaluate your,
- contributions to the project
- your documentation skills
-
Sections to include:
-
Overview: A short overview of your product to provide some context to the reader.
-
Summary of Contributions:
- Code contributed: Give a link to your code on Project Code Dashboard, which should be
https://nus-cs2103-ay1819s2.github.io/cs2103-dashboard/#=undefined&search=githbub_username_in_lower_case(replacegithbub_username_in_lower_casewith your actual username in lower case e.g.,johndoe). This link is also available in the Project List Page -- linked to the icon under your photo. - Features implemented: A summary of the features you implemented. If you implemented multiple features, you are recommended to indicate which one is the biggest feature.
- Other contributions:
- Contributions to project management e.g., setting up project tools, managing releases, managing issue tracker etc.
- Evidence of helping others e.g. responses you posted in our forum, bugs you reported in other team's products,
- Evidence of technical leadership e.g. sharing useful information in the forum
- Code contributed: Give a link to your code on Project Code Dashboard, which should be
-
Contributions to the User Guide: Reproduce the parts in the User Guide that you wrote. This can include features you implemented as well as features you propose to implement.
The purpose of allowing you to include proposed features is to provide you more flexibility to show your documentation skills. e.g. you can bring in a proposed feature just to give you an opportunity to use a UML diagram type not used by the actual features. -
Contributions to the Developer Guide: Reproduce the parts in the Developer Guide that you wrote. Ensure there is enough content to evaluate your technical documentation skills and UML modelling skills. You can include descriptions of your design/implementations, possible alternatives, pros and cons of alternatives, etc.
-
If you plan to use the PPP in your Resume, you can also include your SE work outside of the module (will not be graded)
-
-
Format:
-
File name:
docs/team/githbub_username_in_lower_case.adoce.g.,docs/team/johndoe.adoc -
Follow the example in the AddressBook-Level4
-
💡 You can use the Asciidoc's
includefeature to include sections from the developer guide or the user guide in your PPP. Follow the example in the sample. -
It is assumed that all contents in the PPP were written primarily by you. If any section is written by someone else e.g. someone else wrote described the feature in the User Guide but you implemented the feature, clearly state that the section was written by someone else (e.g.
Start of Extract [from: User Guide] written by Jane Doe). Reason: Your writing skills will be evaluated based on the PPP
-
-
Page limit:
Content Limit Overview + Summary of contributions 0.5-1 (soft limit) Contributions to the User Guide 1-3 (soft limit) Contributions to the Developer Guide 3-6 (soft limit) Total 5-10 (strict) - The page limits given above are after converting to PDF format. The actual amount of content you require is actually less than what these numbers suggest because the HTML → PDF conversion adds a lot of spacing around content.
- Reason for page limit: These submissions are peer-graded (in the PE) which needs to be done in a limited time span.
If you have more content than the limit given above, you can give a representative samples of UG and DG that showcase your documentation skills. Those samples should be understandable on their own. For the parts left-out, you can give an abbreviated version and refer the reader to the full UG/DG for more details.
It's similar to giving extra details as appendices; the reader will look at the UG/DG if the PPP is not enough to make a judgment. For example, when judging documentation quality, if the part in the PPP is not well-written, there is no point reading the rest in the main UG/DG. That's why you need to put the most representative part of your writings in the PPP and still give an abbreviated version of the rest in the PPP itself. Even when judging the quantity of work, the reader should be able to get a good sense of the quantity by combining what is quoted in the PPP and your abbreviated description of the missing part. There is no guarantee that the evaluator will read the full document.
After the session:
- We'll transfer the relevant bug reports to your repo over the weekend. Once you have received the bug reports for your product, it is up to you to decide whether you will act on reported issues before the final submission v1.4. For some issues, the correct decision could be to reject or postpone to a version beyond v1.4.
- You can post in the issue thread to communicate with the tester e.g. to ask for more info, etc. However, the tester is not obliged to respond.
- 💡 Do not argue with the issue reporter to try to convince that person that your way is correct/better. If at all, you can gently explain the rationale for the current behavior but do not waste time getting involved in long arguments. If you think the suggestion/bug is unreasonable, just thank the reporter for their view and close the issue.
[W11.1] SDLC Process Models
Can explain SDLC process models
Software development goes through different stages such as requirements, analysis, design, implementation and testing. These stages are collectively known as the software development life cycle (SDLC). There are several approaches, known as software development life cycle models (also called software process models) that describe different ways to go through the SDLC. Each process model prescribes a "roadmap" for the software developers to manage the development effort. The roadmap describes the aims of the development stage(s), the artifacts or outcome of each stage as well as the workflow i.e. the relationship between stages.
Can explain sequential process models
The sequential model, also called the waterfall model, models software development as a linear process, in which the project is seen as progressing steadily in one direction through the development stages. The name waterfall stems from how the model is drawn to look like a waterfall (see below).
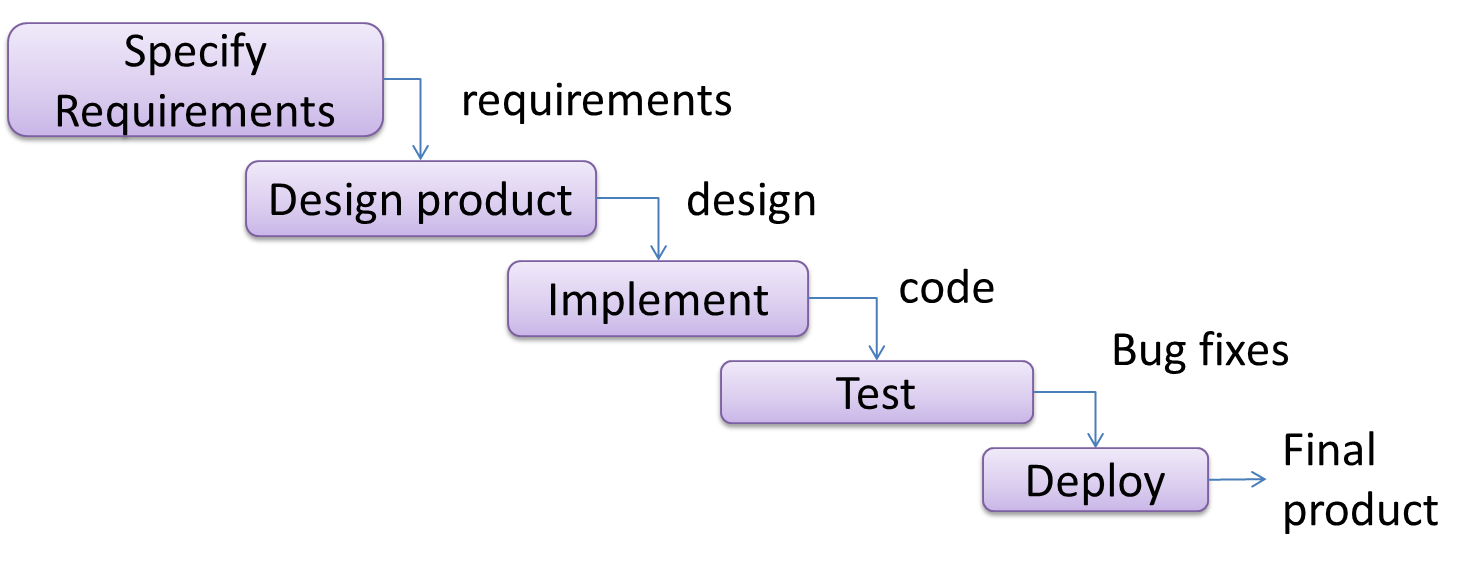
When one stage of the process is completed, it should produce some artifacts to be used in the next stage. For example, upon completion of the requirement stage a comprehensive list of requirements is produced that will see no further modifications. A strict application of the sequential model would require each stage to be completed before starting the next.
This could be a useful model when the problem statement that is well-understood and stable. In such cases, using the sequential model should result in a timely and systematic development effort, provided that all goes well. As each stage has a well-defined outcome, the progress of the project can be tracked with a relative ease.
The major problem with this model is that requirements of a real-world project are rarely well-understood at the beginning and keep changing over time. One reason for this is that users are generally not aware of how a software application can be used without prior experience in using a similar application.
Can explain iterative process models
The iterative model (sometimes called iterative and incremental) advocates having several iterations of SDLC. Each of the iterations could potentially go through all the development stages, from requirement gathering to testing & deployment. Roughly, it appears to be similar to several cycles of the sequential model.
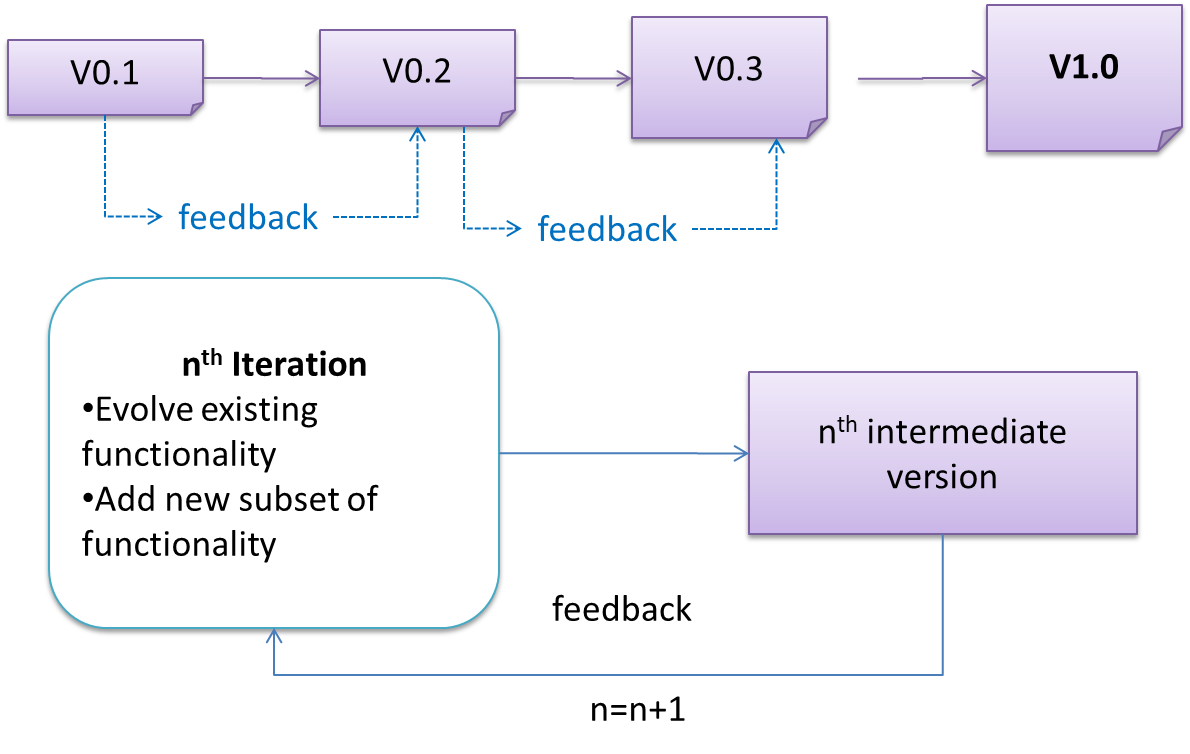
In this model, each of the iterations produces a new version of the product. Feedback on the version can then be fed to the next iteration. Taking the Minesweeper game as an example, the iterative model will deliver a fully playable version from the early iterations. However, the first iteration will have primitive functionality, for example, a clumsy text based UI, fixed board size, limited randomization etc. These functionalities will then be improved in later releases.
The iterative model can take a breadth-first or a depth-first approach to iteration planning.
- breadth-first: an iteration evolves all major components in parallel.
- depth-first: an iteration focuses on fleshing out only some components.
Most project use a mixture of breadth-first and depth-first iterations. Hence, the common phrase ‘an iterative and incremental process’.
Can explain agile process models
In 2001, a group of prominent software engineering practitioners met and brainstormed for an alternative to documentation-driven, heavyweight software development processes that were used in most large projects at the time. This resulted in something called the agile manifesto (a vision statement of what they were looking to do).
We are uncovering better ways of developing software by doing it and helping others do it.
Through this work we have come to value:
- Individuals and interactions over processes and tools
- Working software over comprehensive documentation
- Customer collaboration over contract negotiation
- Responding to change over following a plan
That is, while there is value in the items on the right, we value the items on the left more.
Extract from the Agile Manifesto
Subsequently, some of the signatories of the manifesto went on to create process models that try to follow it. These processes are collectively called agile processes. Some of the key features of agile approaches are:
- Requirements are prioritized based on the needs of the user, are clarified regularly (at times almost on a daily basis) with the entire project team, and are factored into the development schedule as appropriate.
- Instead of doing a very elaborate and detailed design and a project plan for the whole project, the team works based on a rough project plan and a high level design that evolves as the project goes on.
- Strong emphasis on complete transparency and responsibility sharing among the team members. The team is responsible together for the delivery of the product. Team members are accountable, and regularly and openly share progress with each other and with the user.
There are a number of agile processes in the development world today. eXtreme Programming (XP) and Scrum are two of the well-known ones.
Choose the correct statements about agile processes.
- a. They value working software over comprehensive documentation.
- b. They value responding to change over following a plan.
- c. They may not be suitable for some type of projects.
- d. XP and Scrum are agile processes.
(a)(b)(c)(d)
Can explain scrum
This description of Scrum was adapted from Wikipedia [retrieved on 18/10/2011], emphasis added:
Scrum is a process skeleton that contains sets of practices and predefined roles. The main roles in Scrum are:
- The Scrum Master, who maintains the processes (typically in lieu of a project manager)
- The Product Owner, who represents the stakeholders and the business
- The Team, a cross-functional group who do the actual analysis, design, implementation, testing, etc.
A Scrum project is divided into iterations called Sprints. A sprint is the basic unit of development in Scrum. Sprints tend to last between one week and one month, and are a timeboxed (i.e. restricted to a specific duration) effort of a constant length.
Each sprint is preceded by a planning meeting, where the tasks for the sprint are identified and an estimated commitment for the sprint goal is made, and followed by a review or retrospective meeting, where the progress is reviewed and lessons for the next sprint are identified.
During each sprint, the team creates a potentially deliverable product increment (for example, working and tested software). The set of features that go into a sprint come from the product backlog, which is a prioritized set of high level requirements of work to be done. Which backlog items go into the sprint is determined during the sprint planning meeting. During this meeting, the Product Owner informs the team of the items in the product backlog that he or she wants completed. The team then determines how much of this they can commit to complete during the next sprint, and records this in the sprint backlog. During a sprint, no one is allowed to change the sprint backlog, which means that the requirements are frozen for that sprint. Development is timeboxed such that the sprint must end on time; if requirements are not completed for any reason they are left out and returned to the product backlog. After a sprint is completed, the team demonstrates the use of the software.
Scrum enables the creation of self-organizing teams by encouraging co-location of all team members, and verbal communication between all team members and disciplines in the project.
A key principle of Scrum is its recognition that during a project the customers can change their minds about what they want and need (often called requirements churn), and that unpredicted challenges cannot be easily addressed in a traditional predictive or planned manner. As such, Scrum adopts an empirical approach—accepting that the problem cannot be fully understood or defined, focusing instead on maximizing the team’s ability to deliver quickly and respond to emerging requirements.

Daily Scrum is another key scrum practice. The description below was adapted from https://www.mountaingoatsoftware.com (emphasis added):
In Scrum, on each day of a sprint, the team holds a daily scrum meeting called the "daily scrum.” Meetings are typically held in the same location and at the same time each day. Ideally, a daily scrum meeting is held in the morning, as it helps set the context for the coming day's work. These scrum meetings are strictly time-boxed to 15 minutes. This keeps the discussion brisk but relevant.
...
During the daily scrum, each team member answers the following three questions:
- What did you do yesterday?
- What will you do today?
- Are there any impediments in your way?
...
The daily scrum meeting is not used as a problem-solving or issue resolution meeting. Issues that are raised are taken offline and usually dealt with by the relevant subgroup immediately after the meeting.
(This is not an endorsement of the product mentioned in the video)
Can explain XP
The following description was adapted from the XP home page, emphasis added:
Extreme Programming (XP) stresses customer satisfaction. Instead of delivering everything you could possibly want on some date far in the future, this process delivers the software you need as you need it.
XP aims to empower developers to confidently respond to changing customer requirements, even late in the life cycle.
XP emphasizes teamwork. Managers, customers, and developers are all equal partners in a collaborative team. XP implements a simple, yet effective environment enabling teams to become highly productive. The team self-organizes around the problem to solve it as efficiently as possible.
XP aims to improve a software project in five essential ways: communication, simplicity, feedback, respect, and courage. Extreme Programmers constantly communicate with their customers and fellow programmers. They keep their design simple and clean. They get feedback by testing their software starting on day one. Every small success deepens their respect for the unique contributions of each and every team member. With this foundation, Extreme Programmers are able to courageously respond to changing requirements and technology.
XP has a set of simple rules. XP is a lot like a jig saw puzzle with many small pieces. Individually the pieces make no sense, but when combined together a complete picture can be seen. This flow chart shows how Extreme Programming's rules work together.
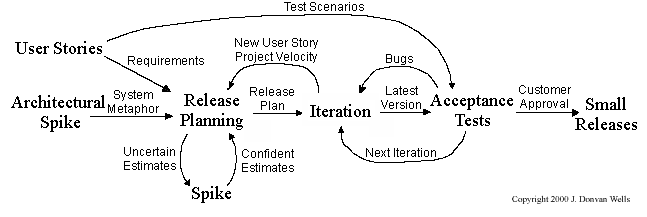
Pair programming, CRC cards, project velocity, and standup meetings are some interesting topics related to XP. Refer to extremeprogramming.org to find out more about XP.
Can explain the Unified Process
The unified process is developed by the Three Amigos - Ivar Jacobson, Grady Booch and James Rumbaugh (the creators of UML).
The unified process consists of four phases: inception, elaboration, construction and transition. The main purpose of each phase can be summarized as follows:
| Phase | Activities | Typical Artifacts |
|---|---|---|
| Inception |
|
|
| Elaboration |
|
|
| Construction |
|
|
| Transition |
|
|
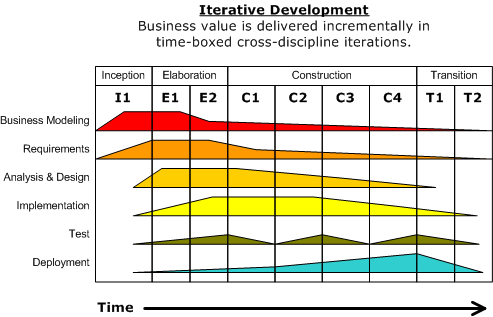
Given above is a visualization of a project done using the Unified process (source: Wikipedia). As the diagram shows, a phase can consist of several iterations. Each vertical column (labeled “I1” “E1”, “E2”, “C1”, etc.) represents a single iteration. Each of the iterations consists of a set of ‘workflows’ such as ‘Business modeling’, ‘Requirements’, ‘Analysis & Design’ etc. The shaded region indicates the amount of resource and effort spent on a particular workflow in a particular iteration.
Unified process is a flexible and customizable process model framework rather than a single fixed process. For example, the number of iterations in each phase, definition of workflows, and the intensity of a given workflow in a given iteration can be adjusted according to the nature of the project. Take the Construction Phase, to develop a simple system, one or two iterations would be sufficient. For a more complicated system, multiple iterations will be more helpful. Therefore, the diagram above simply records a particular application of the UP rather than prescribe how the UP is to be applied. However, this record can be refined and reused for similar future projects.
Choose the correct statements about the unified process.
- a. It was conceived by the three amigos who also created UML.
- b. The Unified process requires the use of UML.
- c. The Unified process is actually a process framework rather than a fixed process.
- d. The Unified process can be iterative and incremental
(a)(b)(c)(d)
Explanation: Although UP was created by the same three amigos who created UML, the UP does not require UML.
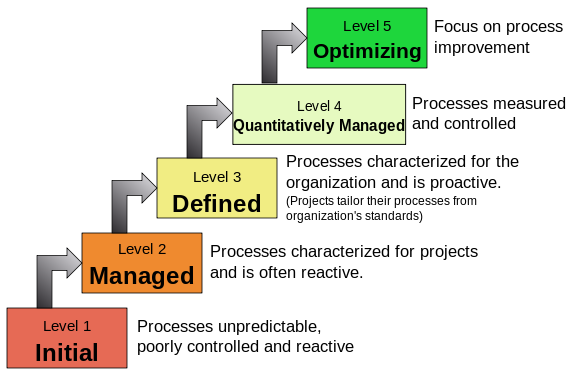
Can explain CMMI
CMMI (Capability Maturity Model Integration) is a process improvement approach defined by Software Engineering Institute at Carnegie Melon University. CMMI provides organizations with the essential elements of effective processes, which will improve their performance. -- adapted from http://www.sei.cmu.edu/cmmi/
CMMI defines five maturity levels for a process and provides criteria to determine if the process of an organization is at a certain maturity level. The diagram below [taken from Wikipedia] gives an overview of the five levels.
Can explain process models at a higher level
This section has some exercise that cover multiple topics related to SDLC process models.
Discuss how sequential approach and the iterative approach can affect the following aspects of a project.
a) Quality of the final product.
b) Risk of overshooting the deadline.
c) Total project cost.
d) Customer satisfaction.
e) Monitoring the project progress.
f) Suitability for a school project
a) Quality of the final product:
- Iterative: Frequent reworking can deteriorate the design. Frequent refactoring should be used to prevent this. Frequent customer feedback can help to improve the quality (i.e. quality as seen by the customer).
- Sequential: Final quality depends on the quality of each phase. Any quality problem in any phase could result in a low quality product.
b) Risk of overshooting the deadline.
- Iterative: Less risk. If the last iteration got delayed, we can always deliver the previous version. However, this does not guarantee that all features promised at the beginning will be delivered on the deadline.
- Sequential: High risk. Any delay in any phase can result in overshooting the deadline with nothing to deliver.
c) Total project cost.
- Iterative: We can always stop before the project budget is exceeded. However, this does not guarantee that all features promised at the beginning will be delivered under the estimated cost. (The sequential model requires us to carry on even if the budget is exceeded because there is no intermediate version to fall back on).
Iterative reworking of existing artifacts could add to the cost. However, this is “cheaper” than finding at the end that we built the wrong product.
d) Customer satisfaction
- Iterative: Customer gets many opportunities to guide the product in the direction he wants. Customer gets to change requirements even in the middle of the product. Both these can increase the probability of customer satisfaction.
- Sequential: Customer satisfaction is guaranteed only if the product was delivered as promised and if the initial requirements proved to be accurate. However, the customer is not required to do the extra work of giving frequent feedback during the project.
e) Monitoring project progress
- Iterative: Hard to measure progress against a plan, as the plan itself keeps changing.
- Sequential: Easier to measure progress against the plan, although this does not ensure eventual success.
f) Suitability for a school project:
Reasons to use iterative:
- Requirements are not fixed.
- Overshooting the deadline is not an option.
- Gives a chance to learn lessons from one iteration and apply them in the next.
Sequential:
- Can save time because we minimize rework.
Find out more about the following three topics and give at least three arguments for and three arguments against each.
(a) Agile processes
(b) Pair programming
(c) Test-driven development
(a) Arguments in favor of agile processes:
- More focus on customer satisfaction.
- Less chance of building the wrong product (because of frequent customer feedback).
- Less resource wasted on bureaucracy, over-documenting, contract negotiations.
Arguments against agile processes (not necessarily true):
- It is ‘just hacking’. Not very systematic. No discipline.
- It is hard to know in advance the exact final product.
- It does not give enough attention to documentation.
- Lack of management control (gives too much freedom to developers)
(b) Arguments in favor of pair programming:
- It could produce better quality code.
- It is good to have more than one person know about any piece of code.
- It is a way to learn from each other.
- It can be used to train new programmers.
- Better discipline and better time management (e.g. less likely to play Farmville while working).
- Better morale due to more interactions with co-workers.
Arguments against pair programming:
- Increase in total man hours required
- Personality clashes between pair-members
- Workspaces need to be adapted to suit two developers working at one computer.
- If pairs are rotated, one needs to know more parts of the system than in solo programming
(c) Arguments in favor of TDD:
- Testing will not be neglected due to time pressure (because it is done first).
- Forces the developer to think about what the component should be before jumping into implementing it.
- Optimizes programmer effort (i.e. if all tests pass, there is no need to add any more functionality).
- Forces us to automate all tests.
Arguments against TDD (not necessarily true):
- Since tests can be seen as ‘executable specifications’, programmers tend to neglect others forms of documentation.
- Promotes ‘trial-and-error’ coding instead of making programmers think through their algorithms (i.e. ‘just keep hacking until all tests pass’).
- Gives a false sense of security. (what if you forgot to test certain scenarios?)
Not intuitive. Some programmer might resist adopting TDD.
The sequential model and the waterfall model are the two most basic process models.
False
Explanation: The sequential model and the waterfall model are the same thing. The second basic model is the iterative model.
Choose the correct statements about the sequential and iterative process models.
- a. The sequential model organizes the project based on activities.
- b. The iterative and incremental model organizes the project based on functionality.
- c. The iterative model can be breadth-first or depth-first.
- d. The iterative model is always better than the sequential model.
- e. Compared to the sequential model, the iterative model is better at adapting to changing requirements.
(a)(b)(c)(d)(e)
Explanation: Both models have pros and cons. There is no definitive ‘better’ choice between the two. However, the iterative model works better in typical software projects than a purely sequential approach.
In general, which has a higher risk of overshooting a deadline?
(b)
Explanation: An iterative process can meet a deadline better than a sequential process. If the last iteration got delayed, we can always deliver the previous version. However, this does not guarantee that all features promised at the beginning will be delivered on the deadline.
[W11.2] Reuse: Frameworks, Libraries, Platforms
Reuse
Can explain software reuse
Reuse is a major theme in software engineering practices. By reusing tried-and-tested components, the robustness of a new software system can be enhanced while reducing the manpower and time requirement. Reusable components come in many forms; it can be reusing a piece of code, a subsystem, or a whole software.
Can explain the costs and benefits of reuse
While you may be tempted to use many libraries/frameworks/platform that seem to crop up on a regular basis and promise to bring great benefits, note that there are costs associated with reuse. Here are some:
- The reused code may be an overkill (think using a sledgehammer to crack a nut) increasing the size of, or/and degrading the performance of, your software.
- The reused software may not be mature/stable enough to be used in an important product. That means the software can change drastically and rapidly, possibly in ways that break your software.
- Non-mature software has the risk of dying off as fast as they emerged, leaving you with a dependency that is no longer maintained.
- The license of the reused software (or its dependencies) restrict how you can use/develop your software.
- The reused software might have bugs, missing features, or security vulnerabilities that are important to your product but not so important to the maintainers of that software, which means those flaws will not get fixed as fast as you need them to.
- Malicious code can sneak into your product via compromised dependencies.
One of your teammates is proposing to use a recently-released “cool” UI framework for your class project. List the pros and cons of this idea.
Pros
- The potential to create a much better product by reusing the framework.
- Learning a new framework is good for the future job prospects.
Cons
- Learning curve may be steep.
- May not be stable (it was recently released).
- May not allow us to do exactly what we want. While frameworks allow customization, such customization can be limited.
- Performance penalties.
- Might interfere with learning objectives of the module.
Note that having more cons does not mean we should not use this framework. Further investigation is required before we can make a final decision.
Libraries
Can explain libraries
A library is a collection of modular code that is general and can be used by other programs.
Java classes you get with the JDK (such as String, ArrayList, HashMap, etc.) are library classes that are provided in the default Java distribution.
Natty is a Java library that can be used for parsing strings that represent dates e.g. The 31st of April in the year 2008
built-in modules you get with Python (such as csv, random, sys, etc.) are libraries that are provided in the default Python distribution. Classes such as list, str, dict are built-in library classes that you get with Python.
Colorama is a Python library that can be used for colorizing text in a CLI.
Can make use of a library
These are the typical steps required to use a library.
- Read the documentation to confirm that its functionality fits your needs
- Check the license to confirm that it allows reuse in the way you plan to reuse it. For example, some libraries might allow non-commercial use only.
- Download the library and make it accessible to your project. Alternatively, you can configure your
dependency management tool to do it for you. - Call the library API from your code where you need to use the library functionality.
Frameworks
Can explain frameworks
The overall structure and execution flow of a specific category of software systems can be very similar. The similarity is an opportunity to reuse at a high scale.
Running example:
IDEs for different programming languages are similar in how they support editing code, organizing project files, debugging, etc.
A software framework is a reusable implementation of a software (or part thereof) providing generic functionality that can be selectively customized to produce a specific application.
Running example:
Eclipse is an IDE framework that can be used to create IDEs for different programming languages.
Some frameworks provide a complete implementation of a default behavior which makes them immediately usable.
Running example:
Eclipse is a fully functional Java IDE out-of-the-box.
A framework facilitates the adaptation and customization of some desired functionality.
Running example:
Eclipse plugin system can be used to create an IDE for different programming languages while reusing most of the existing IDE features of Eclipse. E.g. https://marketplace.eclipse.org/content/pydev-python-ide-eclipse
Some frameworks cover only a specific components or an aspect.
JavaFx a framework for creating Java GUIs. TkInter is a GUI framework for Python.
More examples of frameworks
- Frameworks for Web-based applications: Drupal(PHP), Django(Python), Ruby on Rails (Ruby), Spring (Java)
- Frameworks for testing: JUnit (Java), unittest (Python), Jest (Java Script)
Can differentiate between frameworks and libraries
Although both frameworks and libraries are reuse mechanisms, there are notable differences:
-
Libraries are meant to be used ‘as is’ while frameworks are meant to be customized/extended. e.g., writing plugins for Eclipse so that it can be used as an IDE for different languages (C++, PHP, etc.), adding modules and themes to Drupal, and adding test cases to JUnit.
-
Your code calls the library code while the framework code calls your code. Frameworks use a technique called inversion of control, aka the “Hollywood principle” (i.e. don’t call us, we’ll call you!). That is, you write code that will be called by the framework, e.g. writing test methods that will be called by the JUnit framework. In the case of libraries, your code calls libraries.
Choose correct statements about software frameworks.
- a. They follow the hollywood principle, otherwise known as ‘inversion of control’
- b. They come with full or partial implementation.
- c. They are more concrete than patterns or principles.
- d. They are often configurable.
- e. They are reuse mechanisms.
- f. They are similar to reusable libraries but bigger.
(a)(b)(c)(d)(e)(f)
Explanation: While both libraries and frameworks are reuse mechanisms, and both more concrete than principles and patterns, libraries differ from frameworks in some key ways. One of them is the ‘inversion of control’ used by frameworks but not libraries. Furthermore, frameworks do not have to be bigger than libraries all the time.
Which one of these are frameworks ?
(a)(b)(c)(d)
Explanation: These are frameworks.
Platforms
Can explain platforms
A platform provides a runtime environment for applications. A platform is often bundled with various libraries, tools, frameworks, and technologies in addition to a runtime environment but the defining characteristic of a software platform is the presence of a runtime environment.
Technically, an operating system can be called a platform. For example, Windows PC is a platform for desktop applications while iOS is a platform for mobile apps.
Two well-known examples of platforms are JavaEE and .NET, both of which sit above Operating systems layer, and are used to develop
- JavaEE (Java Enterprise Edition) is both a framework and a platform for writing enterprise applications. The runtime used by the JavaEE applications is the JVM (Java Virtual Machine) that can run on different Operating Systems.
- .NET is a similar platform and a framework. Its runtime is called CLR (Common Language Runtime) and usually used on Windows machines.
Enterprise Application: ‘enterprise applications’ means software applications used at organizations level and therefore has to meet much higher demands (such as in scalability, security, performance, and robustness) than software meant for individual use.
[W11.3] Tips & tricks for demo
Covered by the 'Demo' component of v1.4:
Project Milestone: v1.3
Release as a jar file, release updated user guide, finalize and release developer guide (DG), peer-test released products, verify code authorship.
v1.3 Summary of Milestone
| Milestone | Minimum acceptable performance to consider as 'reached' |
|---|---|
| Contributed code to v1.3 | code merged |
| Code is RepoSense-compatible | as stated in mid-v1.3 |
| v1.3 jar file released on GitHub | as stated |
| v1.3 milestone properly wrapped up on GitHub | as stated |
| Documentation updated to match v1.3 | at least the User Guide and the README.adoc is updated |
v1.3 Project Management
Ensure your code is RepoSense-compatible,
Using RepoSense
In previous semesters we asked students to annotate all their code using special @@author tags so that we can extract each student's code for grading. This semester, we are trying out a tool called RepoSense that is expected to reduce the need for such tagging, and also make it easier for you to see (and learn from) code written by others.
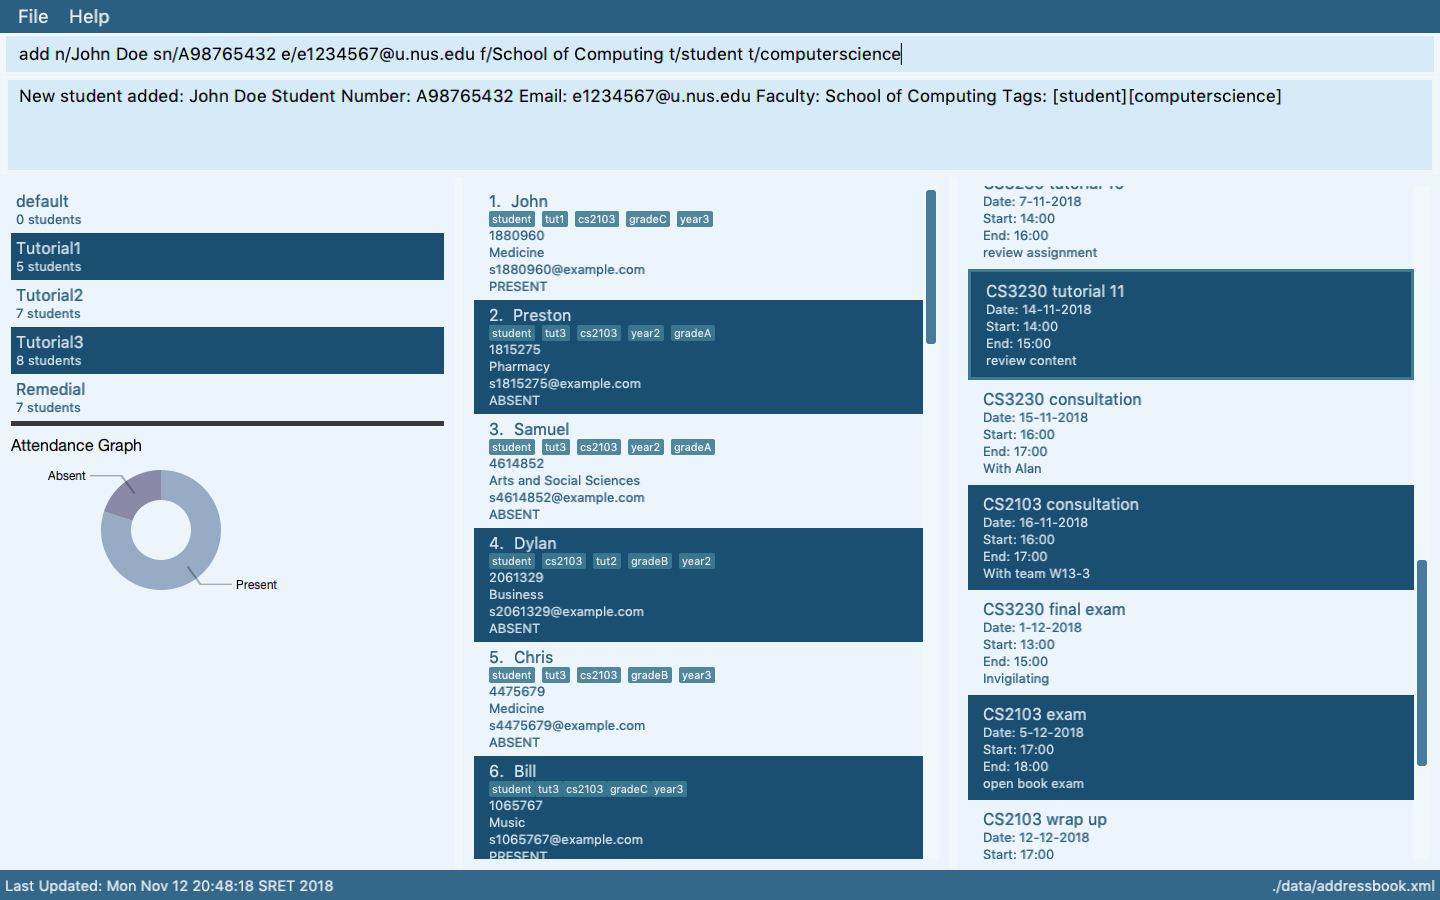
1. View the current status of code authorship data:
- The report generated by the tool is available at Project Code Dashboard. The feature that is most relevant to you is the Code Panel (shown on the right side of the screenshot above). It shows the code attributed to a given author. You are welcome to play around with the other features (they are still under development and will not be used for grading this semester).
- Click on your name to load the code attributed to you (based on Git blame/log data) onto the code panel on the right.
- If the code shown roughly matches the code you wrote, all is fine and there is nothing for you to do.
2. If the code does not match:
-
Here are the possible reasons for the code shown not to match the code you wrote:
- the git username in some of your commits does not match your GitHub username (perhaps you missed our instructions to set your Git username to match GitHub username earlier in the project, or GitHub did not honor your Git username for some reason)
- the actual authorship does not match the authorship determined by git blame/log e.g., another student touched your code after you wrote it, and Git log attributed the code to that student instead
-
In those cases,
- Install RepoSense (see the Getting Started section of the RepoSense User Guide)
- Use the two methods described in the RepoSense User Guide section Configuring a Repo to Provide Additional Data to RepoSense to provide additional data to the authorship analysis to make it more accurate.
- If you add a
config.jsonfile to your repo (as specified by one of the two methods),- Please use the template json file given in the module website so that your display name matches the name we expect it to be.
- If your commits have multiple author names, specify all of them e.g.,
"authorNames": ["theMyth", "theLegend", "theGary"] - Update the line
config.jsonin the.gitignorefile of your repo as/config.jsonso that it ignores theconfig.jsonproduced by the app but not the_reposense/config.json.
- If you add
@@authorannotations, please follow the guidelines below:
Adding @@author tags indicate authorship
-
Mark your code with a
//@@author {yourGithubUsername}. Note the double@.
The//@@authortag should indicates the beginning of the code you wrote. The code up to the next//@@authortag or the end of the file (whichever comes first) will be considered as was written by that author. Here is a sample code file://@@author johndoe method 1 ... method 2 ... //@@author sarahkhoo method 3 ... //@@author johndoe method 4 ... -
If you don't know who wrote the code segment below yours, you may put an empty
//@@author(i.e. no GitHub username) to indicate the end of the code segment you wrote. The author of code below yours can add the GitHub username to the empty tag later. Here is a sample code with an emptyauthortag:method 0 ... //@@author johndoe method 1 ... method 2 ... //@@author method 3 ... method 4 ... -
The author tag syntax varies based on file type e.g. for java, css, fxml. Use the corresponding comment syntax for non-Java files.
Here is an example code from an xml/fxml file.<!-- @@author sereneWong --> <textbox> <label>...</label> <input>...</input> </textbox> ... -
Do not put the
//@@authorinside java header comments.
👎/** * Returns true if ... * @@author johndoe */👍
//@@author johndoe
/**
  * Returns true if ...
  */
What to and what not to annotate
-
Annotate both functional and test code There is no need to annotate documentation files.
-
Annotate only significant size code blocks that can be reviewed on its own e.g., a class, a sequence of methods, a method.
Claiming credit for code blocks smaller than a method is discouraged but allowed. If you do, do it sparingly and only claim meaningful blocks of code such as a block of statements, a loop, or an if-else statement.- If an enhancement required you to do tiny changes in many places, there is no need to annotate all those tiny changes; you can describe those changes in the Project Portfolio page instead.
- If a code block was touched by more than one person, either let the person who wrote most of it (e.g. more than 80%) take credit for the entire block, or leave it as 'unclaimed' (i.e., no author tags).
- Related to the above point, if you claim a code block as your own, more than 80% of the code in that block should have been written by yourself. For example, no more than 20% of it can be code you reused from somewhere.
- 💡 GitHub has a blame feature and a history feature that can help you determine who wrote a piece of code.
-
Do not try to boost the quantity of your contribution using unethical means such as duplicating the same code in multiple places. In particular, do not copy-paste test cases to create redundant tests. Even repetitive code blocks within test methods should be extracted out as utility methods to reduce code duplication. Individual members are responsible for making sure code attributed to them are correct. If you notice a team member claiming credit for code that he/she did not write or use other questionable tactics, you can email us (after the final submission) to let us know.
-
If you wrote a significant amount of code that was not used in the final product,
- Create a folder called
{project root}/unused - Move unused files (or copies of files containing unused code) to that folder
- use
//@@author {yourGithubUsername}-unusedto mark unused code in those files (note the suffixunused) e.g.
//@@author johndoe-unused
method 1 ...
method 2 ...
Please put a comment in the code to explain why it was not used.
- Create a folder called
-
If you reused code from elsewhere, mark such code as
//@@author {yourGithubUsername}-reused(note the suffixreused) e.g.//@@author johndoe-reused method 1 ... method 2 ... -
You can use empty
@@authortags to mark code as not yours when RepoSense attribute the to you incorrectly.-
Code generated by the IDE/framework, should not be annotated as your own.
-
Code you modified in minor ways e.g. adding a parameter. These should not be claimed as yours but you can mention these additional contributions in the Project Portfolio page if you want to claim credit for them.
-
- After you are satisfied with the new results (i.e., results produced by running RepoSense locally), push the
config.jsonfile you added and/or the annotated code to your repo. We'll use that information the next time we run RepoSense (we run it at least once a week). - If you choose to annotate code, please annotate code chunks not smaller than a method. We do not grade code snippets smaller than a method.
- If you encounter any problem when doing the above or if you have questions, please post in the forum.
We recommend you ensure your code is RepoSense-compatible by v1.3
v1.3 Product
-
As before, move the product towards v2.0.
-
Do a
proper product release as described in the Developer Guide. Do some manual tests to ensure the jar file works.
v1.3 Documentation
v1.3 user guide should be updated to match the current version of the product. Reason: v1.3 will be subjected to a trial acceptance testing session
- README page: Update to look like a real product (rather than a project for learning SE) if you haven't done so already. In particular, update the
Ui.pngto match the current product (💡 tips ).
💡 Some common sense tips for a good product screenshot
Ui.png represents your product in its full glory.
- Before taking the screenshot, populate the product with data that makes the product look good. For example, if the product is supposed to show photos, use real photos instead of dummy placeholders.
- It should show a state in which the product is well-populated i.e., don't leave data panels largely blank
- Choose a state that showcase the main features of the product i.e., the login screen is not usually a good choice
- Avoid annotations (arrows, callouts, explanatory text etc.); it should look like the product is being in use for real.
-
User Guide: This document will be used by acceptance testers. Update to match the current version. In particular,
- Clearly indicate which features are not implemented yet e.g. tag those features with a
Coming in v2.0. - For those features already implemented, ensure their descriptions match the exact behavior of the product e.g. replace mockups with actual screenshots
- Clearly indicate which features are not implemented yet e.g. tag those features with a
-
Developer Guide: Update your DG. Tutors will provide feedback on this version. This feedback should be used to improve your final submission.
-
AboutUs page: Update to reflect current state of roles and responsibilities.
Submission: Must be included in the version tagged v1.3.
v1.3 Demo
- Do a quick demo of the main features using the jar file. Objective: demonstrate that the jar file works.
v1.3 Code quality
You will get feedback on your code quality in v1.3. Ensure that you fix the issues pointed out for your final submission.
v1.3 Testing (aka Practical Exam Dry Run)
See info in the panel below:
Relevant: [
What: The v1.3 is subjected to a round of peer acceptance/system testing, also called the Practical Exam Dry Run as this round of testing will be similar to the graded
When, where: week 11 at lecture
Objectives:
- The primary objective of the PE is to increase the rigor of project assessment. Assessing most aspects of the project involves an element subjectivity. As the project counts for 50% of the final grade, it is not prudent to rely on evaluations of tutors alone as there can be significant variations between how different tutors assess projects. That is why we collect more data points via the PE so as to minimize the chance of your project being affected by evaluator-bias.
- Note that none of the significant project grade components are calculated solely based on peer ratings. Rather, PE data are mostly used to cross-validate tutor assessments and identify cases that need further investigation. When peer inputs are used for grading, usually they are combined with tutor evaluations with appropriate weight for each. In some cases ratings from team members are given a higher weight compared to ratings from other teams, if that is appropriate.
- As a bonus, PE also gives us an opportunity to evaluate your manual testing skills, product evaluation skills, effort estimation skills etc.
- Note that the PE is not a means of pitting you against each other. Developers and testers play for the same side; they need to push each other to improve the quality of their work -- not bring down each other.
When, where: Week 13 lecture
Grading:
- Your performance in the practical exam will affect your final grade and your peers, as explained in Admin: Project Assessment section.
- As your submissions can affect the grades of peers, note that we have put in measures to identify insincere/random evaluations and penalize accordingly.
Preparation:
-
Ensure that you can access the relevant issue tracker given below:
-- for PE Dry Run (at v1.3): nus-cs2103-AY1819S2/pe-dry-run
-- for PE (at v1.4): nus-cs2103-AY1819S2/pe (will open only near the actual PE)- These are private repos!. If you cannot access the relevant repo, you may not have accepted the invitation to join the GitHub org used by the module. Go to https://github.com/orgs/nus-cs2103-AY1819S2/invitation to accept the invitation.
- If you cannot find the invitation, post in our forum.
-
Ensure you have access to a computer that is able to run module projects e.g. has the right Java version.
-
Have a good screen grab tool with annotation features so that you can quickly take a screenshot of a bug, annotate it, and post in the issue tracker.
- 💡 You can use Ctrl+V to paste a picture from the clipboard into a text box in GitHub issue tracker.
-
Charge your computer before coming to the PE session. The testing venue may not have enough charging points.
During:
- Take note of your team to test. It will be given to you by the teaching team (distributed via LumiNUS gradebook).
- Download from LumiNUS all files submitted by the team (i.e. jar file, User Guide, Developer Guide, and Project Portfolio Pages) into an empty folder.
- [60 minutes] Test the product and report bugs as described below:
Testing instructions for PE and PE Dry Run
-
What to test:
- PE Dry Run (at v1.3):
- Test the product based on the User Guide (the UG is most likely accessible using the
helpcommand). - Do system testing first i.e., does the product work as specified by the documentation?. If there is time left, you can do acceptance testing as well i.e., does the product solve the problem it claims to solve?.
- Test the product based on the User Guide (the UG is most likely accessible using the
- PE (at v1.4):
- Test based on the Developer Guide (Appendix named Instructions for Manual Testing) and the User Guide. The testing instructions in the Developer Guide can provide you some guidance but if you follow those instructions strictly, you are unlikely to find many bugs. You can deviate from the instructions to probe areas that are more likely to have bugs.
- As before, do both system testing and acceptance testing but give priority to system testing as system testing bugs can earn you more credit.
- PE Dry Run (at v1.3):
-
These are considered bugs:
- Behavior differs from the User Guide
- A legitimate user behavior is not handled e.g. incorrect commands, extra parameters
- Behavior is not specified and differs from normal expectations e.g. error message does not match the error
- The feature does not solve the stated problem of the intended user i.e., the feature is 'incomplete'
- Problems in the User Guide e.g., missing/incorrect info
-
Where to report bugs: Post bug in the following issue trackers (not in the team's repo):
- PE Dry Run (at v1.3): nus-cs2103-AY1819S2/pe-dry-run.
- PE (at v1.4): nus-cs2103-AY1819S2/pe.
-
Bug report format:
- Post bugs as you find them (i.e., do not wait to post all bugs at the end) because the issue tracker will close exactly at the end of the allocated time.
- Do not use team ID in bug reports. Reason: to prevent others copying your bug reports
- Write good quality bug reports; poor quality or incorrect bug reports will not earn credit.
- Use a descriptive title.
- Give a good description of the bug with steps to reproduce and screenshots.
- Assign a severity to the bug report. Bug report without a priority label are considered
severity.Low(lower severity bugs earn lower credit): - Each bug should be a separate issue. The issue will be initialized with one of the following templates:
Bug report
Describe the bug A clear and concise description of what the bug is.
To Reproduce Steps to reproduce the behavior:
- Go to '...'
- Click on '....'
- Scroll down to '....'
- See error
Expected behavior A clear and concise description of what you expected to happen.
Screenshots If applicable, add screenshots to help explain your problem.
Additional context Add any other context about the problem here.
Suggestions for improving the product
Please describe the problem A clear and concise description of what the problem is. Eg. I have to scroll three times to find [...]
Describe the improvement you'd like to suggest A clear and concise description of what you want to happen. Eg., Better to sort based on [...] for quick access
Additional context Add any other context or screenshots about the feature request here.
Bug Severity labels:
severity.Low: A flaw that is unlikely to affect normal operations of the product. Appears only in very rare situations and causes a minor inconvenience only.severity.Medium: A flaw that causes occasional inconvenience to some users but they can continue to use the product.severity.High: A flaw that affects most users and causes major problems for users. i.e., makes the product almost unusable for most users.
-
About posting suggestions:
- PE Dry Run (at v1.3): You can also post suggestions on how to improve the product. 💡 Be diplomatic when reporting bugs or suggesting improvements. For example, instead of criticising the current behavior, simply suggest alternatives to consider.
- PE (at v1.4): Do not post suggestions. But if a feature is missing a critical functionality that makes the feature less useful to the intended user, it can be reported as a bug.
-
If the product doesn't work at all: If the product fails catastrophically e.g., cannot even launch, you can test the fallback team allocated to you. But in this case you must inform us immediately after the session so that we can send your bug reports to the correct team.
- [Remainder of the session] Evaluate the following aspects. Note down your evaluation in a hard copy (as a backup). Submit via TEAMMATES. You are recommended to complete this during the PE session but you have until the end of the day to submit (or revise) your submissions.
- A. Product Design []:
Evaluate the product design based on how the product V2.0 (not V1.4) is described in the User Guide.
-
unable to judge: You are unable to judge this aspect for some reason e.g., UG is not available or does not have enough information. -
Target user:
-
target user specified and appropriate: The target user is clearly specified, prefers typing over other modes of input, and not too general (should be narrowed to a specific user group with certain characteristics). -
value specified and matching: The value offered by the product is clearly specified and matches the target user.
-
-
Value to the target user:
-
value: low: The value to target user is low. App is not worth using. -
value: medium: Some small group of target users might find the app worth using. -
value: high: Most of the target users are likely to find the app worth using.
-
-
Feature-fit:
-
feature-fit: low: Features don't seem to fit together. -
feature-fit: medium: Some features fit together but some don't. -
feature-fit: high: All features fit together.
-
-
polished: The product looks well-designed.
- B. Quality of user docs []:
Evaluate the quality of user documentation based on the parts of the user guide written by the person, as reproduced in the project portfolio. Evaluate from an end-user perspective.
-
UG/ unable to judge: Less than 1 page worth of UG content written by the student or cannot find PPP -
UG/ good use of visuals: Uses visuals e.g., screenshots. -
UG/ good use of examples: Uses examples e.g., sample inputs/outputs. -
UG/ just enough information: Not too much information. All important information is given. -
UG/ easy to understand: The information is easy to understand for the target audience. -
UG/ polished: The document looks neat, well-formatted, and professional.
- C. Quality of developer docs []:
Evaluate the quality of developer documentation based on the developer docs cited/reproduced in the respective project portfolio page. Evaluate from the perspective of a new developer trying to understand how the features are implemented.
-
DG/ unable to judge: Less than 0.5 pages worth of content OR other problems in the document e.g. looks like included wrong content. -
DG/ too little: 0.5 - 1 page of documentation - Diagrams:
-
DG/ types of UML diagrams: 1: Only one type of diagram used (types: Class Diagrams, Object Diagrams, Sequence Diagrams, Activity Diagrams, Use Case Diagrams) -
DG/ types of UML diagrams: 2: Two types of diagrams used -
DG/ types of UML diagrams: 3+: Three or more types of diagrams used -
DG/ UML diagrams suitable: The diagrams used for the right purpose -
DG/ UML notation correct: No more than one minor error in the UML notation -
DG/ diagrams not repetitive: No evidence of repeating the same diagram with minor differences -
DG/ diagrams not too complicated: Diagrams don't cram too much information into them -
DG/ diagrams integrates with text: Diagrams are well integrated into the textual explanations
-
-
DG/ easy to understand: The document is easy to understand/follow -
DG/ just enough information: Not too much information. All important information is given. -
DG/ polished: The document looks neat, well-formatted, and professional.
- D. Feature Quality []:
Evaluate the biggest feature done by the student for difficulty, completeness, and testability. Note: examples given below assume that AB4 did not have the commands edit, undo, and redo.
- Difficulty
-
Feature/ difficulty: unable to judge: You are unable to judge this aspect for some reason. -
Feature/ difficulty: low: e.g. make the existing find command case insensitive. -
Feature/ difficulty: medium: e.g. an edit command that requires the user to type all fields, even the ones that are not being edited. -
Feature/ difficulty: high: e.g., undo/redo command
-
- Completeness
-
Feature/ completeness: unable to judge: You are unable to judge this aspect for some reason. -
Feature/ completeness: low: A partial implementation of the feature. Barely useful. -
Feature/ completeness: medium: The feature has enough functionality to be useful for some of the users. -
Feature/ completeness: high: The feature has all functionality to be useful to almost all users.
-
- Other
-
Feature/ not hard to test: The feature was not too hard to test manually. -
Feature/ polished: The feature looks polished (as if done by a professional programmer).
-
- E. Amount of work []:
Evaluate the amount of work, on a scale of 0 to 30.
- Consider this PR (
historycommand) as 5 units of effort which means this PR (undo/redocommand) is about 15 points of effort. Given that 30 points matches an effort twice as that needed for theundo/redofeature (which was given as an example of anAgrade project), we expect most students to be have efforts lower than 20. - Count all implementation/testing/documentation work as mentioned in that person's PPP. Also look at the actual code written by the person.
- Do not give a high value just to be nice. You will be asked to provide a brief justification for your effort estimates.
Processing PE Bug Reports:
There will be a review period for you to respond to the bug reports you received.
Duration: The review period will start around 1 day after the PE (exact time to be announced) and will last until the following Monday midnight. However, you are recommended to finish this task ASAP, to minimize cutting into your exam preparation work.
Bug reviewing is recommended to be done as a team as some of the decisions need team consensus.
Instructions for Reviewing Bug Reports
-
First, don't freak out if there are lot of bug reports. Many can be duplicates and some can be false positives. In any case, we anticipate that all of these products will have some bugs and our penalty for bugs is not harsh. Furthermore, it depends on the severity of the bug. Some bug may not even be penalized.
-
Do not edit the subject or the description. Your response (if any) should be added as a comment.
-
You may (but not required to) close the bug report after you are done processing it, as a convenient means of separating the 'processed' issues from 'not yet processed' issues.
-
If the bug is reported multiple times, mark all copies EXCEPT one as duplicates using the
duplicatetag (if the duplicates have different severity levels, you should keep the one with the highest severity). In addition, use this technique to indicate which issue they are duplicates of. Duplicates can be omitted from processing steps given below. -
If a bug seems to be for a different product (i.e. wrongly assigned to your team), let us know (email prof).
-
Decide if it is a real bug and apply ONLY one of these labels.
Response Labels:
response.Accepted: You accept it as a bug.response.NotInScope: It is a valid issue but not something the team should be penalized for e.g., it was not related to features delivered in v1.4.response.Rejected: What tester treated as a bug is in fact the expected behavior. You can reject bugs that you inherited from AB4.response.CannotReproduce: You are unable to reproduce the behavior reported in the bug after multiple tries.response.IssueUnclear: The issue description is not clear. Don't post comments asked the tester to give more info. The tester will not be able to see those comments because the bug reports are anonymized.
- If applicable, decide the type of bug. Bugs without
type.*are consideredtype.FunctionalityBugby default (which are liable to a heavier penalty).
Bug Type Labels:
type.FeatureFlaw: some functionality missing from a feature delivered in v1.4 in a way that the feature becomes less useful to the intended target user for normal usage. i.e., the feature is not 'complete'. In other words, an acceptance testing bug that falls within the scope of v1.4 features. These issues are counted against the 'depth and completeness' of the feature.type.FunctionalityBug: the bug is a flaw in how the product works.type.DocTypo: A minor spelling/grammar error in the documentation. Does not affect the user.type.DocumentationBug: A flaw in the documentation that can potentially affect the user e.g., a missing step, a wrong instruction
- If you disagree with the original severity assigned to the bug, you may change it to the correct level.
For all cases of downgrading severity or non-acceptance of a bug, you must add a comment justifying your stance. All such cases will be double-checked by the teaching team and indiscriminate downgrading/non-acceptance of bugs without a good justification, if deemed as a case of trying to game the system, may be penalized as it is unfair to the tester.
Bug Severity labels:
severity.Low: A flaw that is unlikely to affect normal operations of the product. Appears only in very rare situations and causes a minor inconvenience only.severity.Medium: A flaw that causes occasional inconvenience to some users but they can continue to use the product.severity.High: A flaw that affects most users and causes major problems for users. i.e., makes the product almost unusable for most users.
-
Decide who should fix the bug. Use the
Assigneesfield to assign the issue to that person(s). There is no need to actually fix the bug though. It's simply an indication/acceptance of responsibility. If there is no assignee, we will distribute the penalty for that bug (if any) among all team members. -
We recommend (but not enforce) that the feature owner should be assigned bugs related to the feature, even if the bug was caused indirectly by someone else. Reason: The feature owner should have defended the feature against bugs using automated tests and defensive coding techniques.
-
Add an explanatory comment explaining your choice of labels and assignees.
-
We recommend choosing
type.*,severity.*and assignee even for bugs you are not accepting. Reason: your non-acceptance may be rejected by the tutor later, in which case we need to grade it as an accepted bug.
Grading: Taking part in the PE dry run is strongly encouraged as it can affect your grade in the following ways.
- If the product you are allocated to test in the Practical Exam (at v1.4) had a very low bug count, we will consider your performance in PE dry run as well when grading the PE.
- PE dry run will help you practice for the actual PE.
- Taking part in the PE dry run will earn you participation points.
- There is no penalty for bugs reported in your product. Every bug you find is a win-win for you and the team whose product you are testing.
Objectives:
- To train you to do manual testing, bug reporting, bug
triaging, bug fixing, communicating with users/testers/developers, evaluating products etc. - To help you improve your product before the final submission.
Preparation:
-
Ensure that you can access the relevant issue tracker given below:
-- for PE Dry Run (at v1.3): nus-cs2103-AY1819S2/pe-dry-run
-- for PE (at v1.4): nus-cs2103-AY1819S2/pe (will open only near the actual PE)- These are private repos!. If you cannot access the relevant repo, you may not have accepted the invitation to join the GitHub org used by the module. Go to https://github.com/orgs/nus-cs2103-AY1819S2/invitation to accept the invitation.
- If you cannot find the invitation, post in our forum.
-
Ensure you have access to a computer that is able to run module projects e.g. has the right Java version.
-
Have a good screen grab tool with annotation features so that you can quickly take a screenshot of a bug, annotate it, and post in the issue tracker.
- 💡 You can use Ctrl+V to paste a picture from the clipboard into a text box in GitHub issue tracker.
-
Charge your computer before coming to the PE session. The testing venue may not have enough charging points.
During the session:
- Take note of your team to test. Distributed via LumiNUS gradebook.
- Download the latest jar file from the team's GitHub page. Copy it to an empty folder.
Testing instructions for PE and PE Dry Run
-
What to test:
- PE Dry Run (at v1.3):
- Test the product based on the User Guide (the UG is most likely accessible using the
helpcommand). - Do system testing first i.e., does the product work as specified by the documentation?. If there is time left, you can do acceptance testing as well i.e., does the product solve the problem it claims to solve?.
- Test the product based on the User Guide (the UG is most likely accessible using the
- PE (at v1.4):
- Test based on the Developer Guide (Appendix named Instructions for Manual Testing) and the User Guide. The testing instructions in the Developer Guide can provide you some guidance but if you follow those instructions strictly, you are unlikely to find many bugs. You can deviate from the instructions to probe areas that are more likely to have bugs.
- As before, do both system testing and acceptance testing but give priority to system testing as system testing bugs can earn you more credit.
- PE Dry Run (at v1.3):
-
These are considered bugs:
- Behavior differs from the User Guide
- A legitimate user behavior is not handled e.g. incorrect commands, extra parameters
- Behavior is not specified and differs from normal expectations e.g. error message does not match the error
- The feature does not solve the stated problem of the intended user i.e., the feature is 'incomplete'
- Problems in the User Guide e.g., missing/incorrect info
-
Where to report bugs: Post bug in the following issue trackers (not in the team's repo):
- PE Dry Run (at v1.3): nus-cs2103-AY1819S2/pe-dry-run.
- PE (at v1.4): nus-cs2103-AY1819S2/pe.
-
Bug report format:
- Post bugs as you find them (i.e., do not wait to post all bugs at the end) because the issue tracker will close exactly at the end of the allocated time.
- Do not use team ID in bug reports. Reason: to prevent others copying your bug reports
- Write good quality bug reports; poor quality or incorrect bug reports will not earn credit.
- Use a descriptive title.
- Give a good description of the bug with steps to reproduce and screenshots.
- Assign a severity to the bug report. Bug report without a priority label are considered
severity.Low(lower severity bugs earn lower credit): - Each bug should be a separate issue. The issue will be initialized with one of the following templates:
Bug report
Describe the bug A clear and concise description of what the bug is.
To Reproduce Steps to reproduce the behavior:
- Go to '...'
- Click on '....'
- Scroll down to '....'
- See error
Expected behavior A clear and concise description of what you expected to happen.
Screenshots If applicable, add screenshots to help explain your problem.
Additional context Add any other context about the problem here.
Suggestions for improving the product
Please describe the problem A clear and concise description of what the problem is. Eg. I have to scroll three times to find [...]
Describe the improvement you'd like to suggest A clear and concise description of what you want to happen. Eg., Better to sort based on [...] for quick access
Additional context Add any other context or screenshots about the feature request here.
Bug Severity labels:
severity.Low: A flaw that is unlikely to affect normal operations of the product. Appears only in very rare situations and causes a minor inconvenience only.severity.Medium: A flaw that causes occasional inconvenience to some users but they can continue to use the product.severity.High: A flaw that affects most users and causes major problems for users. i.e., makes the product almost unusable for most users.
-
About posting suggestions:
- PE Dry Run (at v1.3): You can also post suggestions on how to improve the product. 💡 Be diplomatic when reporting bugs or suggesting improvements. For example, instead of criticising the current behavior, simply suggest alternatives to consider.
- PE (at v1.4): Do not post suggestions. But if a feature is missing a critical functionality that makes the feature less useful to the intended user, it can be reported as a bug.
-
If the product doesn't work at all: If the product fails catastrophically e.g., cannot even launch, you can test the fallback team allocated to you. But in this case you must inform us immediately after the session so that we can send your bug reports to the correct team.
At the end of the project each student is required to submit a Project Portfolio Page.
-
Objective:
- For you to use (e.g. in your resume) as a well-documented data point of your SE experience
- For us to use as a data point to evaluate your,
- contributions to the project
- your documentation skills
-
Sections to include:
-
Overview: A short overview of your product to provide some context to the reader.
-
Summary of Contributions:
- Code contributed: Give a link to your code on Project Code Dashboard, which should be
https://nus-cs2103-ay1819s2.github.io/cs2103-dashboard/#=undefined&search=githbub_username_in_lower_case(replacegithbub_username_in_lower_casewith your actual username in lower case e.g.,johndoe). This link is also available in the Project List Page -- linked to the icon under your photo. - Features implemented: A summary of the features you implemented. If you implemented multiple features, you are recommended to indicate which one is the biggest feature.
- Other contributions:
- Contributions to project management e.g., setting up project tools, managing releases, managing issue tracker etc.
- Evidence of helping others e.g. responses you posted in our forum, bugs you reported in other team's products,
- Evidence of technical leadership e.g. sharing useful information in the forum
- Code contributed: Give a link to your code on Project Code Dashboard, which should be
-
Contributions to the User Guide: Reproduce the parts in the User Guide that you wrote. This can include features you implemented as well as features you propose to implement.
The purpose of allowing you to include proposed features is to provide you more flexibility to show your documentation skills. e.g. you can bring in a proposed feature just to give you an opportunity to use a UML diagram type not used by the actual features. -
Contributions to the Developer Guide: Reproduce the parts in the Developer Guide that you wrote. Ensure there is enough content to evaluate your technical documentation skills and UML modelling skills. You can include descriptions of your design/implementations, possible alternatives, pros and cons of alternatives, etc.
-
If you plan to use the PPP in your Resume, you can also include your SE work outside of the module (will not be graded)
-
-
Format:
-
File name:
docs/team/githbub_username_in_lower_case.adoce.g.,docs/team/johndoe.adoc -
Follow the example in the AddressBook-Level4
-
💡 You can use the Asciidoc's
includefeature to include sections from the developer guide or the user guide in your PPP. Follow the example in the sample. -
It is assumed that all contents in the PPP were written primarily by you. If any section is written by someone else e.g. someone else wrote described the feature in the User Guide but you implemented the feature, clearly state that the section was written by someone else (e.g.
Start of Extract [from: User Guide] written by Jane Doe). Reason: Your writing skills will be evaluated based on the PPP
-
-
Page limit:
Content Limit Overview + Summary of contributions 0.5-1 (soft limit) Contributions to the User Guide 1-3 (soft limit) Contributions to the Developer Guide 3-6 (soft limit) Total 5-10 (strict) - The page limits given above are after converting to PDF format. The actual amount of content you require is actually less than what these numbers suggest because the HTML → PDF conversion adds a lot of spacing around content.
- Reason for page limit: These submissions are peer-graded (in the PE) which needs to be done in a limited time span.
If you have more content than the limit given above, you can give a representative samples of UG and DG that showcase your documentation skills. Those samples should be understandable on their own. For the parts left-out, you can give an abbreviated version and refer the reader to the full UG/DG for more details.
It's similar to giving extra details as appendices; the reader will look at the UG/DG if the PPP is not enough to make a judgment. For example, when judging documentation quality, if the part in the PPP is not well-written, there is no point reading the rest in the main UG/DG. That's why you need to put the most representative part of your writings in the PPP and still give an abbreviated version of the rest in the PPP itself. Even when judging the quantity of work, the reader should be able to get a good sense of the quantity by combining what is quoted in the PPP and your abbreviated description of the missing part. There is no guarantee that the evaluator will read the full document.
After the session:
- We'll transfer the relevant bug reports to your repo over the weekend. Once you have received the bug reports for your product, it is up to you to decide whether you will act on reported issues before the final submission v1.4. For some issues, the correct decision could be to reject or postpone to a version beyond v1.4.
- You can post in the issue thread to communicate with the tester e.g. to ask for more info, etc. However, the tester is not obliged to respond.
- 💡 Do not argue with the issue reporter to try to convince that person that your way is correct/better. If at all, you can gently explain the rationale for the current behavior but do not waste time getting involved in long arguments. If you think the suggestion/bug is unreasonable, just thank the reporter for their view and close the issue.
A. Two members do a quick demo of your v1.3 using the jar file.
B. Divide these questions among team members and get ready to answer them.
- Distinguish between sequential and iterative processes. Which one are we using in the project?
- Distinguish between breadth-first and depth-first iterative processes using your project as an example.
- Describe how agile process models differ from traditional process models.
C. Divide XP and Scrum between the two teams for the following activity, if there is enough time left.
-
Each team use the Web to find about 5 distinguishing features of the process model.
- Some interesting SCRUM concepts: Product backlog, scrum board, story points, burndown charts, scrum master, product owner
- XP rules are described at http://www.extremeprogramming.org/rules.html
-
Relate those features to your project. i.e. are they applicable? are you doing something similar?
Release as a jar file, release updated user guide, finalize and release developer guide (DG), peer-test released products, verify code authorship.
v1.3 Summary of Milestone
| Milestone | Minimum acceptable performance to consider as 'reached' |
|---|---|
| Contributed code to v1.3 | code merged |
| Code is RepoSense-compatible | as stated in mid-v1.3 |
| v1.3 jar file released on GitHub | as stated |
| v1.3 milestone properly wrapped up on GitHub | as stated |
| Documentation updated to match v1.3 | at least the User Guide and the README.adoc is updated |
v1.3 Project Management
Ensure your code is RepoSense-compatible,
Using RepoSense
In previous semesters we asked students to annotate all their code using special @@author tags so that we can extract each student's code for grading. This semester, we are trying out a tool called RepoSense that is expected to reduce the need for such tagging, and also make it easier for you to see (and learn from) code written by others.
1. View the current status of code authorship data:
- The report generated by the tool is available at Project Code Dashboard. The feature that is most relevant to you is the Code Panel (shown on the right side of the screenshot above). It shows the code attributed to a given author. You are welcome to play around with the other features (they are still under development and will not be used for grading this semester).
- Click on your name to load the code attributed to you (based on Git blame/log data) onto the code panel on the right.
- If the code shown roughly matches the code you wrote, all is fine and there is nothing for you to do.
2. If the code does not match:
-
Here are the possible reasons for the code shown not to match the code you wrote:
- the git username in some of your commits does not match your GitHub username (perhaps you missed our instructions to set your Git username to match GitHub username earlier in the project, or GitHub did not honor your Git username for some reason)
- the actual authorship does not match the authorship determined by git blame/log e.g., another student touched your code after you wrote it, and Git log attributed the code to that student instead
-
In those cases,
- Install RepoSense (see the Getting Started section of the RepoSense User Guide)
- Use the two methods described in the RepoSense User Guide section Configuring a Repo to Provide Additional Data to RepoSense to provide additional data to the authorship analysis to make it more accurate.
- If you add a
config.jsonfile to your repo (as specified by one of the two methods),- Please use the template json file given in the module website so that your display name matches the name we expect it to be.
- If your commits have multiple author names, specify all of them e.g.,
"authorNames": ["theMyth", "theLegend", "theGary"] - Update the line
config.jsonin the.gitignorefile of your repo as/config.jsonso that it ignores theconfig.jsonproduced by the app but not the_reposense/config.json.
- If you add
@@authorannotations, please follow the guidelines below:
Adding @@author tags indicate authorship
-
Mark your code with a
//@@author {yourGithubUsername}. Note the double@.
The//@@authortag should indicates the beginning of the code you wrote. The code up to the next//@@authortag or the end of the file (whichever comes first) will be considered as was written by that author. Here is a sample code file://@@author johndoe method 1 ... method 2 ... //@@author sarahkhoo method 3 ... //@@author johndoe method 4 ... -
If you don't know who wrote the code segment below yours, you may put an empty
//@@author(i.e. no GitHub username) to indicate the end of the code segment you wrote. The author of code below yours can add the GitHub username to the empty tag later. Here is a sample code with an emptyauthortag:method 0 ... //@@author johndoe method 1 ... method 2 ... //@@author method 3 ... method 4 ... -
The author tag syntax varies based on file type e.g. for java, css, fxml. Use the corresponding comment syntax for non-Java files.
Here is an example code from an xml/fxml file.<!-- @@author sereneWong --> <textbox> <label>...</label> <input>...</input> </textbox> ... -
Do not put the
//@@authorinside java header comments.
👎/** * Returns true if ... * @@author johndoe */👍
//@@author johndoe
/**
  * Returns true if ...
  */
What to and what not to annotate
-
Annotate both functional and test code There is no need to annotate documentation files.
-
Annotate only significant size code blocks that can be reviewed on its own e.g., a class, a sequence of methods, a method.
Claiming credit for code blocks smaller than a method is discouraged but allowed. If you do, do it sparingly and only claim meaningful blocks of code such as a block of statements, a loop, or an if-else statement.- If an enhancement required you to do tiny changes in many places, there is no need to annotate all those tiny changes; you can describe those changes in the Project Portfolio page instead.
- If a code block was touched by more than one person, either let the person who wrote most of it (e.g. more than 80%) take credit for the entire block, or leave it as 'unclaimed' (i.e., no author tags).
- Related to the above point, if you claim a code block as your own, more than 80% of the code in that block should have been written by yourself. For example, no more than 20% of it can be code you reused from somewhere.
- 💡 GitHub has a blame feature and a history feature that can help you determine who wrote a piece of code.
-
Do not try to boost the quantity of your contribution using unethical means such as duplicating the same code in multiple places. In particular, do not copy-paste test cases to create redundant tests. Even repetitive code blocks within test methods should be extracted out as utility methods to reduce code duplication. Individual members are responsible for making sure code attributed to them are correct. If you notice a team member claiming credit for code that he/she did not write or use other questionable tactics, you can email us (after the final submission) to let us know.
-
If you wrote a significant amount of code that was not used in the final product,
- Create a folder called
{project root}/unused - Move unused files (or copies of files containing unused code) to that folder
- use
//@@author {yourGithubUsername}-unusedto mark unused code in those files (note the suffixunused) e.g.
//@@author johndoe-unused
method 1 ...
method 2 ...
Please put a comment in the code to explain why it was not used.
- Create a folder called
-
If you reused code from elsewhere, mark such code as
//@@author {yourGithubUsername}-reused(note the suffixreused) e.g.//@@author johndoe-reused method 1 ... method 2 ... -
You can use empty
@@authortags to mark code as not yours when RepoSense attribute the to you incorrectly.-
Code generated by the IDE/framework, should not be annotated as your own.
-
Code you modified in minor ways e.g. adding a parameter. These should not be claimed as yours but you can mention these additional contributions in the Project Portfolio page if you want to claim credit for them.
-
- After you are satisfied with the new results (i.e., results produced by running RepoSense locally), push the
config.jsonfile you added and/or the annotated code to your repo. We'll use that information the next time we run RepoSense (we run it at least once a week). - If you choose to annotate code, please annotate code chunks not smaller than a method. We do not grade code snippets smaller than a method.
- If you encounter any problem when doing the above or if you have questions, please post in the forum.
We recommend you ensure your code is RepoSense-compatible by v1.3
v1.3 Product
-
As before, move the product towards v2.0.
-
Do a
proper product release as described in the Developer Guide. Do some manual tests to ensure the jar file works.
v1.3 Documentation
v1.3 user guide should be updated to match the current version of the product. Reason: v1.3 will be subjected to a trial acceptance testing session
- README page: Update to look like a real product (rather than a project for learning SE) if you haven't done so already. In particular, update the
Ui.pngto match the current product (💡 tips ).
💡 Some common sense tips for a good product screenshot
Ui.png represents your product in its full glory.
- Before taking the screenshot, populate the product with data that makes the product look good. For example, if the product is supposed to show photos, use real photos instead of dummy placeholders.
- It should show a state in which the product is well-populated i.e., don't leave data panels largely blank
- Choose a state that showcase the main features of the product i.e., the login screen is not usually a good choice
- Avoid annotations (arrows, callouts, explanatory text etc.); it should look like the product is being in use for real.
-
User Guide: This document will be used by acceptance testers. Update to match the current version. In particular,
- Clearly indicate which features are not implemented yet e.g. tag those features with a
Coming in v2.0. - For those features already implemented, ensure their descriptions match the exact behavior of the product e.g. replace mockups with actual screenshots
- Clearly indicate which features are not implemented yet e.g. tag those features with a
-
Developer Guide: Update your DG. Tutors will provide feedback on this version. This feedback should be used to improve your final submission.
-
AboutUs page: Update to reflect current state of roles and responsibilities.
Submission: Must be included in the version tagged v1.3.
v1.3 Demo
- Do a quick demo of the main features using the jar file. Objective: demonstrate that the jar file works.
v1.3 Code quality
You will get feedback on your code quality in v1.3. Ensure that you fix the issues pointed out for your final submission.
v1.3 Testing (aka Practical Exam Dry Run)
See info in the panel below:
Relevant: [
What: The v1.3 is subjected to a round of peer acceptance/system testing, also called the Practical Exam Dry Run as this round of testing will be similar to the graded
When, where: week 11 at lecture
Objectives:
- The primary objective of the PE is to increase the rigor of project assessment. Assessing most aspects of the project involves an element subjectivity. As the project counts for 50% of the final grade, it is not prudent to rely on evaluations of tutors alone as there can be significant variations between how different tutors assess projects. That is why we collect more data points via the PE so as to minimize the chance of your project being affected by evaluator-bias.
- Note that none of the significant project grade components are calculated solely based on peer ratings. Rather, PE data are mostly used to cross-validate tutor assessments and identify cases that need further investigation. When peer inputs are used for grading, usually they are combined with tutor evaluations with appropriate weight for each. In some cases ratings from team members are given a higher weight compared to ratings from other teams, if that is appropriate.
- As a bonus, PE also gives us an opportunity to evaluate your manual testing skills, product evaluation skills, effort estimation skills etc.
- Note that the PE is not a means of pitting you against each other. Developers and testers play for the same side; they need to push each other to improve the quality of their work -- not bring down each other.
When, where: Week 13 lecture
Grading:
- Your performance in the practical exam will affect your final grade and your peers, as explained in Admin: Project Assessment section.
- As your submissions can affect the grades of peers, note that we have put in measures to identify insincere/random evaluations and penalize accordingly.
Preparation:
-
Ensure that you can access the relevant issue tracker given below:
-- for PE Dry Run (at v1.3): nus-cs2103-AY1819S2/pe-dry-run
-- for PE (at v1.4): nus-cs2103-AY1819S2/pe (will open only near the actual PE)- These are private repos!. If you cannot access the relevant repo, you may not have accepted the invitation to join the GitHub org used by the module. Go to https://github.com/orgs/nus-cs2103-AY1819S2/invitation to accept the invitation.
- If you cannot find the invitation, post in our forum.
-
Ensure you have access to a computer that is able to run module projects e.g. has the right Java version.
-
Have a good screen grab tool with annotation features so that you can quickly take a screenshot of a bug, annotate it, and post in the issue tracker.
- 💡 You can use Ctrl+V to paste a picture from the clipboard into a text box in GitHub issue tracker.
-
Charge your computer before coming to the PE session. The testing venue may not have enough charging points.
During:
- Take note of your team to test. It will be given to you by the teaching team (distributed via LumiNUS gradebook).
- Download from LumiNUS all files submitted by the team (i.e. jar file, User Guide, Developer Guide, and Project Portfolio Pages) into an empty folder.
- [60 minutes] Test the product and report bugs as described below:
Testing instructions for PE and PE Dry Run
-
What to test:
- PE Dry Run (at v1.3):
- Test the product based on the User Guide (the UG is most likely accessible using the
helpcommand). - Do system testing first i.e., does the product work as specified by the documentation?. If there is time left, you can do acceptance testing as well i.e., does the product solve the problem it claims to solve?.
- Test the product based on the User Guide (the UG is most likely accessible using the
- PE (at v1.4):
- Test based on the Developer Guide (Appendix named Instructions for Manual Testing) and the User Guide. The testing instructions in the Developer Guide can provide you some guidance but if you follow those instructions strictly, you are unlikely to find many bugs. You can deviate from the instructions to probe areas that are more likely to have bugs.
- As before, do both system testing and acceptance testing but give priority to system testing as system testing bugs can earn you more credit.
- PE Dry Run (at v1.3):
-
These are considered bugs:
- Behavior differs from the User Guide
- A legitimate user behavior is not handled e.g. incorrect commands, extra parameters
- Behavior is not specified and differs from normal expectations e.g. error message does not match the error
- The feature does not solve the stated problem of the intended user i.e., the feature is 'incomplete'
- Problems in the User Guide e.g., missing/incorrect info
-
Where to report bugs: Post bug in the following issue trackers (not in the team's repo):
- PE Dry Run (at v1.3): nus-cs2103-AY1819S2/pe-dry-run.
- PE (at v1.4): nus-cs2103-AY1819S2/pe.
-
Bug report format:
- Post bugs as you find them (i.e., do not wait to post all bugs at the end) because the issue tracker will close exactly at the end of the allocated time.
- Do not use team ID in bug reports. Reason: to prevent others copying your bug reports
- Write good quality bug reports; poor quality or incorrect bug reports will not earn credit.
- Use a descriptive title.
- Give a good description of the bug with steps to reproduce and screenshots.
- Assign a severity to the bug report. Bug report without a priority label are considered
severity.Low(lower severity bugs earn lower credit): - Each bug should be a separate issue. The issue will be initialized with one of the following templates:
Bug report
Describe the bug A clear and concise description of what the bug is.
To Reproduce Steps to reproduce the behavior:
- Go to '...'
- Click on '....'
- Scroll down to '....'
- See error
Expected behavior A clear and concise description of what you expected to happen.
Screenshots If applicable, add screenshots to help explain your problem.
Additional context Add any other context about the problem here.
Suggestions for improving the product
Please describe the problem A clear and concise description of what the problem is. Eg. I have to scroll three times to find [...]
Describe the improvement you'd like to suggest A clear and concise description of what you want to happen. Eg., Better to sort based on [...] for quick access
Additional context Add any other context or screenshots about the feature request here.
Bug Severity labels:
severity.Low: A flaw that is unlikely to affect normal operations of the product. Appears only in very rare situations and causes a minor inconvenience only.severity.Medium: A flaw that causes occasional inconvenience to some users but they can continue to use the product.severity.High: A flaw that affects most users and causes major problems for users. i.e., makes the product almost unusable for most users.
-
About posting suggestions:
- PE Dry Run (at v1.3): You can also post suggestions on how to improve the product. 💡 Be diplomatic when reporting bugs or suggesting improvements. For example, instead of criticising the current behavior, simply suggest alternatives to consider.
- PE (at v1.4): Do not post suggestions. But if a feature is missing a critical functionality that makes the feature less useful to the intended user, it can be reported as a bug.
-
If the product doesn't work at all: If the product fails catastrophically e.g., cannot even launch, you can test the fallback team allocated to you. But in this case you must inform us immediately after the session so that we can send your bug reports to the correct team.
- [Remainder of the session] Evaluate the following aspects. Note down your evaluation in a hard copy (as a backup). Submit via TEAMMATES. You are recommended to complete this during the PE session but you have until the end of the day to submit (or revise) your submissions.
- A. Product Design []:
Evaluate the product design based on how the product V2.0 (not V1.4) is described in the User Guide.
-
unable to judge: You are unable to judge this aspect for some reason e.g., UG is not available or does not have enough information. -
Target user:
-
target user specified and appropriate: The target user is clearly specified, prefers typing over other modes of input, and not too general (should be narrowed to a specific user group with certain characteristics). -
value specified and matching: The value offered by the product is clearly specified and matches the target user.
-
-
Value to the target user:
-
value: low: The value to target user is low. App is not worth using. -
value: medium: Some small group of target users might find the app worth using. -
value: high: Most of the target users are likely to find the app worth using.
-
-
Feature-fit:
-
feature-fit: low: Features don't seem to fit together. -
feature-fit: medium: Some features fit together but some don't. -
feature-fit: high: All features fit together.
-
-
polished: The product looks well-designed.
- B. Quality of user docs []:
Evaluate the quality of user documentation based on the parts of the user guide written by the person, as reproduced in the project portfolio. Evaluate from an end-user perspective.
-
UG/ unable to judge: Less than 1 page worth of UG content written by the student or cannot find PPP -
UG/ good use of visuals: Uses visuals e.g., screenshots. -
UG/ good use of examples: Uses examples e.g., sample inputs/outputs. -
UG/ just enough information: Not too much information. All important information is given. -
UG/ easy to understand: The information is easy to understand for the target audience. -
UG/ polished: The document looks neat, well-formatted, and professional.
- C. Quality of developer docs []:
Evaluate the quality of developer documentation based on the developer docs cited/reproduced in the respective project portfolio page. Evaluate from the perspective of a new developer trying to understand how the features are implemented.
-
DG/ unable to judge: Less than 0.5 pages worth of content OR other problems in the document e.g. looks like included wrong content. -
DG/ too little: 0.5 - 1 page of documentation - Diagrams:
-
DG/ types of UML diagrams: 1: Only one type of diagram used (types: Class Diagrams, Object Diagrams, Sequence Diagrams, Activity Diagrams, Use Case Diagrams) -
DG/ types of UML diagrams: 2: Two types of diagrams used -
DG/ types of UML diagrams: 3+: Three or more types of diagrams used -
DG/ UML diagrams suitable: The diagrams used for the right purpose -
DG/ UML notation correct: No more than one minor error in the UML notation -
DG/ diagrams not repetitive: No evidence of repeating the same diagram with minor differences -
DG/ diagrams not too complicated: Diagrams don't cram too much information into them -
DG/ diagrams integrates with text: Diagrams are well integrated into the textual explanations
-
-
DG/ easy to understand: The document is easy to understand/follow -
DG/ just enough information: Not too much information. All important information is given. -
DG/ polished: The document looks neat, well-formatted, and professional.
- D. Feature Quality []:
Evaluate the biggest feature done by the student for difficulty, completeness, and testability. Note: examples given below assume that AB4 did not have the commands edit, undo, and redo.
- Difficulty
-
Feature/ difficulty: unable to judge: You are unable to judge this aspect for some reason. -
Feature/ difficulty: low: e.g. make the existing find command case insensitive. -
Feature/ difficulty: medium: e.g. an edit command that requires the user to type all fields, even the ones that are not being edited. -
Feature/ difficulty: high: e.g., undo/redo command
-
- Completeness
-
Feature/ completeness: unable to judge: You are unable to judge this aspect for some reason. -
Feature/ completeness: low: A partial implementation of the feature. Barely useful. -
Feature/ completeness: medium: The feature has enough functionality to be useful for some of the users. -
Feature/ completeness: high: The feature has all functionality to be useful to almost all users.
-
- Other
-
Feature/ not hard to test: The feature was not too hard to test manually. -
Feature/ polished: The feature looks polished (as if done by a professional programmer).
-
- E. Amount of work []:
Evaluate the amount of work, on a scale of 0 to 30.
- Consider this PR (
historycommand) as 5 units of effort which means this PR (undo/redocommand) is about 15 points of effort. Given that 30 points matches an effort twice as that needed for theundo/redofeature (which was given as an example of anAgrade project), we expect most students to be have efforts lower than 20. - Count all implementation/testing/documentation work as mentioned in that person's PPP. Also look at the actual code written by the person.
- Do not give a high value just to be nice. You will be asked to provide a brief justification for your effort estimates.
Processing PE Bug Reports:
There will be a review period for you to respond to the bug reports you received.
Duration: The review period will start around 1 day after the PE (exact time to be announced) and will last until the following Monday midnight. However, you are recommended to finish this task ASAP, to minimize cutting into your exam preparation work.
Bug reviewing is recommended to be done as a team as some of the decisions need team consensus.
Instructions for Reviewing Bug Reports
-
First, don't freak out if there are lot of bug reports. Many can be duplicates and some can be false positives. In any case, we anticipate that all of these products will have some bugs and our penalty for bugs is not harsh. Furthermore, it depends on the severity of the bug. Some bug may not even be penalized.
-
Do not edit the subject or the description. Your response (if any) should be added as a comment.
-
You may (but not required to) close the bug report after you are done processing it, as a convenient means of separating the 'processed' issues from 'not yet processed' issues.
-
If the bug is reported multiple times, mark all copies EXCEPT one as duplicates using the
duplicatetag (if the duplicates have different severity levels, you should keep the one with the highest severity). In addition, use this technique to indicate which issue they are duplicates of. Duplicates can be omitted from processing steps given below. -
If a bug seems to be for a different product (i.e. wrongly assigned to your team), let us know (email prof).
-
Decide if it is a real bug and apply ONLY one of these labels.
Response Labels:
response.Accepted: You accept it as a bug.response.NotInScope: It is a valid issue but not something the team should be penalized for e.g., it was not related to features delivered in v1.4.response.Rejected: What tester treated as a bug is in fact the expected behavior. You can reject bugs that you inherited from AB4.response.CannotReproduce: You are unable to reproduce the behavior reported in the bug after multiple tries.response.IssueUnclear: The issue description is not clear. Don't post comments asked the tester to give more info. The tester will not be able to see those comments because the bug reports are anonymized.
- If applicable, decide the type of bug. Bugs without
type.*are consideredtype.FunctionalityBugby default (which are liable to a heavier penalty).
Bug Type Labels:
type.FeatureFlaw: some functionality missing from a feature delivered in v1.4 in a way that the feature becomes less useful to the intended target user for normal usage. i.e., the feature is not 'complete'. In other words, an acceptance testing bug that falls within the scope of v1.4 features. These issues are counted against the 'depth and completeness' of the feature.type.FunctionalityBug: the bug is a flaw in how the product works.type.DocTypo: A minor spelling/grammar error in the documentation. Does not affect the user.type.DocumentationBug: A flaw in the documentation that can potentially affect the user e.g., a missing step, a wrong instruction
- If you disagree with the original severity assigned to the bug, you may change it to the correct level.
For all cases of downgrading severity or non-acceptance of a bug, you must add a comment justifying your stance. All such cases will be double-checked by the teaching team and indiscriminate downgrading/non-acceptance of bugs without a good justification, if deemed as a case of trying to game the system, may be penalized as it is unfair to the tester.
Bug Severity labels:
severity.Low: A flaw that is unlikely to affect normal operations of the product. Appears only in very rare situations and causes a minor inconvenience only.severity.Medium: A flaw that causes occasional inconvenience to some users but they can continue to use the product.severity.High: A flaw that affects most users and causes major problems for users. i.e., makes the product almost unusable for most users.
-
Decide who should fix the bug. Use the
Assigneesfield to assign the issue to that person(s). There is no need to actually fix the bug though. It's simply an indication/acceptance of responsibility. If there is no assignee, we will distribute the penalty for that bug (if any) among all team members. -
We recommend (but not enforce) that the feature owner should be assigned bugs related to the feature, even if the bug was caused indirectly by someone else. Reason: The feature owner should have defended the feature against bugs using automated tests and defensive coding techniques.
-
Add an explanatory comment explaining your choice of labels and assignees.
-
We recommend choosing
type.*,severity.*and assignee even for bugs you are not accepting. Reason: your non-acceptance may be rejected by the tutor later, in which case we need to grade it as an accepted bug.
Grading: Taking part in the PE dry run is strongly encouraged as it can affect your grade in the following ways.
- If the product you are allocated to test in the Practical Exam (at v1.4) had a very low bug count, we will consider your performance in PE dry run as well when grading the PE.
- PE dry run will help you practice for the actual PE.
- Taking part in the PE dry run will earn you participation points.
- There is no penalty for bugs reported in your product. Every bug you find is a win-win for you and the team whose product you are testing.
Objectives:
- To train you to do manual testing, bug reporting, bug
triaging, bug fixing, communicating with users/testers/developers, evaluating products etc. - To help you improve your product before the final submission.
Preparation:
-
Ensure that you can access the relevant issue tracker given below:
-- for PE Dry Run (at v1.3): nus-cs2103-AY1819S2/pe-dry-run
-- for PE (at v1.4): nus-cs2103-AY1819S2/pe (will open only near the actual PE)- These are private repos!. If you cannot access the relevant repo, you may not have accepted the invitation to join the GitHub org used by the module. Go to https://github.com/orgs/nus-cs2103-AY1819S2/invitation to accept the invitation.
- If you cannot find the invitation, post in our forum.
-
Ensure you have access to a computer that is able to run module projects e.g. has the right Java version.
-
Have a good screen grab tool with annotation features so that you can quickly take a screenshot of a bug, annotate it, and post in the issue tracker.
- 💡 You can use Ctrl+V to paste a picture from the clipboard into a text box in GitHub issue tracker.
-
Charge your computer before coming to the PE session. The testing venue may not have enough charging points.
During the session:
- Take note of your team to test. Distributed via LumiNUS gradebook.
- Download the latest jar file from the team's GitHub page. Copy it to an empty folder.
Testing instructions for PE and PE Dry Run
-
What to test:
- PE Dry Run (at v1.3):
- Test the product based on the User Guide (the UG is most likely accessible using the
helpcommand). - Do system testing first i.e., does the product work as specified by the documentation?. If there is time left, you can do acceptance testing as well i.e., does the product solve the problem it claims to solve?.
- Test the product based on the User Guide (the UG is most likely accessible using the
- PE (at v1.4):
- Test based on the Developer Guide (Appendix named Instructions for Manual Testing) and the User Guide. The testing instructions in the Developer Guide can provide you some guidance but if you follow those instructions strictly, you are unlikely to find many bugs. You can deviate from the instructions to probe areas that are more likely to have bugs.
- As before, do both system testing and acceptance testing but give priority to system testing as system testing bugs can earn you more credit.
- PE Dry Run (at v1.3):
-
These are considered bugs:
- Behavior differs from the User Guide
- A legitimate user behavior is not handled e.g. incorrect commands, extra parameters
- Behavior is not specified and differs from normal expectations e.g. error message does not match the error
- The feature does not solve the stated problem of the intended user i.e., the feature is 'incomplete'
- Problems in the User Guide e.g., missing/incorrect info
-
Where to report bugs: Post bug in the following issue trackers (not in the team's repo):
- PE Dry Run (at v1.3): nus-cs2103-AY1819S2/pe-dry-run.
- PE (at v1.4): nus-cs2103-AY1819S2/pe.
-
Bug report format:
- Post bugs as you find them (i.e., do not wait to post all bugs at the end) because the issue tracker will close exactly at the end of the allocated time.
- Do not use team ID in bug reports. Reason: to prevent others copying your bug reports
- Write good quality bug reports; poor quality or incorrect bug reports will not earn credit.
- Use a descriptive title.
- Give a good description of the bug with steps to reproduce and screenshots.
- Assign a severity to the bug report. Bug report without a priority label are considered
severity.Low(lower severity bugs earn lower credit): - Each bug should be a separate issue. The issue will be initialized with one of the following templates:
Bug report
Describe the bug A clear and concise description of what the bug is.
To Reproduce Steps to reproduce the behavior:
- Go to '...'
- Click on '....'
- Scroll down to '....'
- See error
Expected behavior A clear and concise description of what you expected to happen.
Screenshots If applicable, add screenshots to help explain your problem.
Additional context Add any other context about the problem here.
Suggestions for improving the product
Please describe the problem A clear and concise description of what the problem is. Eg. I have to scroll three times to find [...]
Describe the improvement you'd like to suggest A clear and concise description of what you want to happen. Eg., Better to sort based on [...] for quick access
Additional context Add any other context or screenshots about the feature request here.
Bug Severity labels:
severity.Low: A flaw that is unlikely to affect normal operations of the product. Appears only in very rare situations and causes a minor inconvenience only.severity.Medium: A flaw that causes occasional inconvenience to some users but they can continue to use the product.severity.High: A flaw that affects most users and causes major problems for users. i.e., makes the product almost unusable for most users.
-
About posting suggestions:
- PE Dry Run (at v1.3): You can also post suggestions on how to improve the product. 💡 Be diplomatic when reporting bugs or suggesting improvements. For example, instead of criticising the current behavior, simply suggest alternatives to consider.
- PE (at v1.4): Do not post suggestions. But if a feature is missing a critical functionality that makes the feature less useful to the intended user, it can be reported as a bug.
-
If the product doesn't work at all: If the product fails catastrophically e.g., cannot even launch, you can test the fallback team allocated to you. But in this case you must inform us immediately after the session so that we can send your bug reports to the correct team.
At the end of the project each student is required to submit a Project Portfolio Page.
-
Objective:
- For you to use (e.g. in your resume) as a well-documented data point of your SE experience
- For us to use as a data point to evaluate your,
- contributions to the project
- your documentation skills
-
Sections to include:
-
Overview: A short overview of your product to provide some context to the reader.
-
Summary of Contributions:
- Code contributed: Give a link to your code on Project Code Dashboard, which should be
https://nus-cs2103-ay1819s2.github.io/cs2103-dashboard/#=undefined&search=githbub_username_in_lower_case(replacegithbub_username_in_lower_casewith your actual username in lower case e.g.,johndoe). This link is also available in the Project List Page -- linked to the icon under your photo. - Features implemented: A summary of the features you implemented. If you implemented multiple features, you are recommended to indicate which one is the biggest feature.
- Other contributions:
- Contributions to project management e.g., setting up project tools, managing releases, managing issue tracker etc.
- Evidence of helping others e.g. responses you posted in our forum, bugs you reported in other team's products,
- Evidence of technical leadership e.g. sharing useful information in the forum
- Code contributed: Give a link to your code on Project Code Dashboard, which should be
-
Contributions to the User Guide: Reproduce the parts in the User Guide that you wrote. This can include features you implemented as well as features you propose to implement.
The purpose of allowing you to include proposed features is to provide you more flexibility to show your documentation skills. e.g. you can bring in a proposed feature just to give you an opportunity to use a UML diagram type not used by the actual features. -
Contributions to the Developer Guide: Reproduce the parts in the Developer Guide that you wrote. Ensure there is enough content to evaluate your technical documentation skills and UML modelling skills. You can include descriptions of your design/implementations, possible alternatives, pros and cons of alternatives, etc.
-
If you plan to use the PPP in your Resume, you can also include your SE work outside of the module (will not be graded)
-
-
Format:
-
File name:
docs/team/githbub_username_in_lower_case.adoce.g.,docs/team/johndoe.adoc -
Follow the example in the AddressBook-Level4
-
💡 You can use the Asciidoc's
includefeature to include sections from the developer guide or the user guide in your PPP. Follow the example in the sample. -
It is assumed that all contents in the PPP were written primarily by you. If any section is written by someone else e.g. someone else wrote described the feature in the User Guide but you implemented the feature, clearly state that the section was written by someone else (e.g.
Start of Extract [from: User Guide] written by Jane Doe). Reason: Your writing skills will be evaluated based on the PPP
-
-
Page limit:
Content Limit Overview + Summary of contributions 0.5-1 (soft limit) Contributions to the User Guide 1-3 (soft limit) Contributions to the Developer Guide 3-6 (soft limit) Total 5-10 (strict) - The page limits given above are after converting to PDF format. The actual amount of content you require is actually less than what these numbers suggest because the HTML → PDF conversion adds a lot of spacing around content.
- Reason for page limit: These submissions are peer-graded (in the PE) which needs to be done in a limited time span.
If you have more content than the limit given above, you can give a representative samples of UG and DG that showcase your documentation skills. Those samples should be understandable on their own. For the parts left-out, you can give an abbreviated version and refer the reader to the full UG/DG for more details.
It's similar to giving extra details as appendices; the reader will look at the UG/DG if the PPP is not enough to make a judgment. For example, when judging documentation quality, if the part in the PPP is not well-written, there is no point reading the rest in the main UG/DG. That's why you need to put the most representative part of your writings in the PPP and still give an abbreviated version of the rest in the PPP itself. Even when judging the quantity of work, the reader should be able to get a good sense of the quantity by combining what is quoted in the PPP and your abbreviated description of the missing part. There is no guarantee that the evaluator will read the full document.
After the session:
- We'll transfer the relevant bug reports to your repo over the weekend. Once you have received the bug reports for your product, it is up to you to decide whether you will act on reported issues before the final submission v1.4. For some issues, the correct decision could be to reject or postpone to a version beyond v1.4.
- You can post in the issue thread to communicate with the tester e.g. to ask for more info, etc. However, the tester is not obliged to respond.
- 💡 Do not argue with the issue reporter to try to convince that person that your way is correct/better. If at all, you can gently explain the rationale for the current behavior but do not waste time getting involved in long arguments. If you think the suggestion/bug is unreasonable, just thank the reporter for their view and close the issue.