Week 8 [Mar 11]
Come prepared for the tutorial:
- This week's tutorial involves discussing some theory questions. There are 5 questions (listed under Tutorial 8 in the schedule page. Please divide the questions among yourselves and come prepared to answer them during the tutorial. We will not be able to finish all five questions during the tutorial unless you come prepared.
Project
-
You are expected to start proper project planning and tracking after v1.1. We have refined instructions for mid-v1.2 instructions. Please follow carefully.
-
Try to achieve all milestone requirements, but do not fret if you miss a few. You will get full marks as long as you achieve about 60% of the milestone requirements on average. Yes, that's a pretty low bar, but we have set it low in order to reduce workload and stress. Ideally, you should achieve close to 80-90%.
Feedback for peers, teaching team
[W8.1] Defensive Programming
Can explain defensive programming
A defensive programmer codes under the assumption "if we leave room for things to go wrong, they will go wrong". Therefore, a defensive programmer proactively tries to eliminate any room for things to go wrong.
Consider a MainApp#getConfig() a method that returns a Config object containing configuration data. A typical implementation is given below:
class MainApp{
    Config config;

    /** Returns the config object */
    Config getConfig(){
        return config;
    }
}
If the returned Config object is not meant to be modified, a defensive programmer might use a more defensive implementation given below. This is more defensive because even if the returned Config object is modified (although it is not meant to be) it will not affect the config object inside the MainApp object.
    /** Returns a copy of the config object */
    Config getConfig(){
        return config.copy(); //return a defensive copy
    }
Can use defensive coding to enforce compulsory associations
Consider two classes, Account and Guarantor, with an association as shown in the following diagram:
Example:
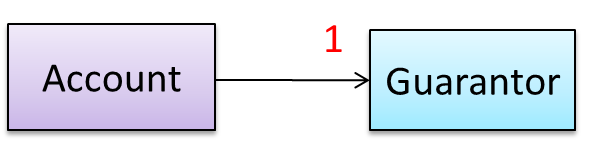
Here, the association is compulsory i.e. an Account object should always be linked to a Guarantor. One way to implement this is to simply use a reference variable, like this:
class Account {
    Guarantor guarantor;

    void setGuarantor(Guarantor g) {
        guarantor = g;
    }
}
However, what if someone else used the Account class like this?
Account a = new Account();
a.setGuarantor(null);
This results in an Account without a Guarantor! In a real banking system, this could have serious consequences! The code here did not try to prevent such a thing from happening. We can make the code more defensive by proactively enforcing the multiplicity constraint, like this:
class Account {
    private Guarantor guarantor;

    public Account(Guarantor g){
        if (g == null) {
            stopSystemWithMessage("multiplicity violated. Null Guarantor");
        }
        guarantor = g;
    }
    public void setGuarantor (Guarantor g){
        if (g == null) {
            stopSystemWithMessage("multiplicity violated. Null Guarantor");
        }
        guarantor = g;
    }
    …
}
For the Manager class shown below, write an addAccount() method that
- restricts the maximum number of Accounts to 8
- avoids adding duplicate Accounts

import java.util.*;

public class Manager {
    private ArrayList< Account > theAccounts ;

    public void addAccount(Account acc) throws Exception {
        if (theAccounts.size( ) == 8){
            throw new Exception ("adding more than 8 accounts");
        }

        if (!theAccounts.contains(acc)) {
            theAccounts.add(acc);
        }
    }

    public void removeAccount(Account acc) {
        theAccounts.remove(acc);
    }
}
Implement the classes defensively with appropriate references and operations to establish the association among the classes. Follow the defensive coding approach. Let the Marriage class handle setting/removal of reference.

public class Marriage {
    private Man husband = null;
    private Woman wife = null;

    // extra information like date etc can be added

    public Marriage(Man m, Woman w) throws Exception {
        if (m == null || w == null) {
            throw new Exception("no man/woman");
        }
        if (m.isMarried() || w.isMarried()) {
            throw new Exception("already married");
        }
        husband = m;
        m.enterMarriage(this);
        wife = w;
        w.enterMarriage(this);
    }

    public Man getHusband() throws Exception {
        if(husband == null) {
            throw new Exception("error state");
        } else {
            return husband;
        }
    }

    public Woman getWife() throws Exception {
        if(wife == null) {
            throw new Exception("error state");
        } else {
            return wife;
        }
    }

    // removal of both ends of 'Marriage'
    public void divorce() throws Exception {
        if (husband==null || wife==null) {
            throw new Exception("no marriage");
        }
        husband.removeFromMarriage(this);
        husband = null;
        wife.removeFromMarriage(this);
        wife = null;
    }
}
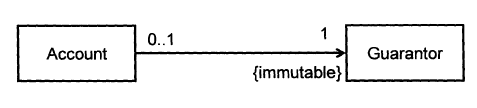
Give a suitable defensive implementation to the Account class in the following class diagram. Note that “{immutable}” means once the association is formed, it cannot be changed.
class Account {
    private Guarantor myGuarantor; // should not be public

    public Account(Guarantor g){
        if (g==null) {
            haltWithErrorMessage(“Account must have a guarantor”);
        }
        myGuarantor = g;
    }
    // there should not be a setGuarantor method
}
class City{
    Country country;

    void setCountry(Country country){
        this.country = country;
    }
}
This is a defensive implementation of the association.
False
Explanation: While the design requires a City to be connected to exactly one Country, the code allows it to be connected to zero Country objects (by passing null to the setCountry() method).
Can use defensive coding to enforce 1-to-1 associations
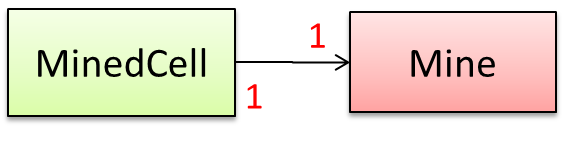
Consider the association given below. A defensive implementation requires to ensure a MinedCell cannot exist without a Mine and vice versa which requires simultaneous object creation. However, Java can only create one object at a time. Given below are two alternatives implementations, both of which violate the multiplicity for a short period of time.
Option 1:
class MinedCell {
    private Mine mine;

    public MinedCell(Mine m){
        if (m == null) {
            showError();
        }
        mine = m;
    }
    …
}
Option 1 forces us to keep a Mine without a MinedCell (until the MinedCell is created).
Option 2:
class MinedCell {
    private Mine mine;

    public MinedCell(){
        mine = new Mine();
    }
    …
}
Option 2 is more defensive because the Mine is immediately linked to a MinedCell.
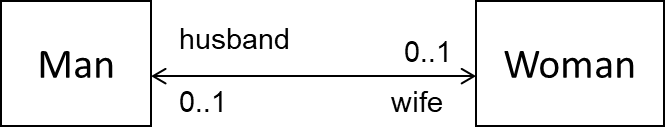
Can use defensive coding to enforce referential integrity of bi-directional associations
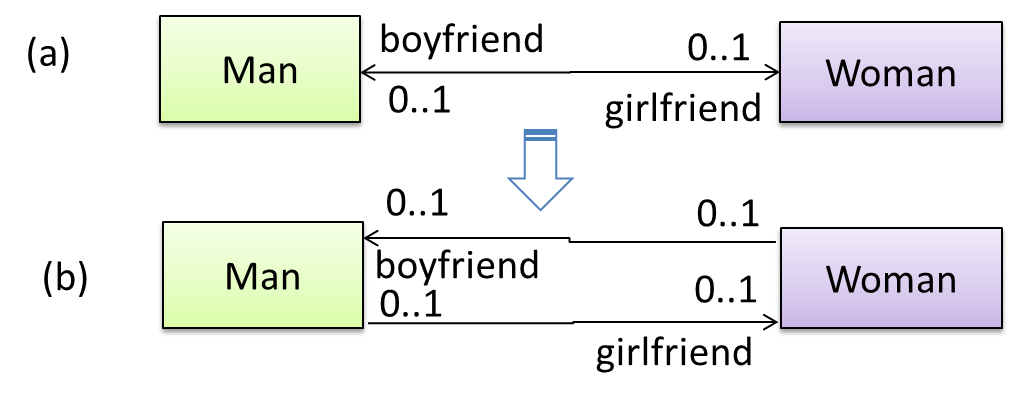
A bidirectional association in the design (shown in (a)) is usually emulated at code level using two variables (as shown in (b)).
class Man {
    Woman girlfriend;

    void setGirlfriend(Woman w) {
        girlfriend = w;
    }
    …
}
class Woman {
    Man boyfriend;

    void setBoyfriend(Man m) {
        boyfriend = m;
    }
}
The two classes are meant to be used as follows:
Woman jean;
Man james;
…
james.setGirlfriend(jean);
jean.setBoyfriend(james);
Suppose the two classes were used this instead:
Woman jean; Man james, yong;
…
james.setGirlfriend(jean);
jean.setBoyfriend(yong);
Now James' girlfriend is Jean, while Jean's boyfriend is not James. This situation results as the code was not defensive enough to stop this "love triangle". In such a situation, we say that the referential integrity has been violated. It simply means there is an inconsistency in object references.

One way to prevent this situation is to implement the two classes as shown below. Note how the referential integrity is maintained.
public class Woman {
    private Man boyfriend;

    public void setBoyfriend(Man m) {
        if(boyfriend == m){
            return;
        }
        if (boyfriend != null) {
            boyfriend.breakUp();
        }
        boyfriend = m;
        m.setGirlfriend(this);
    }

    public void breakUp() {
        boyfriend = null;
    }
    ...
}
public class Man{
    private Woman girlfriend;

    public void setGirlfriend(Woman w) {
        if(girlfriend == w){
            return;
        }
        if (girlfriend != null) {
            girlfriend.breakUp();
        }
        girlfriend = w;
        w.setBoyfriend(this);
    }
    public void breakUp() {
        girlfriend = null;
    }
   ...
}
When the code james.setGirlfriend(jean) is executed, the code ensures that james break up with any current girlfriend before he accepts jean as the girlfriend. Furthermore, the code ensures that jean breaks up with any existing boyfriends and accepts james as the boyfriend.
Imagine that we now support the following feature in our Minesweeper game.
Feature ID: multiplayer
Description: A minefield is divided into mine regions. Each region is assigned to a single player. Players can swap regions. To win the game, all regions must be cleared.
Given below is an extract from our class diagram.
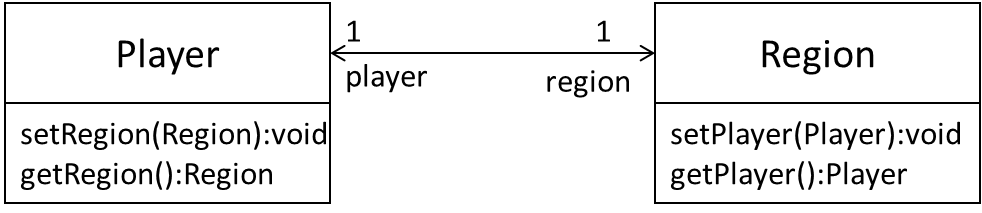
Minimally, this can be implemented like this.
class Player{
    Region region;
    void setRegion(Region r) {
        region = r;
    }
    Region getRegion() {
        return region;
    }
}

// Region class is similar
However, this is not very defensive. For example, a user of this class can pass a null to either of the methods, thus violating the multiplicity of the relationship.
Implement the two classes using a more defensive approach. Take note of the bidirectional link which requires us to preserve referential integrity at all times.
In this solution, we assume Regions can be created without Players (note that we cannot be 100% defensive all the time). The usage will be something like this:
Region r1 = new Region();
Player p1 = new Player(r1);
Region r2 = new Region();
Player p2 = new Player(r2);
p1.setRegion(r2);
r1.setPlayer(p2);
Here are the two classes. Get methods are omitted as they are simple. Note how much extra effort we need to be defensive.
public class Region {
    private Player myPlayer;

    public Region() {
        // initialise region
    }

    public void setPlayer(Player newPlayer) {
        if (newPlayer == null) {
            stopSystemWithErrorMessage("Multiplicity violation");
        }
        if (myPlayer == newPlayer) {
            return; // same player
        }
        if (myPlayer != null) {
            // I already have a Player!
            myPlayer.removeRegion(this);
        }
        myPlayer = newPlayer;
        // set the reverse link
        myPlayer.setRegion(this);
    }

    public void removePlayer(Player disconnectingPlayer) {
        if (myPlayer == disconnectingPlayer){
            myPlayer = null;
        } else {
            stopSystemWithErrorMessage("Unknown Player trying to disconnect");
        }
    }

    private void stopSystemWithErrorMessage(String msg) {
        ...
    }
}
public class Player {
    private Region myRegion;

    public Player(Region region) {
        setRegion(region);
    }

    public void setRegion(Region newRegion) {
        if (newRegion == null) {
            stopSystemWithErrorMessage("Multiplicity violation");
        }
        if (myRegion == newRegion) {
            return; // no change in Region!
        }
        if (myRegion != null) {
            // previous region exists
            myRegion.removePlayer(this);
        }
        myRegion = newRegion;

        // set the reverse link
        myRegion.setPlayer(this);
    }

    public void removeRegion(Region disconnectingRegion) {
        if (myRegion == disconnectingRegion) {
            myRegion = null;
        }
    }

    private void stopSystemWithErrorMessage(String msg) {
        ...
    }
}
Note that the above code stops the system when the multiplicity is violated. Alternatively, we can throw an exception and let the caller handle the situation.
Implement this bidirectional association. Note that the Bank uses accNumber attribute to uniquely identify an Account object. Assume the Bank class is responsible for maintaining the links between objects.

The code below contains a method in the Bank class to create an account; the bank field in the new account is thereby filled by the bank creating it.
We assume that once an Account has been assigned to one Bank, it cannot be assigned to a different Bank. Once the Account is removed from the Bank, it will not be used any more (hence, no need to remove the link from Account to Bank).
public class Account {
    private int accNumber ;
    private Bank theBank ;

    public Account(int n, Bank b) {
        accno = n ;
        theBank = b ;
    }
    public int getNumber() {
        return accNumber;
    }
    public Bank getBank() {
        return theBank ;
    }
}
import java.util.*;

public class Bank {
    private HashMap< Integer, Account > theAccounts = new HashMap < Integer, Account > ();

    public void createAccount(int n) {
        addAccount(new Account(n, this)) ;
    }
    public void addAccount(Account a) {
        theAccounts.put(a.getNumber(), a);
    }
    public void removeAccount(int accNumber) {
        theAccounts.remove(accNumber);
    }
    public Account lookupAccount(int accNumber) {
        return theAccounts.get(accNumber);
    }
}
(a) Is the code given below a defensive translation of the associations shown in the class diagram? Explain your answer.
class Teacher{
    private Student favoriteStudent;

    void setFavoriteStudent(Student s){
        favoriteStudent = s;
    }
}
class Student{
    private Teacher favoriteTeacher;

    void setFavoriteTeacher(Teacher t){
        favoriteTeacher = t;
    }
}

(b) In terms of maintaining referential integrity in the implementation, what is the difference between the following two diagrams?
(c) Show a defensive implementation of the remove(Member m) of the Club class given below.

(a) Yes. Each links is mutable and unidirectional. A simple reference variable is suitable to hold the link.
Teacher class can be made even more defensive by introducing a resetFavoriteStudent() method to unlink the current favorite student from a teacher. In that case, setFavoriteStudent(Student) method should not accept null. This approach is more defensive because it prevents a null value being passed to setFavoriteStudent(Student) by mistake and being interpreted as a request to de-link the current favorite student from the Teacher object.
(b) First diagram has unidirectional links. Second has a bidirectional link. RI is only applicable to the second.
(c)
void removeMember(Member m) {
    if (m==null) {
        throw exception("this is null, not a member!");
    } else if(member_count == 10) {
        throw exception("we need at least 10 members to survive!");
    } else if(!isMember(m)) {
        throw exception ("this fellow is not a member of our club!");
    } else {
        members.remove(m); // members is a data structure such as ArrayList
    }
}
Bidirectional associations, if not implemented properly, can result in referential integrity violations.
True
Explanation: Bidirectional associations require two objects to link to each other. When one of these links is not consistent with the other, we have a referential integrity violation.
Can explain when to use defensive programming
It is not necessary to be 100% defensive all the time. While defensive code may be less prone to be misused or abused, such code can also be more complicated and slower to run.
The suitable degree of defensiveness depends on many factors such as:
- How critical is the system?
- Will the code be used by programmers other than the author?
- The level of programming language support for defensive programming
- The overhead of being defensive
Defensive programming,
- a. can make the program slower.
- b. can make the code longer.
- c. can make the code more complex.
- d. can make the code less susceptible to misuse.
- e. can require extra effort.
(a)(b)(c)(d)(e)
Explanation: Defensive programming requires a more checks, possibly making the code longer, more complex, and possibly slower. Use it only when benefits outweigh costs, which is often.
Can explain the Design-by-Contract approach
Suppose an operation is implemented with the behavior specified precisely in the API (preconditions, post conditions, exceptions etc.). When following the defensive approach, the code should first check if the preconditions have been met. Typically, exceptions are thrown if preconditions are violated. In contrast, the Design-by-Contract (DbC) approach to coding assumes that it is the responsibility of the caller to ensure all preconditions are met. The operation will honor the contract only if the preconditions have been met. If any of them have not been met, the behavior of the operation is "unspecified".
Languages such as Eiffel have native support for DbC. For example, preconditions of an operation can be specified in Eiffel and the language runtime will check precondition violations without the need to do it explicitly in the code. To follow the DbC approach in languages such as Java and C++ where there is no built-in DbC support, assertions can be used to confirm pre-conditions.
Which statements are correct?
- a. It is not natively supported by Java and C++.
- b. It is an alternative to OOP.
- c. It assumes the caller of a method is responsible for ensuring all preconditions are met.
(a)(b)(c)
Explanation: DbC is not an alternative to OOP. We can use DbC in an OOP solution.
[W8.2] Writing Developer Documents
Type of Developer Docs
Can explain the two types of developer docs
Developer-to-developer documentation can be in one of two forms:
- Documentation for developer-as-user: Software components are written by developers and reused by other developers, which means there is a need to document how such components are to be used. Such documentation can take several forms:
- API documentation: APIs expose functionality in small-sized, independent and easy-to-use chunks, each of which can be documented systematically.
- Tutorial-style instructional documentation: In addition to explaining functions/methods independently, some higher-level explanations of how to use an API can be useful.
- Example of API Documentation: String API.
- Example of tutorial-style documentation: Java Internationalization Tutorial
- Example of API Documentation: string API.
- Example of tutorial-style documentation: How to use Regular Expressions in Python
- Documentation for developer-as-maintainer: There is a need to document how a system or a component is designed, implemented and tested so that other developers can maintain and evolve the code. Writing documentation of this type is harder because of the need to explain complex internal details. However, given that readers of this type of documentation usually have access to the source code itself, only some information need to be included in the documentation, as code (and code comments) can also serve as a complementary source of information.
- An example: se-edu/addressbook-level4 Developer Guide.
Choose correct statements about API documentation.
- a. They are useful for both developers who use the API and developers who maintain the API implementation.
- b. There are tools that can generate API documents from code comments.
- d. API documentation may contain code examples.
All
Guideline: Aim for Comprehensibility
Can explain the need for comprehensibility in documents
Technical documents exist to help others understand technical details. Therefore, it is not enough for the documentation to be accurate and comprehensive, it should also be comprehensible too.
Can write reasonably comprehensible developer documents
Here are some tips on writing effective documentation.
- Use plenty of diagrams: It is not enough to explain something in words; complement it with visual illustrations (e.g. a UML diagram).
- Use plenty of examples: When explaining algorithms, show a running example to illustrate each step of the algorithm, in parallel to worded explanations.
- Use simple and direct explanations: Convoluted explanations and fancy words will annoy readers. Avoid long sentences.
- Get rid of statements that do not add value: For example, 'We made sure our system works perfectly' (who didn't?), 'Component X has its own responsibilities' (of course it has!).
- It is not a good idea to have separate sections for each type of artifact, such as 'use cases', 'sequence diagrams', 'activity diagrams', etc. Such a structure, coupled with the indiscriminate inclusion of diagrams without justifying their need, indicates a failure to understand the purpose of documentation. Include diagrams when they are needed to explain something. If you want to provide additional diagrams for completeness' sake, include them in the appendix as a reference.
It is recommended for developer documents,
- a. to have separate sections for each type of diagrams such as class diagrams, sequence diagrams, use case diagrams etc.
- b. to give a high priority to comprehension too, not stop at comprehensiveness only.
(a)(b)
Explanation:
(a) Use diagrams when they help to understand the text descriptions. Text and diagrams should be used in tandem. Having separate sections for each diagram type is a sign of generating diagrams for the sake of having them.
(b) Both are important, but lengthy, complete, accurate yet hard to understand documents are not that useful.
Guideline: Describe Top-Down
Can distinguish between top-down and bottom up documentation
When writing project documents, a top-down breadth-first explanation is easier to understand than a bottom-up one.
Can explain the advantages of top-down documentation
The main advantage of the top-down approach is that the document is structured like an upside down tree (root at the top) and the reader can travel down a path she is interested in until she reaches the component she is interested to learn in-depth, without having to read the entire document or understand the whole system.
Can write documentation in a top-down manner
To explain a system called SystemFoo with two sub-systems, FrontEnd and BackEnd, start by describing the system at the highest level of abstraction, and progressively drill down to lower level details. An outline for such a description is given below.
[First, explain what the system is, in a black-box fashion (no internal details, only the external view).]
SystemFoois a ....
[Next, explain the high-level architecture of SystemFoo, referring to its major components only.]
SystemFooconsists of two major components:FrontEndandBackEnd.
The job ofFrontEndis to ... while the job ofBackEndis to ...
And this is howFrontEndandBackEndwork together ...
[Now we can drill down to FrontEnd's details.]
FrontEndconsists of three major components:A,B,C
A's job is to ...B's job is to...C's job is to...
And this is how the three components work together ...
[At this point, further drill down the internal workings of each component. A reader who is not interested in knowing nitty-gritty details can skip ahead to the section on BackEnd.]
In-depth description of
A
In-depth description ofB
...
[At this point drill down details of the BackEnd.]
...
Guideline: Minimal but Sufficient
Can explain documentation should be minimal yet sufficient
Aim for 'just enough' developer documentation.
- Writing and maintaining developer documents is an overhead. You should try to minimize that overhead.
- If the readers are developers who will eventually read the code, the documentation should complement the code and should provide only just enough guidance to get started.
Can write minimal yet sufficient documentation
Anything that is already clear in the code need not be described in words. Instead, focus on providing higher level information that is not readily visible in the code or comments.
Refrain from duplicating chunks or text. When describing several similar algorithms/designs/APIs, etc., do not simply duplicate large chunks of text. Instead, describe the similarity in one place and emphasize only the differences in other places. It is very annoying to see pages and pages of similar text without any indication as to how they differ from each other.
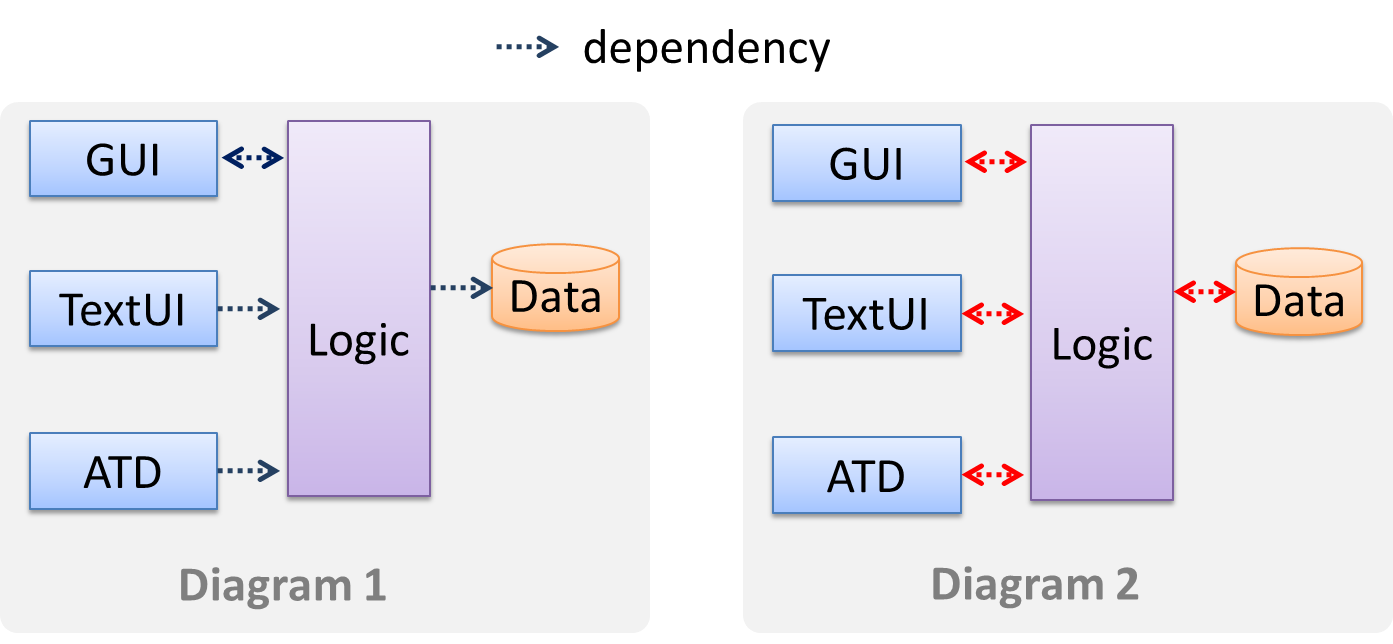
Drawing Architecture Diagrams
Can draw an architecture diagram
While architecture diagrams have no standard notation, try to follow these basic guidelines when drawing them.
-
Minimize the variety of symbols. If the symbols you choose do not have widely-understood meanings e.g. A drum symbol is widely-understood as representing a database, explain their meaning.
-
Avoid the indiscriminate use of double-headed arrows to show interactions between components.
Consider the two architecture diagrams of the same software given below. Because Diagram 2 uses double headed arrows, the important fact that GUI has a bi-directional dependency with the Logic component is no longer captured.
[W8.3] Design Principles: Basics
Abstraction
Can explain abstraction
Abstraction is a technique for dealing with complexity. It works by establishing a level of complexity we are interested in, and suppressing the more complex details below that level.
The guiding principle of abstraction is that only details that are relevant to the current perspective or the task at hand needs to be considered. As most programs are written to solve complex problems involving large amounts of intricate details, it is impossible to deal with all these details at the same time. That is where abstraction can help.
Ignoring lower level data items and thinking in terms of bigger entities is called data abstraction.
Within a certain software component, we might deal with a user data type, while ignoring the details contained in the user data item such as name, and date of birth. These details have been ‘abstracted away’ as they do not affect the task of that software component.
Control abstraction abstracts away details of the actual control flow to focus on tasks at a simplified level.
print(“Hello”) is an abstraction of the actual output mechanism within the computer.
Abstraction can be applied repeatedly to obtain progressively higher levels of abstractions.
An example of different levels of data abstraction: a File is a data item that is at a higher level than an array and an array is at a higher level than a bit.
An example of different levels of control abstraction: execute(Game) is at a higher level than print(Char) which is at a higher than an Assembly language instruction MOV.
Abstraction is a general concept that is not limited to just data or control abstractions.
Some more general examples of abstraction:
- An OOP class is an abstraction over related data and behaviors.
- An architecture is a higher-level abstraction of the design of a software.
- Models (e.g., UML models) are abstractions of some aspect of reality.
Coupling
Can explain coupling
Coupling is a measure of the degree of dependence between components, classes, methods, etc. Low coupling indicates that a component is less dependent on other components. High coupling (aka tight coupling or strong coupling) is discouraged due to the following disadvantages:
- Maintenance is harder because a change in one module could cause changes in other modules coupled to it (i.e. a ripple effect).
- Integration is harder because multiple components coupled with each other have to be integrated at the same time.
- Testing and reuse of the module is harder due to its dependence on other modules.
In the example below, design A appears to have a more coupling between the components than design B.
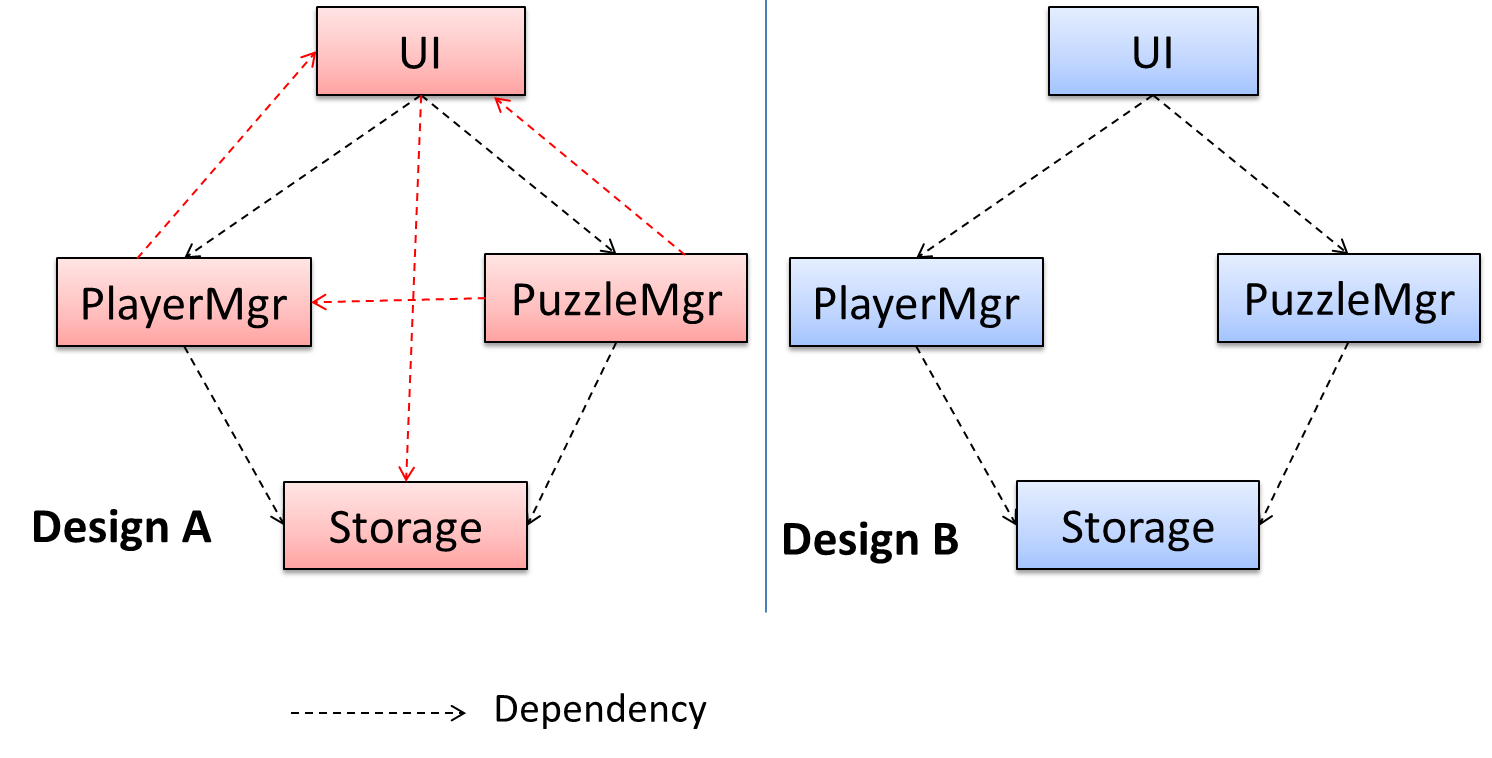
Discuss the coupling levels of alternative designs x and y.

Overall coupling levels in x and y seem to be similar (neither has more dependencies than the other). (Note that the number of dependency links is not a definitive measure of the level of coupling. Some links may be stronger than the others.). However, in x, A is highly-coupled to the rest of the system while B, C, D, and E are standalone (do not depend on anything else). In y, no component is as highly-coupled as A of x. However, only D and E are standalone.
Explain the link (if any) between regressions and coupling.
When the system is highly-coupled, the risk of regressions is higher too e.g. when component A is modified, all components ‘coupled’ to component A risk ‘unintended behavioral changes’.
Discuss the relationship between coupling and
Coupling decreases testability because if the
Choose the correct statements.
- a. As coupling increases, testability decreases.
- b. As coupling increases, the risk of regression increases.
- c. As coupling increases, the value of automated regression testing increases.
- d. As coupling increases, integration becomes easier as everything is connected together.
- e. As coupling increases, maintainability decreases.
(a)(b)(c)(d)(e)
Explanation: High coupling means either more components require to be integrated at once in a big-bang fashion (increasing the risk of things going wrong) or more drivers and stubs are required when integrating incrementally.
Can reduce coupling
X is coupled to Y if a change to Y can potentially require a change in X.
If Foo class calls the method Bar#read(), Foo is coupled to Bar because a change to Bar can potentially (but not always) require a change in the Foo class e.g. if the signature of the Bar#read() is changed, Foo needs to change as well, but a change to the Bar#write() method may not require a change in the Foo class because Foo does not call Bar#write().
class Foo{
    ...
    new Bar().read();
    ...
}

class Bar{
    void read(){
        ...
    }

    void write(){
        ...
    }
}
Some examples of coupling: A is coupled to B if,
Ahas access to the internal structure ofB(this results in a very high level of coupling)AandBdepend on the same global variableAcallsBAreceives an object ofBas a parameter or a return valueAinherits fromBAandBare required to follow the same data format or communication protocol
Which of these indicate a coupling between components A and B?
- a. component A has access to internal structure of component B.
- b. component A and B are written by the same developer.
- c. component A calls component B.
- d. component A receives an object of component B as a parameter.
- e. component A inherits from component B.
- f. components A and B have to follow the same data format or communication protocol.
(a)(b)(c)(d)(e)(f)
Explanation: Being written by the same developer does not imply a coupling.
Can identify types of coupling
Some examples of different coupling types:
- Content coupling: one module modifies or relies on the internal workings of another module e.g., accessing local data of another module
- Common/Global coupling: two modules share the same global data
- Control coupling: one module controlling the flow of another, by passing it information on what to do e.g., passing a flag
- Data coupling: one module sharing data with another module e.g. via passing parameters
- External coupling: two modules share an externally imposed convention e.g., data formats, communication protocols, device interfaces.
- Subclass coupling: a class inherits from another class. Note that a child class is coupled to the parent class but not the other way around.
- Temporal coupling: two actions are bundled together just because they happen to occur at the same time e.g. extracting a contiguous block of code as a method although the code block contains statements unrelated to each other
Cohesion
Can explain cohesion
Cohesion is a measure of how strongly-related and focused the various responsibilities of a component are. A highly-cohesive component keeps related functionalities together while keeping out all other unrelated things.
Higher cohesion is better. Disadvantages of low cohesion (aka weak cohesion):
- Lowers the understandability of modules as it is difficult to express module functionalities at a higher level.
- Lowers maintainability because a module can be modified due to unrelated causes (reason: the module contains code unrelated to each other) or many many modules may need to be modified to achieve a small change in behavior (reason: because the code realated to that change is not localized to a single module).
- Lowers reusability of modules because they do not represent logical units of functionality.
Can increase cohesion
Cohesion can be present in many forms. Some examples:
- Code related to a single concept is kept together, e.g. the
Studentcomponent handles everything related to students. - Code that is invoked close together in time is kept together, e.g. all code related to initializing the system is kept together.
- Code that manipulates the same data structure is kept together, e.g. the
GameArchivecomponent handles everything related to the storage and retrieval of game sessions.
Suppose a Payroll application contains a class that deals with writing data to the database. If the class include some code to show an error dialog to the user if the database is unreachable, that class is not cohesive because it seems to be interacting with the user as well as the database.
Compare the cohesion of the following two versions of the EmailMessage class. Which one is more cohesive and why?
// version-1
class EmailMessage {
    private String sendTo;
 	  private String subject;
    private String message;

    public EmailMessage(String sendTo, String subject, String message) {
        this.sendTo = sendTo;
        this.subject = subject;
        this.message = message;
    }

    public void sendMessage() {
        // sends message using sendTo, subject and message
    }
}

// version-2
class EmailMessage {
    private String sendTo;
    private String subject;
    private String message;
    private String username;

    public EmailMessage(String sendTo, String subject, String message) {
        this.sendTo = sendTo;
        this.subject = subject;
        this.message = message;
    }

    public void sendMessage() {
        // sends message using sendTo, subject and message
    }

    public void login(String username, String password) {
        this.username = username;
        // code to login
    }
}
Version 2 is less cohesive.
Explanation: Version 2 is handling functionality related to login, which is not directly related to the concept of ‘email message’ that the class is supposed to represent. On a related note, we can improve the cohesion of both versions by removing the sendMessage functionality. Although sending message is related to emails, this class is supposed to represent an email message, not an email server.
Some other principles
Can explain single responsibility principle
Single Responsibility Principle (SRP): A class should have one, and only one, reason to change. -- Robert C. Martin
If a class has only one responsibility, it needs to change only when there is a change to that responsibility.
Consider a TextUi class that does parsing of the user commands as well as interacting with the user. That class needs to change when the formatting of the UI changes as well as when the syntax of the user command changes. Hence, such a class does not follow the SRP.
Gather together the things that change for the same reasons. Separate those things that change for different reasons. ―Agile Software Development, Principles, Patterns, and Practices by Robert C. Martin
- An explanation of the SRP from www.oodesign.com
- Another explanation (more detailed) by Patkos Csaba
- A book chapter on SRP - A book chapter on SRP, written by the father of the principle itself Robert C Martin.
Can explain open-closed principle (OCP)
The Open-Close Principle aims to make a code entity easy to adapt and reuse without needing to modify the code entity itself.
Open-Closed Principle (OCP): A module should be open for extension but closed for modification. That is, modules should be written so that they can be extended, without requiring them to be modified. -- proposed by Bertrand Meyer
In object-oriented programming, OCP can be achieved in various ways. This often requires separating the specification (i.e. interface) of a module from its implementation.
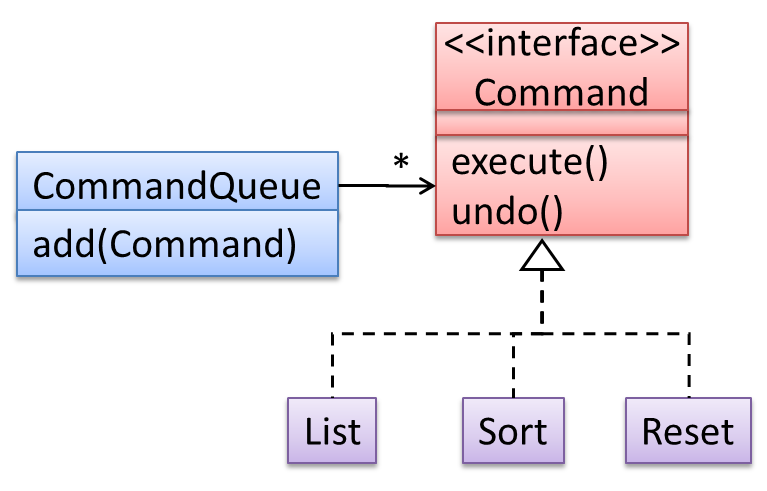
In the design given below, the behavior of the CommandQueue class can be altered by adding more concrete Command subclasses. For example, by including a Delete class alongside List, Sort, and Reset, the CommandQueue can now perform delete commands without modifying its code at all. That is, its behavior was extended without having to modify its code. Hence, it was open to extensions, but closed to modification.
The behavior of a Java generic class can be altered by passing it a different class as a parameter. In the code below, the ArrayList class behaves as a container of Students in one instance and as a container of Admin objects in the other instance, without having to change its code. That is, the behavior of the ArrayList class is extended without modifying its code.
ArrayList students = new ArrayList< Student >();
ArrayList admins = new ArrayList< Admin >();
Which of these is closest to the meaning of the open-closed principle?
(a)
Explanation: Please refer the handout for the definition of OCP.
Can explain separation of concerns principle
Separation of Concerns Principle (SoC): To achieve better modularity, separate the code into distinct sections, such that each section addresses a separate concern. -- Proposed by Edsger W. Dijkstra
A concern in this context is a set of information that affects the code of a computer program.
Examples for concerns:
- A specific feature, such as the code related to
add employeefeature - A specific aspect, such as the code related to
persistenceorsecurity - A specific entity, such as the code related to the
Employeeentity
Applying
If the code related to persistence is separated from the code related to security, a change to how the data are persisted will not need changes to how the security is implemented.
This principle can be applied at the class level, as well as on higher levels.
The
This principle should lead to higher
Design → Design Fundamentals → Coupling →
Coupling is a measure of the degree of dependence between components, classes, methods, etc. Low coupling indicates that a component is less dependent on other components. High coupling (aka tight coupling or strong coupling) is discouraged due to the following disadvantages:
- Maintenance is harder because a change in one module could cause changes in other modules coupled to it (i.e. a ripple effect).
- Integration is harder because multiple components coupled with each other have to be integrated at the same time.
- Testing and reuse of the module is harder due to its dependence on other modules.
In the example below, design A appears to have a more coupling between the components than design B.
Discuss the coupling levels of alternative designs x and y.
Overall coupling levels in x and y seem to be similar (neither has more dependencies than the other). (Note that the number of dependency links is not a definitive measure of the level of coupling. Some links may be stronger than the others.). However, in x, A is highly-coupled to the rest of the system while B, C, D, and E are standalone (do not depend on anything else). In y, no component is as highly-coupled as A of x. However, only D and E are standalone.
Explain the link (if any) between regressions and coupling.
When the system is highly-coupled, the risk of regressions is higher too e.g. when component A is modified, all components ‘coupled’ to component A risk ‘unintended behavioral changes’.
Discuss the relationship between coupling and
Coupling decreases testability because if the
Choose the correct statements.
- a. As coupling increases, testability decreases.
- b. As coupling increases, the risk of regression increases.
- c. As coupling increases, the value of automated regression testing increases.
- d. As coupling increases, integration becomes easier as everything is connected together.
- e. As coupling increases, maintainability decreases.
(a)(b)(c)(d)(e)
Explanation: High coupling means either more components require to be integrated at once in a big-bang fashion (increasing the risk of things going wrong) or more drivers and stubs are required when integrating incrementally.
Design → Design Fundamentals → Cohesion →
Cohesion is a measure of how strongly-related and focused the various responsibilities of a component are. A highly-cohesive component keeps related functionalities together while keeping out all other unrelated things.
Higher cohesion is better. Disadvantages of low cohesion (aka weak cohesion):
- Lowers the understandability of modules as it is difficult to express module functionalities at a higher level.
- Lowers maintainability because a module can be modified due to unrelated causes (reason: the module contains code unrelated to each other) or many many modules may need to be modified to achieve a small change in behavior (reason: because the code realated to that change is not localized to a single module).
- Lowers reusability of modules because they do not represent logical units of functionality.
“Only the GUI class should interact with the user. The GUI class should only concern itself with user interactions”. This statement follows from,
- a. A software design should promote separation of concerns in a design.
- b. A software design should increase cohesion of its components.
- c. A software design should follow single responsibility principle.
(a)(b)(c)
Explanation: By making ‘user interaction’ GUI class’ sole responsibility, we increase its cohesion. This is also in line with separation of concerns (i.e., we separated the concern of user interaction) and single responsibility principle (GUI class has only one responsibility).
[W8.4] Product Design Guidelines
No textbook section. To be covered during the lecture.
Project Milestone: mid-v1.2
Adjust project schedule/rigor as needed, start proper milestone management.
Project Management:
💡 You are free to adjust process rigor and project plan at any future time in the project, starting from v1.2. If you are not sure if a certain adjustment is allowed, you can check with the teaching team first.
- Switch to AB-3 or AB-2 if AB-4 is not working out for you.
Relevant: [
There is no explicit penalty for switching to a lower level AB. All projects are evaluated based on the same yardstick irrespective of on which AB it is based. As an AB is given to you as a 'free' head-start, a lower level AB gives you a shorter head-start, which means your final product is likely to be less functional than those from teams using AB-4 unless you progress faster than them. Nevertheless, you should switch to AB2/3 if you feel you can learn more from the project that way, as our goal is to maximize learning, not features.
If your team wants to stay with AB-4 but you want to switch to a lower level AB, let the us know so that we can work something out for you.
If you have opted to use AB-2 or AB-3 instead of AB-4 as the basis of your product, please note the following points:
- Set up auto-publishing of documentation similar to AB-4
- Add Project Portfolio Pages (PPP) for members, similar to the example provided in AB-4
- You can convert UG, DG, and PPP into pdf files using instructions provided in AB-4 DG
- Create an About Us page similar to AB-4 and update it as described in
mid-v1.1 progress guide
Set up project repo, start moving UG and DG to the repo, attempt to do local-impact changes to the code base.
Project Management:
Set up the team org and the team repo as explained below:
Relevant: [
Organization setup
Please follow the organization/repo name format precisely because we use scripts to download your code or else our scripts will not be able to detect your work.
After receiving your team ID, one team member should do the following steps:
- Create a GitHub organization with the following details:
- Organization name :
CS2103-AY1819S2-TEAM_ID. e.g.CS2103-AY1819S2-W12-1 - Plan: Open Source ($0/month)
- Organization name :
- Add members to the organization:
- Create a team called
developersto your organization. - Add your team members to the developers team.
- Create a team called
Relevant: [
Repo setup
Only one team member:
- Fork Address Book Level 4 to your team org.
- Rename the forked repo as
main. This repo (let's call it the team repo) is to be used as the repo for your project. - Ensure the issue tracker of your team repo is enabled. Reason: our bots will be posting your weekly progress reports on the issue tracker of your team repo.
- Ensure your team members have the desired level of access to your team repo.
- Enable Travis CI for the team repo.
- Set up auto-publishing of docs. When set up correctly, your project website should be available via the URL
https://cs2103-ay1819s2-{team-id}.github.io/maine.g.,https://cs2103-ay1819s2-w13-1.github.io/main/. This also requires you to enable the GitHub Pages feature of your team repo and configure it to serve the website from thegh-pagesbranch. - Create a team PR for us to track your project progress: i.e., create a PR from your team repo
masterbranch to [nus-cs2103-AY1819S2/addressbook-level4]masterbranch. PR name:[Team ID] Product Namee.g.,[T09-2] Contact List Pro. As you merge code to your team repo'smasterbranch, this PR will auto-update to reflect how much your team's product has progressed. In the PR description@mention the other team members so that they get notified when the tutor adds comments to the PR.
All team members:
- Watch the
mainrepo (created above) i.e., go to the repo and click on thewatchbutton to subscribe to activities of the repo - Fork the
mainrepo to your personal GitHub account. - Clone the fork to your Computer.
- Recommended: Set it up as an Intellij project (follow the instructions in the Developer Guide carefully).
- Set up the developer environment in your computer. You are recommended to use JDK 9 for AB-4 as some of the libraries used in AB-4 have not updated to support Java 10 yet. JDK 9 can be downloaded from the Java Archive.
Note that some of our download scripts depend on the following folder paths. Please do not alter those paths in your project.
/src/main/src/test/docs
When updating code in the repo, follow the workflow explained below:
Relevant: [
Workflow
Before you do any coding for the project,
- Ensure you have
set the Git username correctly (as explained in Appendix E) in all Computers you use for coding. - Read
our reuse policy (in Admin: Appendix B) , in particular, how to give credit when you reuse code from the Internet or classmates:
Setting Git Username to Match GitHub Username
We use various tools to analyze your code. For us to be able to identify your commits, you should use the GitHub username as your Git username as well. If there is a mismatch, or if you use multiple user names for Git, our tools might miss some of your work and as a result you might not get credit for some of your work.
In each Computer you use for coding, after installing Git, you should set the Git username as follows.
- Open a command window that can run Git commands (e.g., Git bash window)
- Run the command
git config --global user.name YOUR_GITHUB_USERNAME
e.g.,git config --global user.name JohnDoe
More info about setting Git username is here.
Policy on reuse
Reuse is encouraged. However, note that reuse has its own costs (such as the learning curve, additional complexity, usage restrictions, and unknown bugs). Furthermore, you will not be given credit for work done by others. Rather, you will be given credit for using work done by others.
- You are allowed to reuse work from your classmates, subject to following conditions:
- The work has been published by us or the authors.
- You clearly give credit to the original author(s).
- You are allowed to reuse work from external sources, subject to following conditions:
- The work comes from a source of 'good standing' (such as an established open source project). This means you cannot reuse code written by an outside 'friend'.
- You clearly give credit to the original author. Acknowledge use of third party resources clearly e.g. in the welcome message, splash screen (if any) or under the 'about' menu. If you are open about reuse, you are less likely to get into trouble if you unintentionally reused something copyrighted.
- You do not violate the license under which the work has been released. Please do not use 3rd-party images/audio in your software unless they have been specifically released to be used freely. Just because you found it in the Internet does not mean it is free for reuse.
- Always get permission from us before you reuse third-party libraries. Please post your 'request to use 3rd party library' in our forum. That way, the whole class get to see what libraries are being used by others.
Giving credit for reused work
Given below are how to give credit for things you reuse from elsewhere. These requirements are specific to this module i.e., not applicable outside the module (outside the module you should follow the rules specified by your employer and the license of the reused work)
If you used a third party library:
- Mention in the
README.adoc(under the Acknowledgements section) - mention in the
Project Portfolio Page if the library has a significant relevance to the features you implemented
If you reused code snippets found on the Internet e.g. from StackOverflow answers or
referred code in another software or
referred project code by current/past student:
- If you read the code to understand the approach and implemented it yourself, mention it as a comment
Example://Solution below adapted from https://stackoverflow.com/a/16252290 {Your implmentation of the reused solution here ...} - If you copy-pasted a non-trivial code block (possibly with minor modifications renaming, layout changes, changes to comments, etc.), also mark the code block as reused code (using
@@authortags
Format://@@author {yourGithubUsername}-reused //{Info about the source...} {Reused code (possibly with minor modifications) here ...} //@@authorpersons = getList() //@@author johndoe-reused //Reused from https://stackoverflow.com/a/34646172 with minor modifications Collections.sort(persons, new Comparator<CustomData>() { @Override public int compare(CustomData lhs, CustomData rhs) { return lhs.customInt > rhs.customInt ? -1 : (lhs.customInt < rhs.customInt) ? 1 : 0; } }); //@@author return persons;
Adding @@author tags indicate authorship
-
Mark your code with a
//@@author {yourGithubUsername}. Note the double@.
The//@@authortag should indicates the beginning of the code you wrote. The code up to the next//@@authortag or the end of the file (whichever comes first) will be considered as was written by that author. Here is a sample code file://@@author johndoe method 1 ... method 2 ... //@@author sarahkhoo method 3 ... //@@author johndoe method 4 ... -
If you don't know who wrote the code segment below yours, you may put an empty
//@@author(i.e. no GitHub username) to indicate the end of the code segment you wrote. The author of code below yours can add the GitHub username to the empty tag later. Here is a sample code with an emptyauthortag:method 0 ... //@@author johndoe method 1 ... method 2 ... //@@author method 3 ... method 4 ... -
The author tag syntax varies based on file type e.g. for java, css, fxml. Use the corresponding comment syntax for non-Java files.
Here is an example code from an xml/fxml file.<!-- @@author sereneWong --> <textbox> <label>...</label> <input>...</input> </textbox> ... -
Do not put the
//@@authorinside java header comments.
👎/** * Returns true if ... * @@author johndoe */👍
//@@author johndoe
/**
  * Returns true if ...
  */
What to and what not to annotate
-
Annotate both functional and test code There is no need to annotate documentation files.
-
Annotate only significant size code blocks that can be reviewed on its own e.g., a class, a sequence of methods, a method.
Claiming credit for code blocks smaller than a method is discouraged but allowed. If you do, do it sparingly and only claim meaningful blocks of code such as a block of statements, a loop, or an if-else statement.- If an enhancement required you to do tiny changes in many places, there is no need to annotate all those tiny changes; you can describe those changes in the Project Portfolio page instead.
- If a code block was touched by more than one person, either let the person who wrote most of it (e.g. more than 80%) take credit for the entire block, or leave it as 'unclaimed' (i.e., no author tags).
- Related to the above point, if you claim a code block as your own, more than 80% of the code in that block should have been written by yourself. For example, no more than 20% of it can be code you reused from somewhere.
- 💡 GitHub has a blame feature and a history feature that can help you determine who wrote a piece of code.
-
Do not try to boost the quantity of your contribution using unethical means such as duplicating the same code in multiple places. In particular, do not copy-paste test cases to create redundant tests. Even repetitive code blocks within test methods should be extracted out as utility methods to reduce code duplication. Individual members are responsible for making sure code attributed to them are correct. If you notice a team member claiming credit for code that he/she did not write or use other questionable tactics, you can email us (after the final submission) to let us know.
-
If you wrote a significant amount of code that was not used in the final product,
- Create a folder called
{project root}/unused - Move unused files (or copies of files containing unused code) to that folder
- use
//@@author {yourGithubUsername}-unusedto mark unused code in those files (note the suffixunused) e.g.
//@@author johndoe-unused
method 1 ...
method 2 ...
Please put a comment in the code to explain why it was not used.
- Create a folder called
-
If you reused code from elsewhere, mark such code as
//@@author {yourGithubUsername}-reused(note the suffixreused) e.g.//@@author johndoe-reused method 1 ... method 2 ... -
You can use empty
@@authortags to mark code as not yours when RepoSense attribute the to you incorrectly.-
Code generated by the IDE/framework, should not be annotated as your own.
-
Code you modified in minor ways e.g. adding a parameter. These should not be claimed as yours but you can mention these additional contributions in the Project Portfolio page if you want to claim credit for them.
-
At the end of the project each student is required to submit a Project Portfolio Page.
-
Objective:
- For you to use (e.g. in your resume) as a well-documented data point of your SE experience
- For us to use as a data point to evaluate your,
- contributions to the project
- your documentation skills
-
Sections to include:
-
Overview: A short overview of your product to provide some context to the reader.
-
Summary of Contributions:
- Code contributed: Give a link to your code on Project Code Dashboard, which should be
https://nus-cs2103-ay1819s2.github.io/cs2103-dashboard/#=undefined&search=githbub_username_in_lower_case(replacegithbub_username_in_lower_casewith your actual username in lower case e.g.,johndoe). This link is also available in the Project List Page -- linked to the icon under your photo. - Features implemented: A summary of the features you implemented. If you implemented multiple features, you are recommended to indicate which one is the biggest feature.
- Other contributions:
- Contributions to project management e.g., setting up project tools, managing releases, managing issue tracker etc.
- Evidence of helping others e.g. responses you posted in our forum, bugs you reported in other team's products,
- Evidence of technical leadership e.g. sharing useful information in the forum
- Code contributed: Give a link to your code on Project Code Dashboard, which should be
-
Contributions to the User Guide: Reproduce the parts in the User Guide that you wrote. This can include features you implemented as well as features you propose to implement.
The purpose of allowing you to include proposed features is to provide you more flexibility to show your documentation skills. e.g. you can bring in a proposed feature just to give you an opportunity to use a UML diagram type not used by the actual features. -
Contributions to the Developer Guide: Reproduce the parts in the Developer Guide that you wrote. Ensure there is enough content to evaluate your technical documentation skills and UML modelling skills. You can include descriptions of your design/implementations, possible alternatives, pros and cons of alternatives, etc.
-
If you plan to use the PPP in your Resume, you can also include your SE work outside of the module (will not be graded)
-
-
Format:
-
File name:
docs/team/githbub_username_in_lower_case.adoce.g.,docs/team/johndoe.adoc -
Follow the example in the AddressBook-Level4
-
💡 You can use the Asciidoc's
includefeature to include sections from the developer guide or the user guide in your PPP. Follow the example in the sample. -
It is assumed that all contents in the PPP were written primarily by you. If any section is written by someone else e.g. someone else wrote described the feature in the User Guide but you implemented the feature, clearly state that the section was written by someone else (e.g.
Start of Extract [from: User Guide] written by Jane Doe). Reason: Your writing skills will be evaluated based on the PPP
-
-
Page limit:
Content Limit Overview + Summary of contributions 0.5-1 (soft limit) Contributions to the User Guide 1-3 (soft limit) Contributions to the Developer Guide 3-6 (soft limit) Total 5-10 (strict) - The page limits given above are after converting to PDF format. The actual amount of content you require is actually less than what these numbers suggest because the HTML → PDF conversion adds a lot of spacing around content.
- Reason for page limit: These submissions are peer-graded (in the PE) which needs to be done in a limited time span.
If you have more content than the limit given above, you can give a representative samples of UG and DG that showcase your documentation skills. Those samples should be understandable on their own. For the parts left-out, you can give an abbreviated version and refer the reader to the full UG/DG for more details.
It's similar to giving extra details as appendices; the reader will look at the UG/DG if the PPP is not enough to make a judgment. For example, when judging documentation quality, if the part in the PPP is not well-written, there is no point reading the rest in the main UG/DG. That's why you need to put the most representative part of your writings in the PPP and still give an abbreviated version of the rest in the PPP itself. Even when judging the quantity of work, the reader should be able to get a good sense of the quantity by combining what is quoted in the PPP and your abbreviated description of the missing part. There is no guarantee that the evaluator will read the full document.
Follow the
- Get team members to review PRs. A workflow without PR reviews is a risky workflow.
- Do not merge PRs failing
CI . After setting up Travis, the CI status of a PR is reported at the bottom of the PR page. The screenshot below shows the status of a PR that is passing all CI checks.
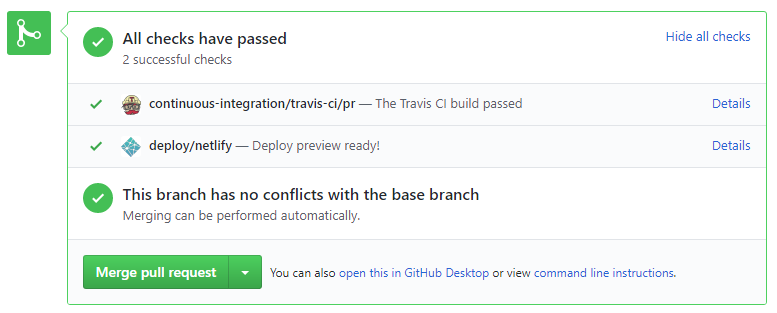
If there is a failure, you can click on theDetailslink in corresponding line to find out more about the failure. Once you figure out the cause of the failure, push the a fix to the PR. - After setting up Netlify, you can use Netlify PR Preview to preview changes to documentation files, if the PR contains updates to documentation. To see the preview, click on the
Detailslink in front of the Netlify status reported (refer screenshot above).
After completing v1.1, you can adjust process rigor to suit your team's pace, as explained below.
-
Reduce automated tests have benefits, but they can be a pain to write/maintain; GUI tests are especially hard to maintain because their behavior can sometimes depend on things such as the OS, resolution etc.
It is OK to get rid of some of the troublesome tests and rely more on manual testing instead. The less automated tests you have, the higher the risk of regressions; but it may be an acceptable trade-off under the circumstances if tests are slowing you down too much.
There is no direct penalty for removing GUI tests. Also noteour expectation on test code . -
Reduce automated checks: You can also reduce the rigor of checkstyle checks to expedite PR processing.
-
Switch to a lighter workflow: While forking workflow is the safest, it is also rather heavy. You an switch to a simpler workflow if the forking workflow is slowing you down. Refer the textbook to find more about alternative workflows: branching workflow, centralized workflow. However, we still recommend that you use PR reviews, at least for PRs affecting others' features.
You can also increase the rigor/safety of your workflow in the following ways:
- Use GitHub's Protected Branches feature to protect your
masterbranch against rogue PRs.
- There is no requirement for a minimum coverage level. Note that in a production environment you are often required to have at least 90% of the code covered by tests. In this project, it can be less. The less coverage you have, the higher the risk of regression bugs, which will cost marks if not fixed before the final submission.
- You must write some tests so that we can evaluate your ability to write tests.
- How much of each type of testing should you do? We expect you to decide. You learned different types of testing and what they try to achieve. Based on that, you should decide how much of each type is required. Similarly, you can decide to what extent you want to automate tests, depending on the benefits and the effort required.
Project Management → Revision Control →
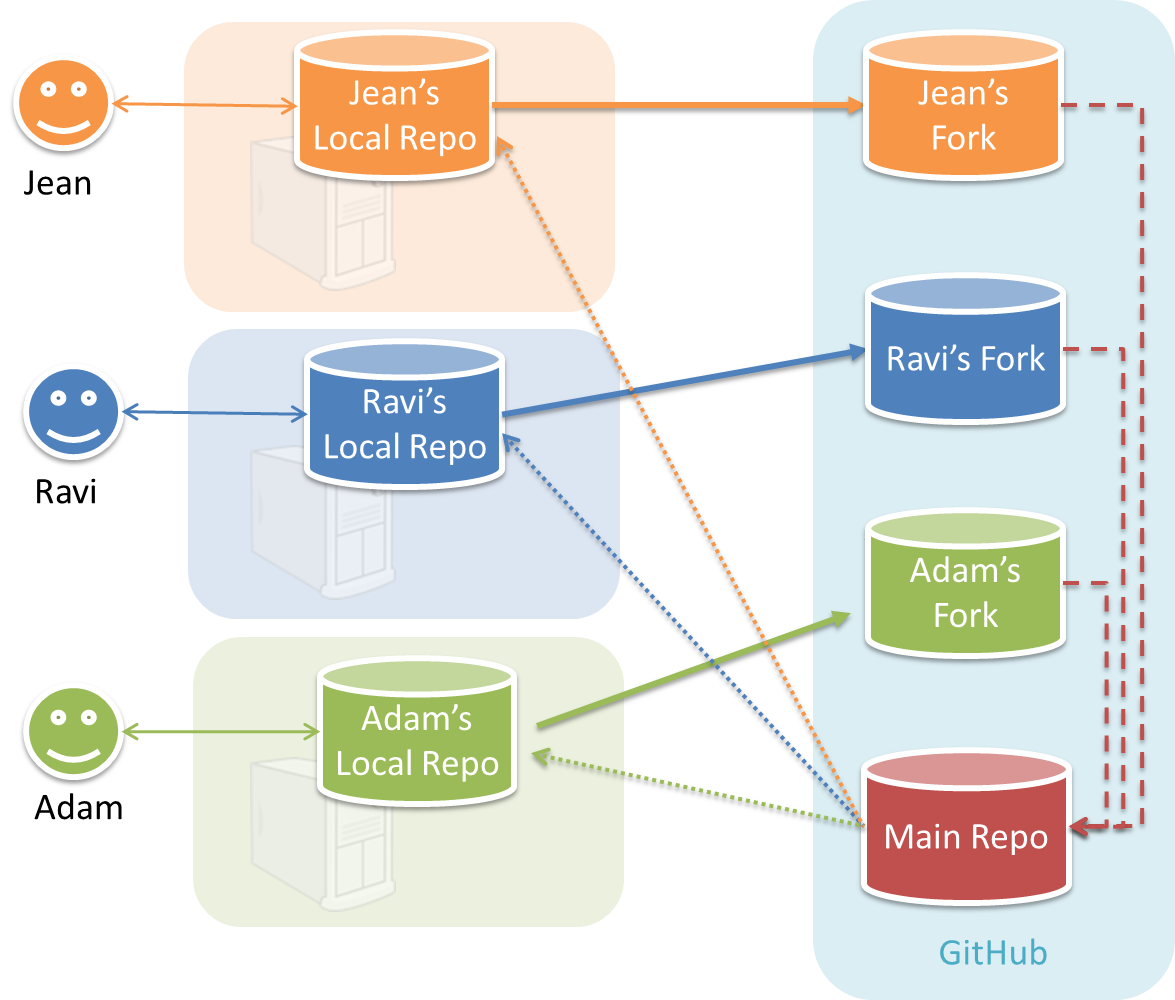
In the forking workflow, the 'official' version of the software is kept in a remote repo designated as the 'main repo'. All team members fork the main repo create pull requests from their fork to the main repo.
To illustrate how the workflow goes, let’s assume Jean wants to fix a bug in the code. Here are the steps:
- Jean creates a separate branch in her local repo and fixes the bug in that branch.
- Jean pushes the branch to her fork.
- Jean creates a pull request from that branch in her fork to the main repo.
- Other members review Jean’s pull request.
- If reviewers suggested any changes, Jean updates the PR accordingly.
- When reviewers are satisfied with the PR, one of the members (usually the team lead or a designated 'maintainer' of the main repo) merges the PR, which brings Jean’s code to the main repo.
- Other members, realizing there is new code in the upstream repo, sync their forks with the new upstream repo (i.e. the main repo). This is done by pulling the new code to their own local repo and pushing the updated code to their own fork.
- A detailed explanation of the Forking Workflow - From Atlassian
Documentation:
Recommended procedure for updating docs:
- Divide among yourselves who will update which parts of the document(s).
- Update the team repo by following the workflow mentioned above.
Update the following pages in your project repo:
- About Us page:
This page is used for module admin purposes. Please follow the format closely or else our scripts will not be able to give credit for your work.
- Replace info of SE-EDU developers with info of your team, including a suitable photo as described
here . - Including the name/photo of the supervisor/lecturer is optional.
- The photo of a team member should be
doc/images/githbub_username_in_lower_case.pnge.g.docs/images/damithc.png. If you photo is in jpg format, name the file as.pnganyway. - Indicate the different roles played and responsibilities held by each team member. You can reassign these
roles and responsibilities (as explained in Admin Project Scope) later in the project, if necessary.
- Replace info of SE-EDU developers with info of your team, including a suitable photo as described
-
The purpose of the profile photo is for the teaching team to identify you. Therefore, you should choose a recent individual photo showing your face clearly (i.e., not too small) -- somewhat similar to a passport photo. Some examples can be seen in the 'Teaching team' page. Given below are some examples of good and bad profile photos.
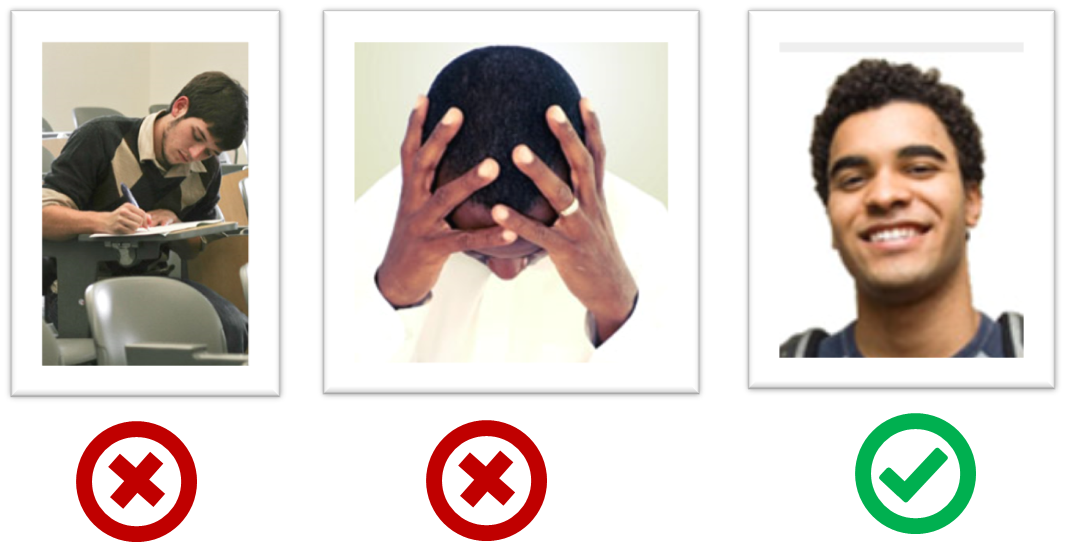
-
If you are uncomfortable posting your photo due to security reasons, you can post a lower resolution image so that it is hard for someone to misuse that image for fraudulent purposes. If you are concerned about privacy, you can request permission to omit your photo from the page by writing to prof.
Roles indicate aspects you are in charge of and responsible for. E.g., if you are in charge of documentation, you are the person who should allocate which parts of the documentation is to be done by who, ensure the document is in right format, ensure consistency etc.
This is a non-exhaustive list; you may define additional roles.
- Team lead: Responsible for overall project coordination.
- Documentation (short for ‘in charge of documentation’): Responsible for the quality of various project documents.
- Testing: Ensures the testing of the project is done properly and on time.
- Code quality: Looks after code quality, ensures adherence to coding standards, etc.
- Deliverables and deadlines: Ensure project deliverables are done on time and in the right format.
- Integration: In charge of versioning of the code, maintaining the code repository, integrating various parts of the software to create a whole.
- Scheduling and tracking: In charge of defining, assigning, and tracking project tasks.
- [Tool ABC] expert: e.g. Intellij expert, Git expert, etc. Helps other team member with matters related to the specific tool.
- In charge of[Component XYZ]: e.g. In charge of
Model,UI,Storage, etc. If you are in charge of a component, you are expected to know that component well, and review changes done to that component in v1.3-v1.4.
Please make sure each of the important roles are assigned to one person in the team. It is OK to have a 'backup' for each role, but for each aspect there should be one person who is unequivocally the person responsible for it.
-
Contact Us Page: Update to match your product.
-
README.adoc page: Update it to match your project.
-
Add a UI mockup of your intended final product.
Note that the image of the UI should bedocs/images/Ui.pngso that it can be downloaded by our scripts. Limit the file to contain one screenshot/mockup only and ensure the new image is roughly the sameheight x widthproportions as the original one. Reason: when we compile these images from all teams into one page (example), yours should not look out of place. -
The original
README.adocfile (which doubles as the landing page of your project website) is written to read like the introduction to an SE learning/teaching resource. You should restructure this page to look like the home page of a real product (not a school project) targeting real users e.g. remove references to addressbook-level3, Learning Outcomes etc. mention target users, add a marketing blurb etc. On a related note, also removeLearning Outcomeslink and related pages. -
Update the link of the Travis build status badge (
 ) so that it reflects the build status of your team repo.
For the other badges,- either set up the respective tool for your project (AB-4 Developer Guide has instructions on how to set up AppVeyor and Coveralls) and update the badges accordingly,
- or remove the badge.
-
Acknowledge the original source of the code i.e. AddressBook-Level4 project created by SE-EDU initiative at
https://github.com/se-edu/
-
-
User Guide: Start moving the content from your User Guide (draft created in previous weeks) into the User Guide page in your repository. If a feature is not implemented, mark it as 'Coming in v2.0' (example).
-
Developer Guide: Similar to the User Guide, start moving the content from your Developer Guide (draft created in previous weeks) into the Developer Guide page in your team repository.
Product:
-
Each member can attempt to do a
local-impact change to the code base.Objective: To familiarize yourself with at least one
components of the product.Description: Divide the components among yourselves. Each member can do some small enhancements to their component(s) to learn the code of that component. Some suggested enhancements are given in the AddressBook-Level4 developer guide.
Submission: Create PRs from your own fork to your team repo. Get it merged by following your team's workflow.
- Adjust process rigor to suit your team's pace, as explained in the panel below.
Relevant: [
After completing v1.1, you can adjust process rigor to suit your team's pace, as explained below.
-
Reduce automated tests have benefits, but they can be a pain to write/maintain; GUI tests are especially hard to maintain because their behavior can sometimes depend on things such as the OS, resolution etc.
It is OK to get rid of some of the troublesome tests and rely more on manual testing instead. The less automated tests you have, the higher the risk of regressions; but it may be an acceptable trade-off under the circumstances if tests are slowing you down too much.
There is no direct penalty for removing GUI tests. Also noteour expectation on test code . -
Reduce automated checks: You can also reduce the rigor of checkstyle checks to expedite PR processing.
-
Switch to a lighter workflow: While forking workflow is the safest, it is also rather heavy. You an switch to a simpler workflow if the forking workflow is slowing you down. Refer the textbook to find more about alternative workflows: branching workflow, centralized workflow. However, we still recommend that you use PR reviews, at least for PRs affecting others' features.
You can also increase the rigor/safety of your workflow in the following ways:
- Use GitHub's Protected Branches feature to protect your
masterbranch against rogue PRs.
- There is no requirement for a minimum coverage level. Note that in a production environment you are often required to have at least 90% of the code covered by tests. In this project, it can be less. The less coverage you have, the higher the risk of regression bugs, which will cost marks if not fixed before the final submission.
- You must write some tests so that we can evaluate your ability to write tests.
- How much of each type of testing should you do? We expect you to decide. You learned different types of testing and what they try to achieve. Based on that, you should decide how much of each type is required. Similarly, you can decide to what extent you want to automate tests, depending on the benefits and the effort required.
-
Adjust project plan if necessary. Now that you have a some idea about the code base, revisit the feature release plan and adjust it if necessary.
-
Set up the issue tracker as described in the panel below, if you haven't done so already.
Relevant: [
Issue tracker setup
We recommend you configure the issue tracker of the main repo as follows:
- Delete existing labels and add the following labels.
💡 Issue type labels are useful from the beginning of the project. The other labels are needed only when you start implementing the features.
Issue type labels:
type.Epic: A big feature which can be broken down into smaller stories e.g. searchtype.Story: A user storytype.Enhancement: An enhancement to an existing storytype.Task: Something that needs to be done, but not a story, bug, or an epic. e.g. Move testing code into a new folder)type.Bug: A bug
Status labels:
status.Ongoing: The issue is currently being worked on. note: remove this label before closing an issue.
Priority labels:
priority.High: Must dopriority.Medium: Nice to havepriority.Low: Unlikely to do
Bug Severity labels:
severity.Low: A flaw that is unlikely to affect normal operations of the product. Appears only in very rare situations and causes a minor inconvenience only.severity.Medium: A flaw that causes occasional inconvenience to some users but they can continue to use the product.severity.High: A flaw that affects most users and causes major problems for users. i.e., makes the product almost unusable for most users.
-
Create following milestones :
v1.0,v1.1,v1.2,v1.3,v1.4, -
You may configure other project settings as you wish. e.g. more labels, more milestones
- Start proper schedule tracking and milestone management as explained in the panel below.
Relevant: [
Project Schedule Tracking
In general, use the issue tracker (Milestones, Issues, PRs, Tags, Releases, and Labels) for assigning, scheduling, and tracking all noteworthy project tasks, including user stories. Update the issue tracker regularly to reflect the current status of the project. You can also use GitHub's Projects feature to manage the project, but keep it linked to the issue tracker as much as you can.
Using Issues:
During the initial stages (latest by the start of v1.2):
-
Record each of the user stories you plan to deliver as an issue in the issue tracker. e.g.
Title: As a user I can add a deadline
Description: ... so that I can keep track of my deadlines -
Assign the
type.*andpriority.*labels to those issues. -
Formalize the project plan by assigning relevant issues to the corresponding milestone.
From milestone v1.2:
-
Define project tasks as issues. When you start implementing a user story (or a feature), break it down to smaller tasks if necessary. Define reasonable sized, standalone tasks. Create issues for each of those tasks so that they can be tracked.e.g.
-
A typical task should be able to done by one person, in a few hours.
- Bad (reasons: not a one-person task, not small enough):
Write the Developer Guide - Good:
Update class diagram in the Developer Guide for v1.4
- Bad (reasons: not a one-person task, not small enough):
-
There is no need to break things into VERY small tasks. Keep them as big as possible, but they should be no bigger than what you are going to assign a single person to do within a week. eg.,
- Bad:
Implementing parser(reason: too big). - Good:
Implementing parser support for adding of floating tasks
- Bad:
-
Do not track things taken for granted. e.g.,
push code to reposhould not be a task to track. In the example given under the previous point, it is taken for granted that the owner will also (a) test the code and (b) push to the repo when it is ready. Those two need not be tracked as separate tasks. -
Write a descriptive title for the issue. e.g.
Add support for the 'undo' command to the parser- Omit redundant details. In some cases, the issue title is enough to describe the task. In that case, no need to repeat it in the issue description. There is no need for well-crafted and detailed descriptions for tasks. A minimal description is enough. Similarly, labels such as
prioritycan be omitted if you think they don't help you.
- Omit redundant details. In some cases, the issue title is enough to describe the task. In that case, no need to repeat it in the issue description. There is no need for well-crafted and detailed descriptions for tasks. A minimal description is enough. Similarly, labels such as
-
-
Assign tasks (i.e., issues) to the corresponding team members using the
assigneesfield. Normally, there should be some ongoing tasks and some pending tasks against each team member at any point. -
Optionally, you can use
status.ongoinglabel to indicate issues currently ongoing.
Using Milestones:
We recommend you do proper milestone management starting from v1.2. Given below are the conditions to satisfy for a milestone to be considered properly managed:
Planning a Milestone:
-
Issues assigned to the milestone, team members assigned to issues: Used GitHub milestones to indicate which issues are to be handled for which milestone by assigning issues to suitable milestones. Also make sure those issues are assigned to team members. Note that you can change the milestone plan along the way as necessary.
-
Deadline set for the milestones (in the GitHub milestone). Your internal milestones can be set earlier than the deadlines we have set, to give you a buffer.
Wrapping up a Milestone:
-
A working product tagged with the correct tag (e.g.
v1.2) and is pushed to the main repo
or a product release done on GitHub. A product release is optional for v1.2 but required from from v1.3. Click here to see an example release. -
All tests passing on Travis for the version tagged/released.
-
Milestone updated to match the product i.e. all issues completed and PRs merged for the milestone should be assigned to the milestone. Incomplete issues/PRs should be moved to a future milestone.
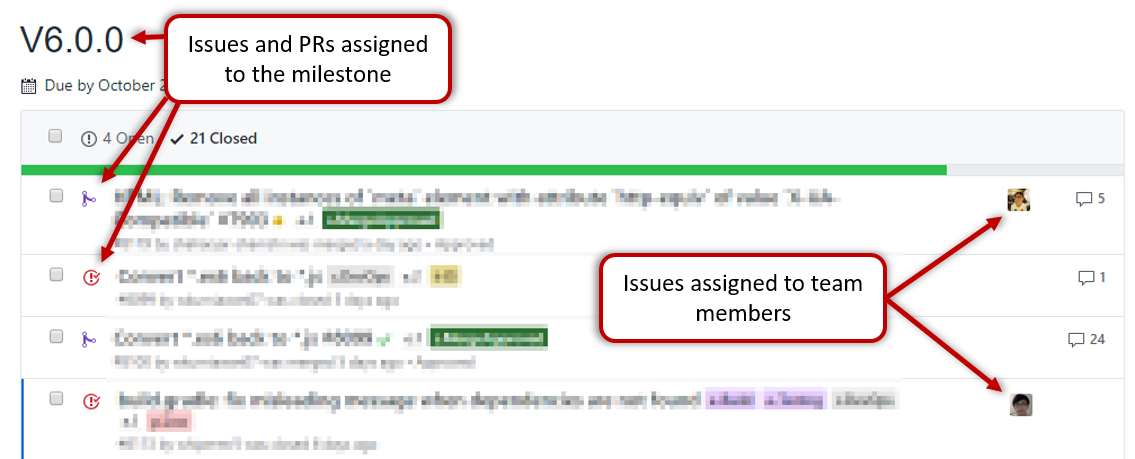
-
Milestone closed.
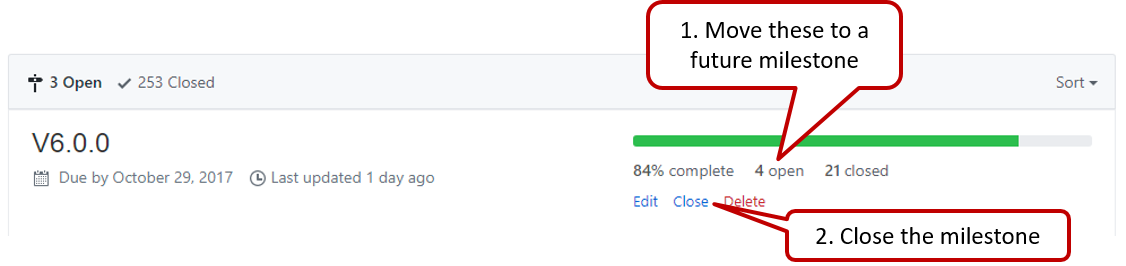
-
If necessary, future milestones are revised based on what you experienced in the current milestone e.g. if you could not finish all issues assigned to the current milestone, it is a sign that you overestimated how much you can do in a week, which means you might want to reduce the issues assigned to future milestones to match that observation.
Product:
- From v1.2 onwards each member is expected to contribute
some code to eachmilestone , preferably each week; only merged code is considered as contributions(Reason) .
If an enhancement is too big to complete in one milestone, try to deliver it in smaller incremental steps e.g. deliver a basic version of the enhancement first.
Questions to discuss during tutorial: Divide these questions among team members. Be prepared to answer questions allocated to you.
Q1
- What is abstraction? How is it used in the project?
- What is coupling?
Foodepends onBarif …?- Give examples of different ways how a class
Foocan be coupled toBar
- What is cohesion?
- How does cohesion relates to coupling?
Q2
- What is the Principle of SoC?
- How does SoC relate to coupling and cohesion?
- What is SRP?
- How does SRP relate to SoC?
Q3
- What is OCP?
- Explain several different ways of achieving OCP
- Does the project follow OCP? E.g. Can we add a new command or a new storage type without modifying existing code too much?
Q4
- What’s the use of assertions?
- Demonstrate an assertion failure using Intellij.
- What’s the purpose of logging levels? What are the available logging levels in AB4?
Q5
- What is defensive programming?
Give an example of defensive programming from your project.
Adjust project schedule/rigor as needed, start proper milestone management.
Project Management:
💡 You are free to adjust process rigor and project plan at any future time in the project, starting from v1.2. If you are not sure if a certain adjustment is allowed, you can check with the teaching team first.
- Switch to AB-3 or AB-2 if AB-4 is not working out for you.
Relevant: [
There is no explicit penalty for switching to a lower level AB. All projects are evaluated based on the same yardstick irrespective of on which AB it is based. As an AB is given to you as a 'free' head-start, a lower level AB gives you a shorter head-start, which means your final product is likely to be less functional than those from teams using AB-4 unless you progress faster than them. Nevertheless, you should switch to AB2/3 if you feel you can learn more from the project that way, as our goal is to maximize learning, not features.
If your team wants to stay with AB-4 but you want to switch to a lower level AB, let the us know so that we can work something out for you.
If you have opted to use AB-2 or AB-3 instead of AB-4 as the basis of your product, please note the following points:
- Set up auto-publishing of documentation similar to AB-4
- Add Project Portfolio Pages (PPP) for members, similar to the example provided in AB-4
- You can convert UG, DG, and PPP into pdf files using instructions provided in AB-4 DG
- Create an About Us page similar to AB-4 and update it as described in
mid-v1.1 progress guide
Set up project repo, start moving UG and DG to the repo, attempt to do local-impact changes to the code base.
Project Management:
Set up the team org and the team repo as explained below:
Relevant: [
Organization setup
Please follow the organization/repo name format precisely because we use scripts to download your code or else our scripts will not be able to detect your work.
After receiving your team ID, one team member should do the following steps:
- Create a GitHub organization with the following details:
- Organization name :
CS2103-AY1819S2-TEAM_ID. e.g.CS2103-AY1819S2-W12-1 - Plan: Open Source ($0/month)
- Organization name :
- Add members to the organization:
- Create a team called
developersto your organization. - Add your team members to the developers team.
- Create a team called
Relevant: [
Repo setup
Only one team member:
- Fork Address Book Level 4 to your team org.
- Rename the forked repo as
main. This repo (let's call it the team repo) is to be used as the repo for your project. - Ensure the issue tracker of your team repo is enabled. Reason: our bots will be posting your weekly progress reports on the issue tracker of your team repo.
- Ensure your team members have the desired level of access to your team repo.
- Enable Travis CI for the team repo.
- Set up auto-publishing of docs. When set up correctly, your project website should be available via the URL
https://cs2103-ay1819s2-{team-id}.github.io/maine.g.,https://cs2103-ay1819s2-w13-1.github.io/main/. This also requires you to enable the GitHub Pages feature of your team repo and configure it to serve the website from thegh-pagesbranch. - Create a team PR for us to track your project progress: i.e., create a PR from your team repo
masterbranch to [nus-cs2103-AY1819S2/addressbook-level4]masterbranch. PR name:[Team ID] Product Namee.g.,[T09-2] Contact List Pro. As you merge code to your team repo'smasterbranch, this PR will auto-update to reflect how much your team's product has progressed. In the PR description@mention the other team members so that they get notified when the tutor adds comments to the PR.
All team members:
- Watch the
mainrepo (created above) i.e., go to the repo and click on thewatchbutton to subscribe to activities of the repo - Fork the
mainrepo to your personal GitHub account. - Clone the fork to your Computer.
- Recommended: Set it up as an Intellij project (follow the instructions in the Developer Guide carefully).
- Set up the developer environment in your computer. You are recommended to use JDK 9 for AB-4 as some of the libraries used in AB-4 have not updated to support Java 10 yet. JDK 9 can be downloaded from the Java Archive.
Note that some of our download scripts depend on the following folder paths. Please do not alter those paths in your project.
/src/main/src/test/docs
When updating code in the repo, follow the workflow explained below:
Relevant: [
Workflow
Before you do any coding for the project,
- Ensure you have
set the Git username correctly (as explained in Appendix E) in all Computers you use for coding. - Read
our reuse policy (in Admin: Appendix B) , in particular, how to give credit when you reuse code from the Internet or classmates:
Setting Git Username to Match GitHub Username
We use various tools to analyze your code. For us to be able to identify your commits, you should use the GitHub username as your Git username as well. If there is a mismatch, or if you use multiple user names for Git, our tools might miss some of your work and as a result you might not get credit for some of your work.
In each Computer you use for coding, after installing Git, you should set the Git username as follows.
- Open a command window that can run Git commands (e.g., Git bash window)
- Run the command
git config --global user.name YOUR_GITHUB_USERNAME
e.g.,git config --global user.name JohnDoe
More info about setting Git username is here.
Policy on reuse
Reuse is encouraged. However, note that reuse has its own costs (such as the learning curve, additional complexity, usage restrictions, and unknown bugs). Furthermore, you will not be given credit for work done by others. Rather, you will be given credit for using work done by others.
- You are allowed to reuse work from your classmates, subject to following conditions:
- The work has been published by us or the authors.
- You clearly give credit to the original author(s).
- You are allowed to reuse work from external sources, subject to following conditions:
- The work comes from a source of 'good standing' (such as an established open source project). This means you cannot reuse code written by an outside 'friend'.
- You clearly give credit to the original author. Acknowledge use of third party resources clearly e.g. in the welcome message, splash screen (if any) or under the 'about' menu. If you are open about reuse, you are less likely to get into trouble if you unintentionally reused something copyrighted.
- You do not violate the license under which the work has been released. Please do not use 3rd-party images/audio in your software unless they have been specifically released to be used freely. Just because you found it in the Internet does not mean it is free for reuse.
- Always get permission from us before you reuse third-party libraries. Please post your 'request to use 3rd party library' in our forum. That way, the whole class get to see what libraries are being used by others.
Giving credit for reused work
Given below are how to give credit for things you reuse from elsewhere. These requirements are specific to this module i.e., not applicable outside the module (outside the module you should follow the rules specified by your employer and the license of the reused work)
If you used a third party library:
- Mention in the
README.adoc(under the Acknowledgements section) - mention in the
Project Portfolio Page if the library has a significant relevance to the features you implemented
If you reused code snippets found on the Internet e.g. from StackOverflow answers or
referred code in another software or
referred project code by current/past student:
- If you read the code to understand the approach and implemented it yourself, mention it as a comment
Example://Solution below adapted from https://stackoverflow.com/a/16252290 {Your implmentation of the reused solution here ...} - If you copy-pasted a non-trivial code block (possibly with minor modifications renaming, layout changes, changes to comments, etc.), also mark the code block as reused code (using
@@authortags
Format://@@author {yourGithubUsername}-reused //{Info about the source...} {Reused code (possibly with minor modifications) here ...} //@@authorpersons = getList() //@@author johndoe-reused //Reused from https://stackoverflow.com/a/34646172 with minor modifications Collections.sort(persons, new Comparator<CustomData>() { @Override public int compare(CustomData lhs, CustomData rhs) { return lhs.customInt > rhs.customInt ? -1 : (lhs.customInt < rhs.customInt) ? 1 : 0; } }); //@@author return persons;
Adding @@author tags indicate authorship
-
Mark your code with a
//@@author {yourGithubUsername}. Note the double@.
The//@@authortag should indicates the beginning of the code you wrote. The code up to the next//@@authortag or the end of the file (whichever comes first) will be considered as was written by that author. Here is a sample code file://@@author johndoe method 1 ... method 2 ... //@@author sarahkhoo method 3 ... //@@author johndoe method 4 ... -
If you don't know who wrote the code segment below yours, you may put an empty
//@@author(i.e. no GitHub username) to indicate the end of the code segment you wrote. The author of code below yours can add the GitHub username to the empty tag later. Here is a sample code with an emptyauthortag:method 0 ... //@@author johndoe method 1 ... method 2 ... //@@author method 3 ... method 4 ... -
The author tag syntax varies based on file type e.g. for java, css, fxml. Use the corresponding comment syntax for non-Java files.
Here is an example code from an xml/fxml file.<!-- @@author sereneWong --> <textbox> <label>...</label> <input>...</input> </textbox> ... -
Do not put the
//@@authorinside java header comments.
👎/** * Returns true if ... * @@author johndoe */👍
//@@author johndoe
/**
  * Returns true if ...
  */
What to and what not to annotate
-
Annotate both functional and test code There is no need to annotate documentation files.
-
Annotate only significant size code blocks that can be reviewed on its own e.g., a class, a sequence of methods, a method.
Claiming credit for code blocks smaller than a method is discouraged but allowed. If you do, do it sparingly and only claim meaningful blocks of code such as a block of statements, a loop, or an if-else statement.- If an enhancement required you to do tiny changes in many places, there is no need to annotate all those tiny changes; you can describe those changes in the Project Portfolio page instead.
- If a code block was touched by more than one person, either let the person who wrote most of it (e.g. more than 80%) take credit for the entire block, or leave it as 'unclaimed' (i.e., no author tags).
- Related to the above point, if you claim a code block as your own, more than 80% of the code in that block should have been written by yourself. For example, no more than 20% of it can be code you reused from somewhere.
- 💡 GitHub has a blame feature and a history feature that can help you determine who wrote a piece of code.
-
Do not try to boost the quantity of your contribution using unethical means such as duplicating the same code in multiple places. In particular, do not copy-paste test cases to create redundant tests. Even repetitive code blocks within test methods should be extracted out as utility methods to reduce code duplication. Individual members are responsible for making sure code attributed to them are correct. If you notice a team member claiming credit for code that he/she did not write or use other questionable tactics, you can email us (after the final submission) to let us know.
-
If you wrote a significant amount of code that was not used in the final product,
- Create a folder called
{project root}/unused - Move unused files (or copies of files containing unused code) to that folder
- use
//@@author {yourGithubUsername}-unusedto mark unused code in those files (note the suffixunused) e.g.
//@@author johndoe-unused
method 1 ...
method 2 ...
Please put a comment in the code to explain why it was not used.
- Create a folder called
-
If you reused code from elsewhere, mark such code as
//@@author {yourGithubUsername}-reused(note the suffixreused) e.g.//@@author johndoe-reused method 1 ... method 2 ... -
You can use empty
@@authortags to mark code as not yours when RepoSense attribute the to you incorrectly.-
Code generated by the IDE/framework, should not be annotated as your own.
-
Code you modified in minor ways e.g. adding a parameter. These should not be claimed as yours but you can mention these additional contributions in the Project Portfolio page if you want to claim credit for them.
-
At the end of the project each student is required to submit a Project Portfolio Page.
-
Objective:
- For you to use (e.g. in your resume) as a well-documented data point of your SE experience
- For us to use as a data point to evaluate your,
- contributions to the project
- your documentation skills
-
Sections to include:
-
Overview: A short overview of your product to provide some context to the reader.
-
Summary of Contributions:
- Code contributed: Give a link to your code on Project Code Dashboard, which should be
https://nus-cs2103-ay1819s2.github.io/cs2103-dashboard/#=undefined&search=githbub_username_in_lower_case(replacegithbub_username_in_lower_casewith your actual username in lower case e.g.,johndoe). This link is also available in the Project List Page -- linked to the icon under your photo. - Features implemented: A summary of the features you implemented. If you implemented multiple features, you are recommended to indicate which one is the biggest feature.
- Other contributions:
- Contributions to project management e.g., setting up project tools, managing releases, managing issue tracker etc.
- Evidence of helping others e.g. responses you posted in our forum, bugs you reported in other team's products,
- Evidence of technical leadership e.g. sharing useful information in the forum
- Code contributed: Give a link to your code on Project Code Dashboard, which should be
-
Contributions to the User Guide: Reproduce the parts in the User Guide that you wrote. This can include features you implemented as well as features you propose to implement.
The purpose of allowing you to include proposed features is to provide you more flexibility to show your documentation skills. e.g. you can bring in a proposed feature just to give you an opportunity to use a UML diagram type not used by the actual features. -
Contributions to the Developer Guide: Reproduce the parts in the Developer Guide that you wrote. Ensure there is enough content to evaluate your technical documentation skills and UML modelling skills. You can include descriptions of your design/implementations, possible alternatives, pros and cons of alternatives, etc.
-
If you plan to use the PPP in your Resume, you can also include your SE work outside of the module (will not be graded)
-
-
Format:
-
File name:
docs/team/githbub_username_in_lower_case.adoce.g.,docs/team/johndoe.adoc -
Follow the example in the AddressBook-Level4
-
💡 You can use the Asciidoc's
includefeature to include sections from the developer guide or the user guide in your PPP. Follow the example in the sample. -
It is assumed that all contents in the PPP were written primarily by you. If any section is written by someone else e.g. someone else wrote described the feature in the User Guide but you implemented the feature, clearly state that the section was written by someone else (e.g.
Start of Extract [from: User Guide] written by Jane Doe). Reason: Your writing skills will be evaluated based on the PPP
-
-
Page limit:
Content Limit Overview + Summary of contributions 0.5-1 (soft limit) Contributions to the User Guide 1-3 (soft limit) Contributions to the Developer Guide 3-6 (soft limit) Total 5-10 (strict) - The page limits given above are after converting to PDF format. The actual amount of content you require is actually less than what these numbers suggest because the HTML → PDF conversion adds a lot of spacing around content.
- Reason for page limit: These submissions are peer-graded (in the PE) which needs to be done in a limited time span.
If you have more content than the limit given above, you can give a representative samples of UG and DG that showcase your documentation skills. Those samples should be understandable on their own. For the parts left-out, you can give an abbreviated version and refer the reader to the full UG/DG for more details.
It's similar to giving extra details as appendices; the reader will look at the UG/DG if the PPP is not enough to make a judgment. For example, when judging documentation quality, if the part in the PPP is not well-written, there is no point reading the rest in the main UG/DG. That's why you need to put the most representative part of your writings in the PPP and still give an abbreviated version of the rest in the PPP itself. Even when judging the quantity of work, the reader should be able to get a good sense of the quantity by combining what is quoted in the PPP and your abbreviated description of the missing part. There is no guarantee that the evaluator will read the full document.
Follow the
- Get team members to review PRs. A workflow without PR reviews is a risky workflow.
- Do not merge PRs failing
CI . After setting up Travis, the CI status of a PR is reported at the bottom of the PR page. The screenshot below shows the status of a PR that is passing all CI checks.
If there is a failure, you can click on theDetailslink in corresponding line to find out more about the failure. Once you figure out the cause of the failure, push the a fix to the PR. - After setting up Netlify, you can use Netlify PR Preview to preview changes to documentation files, if the PR contains updates to documentation. To see the preview, click on the
Detailslink in front of the Netlify status reported (refer screenshot above).
After completing v1.1, you can adjust process rigor to suit your team's pace, as explained below.
-
Reduce automated tests have benefits, but they can be a pain to write/maintain; GUI tests are especially hard to maintain because their behavior can sometimes depend on things such as the OS, resolution etc.
It is OK to get rid of some of the troublesome tests and rely more on manual testing instead. The less automated tests you have, the higher the risk of regressions; but it may be an acceptable trade-off under the circumstances if tests are slowing you down too much.
There is no direct penalty for removing GUI tests. Also noteour expectation on test code . -
Reduce automated checks: You can also reduce the rigor of checkstyle checks to expedite PR processing.
-
Switch to a lighter workflow: While forking workflow is the safest, it is also rather heavy. You an switch to a simpler workflow if the forking workflow is slowing you down. Refer the textbook to find more about alternative workflows: branching workflow, centralized workflow. However, we still recommend that you use PR reviews, at least for PRs affecting others' features.
You can also increase the rigor/safety of your workflow in the following ways:
- Use GitHub's Protected Branches feature to protect your
masterbranch against rogue PRs.
- There is no requirement for a minimum coverage level. Note that in a production environment you are often required to have at least 90% of the code covered by tests. In this project, it can be less. The less coverage you have, the higher the risk of regression bugs, which will cost marks if not fixed before the final submission.
- You must write some tests so that we can evaluate your ability to write tests.
- How much of each type of testing should you do? We expect you to decide. You learned different types of testing and what they try to achieve. Based on that, you should decide how much of each type is required. Similarly, you can decide to what extent you want to automate tests, depending on the benefits and the effort required.
Project Management → Revision Control →
In the forking workflow, the 'official' version of the software is kept in a remote repo designated as the 'main repo'. All team members fork the main repo create pull requests from their fork to the main repo.
To illustrate how the workflow goes, let’s assume Jean wants to fix a bug in the code. Here are the steps:
- Jean creates a separate branch in her local repo and fixes the bug in that branch.
- Jean pushes the branch to her fork.
- Jean creates a pull request from that branch in her fork to the main repo.
- Other members review Jean’s pull request.
- If reviewers suggested any changes, Jean updates the PR accordingly.
- When reviewers are satisfied with the PR, one of the members (usually the team lead or a designated 'maintainer' of the main repo) merges the PR, which brings Jean’s code to the main repo.
- Other members, realizing there is new code in the upstream repo, sync their forks with the new upstream repo (i.e. the main repo). This is done by pulling the new code to their own local repo and pushing the updated code to their own fork.
- A detailed explanation of the Forking Workflow - From Atlassian
Documentation:
Recommended procedure for updating docs:
- Divide among yourselves who will update which parts of the document(s).
- Update the team repo by following the workflow mentioned above.
Update the following pages in your project repo:
- About Us page:
This page is used for module admin purposes. Please follow the format closely or else our scripts will not be able to give credit for your work.
- Replace info of SE-EDU developers with info of your team, including a suitable photo as described
here . - Including the name/photo of the supervisor/lecturer is optional.
- The photo of a team member should be
doc/images/githbub_username_in_lower_case.pnge.g.docs/images/damithc.png. If you photo is in jpg format, name the file as.pnganyway. - Indicate the different roles played and responsibilities held by each team member. You can reassign these
roles and responsibilities (as explained in Admin Project Scope) later in the project, if necessary.
- Replace info of SE-EDU developers with info of your team, including a suitable photo as described
-
The purpose of the profile photo is for the teaching team to identify you. Therefore, you should choose a recent individual photo showing your face clearly (i.e., not too small) -- somewhat similar to a passport photo. Some examples can be seen in the 'Teaching team' page. Given below are some examples of good and bad profile photos.
-
If you are uncomfortable posting your photo due to security reasons, you can post a lower resolution image so that it is hard for someone to misuse that image for fraudulent purposes. If you are concerned about privacy, you can request permission to omit your photo from the page by writing to prof.
Roles indicate aspects you are in charge of and responsible for. E.g., if you are in charge of documentation, you are the person who should allocate which parts of the documentation is to be done by who, ensure the document is in right format, ensure consistency etc.
This is a non-exhaustive list; you may define additional roles.
- Team lead: Responsible for overall project coordination.
- Documentation (short for ‘in charge of documentation’): Responsible for the quality of various project documents.
- Testing: Ensures the testing of the project is done properly and on time.
- Code quality: Looks after code quality, ensures adherence to coding standards, etc.
- Deliverables and deadlines: Ensure project deliverables are done on time and in the right format.
- Integration: In charge of versioning of the code, maintaining the code repository, integrating various parts of the software to create a whole.
- Scheduling and tracking: In charge of defining, assigning, and tracking project tasks.
- [Tool ABC] expert: e.g. Intellij expert, Git expert, etc. Helps other team member with matters related to the specific tool.
- In charge of[Component XYZ]: e.g. In charge of
Model,UI,Storage, etc. If you are in charge of a component, you are expected to know that component well, and review changes done to that component in v1.3-v1.4.
Please make sure each of the important roles are assigned to one person in the team. It is OK to have a 'backup' for each role, but for each aspect there should be one person who is unequivocally the person responsible for it.
-
Contact Us Page: Update to match your product.
-
README.adoc page: Update it to match your project.
-
Add a UI mockup of your intended final product.
Note that the image of the UI should bedocs/images/Ui.pngso that it can be downloaded by our scripts. Limit the file to contain one screenshot/mockup only and ensure the new image is roughly the sameheight x widthproportions as the original one. Reason: when we compile these images from all teams into one page (example), yours should not look out of place. -
The original
README.adocfile (which doubles as the landing page of your project website) is written to read like the introduction to an SE learning/teaching resource. You should restructure this page to look like the home page of a real product (not a school project) targeting real users e.g. remove references to addressbook-level3, Learning Outcomes etc. mention target users, add a marketing blurb etc. On a related note, also removeLearning Outcomeslink and related pages. -
Update the link of the Travis build status badge (
) so that it reflects the build status of your team repo.
For the other badges,- either set up the respective tool for your project (AB-4 Developer Guide has instructions on how to set up AppVeyor and Coveralls) and update the badges accordingly,
- or remove the badge.
-
Acknowledge the original source of the code i.e. AddressBook-Level4 project created by SE-EDU initiative at
https://github.com/se-edu/
-
-
User Guide: Start moving the content from your User Guide (draft created in previous weeks) into the User Guide page in your repository. If a feature is not implemented, mark it as 'Coming in v2.0' (example).
-
Developer Guide: Similar to the User Guide, start moving the content from your Developer Guide (draft created in previous weeks) into the Developer Guide page in your team repository.
Product:
-
Each member can attempt to do a
local-impact change to the code base.Objective: To familiarize yourself with at least one
components of the product.Description: Divide the components among yourselves. Each member can do some small enhancements to their component(s) to learn the code of that component. Some suggested enhancements are given in the AddressBook-Level4 developer guide.
Submission: Create PRs from your own fork to your team repo. Get it merged by following your team's workflow.
- Adjust process rigor to suit your team's pace, as explained in the panel below.
Relevant: [
After completing v1.1, you can adjust process rigor to suit your team's pace, as explained below.
-
Reduce automated tests have benefits, but they can be a pain to write/maintain; GUI tests are especially hard to maintain because their behavior can sometimes depend on things such as the OS, resolution etc.
It is OK to get rid of some of the troublesome tests and rely more on manual testing instead. The less automated tests you have, the higher the risk of regressions; but it may be an acceptable trade-off under the circumstances if tests are slowing you down too much.
There is no direct penalty for removing GUI tests. Also noteour expectation on test code . -
Reduce automated checks: You can also reduce the rigor of checkstyle checks to expedite PR processing.
-
Switch to a lighter workflow: While forking workflow is the safest, it is also rather heavy. You an switch to a simpler workflow if the forking workflow is slowing you down. Refer the textbook to find more about alternative workflows: branching workflow, centralized workflow. However, we still recommend that you use PR reviews, at least for PRs affecting others' features.
You can also increase the rigor/safety of your workflow in the following ways:
- Use GitHub's Protected Branches feature to protect your
masterbranch against rogue PRs.
- There is no requirement for a minimum coverage level. Note that in a production environment you are often required to have at least 90% of the code covered by tests. In this project, it can be less. The less coverage you have, the higher the risk of regression bugs, which will cost marks if not fixed before the final submission.
- You must write some tests so that we can evaluate your ability to write tests.
- How much of each type of testing should you do? We expect you to decide. You learned different types of testing and what they try to achieve. Based on that, you should decide how much of each type is required. Similarly, you can decide to what extent you want to automate tests, depending on the benefits and the effort required.
-
Adjust project plan if necessary. Now that you have a some idea about the code base, revisit the feature release plan and adjust it if necessary.
-
Set up the issue tracker as described in the panel below, if you haven't done so already.
Relevant: [
Issue tracker setup
We recommend you configure the issue tracker of the main repo as follows:
- Delete existing labels and add the following labels.
💡 Issue type labels are useful from the beginning of the project. The other labels are needed only when you start implementing the features.
Issue type labels:
type.Epic: A big feature which can be broken down into smaller stories e.g. searchtype.Story: A user storytype.Enhancement: An enhancement to an existing storytype.Task: Something that needs to be done, but not a story, bug, or an epic. e.g. Move testing code into a new folder)type.Bug: A bug
Status labels:
status.Ongoing: The issue is currently being worked on. note: remove this label before closing an issue.
Priority labels:
priority.High: Must dopriority.Medium: Nice to havepriority.Low: Unlikely to do
Bug Severity labels:
severity.Low: A flaw that is unlikely to affect normal operations of the product. Appears only in very rare situations and causes a minor inconvenience only.severity.Medium: A flaw that causes occasional inconvenience to some users but they can continue to use the product.severity.High: A flaw that affects most users and causes major problems for users. i.e., makes the product almost unusable for most users.
-
Create following milestones :
v1.0,v1.1,v1.2,v1.3,v1.4, -
You may configure other project settings as you wish. e.g. more labels, more milestones
- Start proper schedule tracking and milestone management as explained in the panel below.
Relevant: [
Project Schedule Tracking
In general, use the issue tracker (Milestones, Issues, PRs, Tags, Releases, and Labels) for assigning, scheduling, and tracking all noteworthy project tasks, including user stories. Update the issue tracker regularly to reflect the current status of the project. You can also use GitHub's Projects feature to manage the project, but keep it linked to the issue tracker as much as you can.
Using Issues:
During the initial stages (latest by the start of v1.2):
-
Record each of the user stories you plan to deliver as an issue in the issue tracker. e.g.
Title: As a user I can add a deadline
Description: ... so that I can keep track of my deadlines -
Assign the
type.*andpriority.*labels to those issues. -
Formalize the project plan by assigning relevant issues to the corresponding milestone.
From milestone v1.2:
-
Define project tasks as issues. When you start implementing a user story (or a feature), break it down to smaller tasks if necessary. Define reasonable sized, standalone tasks. Create issues for each of those tasks so that they can be tracked.e.g.
-
A typical task should be able to done by one person, in a few hours.
- Bad (reasons: not a one-person task, not small enough):
Write the Developer Guide - Good:
Update class diagram in the Developer Guide for v1.4
- Bad (reasons: not a one-person task, not small enough):
-
There is no need to break things into VERY small tasks. Keep them as big as possible, but they should be no bigger than what you are going to assign a single person to do within a week. eg.,
- Bad:
Implementing parser(reason: too big). - Good:
Implementing parser support for adding of floating tasks
- Bad:
-
Do not track things taken for granted. e.g.,
push code to reposhould not be a task to track. In the example given under the previous point, it is taken for granted that the owner will also (a) test the code and (b) push to the repo when it is ready. Those two need not be tracked as separate tasks. -
Write a descriptive title for the issue. e.g.
Add support for the 'undo' command to the parser- Omit redundant details. In some cases, the issue title is enough to describe the task. In that case, no need to repeat it in the issue description. There is no need for well-crafted and detailed descriptions for tasks. A minimal description is enough. Similarly, labels such as
prioritycan be omitted if you think they don't help you.
- Omit redundant details. In some cases, the issue title is enough to describe the task. In that case, no need to repeat it in the issue description. There is no need for well-crafted and detailed descriptions for tasks. A minimal description is enough. Similarly, labels such as
-
-
Assign tasks (i.e., issues) to the corresponding team members using the
assigneesfield. Normally, there should be some ongoing tasks and some pending tasks against each team member at any point. -
Optionally, you can use
status.ongoinglabel to indicate issues currently ongoing.
Using Milestones:
We recommend you do proper milestone management starting from v1.2. Given below are the conditions to satisfy for a milestone to be considered properly managed:
Planning a Milestone:
-
Issues assigned to the milestone, team members assigned to issues: Used GitHub milestones to indicate which issues are to be handled for which milestone by assigning issues to suitable milestones. Also make sure those issues are assigned to team members. Note that you can change the milestone plan along the way as necessary.
-
Deadline set for the milestones (in the GitHub milestone). Your internal milestones can be set earlier than the deadlines we have set, to give you a buffer.
Wrapping up a Milestone:
-
A working product tagged with the correct tag (e.g.
v1.2) and is pushed to the main repo
or a product release done on GitHub. A product release is optional for v1.2 but required from from v1.3. Click here to see an example release. -
All tests passing on Travis for the version tagged/released.
-
Milestone updated to match the product i.e. all issues completed and PRs merged for the milestone should be assigned to the milestone. Incomplete issues/PRs should be moved to a future milestone.
-
Milestone closed.
-
If necessary, future milestones are revised based on what you experienced in the current milestone e.g. if you could not finish all issues assigned to the current milestone, it is a sign that you overestimated how much you can do in a week, which means you might want to reduce the issues assigned to future milestones to match that observation.
Product:
- From v1.2 onwards each member is expected to contribute
some code to eachmilestone , preferably each week; only merged code is considered as contributions(Reason) .
If an enhancement is too big to complete in one milestone, try to deliver it in smaller incremental steps e.g. deliver a basic version of the enhancement first.
Why aren't we allowed to build a new product from scratch?
There are many reasons. One of them is that most of you will be working with existing software in your first few years of the career while hardly any school projects train you to work with existing code bases. We decided to bite the bullet and use CS2103/T to train you to work in existing code bases.
Why so many submissions?
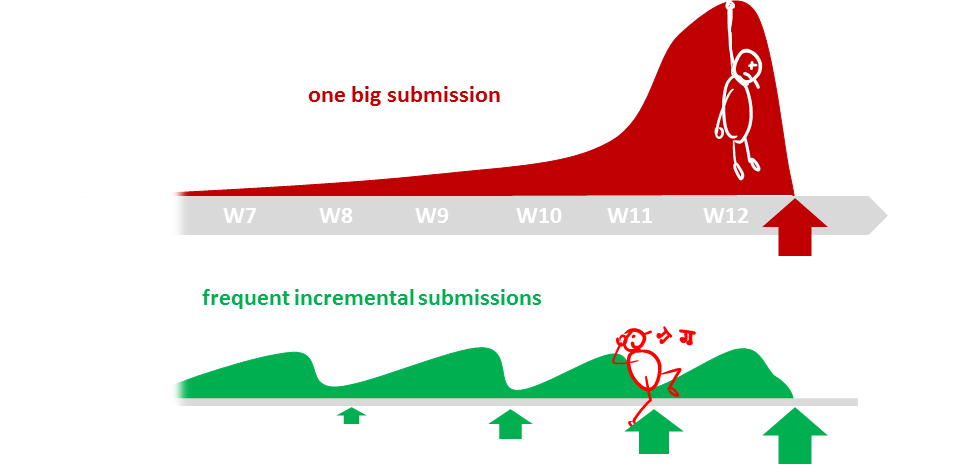
The high number of submissions is not meant to increase workload but to spread it across the semester. Learning theory and applying them should be done in parallel to maximize the learning effect. That can happen only if we spread theory and 'application of theory' (i.e., project work) evenly across the semester.
Why submission requirements differ between CS2103/T and CS2101?
They do, and they should.
CS2103T communication requirements are limited to a very narrow scope (i.e., communicate about the product to users and developers). CS2101 aims to teach you technical communication in a much wider context. While you may be able to reuse some of the stuff across the two modules, submissions are not intended to be exactly the same.