Week 5 [Feb 11]
- We will be adding you all to cs2103-AY1819S2 github org. Please accept the invitation sent by GitHub as you need to be a member of the org for some of the future module activities. If you did not receive the invitation link, you can use the link https://github.com/orgs/nus-cs2103-AY1819S2/invitation.
[W5.1] Design: Models
Can explain models
A model is a representation of something else.
A
A class diagram is a diagram drawn using the UML modelling notation.
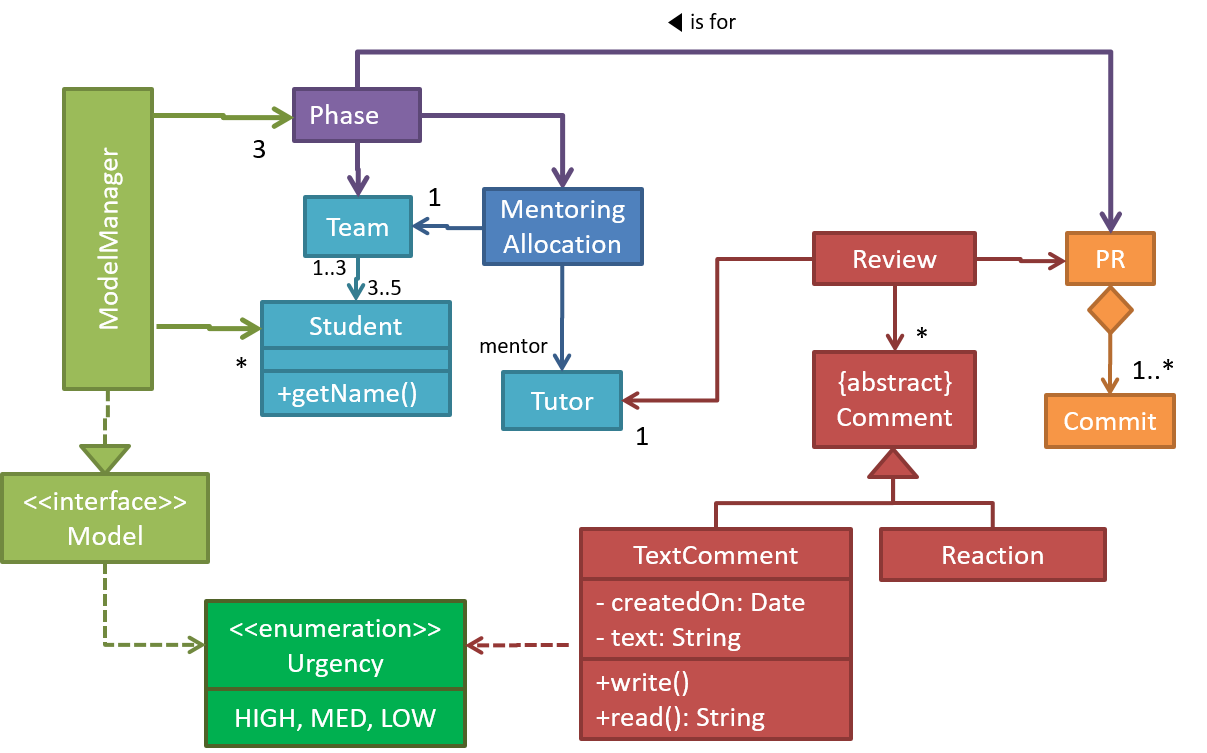
An example class diagram:
A model provides a simpler view of a complex entity because a model captures only a selected aspect. This omission of some aspects implies models are
Design → Design Fundamentals → Abstraction →
Abstraction is a technique for dealing with complexity. It works by establishing a level of complexity we are interested in, and suppressing the more complex details below that level.
The guiding principle of abstraction is that only details that are relevant to the current perspective or the task at hand needs to be considered. As most programs are written to solve complex problems involving large amounts of intricate details, it is impossible to deal with all these details at the same time. That is where abstraction can help.
Ignoring lower level data items and thinking in terms of bigger entities is called data abstraction.
Within a certain software component, we might deal with a user data type, while ignoring the details contained in the user data item such as name, and date of birth. These details have been ‘abstracted away’ as they do not affect the task of that software component.
Control abstraction abstracts away details of the actual control flow to focus on tasks at a simplified level.
print(“Hello”) is an abstraction of the actual output mechanism within the computer.
Abstraction can be applied repeatedly to obtain progressively higher levels of abstractions.
An example of different levels of data abstraction: a File is a data item that is at a higher level than an array and an array is at a higher level than a bit.
An example of different levels of control abstraction: execute(Game) is at a higher level than print(Char) which is at a higher than an Assembly language instruction MOV.
Abstraction is a general concept that is not limited to just data or control abstractions.
Some more general examples of abstraction:
- An OOP class is an abstraction over related data and behaviors.
- An architecture is a higher-level abstraction of the design of a software.
- Models (e.g., UML models) are abstractions of some aspect of reality.
A class diagram captures the structure of the software design but not the behavior.
Multiple models of the same entity may be needed to capture it fully.
In addition to a class diagram (or even multiple class diagrams), a number of other diagrams may be needed to capture various interesting aspects of the software.
Can explain how models are used
In software development, models are useful in several ways:
a) To analyze a complex entity related to software development.
Some examples of using models for analysis:
- Models of the problem domain (i.e. the environment in which the software is expected to solve a problem) can be built to aid the understanding of the problem to be solved.
- When planning a software solution, models can be created to figure out how the solution is to be built. An architecture diagram is such a model.
b) To communicate information among stakeholders. Models can be used as a visual aid in discussions and documentations.
Some examples of using models to communicate:
- We can use an
architecture diagram to explain the high-level design of the software to developers. - A business analyst can use a use case diagram to explain to the customer the functionality of the system.
- A class diagram can be reverse-engineered from code so as to help explain the design of a component to a new developer.
An architecture diagram depicts the high-level design of a software.
Some example architecture diagrams:


source: https://commons.wikimedia.org
source: https://commons.wikimedia.org

source: https://commons.wikimedia.org
c) As a blueprint for creating software. Models can be used as instructions for building software.
Some examples of using models to as blueprints:
- A senior developer draws a class diagram to propose a design for an OOP software and passes it to a junior programmer to implement.
- A software tool allows users to draw UML models using its interface and the tool automatically generates the code based on the model.
Model-driven development (MDD), also called Model-driven engineering, is an approach to software development that strives to exploit models as blueprints. MDD uses models as primary engineering artifacts when developing software. That is, the system is first created in the form of models. After that, the models are converted to code using code-generation techniques (usually, automated or semi-automated, but can even involve manual translation from model to code). MDD requires the use of a very expressive modeling notation (graphical or otherwise), often specific to a given problem domain. It also requires sophisticated tools to generate code from models and maintain the link between models and the code. One advantage of MDD is that the same model can be used to create software for different platforms and different languages. MDD has a lot of promise, but it is still an emerging technology
Further reading:
- Martin Fowler's view on MDD - TLDR: he is sceptical
- 5 types of Model Driven Software Development - A more optimistic view, although an old article
Choose the correct statements about models.
- a. Models are abstractions.
- b. Models can be used for communication.
- c. Models can be used for analysis of a problem.
- d. Generating models from code is useless.
- e. Models can be used as blueprints for generating code.
(a) (b) (c) (e)
Explanation: Models generated from code can be used for understanding, analysing, and communicating about the code.
Explain how models (e.g. UML diagrams) can be used in a class project.
Can models be useful in evaluating the design quality of a software written by students?
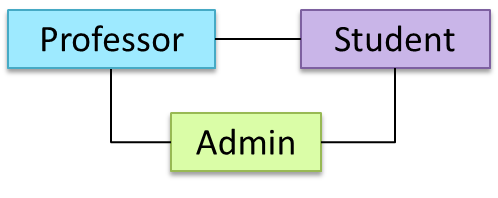
[W5.2] UML: Class/Object Diagrams - Basics
Can explain structure modelling of OO solutions
An OO solution is basically a network of objects interacting with each other. Therefore, it is useful to be able to model how the relevant objects are 'networked' together inside a software i.e. how the objects are connected together.
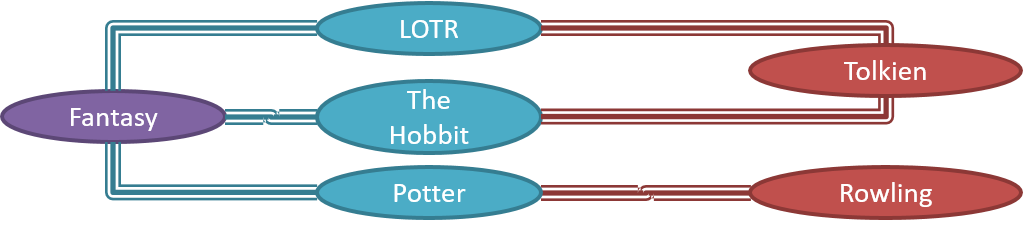
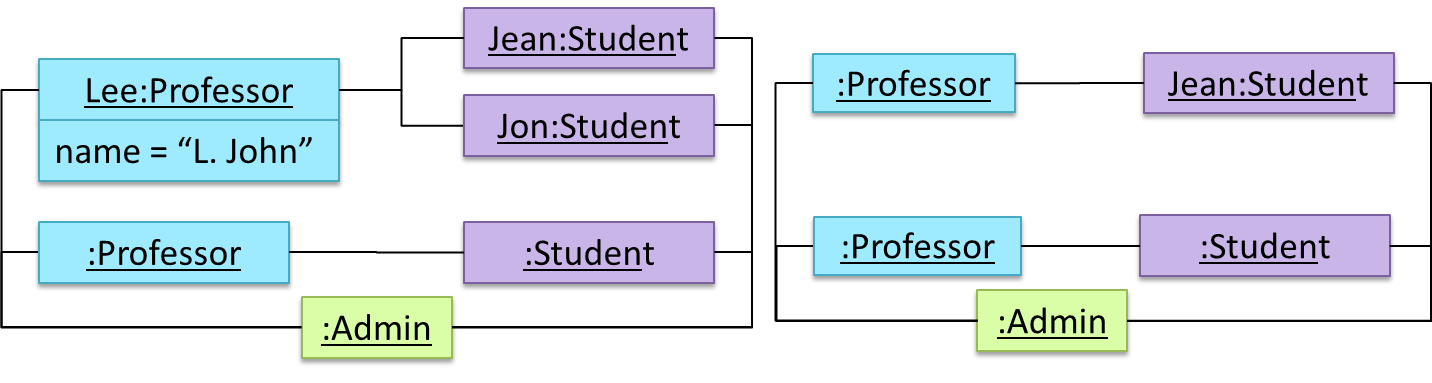
Given below is an illustration of some objects and how they are connected together. Note: the diagram uses an ad-hoc notation.
Note that these object structures within the same software can change over time.
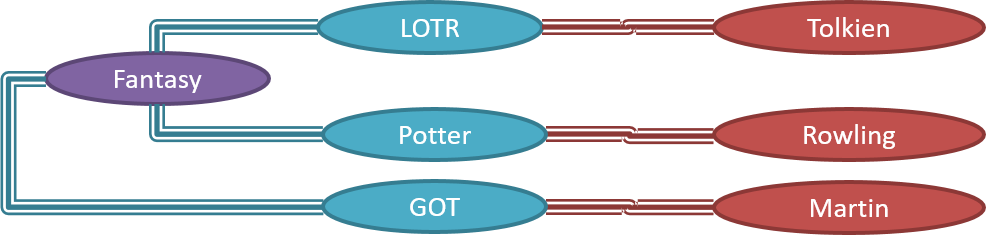
Given below is how the object structure in the previous example could have looked like at a different time.
However, object structures do not change at random; they change based on a set of rules, as was decided by the designer of that software. Those rules that object structures need to follow can be illustrated as a class structure i.e. a structure that exists among the relevant classes.
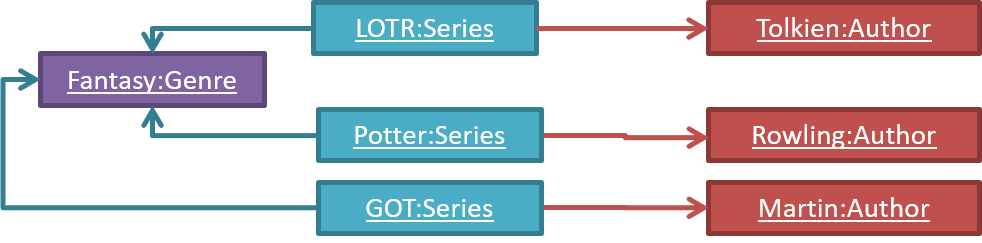
Here is a class structure (drawn using an ad-hoc notation) that matches the object structures given in the previous two examples. For example, note how this class structure does not allow any connection between Genre objects and Author objects, a rule followed by the two object structures above.

UML Object Diagrams are used to model object structures and UML Class Diagrams are used to model class structures of an OO solution.
Here is an object diagram for the above example:
And here is the class diagram for it:

Can use basic-level class diagrams
Classes form the basis of class diagrams.
Associations are the main connections among the classes in a class diagram.
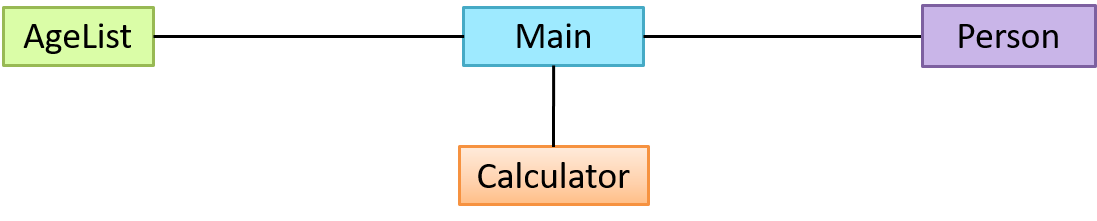
The most basic class diagram is a bunch of classes with some solid lines among them to represent associations, such as this one.
An example class diagram showing associations between classes.
In addition, associations can show additional decorations such as association labels, association roles, multiplicity and navigability to add more information to a class diagram.
Here is the same class diagram shown earlier but with some additional information included:
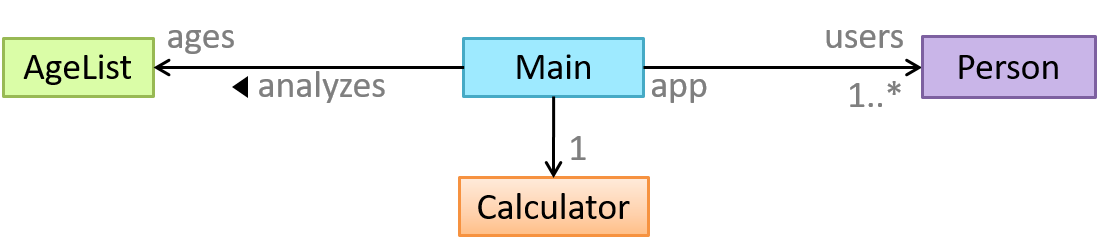
Which association notatations are shown in this diagram?

- a. association labels
- b. association roles
- c. association multiplicity
- d. class names
(a) (b) (c) (d)
Explanation: '1’ is a multiplicity, ‘mentored by’ is a label, and ‘mentor’ is a role.
Explain the associations, navigabilities, and multiplicities in the class diagram below:
Draw a class diagram for the code below. Show the attributes, methods, associations, navigabilities, and multiplicities in the class diagram below:
class Box {
    private Item[] parts = new Item[10];
    private Item spareItem;
    private Lid lid; // lid of this box
    private Box outerBox;

    public void open(){
        //...
    }
}
class Item {
    public static int totalItems;
}
class Lid {
    Box box; // the box for which this is the lid
}
Can use basic object diagrams
Object diagrams can be used to complement class diagrams. For example, you can use object diagrams to model different object structures that can result from a design represented by a given class diagram.
This question is based on the following question from another topic:
Draw a class diagram for the code below. Show the attributes, methods, associations, navigabilities, and multiplicities in the class diagram below:
class Box {
    private Item[] parts = new Item[10];
    private Item spareItem;
    private Lid lid; // lid of this box
    private Box outerBox;

    public void open(){
        //...
    }
}
class Item {
    public static int totalItems;
}
class Lid {
    Box box; // the box for which this is the lid
}
Draw an object diagram to match the code. Include objects of all three classes in your object diagram.
Can distinguish between class diagrams and object diagrams
Compared to the notation for a class diagrams, object diagrams differ in the following ways:
- Shows objects instead of classes:
- Instance name may be shown
- There is a
:before the class name - Instance and class names are underlined
- Methods are omitted
- Multiplicities are omitted
Furthermore, multiple object diagrams can correspond to a single class diagram.
Both object diagrams are derived from the same class diagram shown earlier. In other words, each of these object diagrams shows ‘an instance of’ the same class diagram.
Which of these class diagrams match the given object diagram?
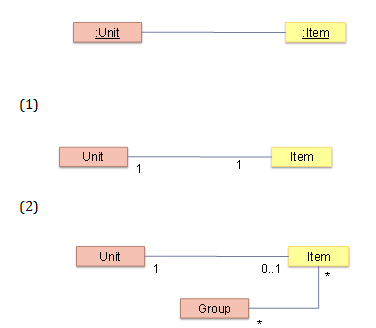
- a
- b
(a) (b)
Explanation: Both class diagrams allow one Unit object to be linked to one Item object.
[W5.3] UML: Class Diagrams - Intermediate
Can use UML notes
UML notes can augment UML diagrams with additional information. These notes can be shown connected to a particular element in the diagram or can be shown without a connection. The diagram below shows examples of both.
Example:
Can specify constraints in UML diagrams
A constraint can be given inside a note, within curly braces. Natural language or a formal notation such as OCL (Object Constraint Language) may be used to specify constraints.
Example:
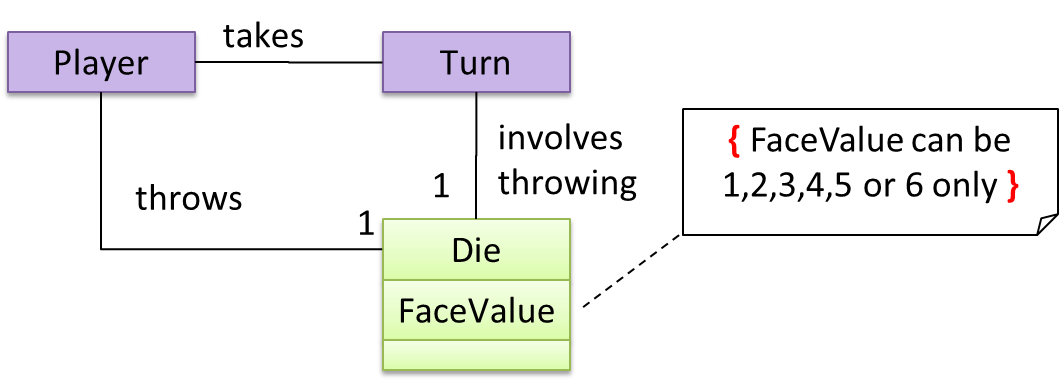
Can show an association as an attribute
An association can be shown as an attribute instead of a line.
Association multiplicities and the default value too can be shown as part of the attribute using the following notation. Both are optional.
name: type [multiplicity] = default value
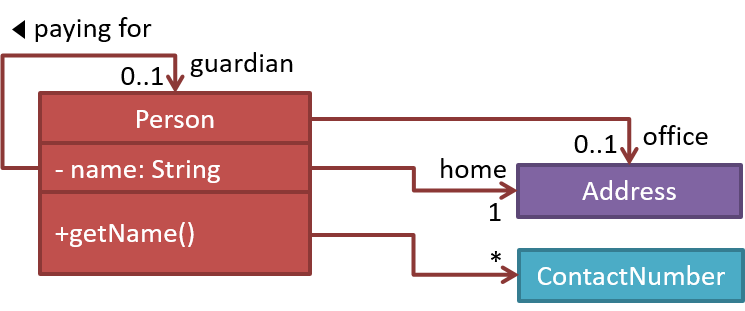
The diagram below depicts a multi-player Square Game being played on a board comprising of 100 squares. Each of the squares may be occupied with any number of pieces, each belonging to a certain player.
A Piece may or may not be on a Square. Note how that association can be replaced by an isOn attribute of the Piece class. The isOn attribute can either be null or hold a reference to a Square object, matching the 0..1 multiplicity of the association it replaces. The default value is null.
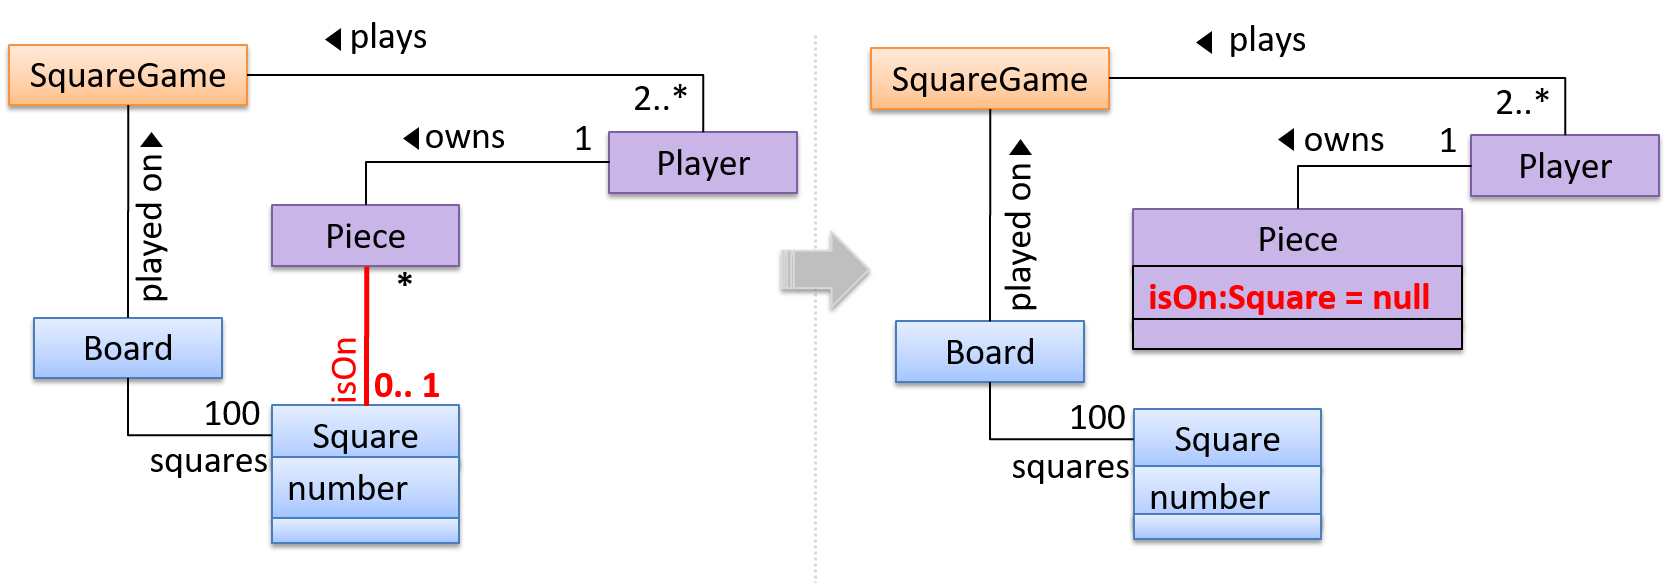
The association that a Board has 100 Sqaures can be shown in either of these two ways:

Can use intermediate-level class diagrams
A class diagram can also show different types of associations: inheritance, compositions, aggregations, dependencies.
A class diagram can also show different types of class-like entities:
Which of these statements match the class diagram?
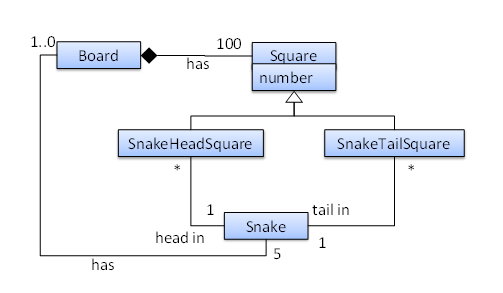
- a. A
Snakemust belong to at least oneBoard. - b. A
SnakeHeadSquarecan contain only oneSnakehead. - c. A
Squarecan contain aSnakehead. - d. A
Snakehead can be in more than oneSnakeHeadSquare - e. The
Boardhas exactly 5Snakes.
(a)(b)(c)(d)(e)
Explanation:
(a) does not match because a Snake may or may not belong to a Board (multiplicity is 0..1)
(b) matches the diagram because the multiplicity given in 1
(c) matches the diagram because SnakeHeadSquare is a Square (due to inheritance)
(d) matches the diagram because the multiplicity given is *
(e) matches the diagram because the multiplicity given in 5
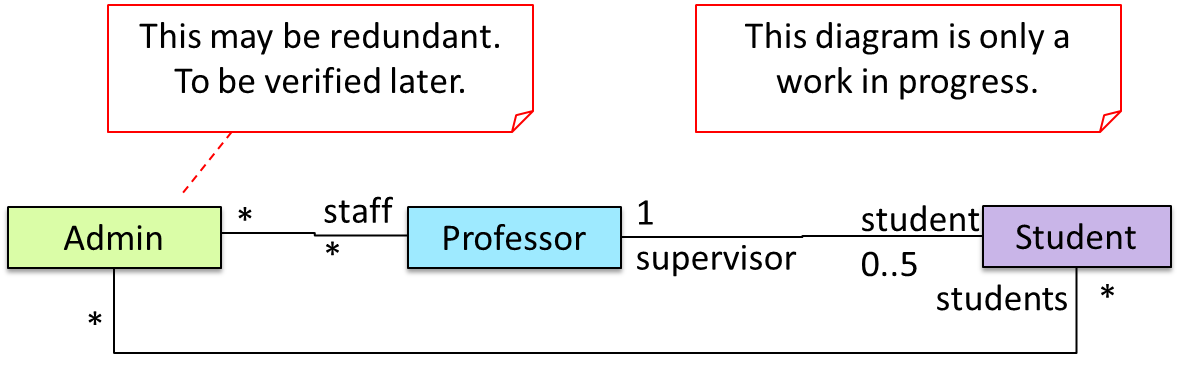
Explain the meaning of various class diagram notations in the following class diagram:
Consider the code below:
public interface Billable {
    void bill();
}
public abstract class Item
         implements Billable {
    public abstract void print();
}
public class StockItem extends Item {
    private Review review;
    private String name;

    public StockItem(
        String name, Rating rating){

        this.name = name;
        this.review = new Review(rating);
    }

    @Override
    public void print() {
        //...
    }

    @Override
    public void bill() {
        //...
    }
}
public enum Rating {
    GOOD, OK, POOR
}
public class Review {
    private final Rating rating;

    public Review(Rating rating) {
        this.rating = rating;
    }
}
import java.util.List;

public class Inventory {
    private List<Item> items;

    public int getItemCount(){
        return items.size();
    }

    public void generateBill(Billable b){
        // ...
    }

    public void add(Item s) {
        items.add(s);
    }
}
(a) Draw a class diagram to represent the code
(b) Draw an object diagram to represent the situation where the inventory has one item with a name spanner and a review of POOR rating.
[W5.4] Developer Testing: Basics
Can explain developer testing
Developer testing is the testing done by the developers themselves as opposed to professional testers or end-users.
Can explain the need for early developer testing
Delaying testing until the full product is complete has a number of disadvantages:
- Locating the cause of such a test case failure is difficult due to a large search space; in a large system, the search space could be millions of lines of code, written by hundreds of developers! The failure may also be due to multiple inter-related bugs.
- Fixing a bug found during such testing could result in major rework, especially if the bug originated during the design or during requirements specification i.e. a faulty design or faulty requirements.
- One bug might 'hide' other bugs, which could emerge only after the first bug is fixed.
- The delivery may have to be delayed if too many bugs were found during testing.
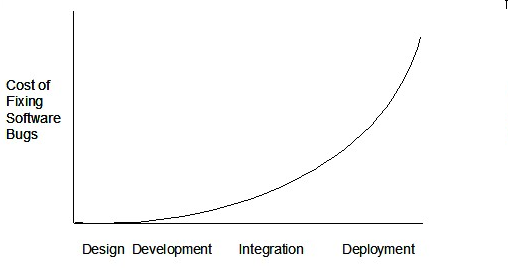
Therefore, it is better to do early testing, as hinted by the popular rule of thumb given below, also illustrated by the graph below it.
The earlier a bug is found, the easier and cheaper to have it fixed.
Such early testing of partially developed software is usually, and by necessity, done by the developers themselves i.e. developer testing.
Discuss pros and cons of developers testing their own code.
Pros:
- Can be done early (the earlier we find a bug, the cheaper it is to fix).
- Can be done at lower levels, for examples, at operation and class level (testers usually test the system at UI level).
- It is possible to do more thorough testing because developers know the expected external behavior as well as the internal structure of the component.
- It forces developers to take responsibility for their own work (they cannot claim that "testing is the job of the testers").
Cons:
- A developer may subconsciously test only situations that he knows to work (i.e. test it too 'gently').
- A developer may be blind to his own mistakes (if he did not consider a certain combination of input while writing code, it is possible for him to miss it again during testing).
- A developer may have misunderstood what the SUT is supposed to do in the first place.
- A developer may lack the testing expertise.
The cost of fixing a bug goes down as we reach the product release.
False. The cost goes up over time.
Explain why early testing by developers is important.
Can explain test drivers
A test driver is the code that ‘drives’ the
PayrollTest ‘drives’ the PayRoll class by sending it test inputs and verifies if the output is as expected.
public class PayrollTestDriver {
    public static void main(String[] args) throws Exception {

        //test setup
        Payroll p = new Payroll();

        //test case 1
        p.setEmployees(new String[]{"E001", "E002"});
        // automatically verify the response
        if (p.totalSalary() != 6400) {
            throw new Error("case 1 failed ");
        }

        //test case 2
        p.setEmployees(new String[]{"E001"});
        if (p.totalSalary() != 2300) {
            throw new Error("case 2 failed ");
        }

        //more tests...

        System.out.println("All tests passed");
    }
}
Can explain test automation tools
JUnit is a tool for automated testing of Java programs. Similar tools are available for other languages and for automating different types of testing.
This an automated test for a Payroll class, written using JUnit libraries.
@Test
public void testTotalSalary(){
    Payroll p = new Payroll();

    //test case 1
    p.setEmployees(new String[]{"E001", "E002"});
    assertEquals(6400, p.totalSalary());

    //test case 2
    p.setEmployees(new String[]{"E001"});
    assertEquals(2300, p.totalSalary());

    //more tests...
}
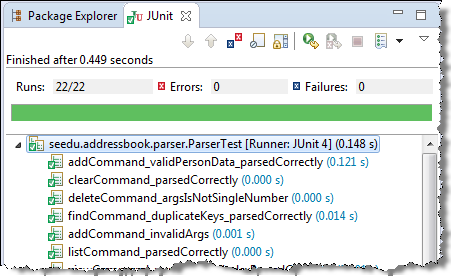
Most modern IDEs has integrated support for testing tools. The figure below shows the JUnit output when running some JUnit tests using the Eclipse IDE.
Can use simple JUnit tests
When writing JUnit tests for a class Foo, the common practice is to create a FooTest class, which will contain various test methods.
Suppose we want to write tests for the IntPair class below.
public class IntPair {
    int first;
    int second;

    public IntPair(int first, int second) {
        this.first = first;
        this.second = second;
    }

    public int intDivision() throws Exception {
        if (second == 0){
            throw new Exception("Divisor is zero");
        }
        return first/second;
    }

    @Override
    public String toString() {
        return first + "," + second;
    }
}
Here's a IntPairTest class to match.
import org.junit.Test;
import org.junit.Assert;

public class IntPairTest {

    @Test
    public void testStringConversion() {
        Assert.assertEquals("4,7", new IntPair(4, 7).toString());
    }

    @Test
    public void intDivision_nonZeroDivisor_success() throws Exception {
        Assert.assertEquals(2, new IntPair(4, 2).intDivision());
        Assert.assertEquals(0, new IntPair(1, 2).intDivision());
        Assert.assertEquals(0, new IntPair(0, 5).intDivision());
    }

    @Test
    public void intDivision_zeroDivisor_exceptionThrown() {
        try {
            Assert.assertEquals(0, new IntPair(1, 0).intDivision());
            Assert.fail(); // the test should not reach this line
        } catch (Exception e) {
            Assert.assertEquals("Divisor is zero", e.getMessage());
        }
    }
}
Notes:
- Each test method is marked with a
@Testannotation. - Tests use
Assert.assertEquals(expected, actual)methods to compare the expected output with the actual output. If they do not match, the test will fail. JUnit comes with other similar methods such asAssert.assertNullandAssert.assertTrue. - Java code normally use camelCase for method names e.g.,
testStringConversionbut when writing test methods, sometimes another convention is used:whatIsBeingTested_descriptionOfTestInputs_expectedOutcomee.g.,intDivision_zeroDivisor_exceptionThrown - There are several ways to verify the code throws the correct exception. The third test method in the example above shows one of the simpler methods. If the exception is thrown, it will be caught and further verified inside the
catchblock. But if it is not thrown as expected, the test will reachAssert.fail()line and will fail as a result. - The easiest way to run JUnit tests is to do it via the IDE. For example, in Intellij you can right-click the folder containing test classes and choose 'Run all tests...'
- Optionally, you can use static imports to avoid having to specify
Assert.everywhere.import static org.junit.Assert.assertEquals; //... @Test public void testStringConversion() { assertEquals("4,7", new IntPair(4, 7).toString()); }
JUnit 4 with IntelliJ: A quick introduction -- by DrBFraser
- JUnit cookbook - a short tutorial from JUnit creators
- JUnit tutorial - a more detailed tutorial from a developer Lars Vogel
- How to test private methods in Java? [ short answer ] [ long answer ]
[W5.5] OOP: Polymorphism
Polymorphism
Can explain OOP polymorphism
Polymorphism:
The ability of different objects to respond, each in its own way, to identical messages is called polymorphism. -- Object-Oriented Programming with Objective-C, Apple
Polymorphism allows you to write code targeting superclass objects, use that code on subclass objects, and achieve possibly different results based on the actual class of the object.
Assume classes Cat and Dog are both subclasses of the Animal class. You can write code targeting Animal objects and use that code on Cat and Dog objects, achieving possibly different results based on whether it is a Cat object or a Dog object. Some examples:
- Declare an array of type
Animaland still be able to storeDogandCatobjects in it. - Define a method that takes an
Animalobject as a parameter and yet be able to passDogandCatobjects to it. - Call a method on a
Dogor aCatobject as if it is anAnimalobject (i.e., without knowing whether it is aDogobject or aCatobject) and get a different response from it based on its actual class e.g., call theAnimalclass' methodspeak()on objectaand get aMeowas the return value ifais aCatobject andWoofif it is aDogobject.
Polymorphism literally means "ability to take many forms".
Can use polymorphism in Java
Java is a strongly-typed language which means the code works with only the object types that it targets.
The following code PetShelter keeps a list of Cat objects and make them speak. The code will not work with any other type, for example, Dog objects.
public class PetShelter {
    private static Cat[] cats = new Cat[]{
            new Cat("Mittens"),
            new Cat("Snowball")};

    public static void main(String[] args) {
        for (Cat c: cats){
            System.out.println(c.speak());
        }
    }
}
Mittens: Meow
Snowball: Meow
public class Cat {
    public Cat(String name) {
        super(name);
    }

    public String speak() {
        return name + ": Meow";
    }
}
This strong-typing can lead to unnecessary verbosity caused by repetitive similar code that do similar things with different object types.
If the PetShelter is to keep both cats and dogs, you'll need two arrays and two loops:
public class PetShelter {
    private static Cat[] cats = new Cat[]{
            new Cat("Mittens"),
            new Cat("Snowball")};
    private static Dog[] dogs = new Dog[]{
            new Dog("Spot")};

    public static void main(String[] args) {
        for (Cat c: cats){
            System.out.println(c.speak());
        }
        for(Dog d: dogs){
            System.out.println(d.speak());
        }
    }
}
Mittens: Meow
Snowball: Meow
Spot: Woof
public class Dog {
    public Dog(String name) {
        super(name);
    }

    public String speak() {
        return name + ": Woof";
    }
}
A better way is to take advantage of polymorphism to write code that targets a superclass but works with any subclass objects.
The PetShelter2 use one data structure to keep both types of animals and one loop to make them speak. The code targets the Animal superclass (assuming Cat and Dog inherits from the Animal class) instead of repeating the code for each animal type.
public class PetShelter2 {
    private static Animal[] animals = new Animal[]{
            new Cat("Mittens"),
            new Cat("Snowball"),
            new Dog("Spot")};

    public static void main(String[] args) {
        for (Animal a: animals){
            System.out.println(a.speak());
        }
    }
}
Mittens: Meow
Snowball: Meow
Spot: Woof
public class Animal {

    protected String name;

    public Animal(String name){
        this.name = name;
    }
    public String speak(){
        return name;
    }
}
public class Cat extends Animal {
    public Cat(String name) {
        super(name);
    }

    @Override
    public String speak() {
        return name + ": Meow";
    }
}
public class Dog extends Animal {
    public Dog(String name) {
        super(name);
    }

    @Override
    public String speak() {
        return name + ": Woof";
    }
}
Explanation: Because Java supports polymorphism, you can store both Cat and Dog objects in an array of Animal objects. Similarly, you can call the speak method on any Animal object (as done in the loop) and yet get different behavior from Cat objects and Dog objects.
💡 Suggestion: try to add an Animal object (e.g., new Animal("Unnamed")) to the animals array and see what happens.
Polymorphic code is better in several ways:
- It is shorter.
- It is simpler.
- It is more flexible (in the above example, the
mainmethod will work even if we add more animal types).
The Main class below keeps a list of Circle and Rectangle objects and prints the area (as an int value) of each shape when requested.
Add the missing variables/methods to the code below so that it produces the output given.
public class Main {
    //TODO add your methods here

    public static void main(String[] args) {
        addShape(new Circle(5));
        addShape(new Rectangle(3, 4));
        addShape(new Circle(10));
        printAreas();
        addShape(new Rectangle(4, 4));
        printAreas();
    }
}
78
12
314
78
12
314
16
Circle class and Rectangle class is given below but you'll need to add a parent class Shape:
public class Circle {

    private int radius;

    public Circle(int radius) {
        this.radius = radius;
    }

    public int area() {
        return (int)(Math.PI * radius * radius);
    }
}
public class Rectangle {
    private int height;
    private int width;

    public Rectangle(int height, int width){
        this.height = height;
        this.width = width;
    }

    public int area() {
        return height * width;
    }
}
💡 You may use an array of size 100 to store the shapes.
public class Main {
    private static Shape[] shapes = new Shape[100];
    private static int shapeCount = 0;

    public static void addShape(Shape s){
        shapes[shapeCount] = s;
        shapeCount++;
    }

    // ...

}
This exercise continues from the TaskManager Level1 exercise quoted above.
Enhance your TaskManager program in the following ways.
A. Add support for two types of tasks:
- ToDo : a task to do someday
- Deadline: a task to be done by a specific deadline
Both types keeps an internal flag to indicate if the task is done. The flag is initially set to false.
Here is an example output:
Welcome to TaskManager-Level2!
Your task? todo submit report
Tasks in the list: 1
Your task? deadline write report /by this Friday 4pm
Tasks in the list: 2
Your task? todo read textbook
Tasks in the list: 3
Your task? deadline return textbook /by Sunday
Tasks in the list: 4
Your task? print
Tasks:
[1] description: submit report
is done? No
[2] description: write report
is done? No
do by: this Friday 4pm
[3] description: read textbook
is done? No
[4] description: return textbook
is done? No
do by: Sunday
Your task? exit
Bye!
Changes to the behavior:
addtask description: adds thetask descriptionto the task listtodotask description: adds to the task list a todo task with the giventask descriptiondeadlinetask description /by deadline description: adds to the task list a deadline task with the giventask descriptionand with thedeadline description
Suggestion:
- Make the
Todoclass inherit fromTaskclass, and makeDeadlinetask inherit fromTodoclass. - Use polymorphism to store both types of tasks in an array of
Tasktype and use one loop to print both types of tasks.
B. Add support for
Quality Assurance → Testing → Test Automation →
A simple way to semi-automate testing of a CLI(Command Line Interface) app is by using input/output re-direction.
- First, we feed the app with a sequence of test inputs that is stored in a file while redirecting the output to another file.
- Next, we compare the actual output file with another file containing the expected output.
Let us assume we are testing a CLI app called AddressBook. Here are the detailed steps:
-
Store the test input in the text file
input.txt.add Valid Name p/12345 valid@email.butNoPrefix add Valid Name 12345 e/valid@email.butPhonePrefixMissing -
Store the output we expect from the SUT in another text file
expected.txt.Command: || [add Valid Name p/12345 valid@email.butNoPrefix] Invalid command format: add Command: || [add Valid Name 12345 e/valid@email.butPhonePrefixMissing] Invalid command format: add -
Run the program as given below, which will redirect the text in
input.txtas the input toAddressBookand similarly, will redirect the output of AddressBook to a text fileoutput.txt. Note that this does not require any code changes toAddressBook.java AddressBook < input.txt > output.txt-
💡 The way to run a CLI program differs based on the language.
e.g., In Python, assuming the code is inAddressBook.pyfile, use the command
python AddressBook.py < input.txt > output.txt -
💡 If you are using Windows, use a normal command window to run the app, not a Power Shell window.
More on the >operator and the<operator. tangentialA CLI program takes input from the keyboard and outputs to the console. That is because those two are default input and output streams, respectively. But you can change that behavior using
<and>operators. For example, if you runAddressBookin a command window, the output will be shown in the console, but if you run it like this,java AddressBook > output.txtthe Operating System then creates a file
output.txtand stores the output in that file instead of displaying it in the console. No file I/O coding is required. Similarly, adding< input.txt(or any other filename) makes the OS redirect the contents of the file as input to the program, as if the user typed the content of the file one line at a time.Resources:
-
-
Next, we compare
output.txtwith theexpected.txt. This can be done using a utility such as WindowsFC(i.e. File Compare) command, Unixdiffcommand, or a GUI tool such as WinMerge.FC output.txt expected.txt
Note that the above technique is only suitable when testing CLI apps, and only if the exact output can be predetermined. If the output varies from one run to the other (e.g. it contains a time stamp), this technique will not work. In those cases we need more sophisticated ways of automating tests.
CLI App: An application that has a Command Line Interface. i.e. user interacts with the app by typing in commands.
import java.util.Scanner;

public class Main {
    static Scanner in = new Scanner(System.in);
    static Task[] tasks = new Task[100];
    static int taskCount = 0;

    public static void main(String[] args) {
        printWelcome();
        String line;

        boolean isExit = false;
        while (!isExit) {
            line = getInput();
            String command = line.split(" ")[0];
            switch (command) {
                case "exit":
                case "":
                    isExit = true;
                    break;
                case "todo":
                    addTodo(line);
                    break;
                case "deadline":
                    addDeadline(line);
                    break;
                case "print":
                    printTasks();
                    break;
                default:
                    printError();
            }
        }
        exit();

    }

    private static void addTodo(String line) {
        tasks[taskCount] = new Todo(line.substring("todo".length()).trim());
        taskCount++;
        System.out.println("Tasks in the list: " + taskCount);
    }

  // ...

    private static void printTasks() {
        System.out.println("Tasks:");
        for (int i = 0; i < taskCount; i++) {
            System.out.println("[" + (i + 1) + "] " + tasks[i]);
        }
    }
}
Abstract Classes
Can implement abstract classes
Abstract Class: A class declared as an abstract class cannot be instantiated, but they can be subclassed.
You can use declare a class as abstract when a class is merely a representation of commonalities among its subclasses in which case it does not make sense to instantiate objects of that class.
The Animal class that exist as a generalization of its subclasses Cat, Dog, Horse, Tiger etc. can be declared as abstract because it does not make sense to instantiate an Animal object.
Abstract Method: An abstract method is a method signature without a method implementation.
The move method of the Animal class is likely to be an abstract method as it is not possible to implement a move method at the Animal class level to fit all subclasses because each animal type can move in a different way.
A class that has an abstract method becomes an abstract class because the class definition is incomplete (due to the missing method body) and it is not possible to create objects using an incomplete class definition.
Even a class that does not have any abstract methods can be declared as an abstract class.
Can use abstract classes and methods
In Java, an abstract method is declared with the keyword abstract and given without an implementation. If a class includes abstract methods, then the class itself must be declared abstract.
The speak method in this Animal class is abstract. Note how the method signature ends with a semicolon and there is no method body. This makes sense as the implementation of the speak method depends on the type of the animal and it is meaningless to provide a common implementation for all animal types.
public abstract class Animal {

    protected String name;

    public Animal(String name){
        this.name = name;
    }
    public abstract String speak();
}
As one method of the class is abstract, the class itself is abstract.
An abstract class is declared with the keyword abstract. Abstract classes can be used as reference type but cannot be instantiated.
This Account class has been declared as abstract although it does not have any abstract methods. Attempting to instantiate Account objects will result in a compile error.
public abstract class Account {

    int number;

    void close(){
        //...
    }
}
Account a; OK to use as a type
a = new Account(); Compile error!
When an abstract class is subclassed, the subclass should provides implementations for all of the abstract methods in its superclass or else the subclass must also be declared abstract.
The Feline class below inherits from the abstract class Animal but it does not provide an implementation for the abstract method speak. As a result, the Feline class needs to be abstract too.
public abstract class Feline extends Animal {
    public Feline(String name) {
        super(name);
    }

}
The DomesticCat class inherits the abstract Feline class and provides the implementation for the abstract method speak. As a result, it need not be declared abstract.
public class DomesticCat extends Feline {
    public DomesticCat(String name) {
        super(name);
    }

    @Override
    public String speak() {
        return "Meow";
    }
}
Animal a = new Feline("Mittens"); Compile error! Feline is abstract.
Animal a = new DomesticCat("Mittens"); OK. DomesticCat can be instantiated and assigned to a variable of Animal type (the assignment is allowed by polymorphism).
The Main class below keeps a list of Circle and Rectangle objects and prints the area (as an int value) of each shape when requested.
public class Main {
    private static Shape[] shapes = new Shape[100];
    private static int shapeCount = 0;

    public static void addShape(Shape s){
        shapes[shapeCount] = s;
        shapeCount++;
    }

    public static void printAreas(){
        for (int i = 0; i < shapeCount; i++){
            shapes[i].print();
        }
    }

    public static void main(String[] args) {
        addShape(new Circle(5));
        addShape(new Rectangle(3, 4));
        addShape(new Circle(10));
        addShape(new Rectangle(4, 4));
        printAreas();
    }
}
Circle of area 78
Rectangle of area 12
Circle of area 314
Rectangle of area 16
Circle class and Rectangle class is given below:
public class Circle extends Shape {

    private int radius;

    public Circle(int radius) {
        this.radius = radius;
    }

    @Override
    public int area() {
        return (int)(Math.PI * radius * radius);
    }

    @Override
    public void print() {
        System.out.println("Circle of area " + area());
    }
}
public class Rectangle extends Shape {
    private int height;
    private int width;

    public Rectangle(int height, int width){
        this.height = height;
        this.width = width;
    }

    @Override
    public int area() {
        return height * width;
    }

    @Override
    public void print() {
        System.out.println("Rectangle of area " + area());
    }
}
Add the missing Shape class as an abstract class with two abstract methods.
public abstract class Shape {

    public abstract int area();
    // ...
}
Choose the correct statements about Java abstract classes and
- a. A concrete class can contain an abstract method.
- b. An abstract class can contain concrete methods.
- c. An abstract class need not contain any concrete methods.
- d. An abstract class cannot be instantiated.
(b)(c)(d)
Explanation: A concrete class cannot contain even a single abstract method.
Interfaces
Can explain interfaces
An interface is a behavior specification i.e. a collection of
There are a number of situations in software engineering when it is important for disparate groups of programmers to agree to a "contract" that spells out how their software interacts. Each group should be able to write their code without any knowledge of how the other group's code is written. Generally speaking, interfaces are such contracts. --Oracle Docs on Java
Suppose SalariedStaff is an interface that contains two methods setSalary(int) and getSalary(). AcademicStaff can declare itself as implementing the SalariedStaff interface, which means the AcademicStaff class must implement all the methods specified by the SalariedStaff interface i.e., setSalary(int) and getSalary().
A class implementing an interface results in an is-a relationship, just like in class inheritance.
In the example above, AcademicStaff is a SalariedStaff. An AcademicStaff object can be used anywhere a SalariedStaff object is expected e.g. SalariedStaff ss = new AcademicStaff().
Can use interfaces in Java
The text given in this section borrows some explanations and code examples from the -- Java Tutorial.
In Java, an interface is a reference type, similar to a class, mainly containing method signatures. Defining an interface is similar to creating a new class except it uses the keyword interface in place of class.
Here is an interface named DrivableVehicle that defines methods needed to drive a vehicle.
public interface DrivableVehicle {
    void turn(Direction direction);
    void changeLanes(Direction direction);
    void signalTurn(Direction direction, boolean signalOn);
    // more method signatures
}
Note that the method signatures have no braces and are terminated with a semicolon.
Interfaces cannot be instantiated—they can only be implemented by classes. When an instantiable class implements an interface, indicated by the keyword implements, it provides a method body for each of the methods declared in the interface.
Here is how a class CarModelX can implement the DrivableVehicle interface.
public class CarModelX implements DrivableVehicle {

    @Override
    public void turn(Direction direction) {
       // implementation
    }

    // implementation of other methods
}
An interface can be used as a type e.g., DrivableVechile dv = new CarModelX();.
Interfaces can inherit from other interfaces using the extends keyword, similar to a class inheriting another.
Here is an interface named SelfDrivableVehicle that inherits the DrivableVehicle interface.
public interface SelfDrivableVehicle extends DrivableVehicle {
   void goToAutoPilotMode();
}
Note that the method signatures have no braces and are terminated with a semicolon.
Furthermore, Java allows multiple inheritance among interfaces. A Java interface can inherit multiple other interfaces. A Java class can implement multiple interfaces (and inherit from one class).
The design below is allowed by Java. In case you are not familiar with UML notation used: solid lines indicate normal inheritance; dashed lines indicate interface inheritance; the triangle points to the parent.
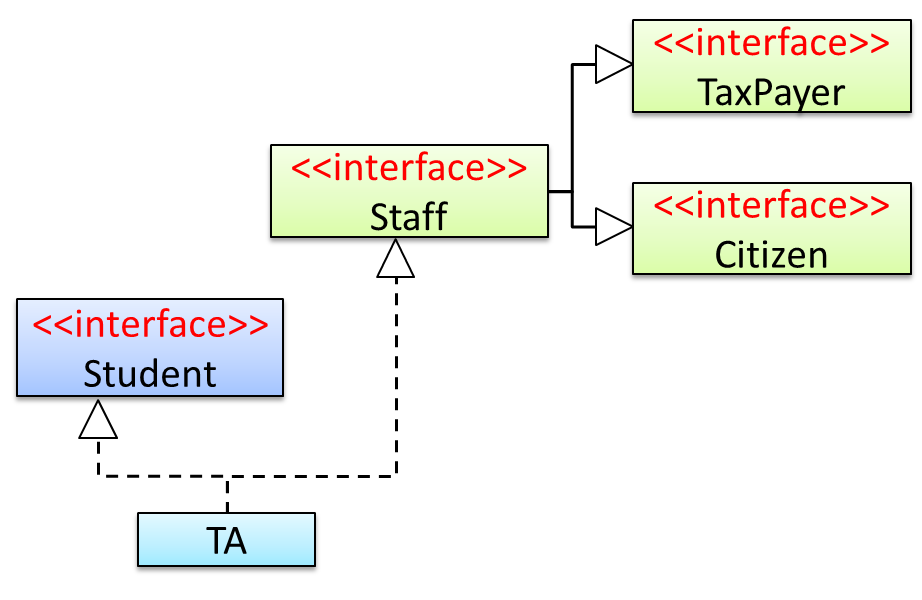
Staffinterface inherits (note the solid lines) the interfacesTaxPayerandCitizen.TAclass implements bothStudentinterface and theStaffinterface.- Because of point 1 above,
TAclass has to implement all methods in the interfacesTaxPayerandCitizen. - Because of points 1,2,3, a
TAis aStaff, is aTaxPayerand is aCitizen.
Interfaces can also contain
C++ to Java → Miscellaneous Topics →
Java does not directly support constants. The convention is to use a static final variable where a constant is needed. The static modifier causes the variable to be available without instantiating an object. The final modifier causes the variable to be unchangeable. Java constants are normally declared in ALL CAPS separated by underscores.
Here is an example of a constant named MAX_BALANCE which can be accessed as Account.MAX_BALANCE.
public class Account{

  public static final double MAX_BALANCE = 1000000.0;

}
Math.PI is an example constant that comes with Java.
This example adds a constant MAX_SPEED and a static method isSpeedAllowed to the interface DrivableVehicle.
public interface DrivableVehicle {

    int MAX_SPEED = 150;

    static boolean isSpeedAllowed(int speed){
        return speed <= MAX_SPEED;
    }

    void turn(Direction direction);
    void changeLanes(Direction direction);
    void signalTurn(Direction direction, boolean signalOn);
    // more method signatures
}
Interfaces can contain default method implementations and nested types. They are not covered here.
The Main class below passes a list of Printable objects (i.e., objects that implement the Printable interface) for another method to be printed.
public class Main {

    public static void printObjects(Printable[] items) {
        for (Printable p : items) {
            p.print();
        }
    }

    public static void main(String[] args) {
        Printable[] printableItems = new Printable[]{
                new Circle(5),
                new Rectangle(3, 4),
                new Person("James Cook")};

        printObjects(printableItems);
    }
}
Circle of area 78
Rectangle of area 12
Person of name James Cook
Classes Shape, Circle, and Rectangle are given below:
public abstract class Shape {

    public abstract int area();
}
public class Circle extends Shape implements Printable {

    private int radius;

    public Circle(int radius) {
        this.radius = radius;
    }

    @Override
    public int area() {
        return (int)(Math.PI * radius * radius);
    }

    @Override
    public void print() {
        System.out.println("Circle of area " + area());
    }
}
public class Rectangle extends Shape implements Printable {
    private int height;
    private int width;

    public Rectangle(int height, int width){
        this.height = height;
        this.width = width;
    }

    @Override
    public int area() {
        return height * width;
    }

    @Override
    public void print() {
        System.out.println("Rectangle of area " + area());
    }
}
Add the missing Printable interface. Add the missing methods of the Person class given below.
public class Person implements Printable {

    private String name;

    // todo: add missing methods
}
public interface Printable {
    //...
}
Project Preparation: 2 KLoC
This task can earn you 3 participation marks, 2 mark for the individual component and 1 bonus mark for the team component. You can omit either one of them.
💡 When working with existing code, a safe approach is to change the code in very small steps, each resulting in a verifiable change without breaking the app. For example, when adding a new sort command, the first few steps can be,
- Teach the app to accept a
sortcommand but ignore it. - Next, teach the app to direct the
sortcommand to an existing command e.g.sortcommand simply invokes thelistcommand internally. - Add a
SortCommandclass but make it simply a copy of the the existingListCommand. Direct thesortcommand to the newSortCommand. - ...
💡 Note that you can reuse the code you write here in your final project, if applicable.
Individual component:
Requirements: Do an enhancement to [AddressBook - Level2] e.g. add a new command. It can be the same enhancement you did to AddressBook Level1 (at the 1KLoC milestone in week 3). The size of the enhancement does not matter but try to limit to one enhancement (rather than mix many enhancements). In addition,
- update the User Guide
- update existing tests and add new tests if necessary, for both JUnit tests and I/O tests
- follow the coding standard
- follow the OOP style
Optional but encouraged:
- Update the Developer Guide
Submission: Create a PR against Addressbook-Level2. Try to make a clean PR (i.e. free of unrelated code modifications).
Team component:
The team component is to be done by all members, including those who didn't do the individual component.
-
Review PRs created by team members in the Individual Component above i.e. add review comments in the PR created against module repo. You can either give suggestions to improve, or ask questions to understand, the code written by the team member.
-
Requirements: Try to ensure that each PR reviewed by at least one team member and each team member's PR is reviewed by at least one other team member.
-
Submission: Just update PR created in the individual component by adding comments/commits to it.
Project Milestone: v1.0
Conceptualize product and document it as a user guide (UG)(draft), draft a rough project plan.
v1.0 Summary of Milestone
Here is a summary of items you need to deliver to reach v1.0 individual () and team () milestones. See sections below for more details of each item.
| Milestone | Minimum acceptable performance to consider as 'reached' |
|---|---|
| requirements documented | a draft of v2.0 requirements in some form |
| [optional] product survey documented | none |
| v2.0 conceptualized | a draft of v2.0 user guide in some form |
| feature releases planned | a rough feature release plan |
Reaching individual and team milestones are considered for grading the project management component of your project grade (expand the panel below for more info).
The deadline for reaching a milestone is the midnight before your tutorial e.g., if your tutorial is on Wednesday, you need to reach the milestone by Tuesday midnight.
Relevant: [
5A. Process:
Evaluates: How well you did in project management related aspects of the project, as an individual and as a team
Based on: tutor/bot observations of project milestones and GitHub data
Milestones need to be reached the midnight before of the tutorial for it to be counted as achieved. To get a good grade for this aspect, achieve at least 60% of the recommended milestone progress.
Other criteria:
- Good use of GitHub milestones
- Good use of GitHub release mechanism
- Good version control, based on the repo
- Reasonable attempt to use the forking workflow
- Good task definition, assignment and tracking, based on the issue tracker
- Good use of buffers (opposite: everything at the last minute)
- Project done iteratively and incrementally (opposite: doing most of the work in one big burst)
5B. Team-tasks:
Evaluates: How much you contributed to team-tasks
Based on: peer evaluations, tutor observations
To earn full marks, you should have done a fair share of the team tasks. You can earn bonus marks by doing more than your fair share.
Relevant: [
Here is a non-exhaustive list of team-tasks:
- Necessary general code enhancements e.g.,
- Work related to renaming the product
- Work related to changing the product icon
- Morphing the product into a different product
- Setting up the GitHub, Travis, AppVeyor, etc.
- Maintaining the issue tracker
- Release management
- Updating user/developer docs that are not specific to a feature e.g. documenting the target user profile
- Incorporating more useful tools/libraries/frameworks into the product or the project workflow (e.g. automate more aspects of the project workflow using a GitHub plugin)
v1.0 Documentation
-
User Guide:
Draft a user guide in a convenient medium (e.g., a GoogleDoc) to describe what the product would be like when it is at v2.0.- We recommend that you follow the existing AB4 User Guide in terms of structure and format.
- As this is a very rough draft and the final version will be in a different format altogether (i.e., in asciidoc format), don't waste time in formatting, copy editing etc. It is fine as long as the tutor can get a rough idea of the features from this draft. You can also do just the 'Features' section and omit the other parts.
- Do try to come up with concrete command syntax for feature that you would implement (at least for those that you will implement by v1.4).
- Consider including some UI mock-ups too (they can be hand-drawn or created using a tool such as PowerPoint or Balsamiq).
💡 It is highly recommended that you divide documentation work (in the User Guide and the Developer Guide) among team members based on enhancements/features each person would be adding e.g., If you are the person planing to add a feature X, you should be the person to describe the feature X in the User Guide and in the Developer Guide. For features that are not planned to be implemented by v1.4, you can divide them based on who will be implementing them if the project were to continue until v2.0 (hypothetically).
Reason: In the final project evaluation your documentation skills will be graded based on sections of the User/Developer Guide you have written.
Suggested length: Follow the existing user guide and developer guides in terms of the level of details.
Submission
: Save your draft as a single pdf file, name it {Your Team ID}.pdf e.g., W09-3.pdf and upload to LumiNUS. Only one PDF per team should be uploaded.
v1.0 Project Management
-
After the v2.0 is conceptualized, decide which features each member will do by v1.4. We realize that it will be hard for you to estimate the effort required for each feature as you are not familiar with the code base. Nevertheless, come up with a project plan as per your best estimate; this plan can be revised at later stages. It is better to start with some plan rather than no plan at all. If in doubt, choose to do less than more; we don't expect you to deliver a lot of big features.
-
Divide each of those features into three increments, to be released at v1.1, v1.2, v1.3 (v1.4 omitted deliberately as a buffer). Each increment should deliver a end-user visible enhancement.
-
Document the above two items somewhere e.g., in a Google doc/sheet. An example is given below:
* Jake Woo: Profile photo feature
  * v1.1: show a place holder for photo, showing a generic default image
  * v1.2: can specify photo location if it is in local hard disk,
          show photo from local hard disk
  * v1.3: auto-copy the photo to app folder, support using online photo
          as profile pic, stylize photo e.g., round frame
Submission : Include in the pdf file you upload to LumiNUS.
Suggested question to discuss:
Explain the associations, navigabilities, and multiplicities in the class diagram below:
Suppose we wrote a program to follow the class structure given in this class diagram:
Draw object diagrams to represent the object structures after each of these steps below. Assume that we are trying to minimize the number of total objects.
i.e. apply step 1 → [diagram 1] → apply step 2 on diagram 1 → [diagram 2] and so on.
-
There are no persons.
-
Alfredis the Guardian ofBruce. -
Bruce's contact number is the same asAlfred's. -
Alfredis also the guardian of another person. That person listsAlfreds home address as his home address as well as office address. -
Alfredhas a an office address atWayne Industriesbuilding which is different from his home address (i.e.Bat Cave).
After step 2, the diagram should be like this:

Explain the meaning of various class diagram notations in the following class diagram:
Consider the code below:
public interface Billable {
    void bill();
}
public abstract class Item
         implements Billable {
    public abstract void print();
}
public class StockItem extends Item {
    private Review review;
    private String name;

    public StockItem(
        String name, Rating rating){

        this.name = name;
        this.review = new Review(rating);
    }

    @Override
    public void print() {
        //...
    }

    @Override
    public void bill() {
        //...
    }
}
public enum Rating {
    GOOD, OK, POOR
}
public class Review {
    private final Rating rating;

    public Review(Rating rating) {
        this.rating = rating;
    }
}
import java.util.List;

public class Inventory {
    private List<Item> items;

    public int getItemCount(){
        return items.size();
    }

    public void generateBill(Billable b){
        // ...
    }

    public void add(Item s) {
        items.add(s);
    }
}
(a) Draw a class diagram to represent the code
(b) Draw an object diagram to represent the situation where the inventory has one item with a name spanner and a review of POOR rating.
Policy on project work distribution
As most of the work is graded individually, it is OK to do less or more than equal share in your project team.
Related: [Admin: Project: Scope]
Policy on email response time
Normally, the prof will respond within 24 hours if it was an email sent to the prof or a forum post directed at the prof. If you don't get a response within that time, please feel free to remind the prof. It is likely that the prof did not notice your post or the email got stuck somewhere.
Similarly we expect you to check email regularly and respond to emails written to you personally (not mass email) promptly.
Not responding to a personal email is a major breach of professional etiquette (and general civility). Imagine how pissed off you would be if you met the prof along the corridor, said 'Hi prof, good morning' and the prof walked away without saying anything back. Not responding to a personal email is just as bad. Always take a few seconds to at least acknowledge such emails. It doesn't take long to type "Noted. Thanks" and hit 'send'.
The promptness of a reply is even more important when the email is requesting you for something that you cannot provide. Imagine you wrote to the prof requesting a reference letter and the prof did not respond at all because he/she did not want to give you one; You'll be quite frustrated because you wouldn't know whether to look for another prof or wait longer for a response. Saying 'No' is fine and in fact a necessary part of professional life; but saying nothing is not acceptable. If you didn't reply, the sender will not even know whether you received the email.
Why so much bean counting?
Sometimes, small things matter in big ways. e.g., all other things being equal, a job may be offered to the candidate who has the neater looking CV although both have the same qualifications. This may be unfair, but that's how the world works. Students forget this harsh reality when they are in the protected environment of the school and tend to get sloppy with their work habits. That is why we reward all positive behavior, even small ones (e.g., following precise submission instructions, arriving on time etc.).
But unlike the real world, we are forgiving. That is why you can still earn full 10 marks of the participation marks even if you miss a few things here and there.
Related article: This Is The Personality Trait That Most Often Predicts Success (this is why we reward things like punctuality).