Week 3 [Jan 28]
-
We start formal tutorials this week. The tutorial time table is on the module website.
-
There is graded project task this week!
-
Note that the official ⏰ deadline to achieve weekly project tasks is the midnight before your tutorial. Our scripts that detect your work run at midnight and only the work that's done by midnight will be eligible for marks (for cases where the task is graded).
Team forming
- Forming project teams will happen at the start of this week's tutorial; please try to arrive on time. If you are not there at the team forming time and others in the class are unaware which team you wanted to be in, we'll have to put you into a team randomly.
[W3.1] Refactoring: Basics
Can explain refactoring
The first version of the code you write may not be of production quality. It is OK to first concentrate on making the code work, rather than worry over the quality of the code, as long as you improve the quality later. This process of improving a program's internal structure in small steps without modifying its external behavior is called refactoring.
- Refactoring is not rewriting: Discarding poorly-written code entirely and re-writing it from scratch is not refactoring because refactoring needs to be done in small steps.
- Refactoring is not bug fixing: By definition, refactoring is different from bug fixing or any other modifications that alter the external behavior (e.g. adding a feature) of the component in concern.
💡 Improving code structure can have many secondary benefits: e.g.
- hidden bugs become easier to spot
- improve performance (sometimes, simpler code runs faster than complex code because simpler code is easier for the compiler to optimize).
Given below are two common refactorings (
- Java: http://refactoring.com/catalog/ - This is a list of common refactorings, maintained by Martin Fowler, a leading authority on refactoring. He is also the author of the ‘bestseller’ on refactoring: Refactoring: Improving the Design of Existing Code
- Python: https://refactoring.guru/refactoring/catalog -- A catalog of refactorings applicable to Python code.
Refactoring Name: Consolidate Duplicate Conditional Fragments
Situation: The same fragment of code is in all branches of a conditional expression.
Method: Move it outside of the expression.
Example:
|
→ |
|
|
→ |
|
Refactoring Name: Extract Method
Situation: You have a code fragment that can be grouped together.
Method: Turn the fragment into a method whose name explains the purpose of the method.
Example:
void printOwing() {
    printBanner();

    //print details
    System.out.println("name:	" + name);
    System.out.println("amount	" + getOutstanding());
}
void printOwing() {
    printBanner();
    printDetails(getOutstanding());
}

void printDetails (double outstanding) {
    System.out.println("name:	" + name);
    System.out.println("amount	" + outstanding);
}
def print_owing():
    print_banner()

    //print details
    print("name:	" + name)
    print("amount	" + get_outstanding())
def print_owing():
    print_banner()
    print_details(get_outstanding())

def print_details(amount):
    print("name:	" + name)
    print("amount	" + amount)
💡 Some IDEs have built in support for basic refactorings such as automatically renaming a variable/method/class in all places it has been used.
Refactoring, even if done with the aid of an IDE, may still result in regressions. Therefore, each small refactoring should be followed by regression testing.
Choose the correct statements
- a. Refactoring can improve understandability
- b. Refactoring can uncover bugs
- c. Refactoring can result in better performance
- d. Refactoring can change the number of methods/classes
a, b, c, d
Explanation:
- (a, b, c) Although the primary aim of refactoring is to improve internal code structure, there are other secondary benefits.
- (d) Some refactorings result in adding/removing methods/classes.
Do you agree with the following statement? Justify your answer.
Statement: Whenever we refactor code to fix bugs, we need not do regression testing if the bug fix was minor.
There are two flaws in the given statement.
DISAGREE.
- Even a minor change can have major repercussions on the system. We MUST do regression testing after each change, no matter how minor it is.
- Fixing bugs is technically not refactoring.
Explain what is refactoring and why it is not the same as rewriting, bug fixing, or adding features.
Can use automated refactoring features of the IDE
This video explains how to automate the 'Extract parameter' refactoring using Intellij IDEA. Most other refactorings available works similarly. i.e. select the code to refactor → find the refactoring in the context menu or use the keyboard shortcut.
Here's another video explaining how to change a method signature as part of refactoring.
- Introduction to Refactoring (in Intellij IDEA) : An article on refactorings available in Intellij IDEA.
Can apply some basic refactoring
Given below are some more commonly used refactorings. A more comprehensive list is available at
- Java: http://refactoring.com/catalog/ - This is a list of common refactorings, maintained by Martin Fowler, a leading authority on refactoring. He is also the author of the ‘bestseller’ on refactoring: Refactoring: Improving the Design of Existing Code
- Python: https://refactoring.guru/refactoring/catalog -- A catalog of refactorings applicable to Python code.
Can decide when to apply a given refactoring
We know that it is important to refactor frequently so as to avoid the accumulation of ‘messy’ code which might get out of control. But how much refactoring is too much refactoring? It is too much refactoring when the benefits no longer justify the cost. The costs and the benefits depend on the context. That is why some refactorings are ‘opposites’ of each other (e.g. extract method vs inline method).
‘Extract method’ and ‘Inline method’ refactorings
a
[W3.2] Coding Standards
Can explain the importance of code quality
Always code as if the person who ends up maintaining your code will be a violent psychopath who knows where you live. -- Martin Golding
Can explain the need for following a standard
One essential way to improve code quality is to follow a consistent style. That is why software engineers follow a strict coding standard (aka style guide).
The aim of a coding standard is to make the entire code base look like it was written by one person. A coding standard is usually specific to a programming language and specifies guidelines such as the location of opening and closing braces, indentation styles and naming styles (e.g. whether to use Hungarian style, Pascal casing, Camel casing, etc.). It is important that the whole team/company use the same coding standard and that standard is not generally inconsistent with typical industry practices. If a company's coding standards is very different from what is used typically in the industry, new recruits will take longer to get used to the company's coding style.
💡 IDEs can help to enforce some parts of a coding standard e.g. indentation rules.
What is the recommended approach regarding coding standards?
c
What is the aim of using a coding standard? How does it help?
Can follow simple mechanical style rules
Learn basic guidelines of the Java coding standard (by OSS-Generic)
Sample coding standard: PEP 8 Python Style Guide -- by Python.org
Consider the code given below:
import java.util.*;

public class Task {
    public static final String descriptionPrefix = "description: ";
    private String description;
    private boolean important;
    List<String> pastDescription = new ArrayList<>(); // a list of past descriptions

    public Task(String d) {
      this.description = d;
      if (!d.isEmpty())
          this.important = true;
    }

    public String getAsXML() { return "<task>"+description+"</task>"; }

    /**
     * Print the description as a string.
     */
    public void printingDescription(){ System.out.println(this); }

    @Override
    public String toString() { return descriptionPrefix + description; }
}
In what ways the code violate the basic guidelines (i.e., those marked with one ⭐️) of the OSS-Generic Java Coding Standard given here?
Here are three:
descriptionPrefixis a constant and should be namedDESCRIPTION_PREFIX- method name
printingDescription()should be named asprintDescription() - boolean variable
importantshould be named to sound boolean e.g.,isImportant
There are many more.
Can follow intermediate style rules
Go through the provided Java coding standard and learn the intermediate style rules.
According to the given Java coding standard, which one of these is not a good name?
b
Explanation: checkWeight is an action. Naming variables as actions makes the code harder to follow. isWeightValid may be a better name.
Repeat the exercise in the panel below but also find violations of intermediate level guidelines.
Consider the code given below:
import java.util.*;

public class Task {
    public static final String descriptionPrefix = "description: ";
    private String description;
    private boolean important;
    List<String> pastDescription = new ArrayList<>(); // a list of past descriptions

    public Task(String d) {
      this.description = d;
      if (!d.isEmpty())
          this.important = true;
    }

    public String getAsXML() { return "<task>"+description+"</task>"; }

    /**
     * Print the description as a string.
     */
    public void printingDescription(){ System.out.println(this); }

    @Override
    public String toString() { return descriptionPrefix + description; }
}
In what ways the code violate the basic guidelines (i.e., those marked with one ⭐️) of the OSS-Generic Java Coding Standard given here?
Here are three:
descriptionPrefixis a constant and should be namedDESCRIPTION_PREFIX- method name
printingDescription()should be named asprintDescription() - boolean variable
importantshould be named to sound boolean e.g.,isImportant
There are many more.
Here's one you are more likely to miss:
* Print the description as a string.→* Prints the description as a string.
There are more.
[W3.3] RCS: Project Management
Can explain branching
Branching is the process of evolving multiple versions of the software in parallel. For example, one team member can create a new branch and add an experimental feature to it while the rest of the team keeps working on another branch. Branches can be given names e.g. master, release, dev.
A branch can be merged into another branch. Merging usually result in a new commit that represents the changes done in the branch being merged.
Merge conflicts happen when you try to merge two branches that had changed the same part of the code and the RCS software cannot decide which changes to keep. In those cases we have to ‘resolve’ those conflicts manually.
In the context of RCS, what is the branching? What is the need for branching?.
In the context of RCS, what is the merging branches? How can it lead to merge conflicts?.
Can use Git branching
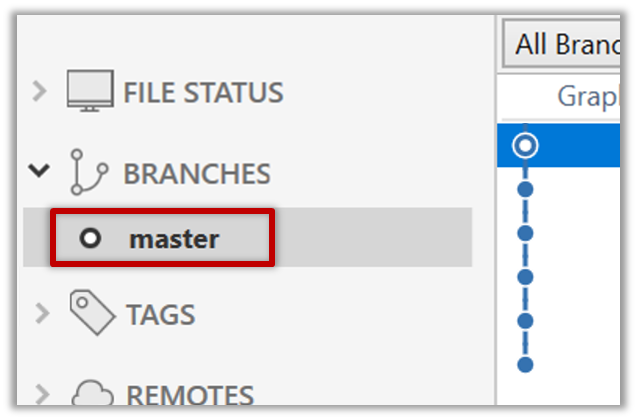
0. Observe that you are normally in the branch called master. For this, you can take any repo you have on your computer (e.g. a clone of the samplerepo-things).
git status
on branch master
1. Start a branch named feature1 and switch to the new branch.
Click on the Branch button on the main menu. In the next dialog, enter the branch name and click Create Branch

Note how the feature1 is indicated as the current branch.

You can use the branch command to create a new branch and the checkout command to switch to a specific branch.
git branch feature1
git checkout feature1
One-step shortcut to create a branch and switch to it at the same time:
git checkout –b feature1
2. Create some commits in the new branch. Just commit as per normal. Commits you add while on a certain branch will become part of that branch.
3. Switch to the master branch. Note how the changes you did in the feature1 branch are no longer in the working directory.
Double-click the master branch
git checkout master
4. Add a commit to the master branch. Let’s imagine it’s a bug fix.
5. Switch back to the feature1 branch (similar to step 3).
6. Merge the master branch to the feature1 branch, giving an end-result like the below. Also note how Git has created a merge commit.
Right-click on the master branch and choose merge master into the current branch. Click OK in the next dialog.
git merge master
Observe how the changes you did in the master branch (i.e. the imaginary bug fix) is now available even when you are in the feature1 branch.
7. Add another commit to the feature1 branch.
8. Switch to the master branch and add one more commit.
9. Merge feature1 to the master branch, giving and end-result like this:
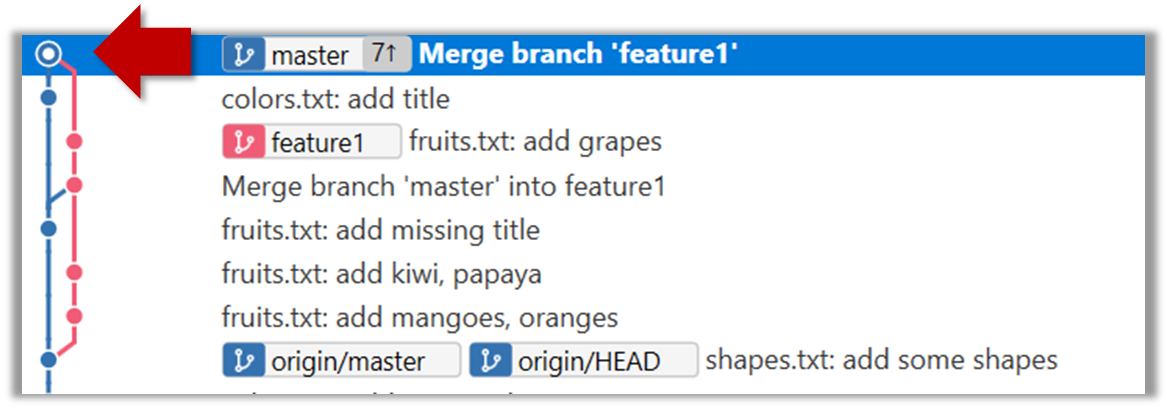
Right-click on the feature1 branch and choose Merge....
git merge feature1
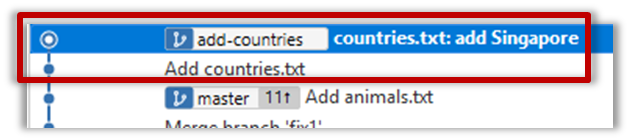
10. Create a new branch called add-countries, switch to it, and add some commits to it (similar to steps 1-2 above). You should have something like this now:
11. Go back to the master branch and merge the add-countries branch onto the master branch (similar to steps 8-9 above). While you might expect to see something like the below,
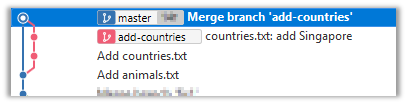
... you are likely to see something like this instead:

That is because Git does a fast forward merge if possible. Seeing that the master branch has not changed since you started the add-countries branch, Git has decided it is simpler to just put the commits of the add-countries branch in front of the master branch, without going into the trouble of creating an extra merge commit.
It is possible to force Git to create a merge commit even if fast forwarding is possible.
Tick the box shown below when you merge a branch:
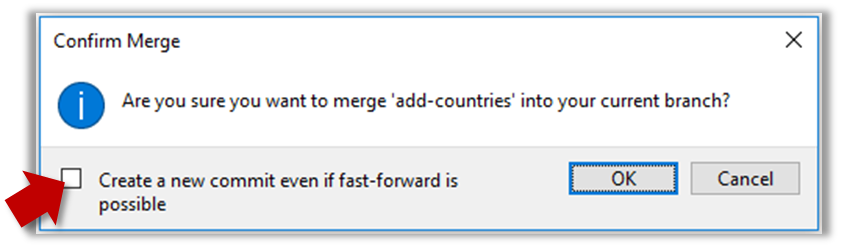
Use the --no-ff switch (short for no fast forward):
git merge --no-ff add-countries
Can create PRs on GitHub
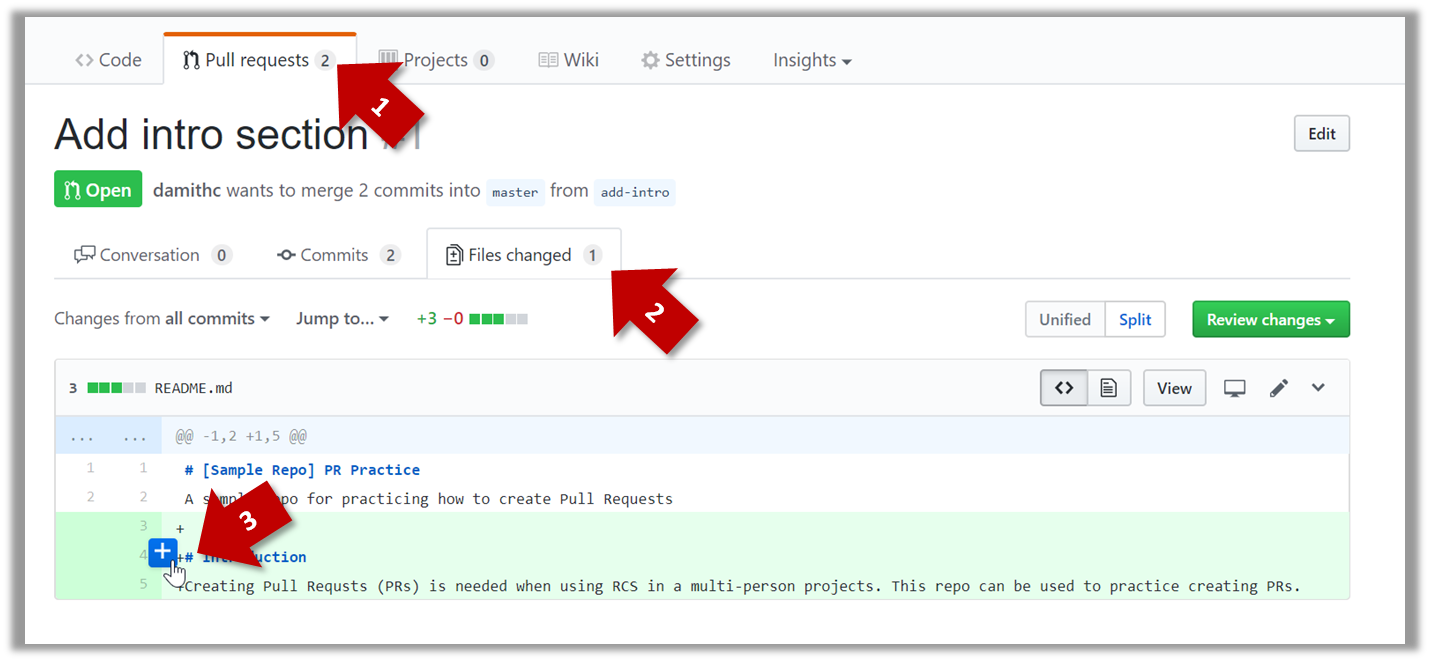
1. Fork the samplerepo-pr-practice onto your GitHub account. Clone it onto your computer.
2. Create a branch named add-intro in your clone. Add a couple of commits which adds/modifies an Introduction section to the README.md. Example:
# Introduction
Creating Pull Requsts (PRs) is needed when using RCS in a multi-person projects.
This repo can be used to practice creating PRs.
3. Push the add-intro branch to your fork.
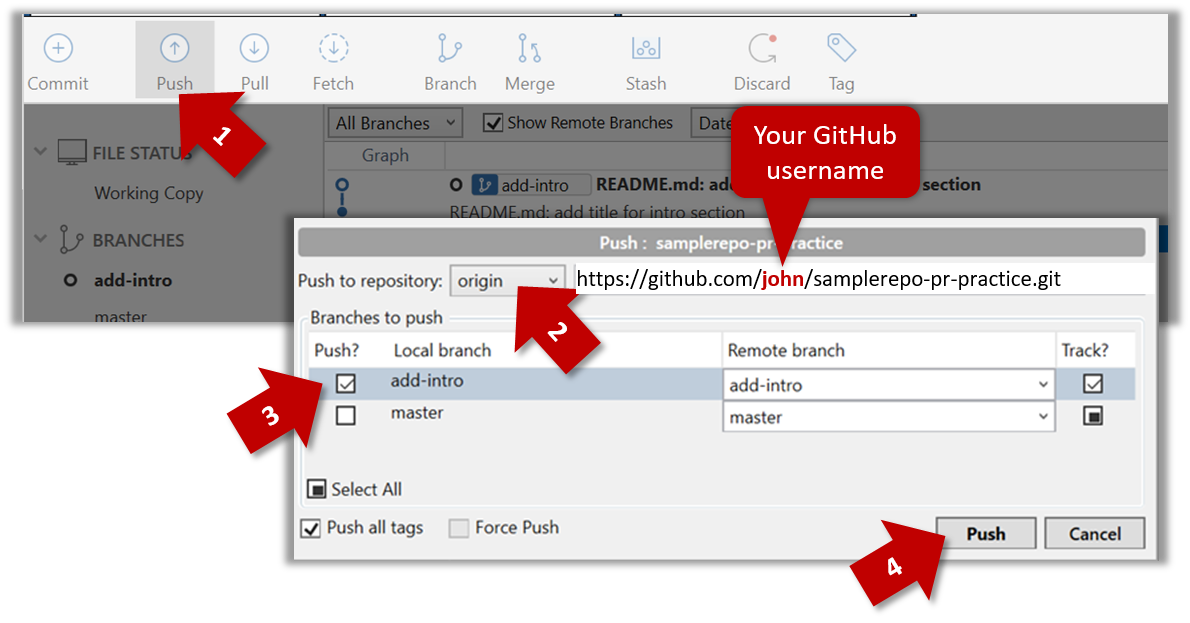
git push origin add-intro
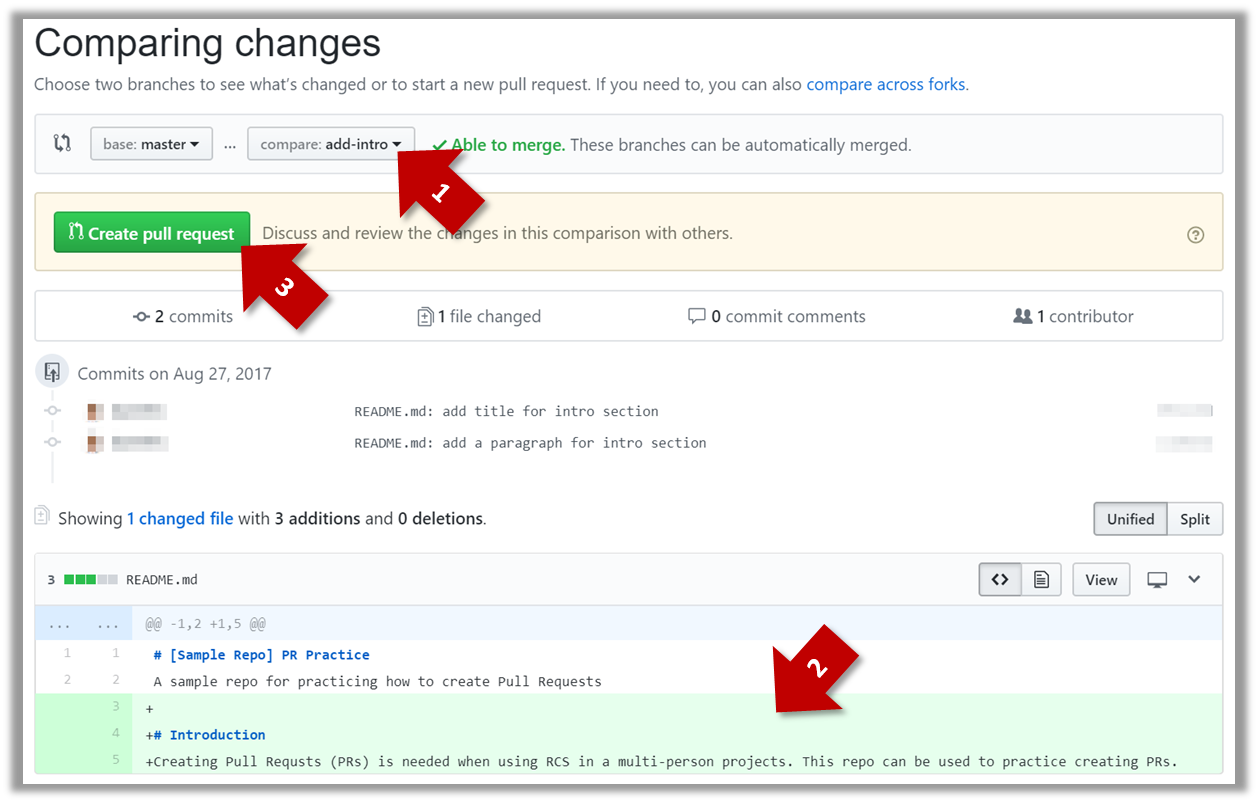
4. Create a Pull Request from the add-intro branch in your fork to the master branch of the same fork (i.e. your-user-name/samplerepo-pr-practice, not se-edu/samplerepo-pr-practice), as described below.
4a. Go to the GitHub page of your fork (i.e. https://github.com/{your_username}/samplerepo-pr-practice), click on the Pull Requests tab, and then click on New Pull Request button.

4b. Select base fork and head fork as follows:
base fork: your own fork (i.e.{your user name}/samplerepo-pr-practice, NOTse-edu/samplerepo-pr-practice)head fork: your own fork.

The base fork is where changes should be applied. The head fork contains the changes you would like to be applied.
4c. (1) Set the base branch to master and head branch to add-intro, (2) confirm the diff contains the changes you propose to merge in this PR (i.e. confirm that you did not accidentally include extra commits in the branch), and (3) click the Create pull request button.
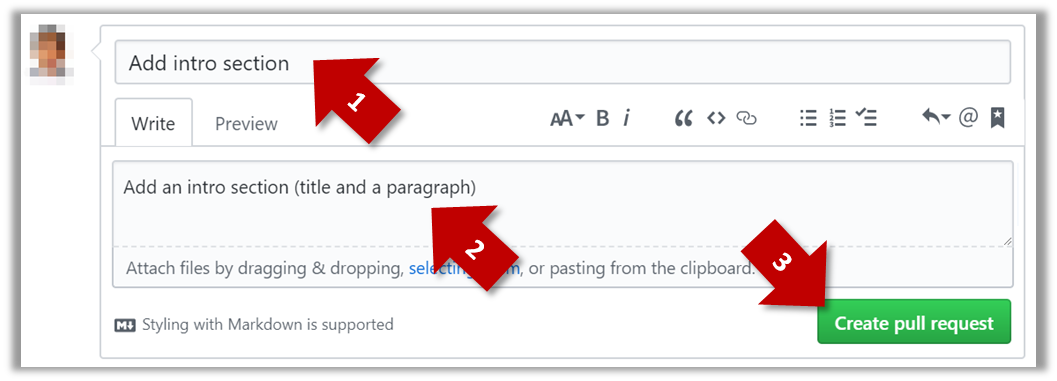
4d. (1) Set PR name, (2) set PR description, and (3) Click the Create pull request button.
A common newbie mistake when creating branch-based PRs is to mix commits of one PR with another. To learn how to avoid that mistake, you are encouraged to continue and create another PR as explained below.
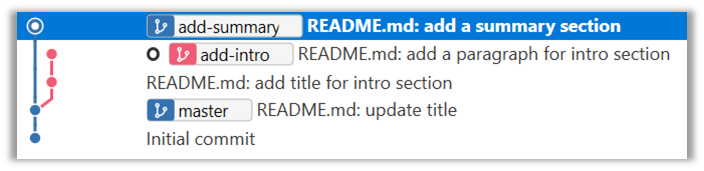
5. In your local repo, create a new branch add-summary off the master branch.
When creating the new branch, it is very important that you switch back to the master branch first. If not, the new branch will be created off the current branch add-intro. And that is how you end up having commits of the first PR in the second PR as well.
6. Add a commit in the add-summary branch that adds a Summary section to the README.md, in exactly the same place you added the Introduction section earlier.
7. Push the add-summary to your fork and create a new PR similar to before.
Can use Git to resolve merge conflicts
1. Start a branch named fix1 in a local repo. Create a commit that adds a line with some text to one of the files.
2. Switch back to master branch. Create a commit with a conflicting change i.e. it adds a line with some different text in the exact location the previous line was added.
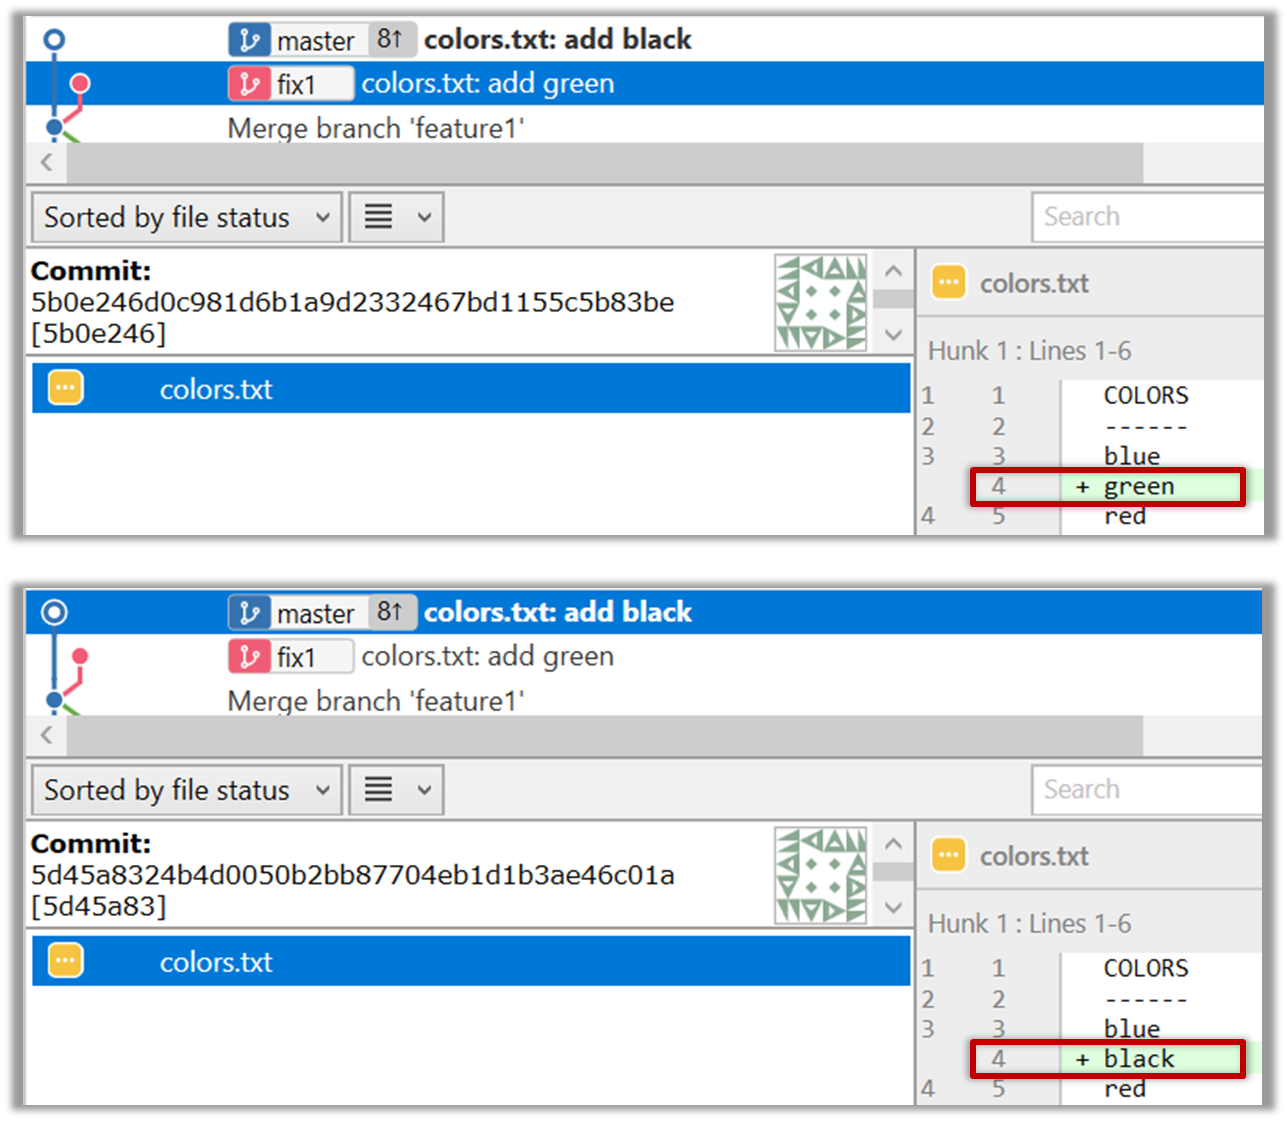
3. Try to merge the fix1 branch onto the master branch. Git will pause mid-way during the merge and report a merge conflict. If you open the conflicted file, you will see something like this:
COLORS
------
blue
<<<<<<< HEAD
black
=======
green
>>>>>>> fix1
red
white
4. Observe how the conflicted part is marked between a line starting with <<<<<<< and a line starting with >>>>>>>, separated by another line starting with =======.
This is the conflicting part that is coming from the master branch:
<<<<<<< HEAD
black
=======
This is the conflicting part that is coming from the fix1 branch:
=======
green
>>>>>>> fix1
5. Resolve the conflict by editing the file. Let us assume you want to keep both lines in the merged version. You can modify the file to be like this:
COLORS
------
blue
black
green
red
white
6. Stage the changes, and commit.
Can review and merge PRs on GitHub
1. Go to GitHub page of your fork and review the add-intro PR you created previously in [
1. Fork the samplerepo-pr-practice onto your GitHub account. Clone it onto your computer.
2. Create a branch named add-intro in your clone. Add a couple of commits which adds/modifies an Introduction section to the README.md. Example:
# Introduction
Creating Pull Requsts (PRs) is needed when using RCS in a multi-person projects.
This repo can be used to practice creating PRs.
3. Push the add-intro branch to your fork.
git push origin add-intro
4. Create a Pull Request from the add-intro branch in your fork to the master branch of the same fork (i.e. your-user-name/samplerepo-pr-practice, not se-edu/samplerepo-pr-practice), as described below.
4a. Go to the GitHub page of your fork (i.e. https://github.com/{your_username}/samplerepo-pr-practice), click on the Pull Requests tab, and then click on New Pull Request button.
4b. Select base fork and head fork as follows:
base fork: your own fork (i.e.{your user name}/samplerepo-pr-practice, NOTse-edu/samplerepo-pr-practice)head fork: your own fork.
The base fork is where changes should be applied. The head fork contains the changes you would like to be applied.
4c. (1) Set the base branch to master and head branch to add-intro, (2) confirm the diff contains the changes you propose to merge in this PR (i.e. confirm that you did not accidentally include extra commits in the branch), and (3) click the Create pull request button.
4d. (1) Set PR name, (2) set PR description, and (3) Click the Create pull request button.
A common newbie mistake when creating branch-based PRs is to mix commits of one PR with another. To learn how to avoid that mistake, you are encouraged to continue and create another PR as explained below.
5. In your local repo, create a new branch add-summary off the master branch.
When creating the new branch, it is very important that you switch back to the master branch first. If not, the new branch will be created off the current branch add-intro. And that is how you end up having commits of the first PR in the second PR as well.
6. Add a commit in the add-summary branch that adds a Summary section to the README.md, in exactly the same place you added the Introduction section earlier.
7. Push the add-summary to your fork and create a new PR similar to before.
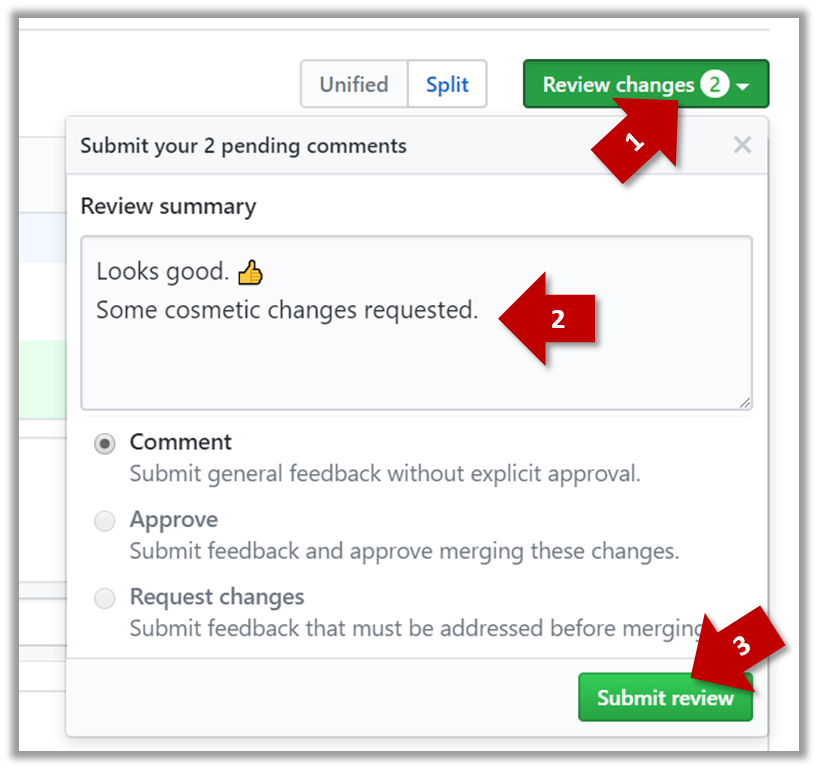
1a. Go to the respective PR page and click on the Files changed tab. Hover over the line you want to comment on and click on the icon that appears on the left margin. That should create a text box for you to enter your comment.
1b. Enter some dummy comment and click on Start a review button.
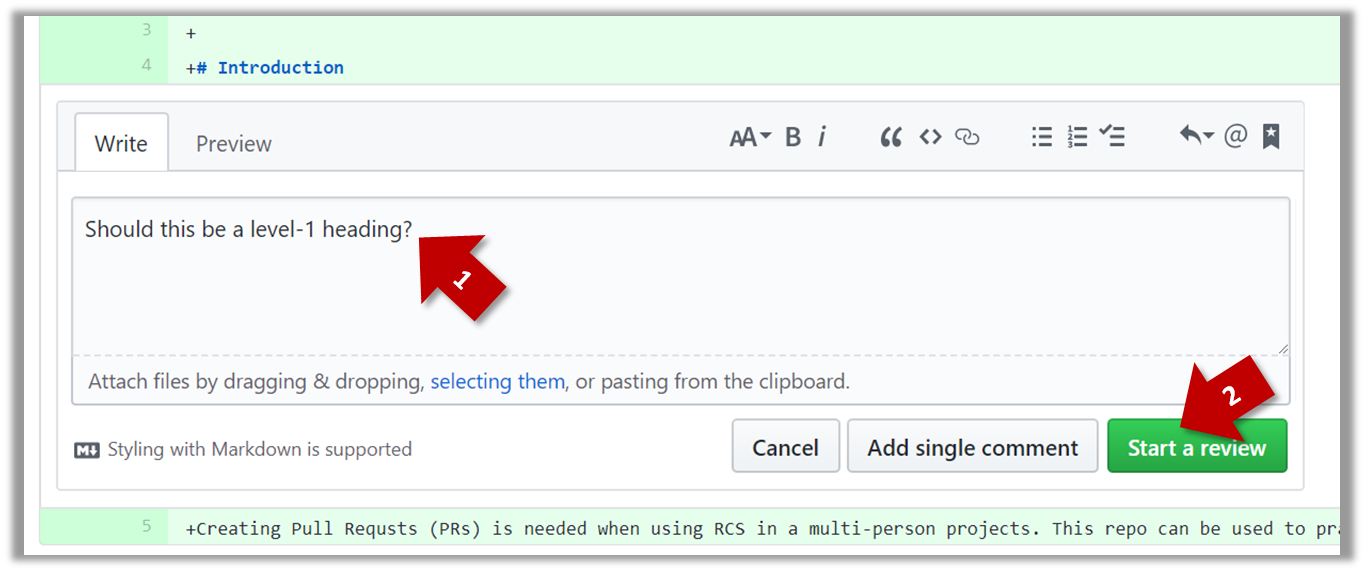
1c. Add a few more comments in other places of the code.
1d. Click on the Review Changes button, enter an overall comment, and click on the Submit review button.
2. Update the PR to simulate revising the code based on reviewer comments. Add some more commits to the add-intro branch and push the new commits to the fork. Observe how the PR is updated automatically to reflect the new code.
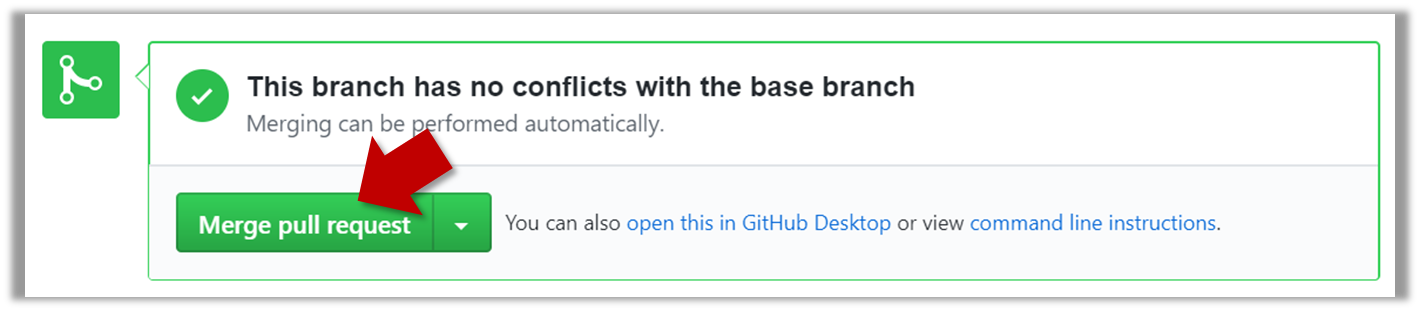
3. Merge the PR. Go to the GitHub page of the respective PR, scroll to the bottom of the Conversation tab, and click on the Merge pull request button, followed by the Confirm merge button. You should see a Pull request successfully merged and closed message after the PR is merged.
4. Sync the local repo with the remote repo. Because of the merge you did on the GitHub, the master branch of your fork is now ahead of your local repo by one commit. To sync the local repo with the remote repo, pull the master branch to the local repo.
git checkout master
git pull origin master
Observe how the add-intro branch is now merged to the master branch in your local repo as well.
5. De-conflict the add-summary PR
add-summary PR is now showing a conflict (when you scroll to the bottom of that page, you should see a message This branch has conflicts that must be resolved). You can resolve it locally and update the PR accordingly, as explained below.
5a. Switch to the add-summary branch. To make that branch up-to-date with the master branch, merge the master branch to it, which will surface the merge conflict. Resolve it and complete the merge.
5b. Push the updated add-summary branch to the fork. That will remove the 'merge conflicts' warning in the GitHub page of the PR.
6. Merge the add-summary PR using the GitHub interface, similar to how you merged the previous PR.
Note that you could have merged the add-summary branch to the master branch locally before pushing it to GitHub. In that case, the PR will be merged on GitHub automatically to reflect that the branch has been merged already.
Can explain forking workflow
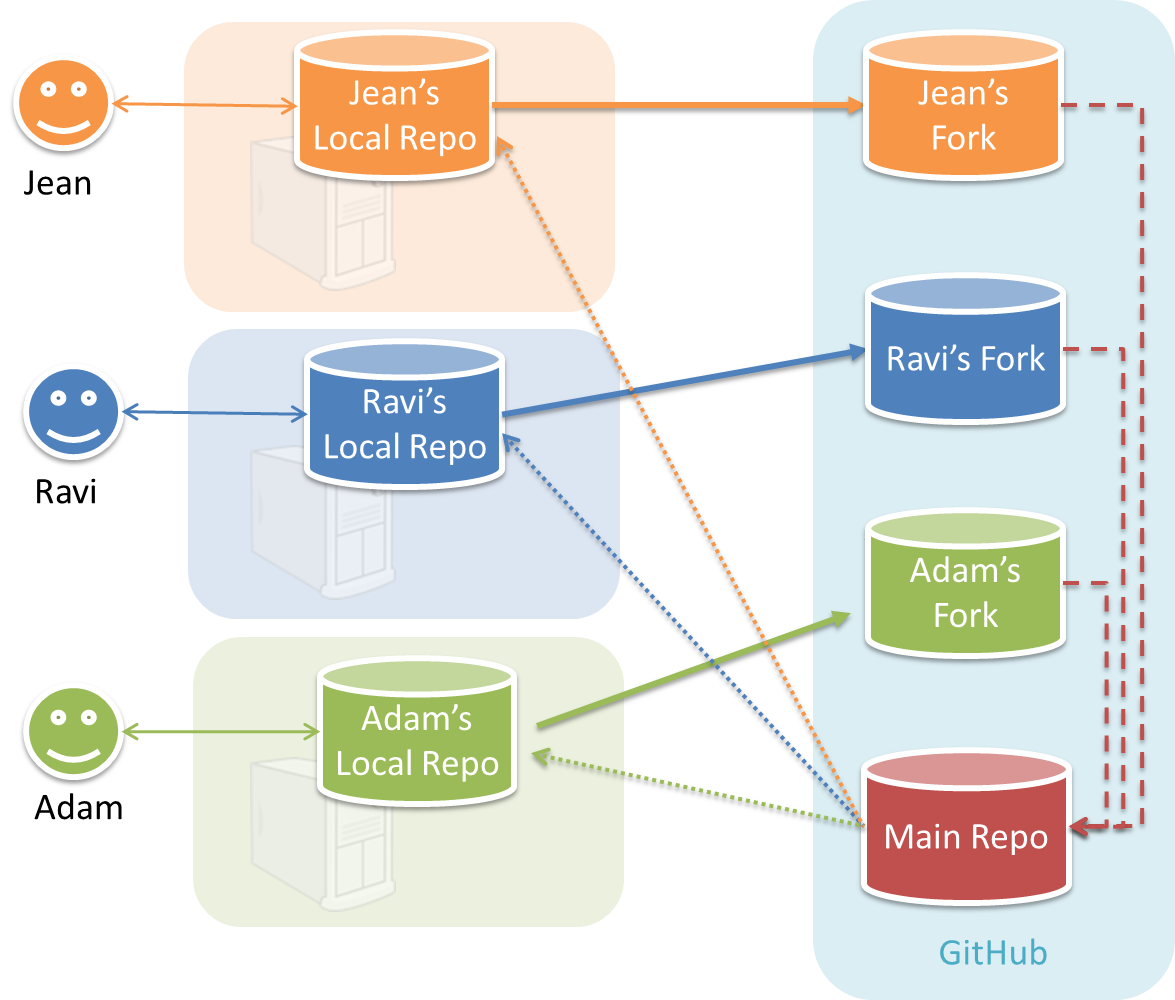
In the forking workflow, the 'official' version of the software is kept in a remote repo designated as the 'main repo'. All team members fork the main repo create pull requests from their fork to the main repo.
To illustrate how the workflow goes, let’s assume Jean wants to fix a bug in the code. Here are the steps:
- Jean creates a separate branch in her local repo and fixes the bug in that branch.
- Jean pushes the branch to her fork.
- Jean creates a pull request from that branch in her fork to the main repo.
- Other members review Jean’s pull request.
- If reviewers suggested any changes, Jean updates the PR accordingly.
- When reviewers are satisfied with the PR, one of the members (usually the team lead or a designated 'maintainer' of the main repo) merges the PR, which brings Jean’s code to the main repo.
- Other members, realizing there is new code in the upstream repo, sync their forks with the new upstream repo (i.e. the main repo). This is done by pulling the new code to their own local repo and pushing the updated code to their own fork.
- A detailed explanation of the Forking Workflow - From Atlassian
Can follow Forking Workflow
This activity is best done as a team. If you are learning this alone, you can simulate a team by using two different browsers to log into GitHub using two different accounts.
-
One member: set up the team org and the team repo.
- Create a GitHub organization for your team. The org name is up to you. We'll refer to this organization as team org from now on.
- Add a team called
developersto your team org. - Add your team members to the
developersteam. - Fork se-edu/samplerepo-workflow-practice to your team org. We'll refer to this as the team repo.
- Add the forked repo to the
developersteam. Give write access.
-
Each team member: create PRs via own fork
- Fork that repo from your team org to your own GitHub account.
- Create a PR to add a file
yourName.md(e.g.jonhDoe.md) containing a brief resume of yourself (branch → commit → push → create PR)
-
For each PR: review, update, and merge.
- A team member (not the PR author): Review the PR by adding comments (can be just dummy comments).
- PR author: Update the PR by pushing more commits to it, to simulate updating the PR based on review comments.
- Another team member: Merge the PR using the GitHub interface.
- All members: Sync your local repo (and your fork) with upstream repo. In this case, your upstream repo is the repo in your team org.
-
Create conflicting PRs.
- Each team member: Create a PR to add yourself under the
Team Memberssection in theREADME.md. - One member: in the
masterbranch, remove John Doe and Jane Doe from theREADME.md, commit, and push to the main repo.
- Each team member: Create a PR to add yourself under the
-
Merge conflicting PRs one at a time. Before merging a PR, you’ll have to resolve conflicts. Steps:
- [Optional] A member can inform the PR author (by posting a comment) that there is a conflict in the PR.
- PR author: Pull the
masterbranch from the repo in your team org. Merge the pulledmasterbranch to your PR branch. Resolve the merge conflict that crops up during the merge. Push the updated PR branch to your fork. - Another member or the PR author: When GitHub does not indicate a conflict anymore, you can go ahead and merge the PR.
Can explain DRCS vs CRCS
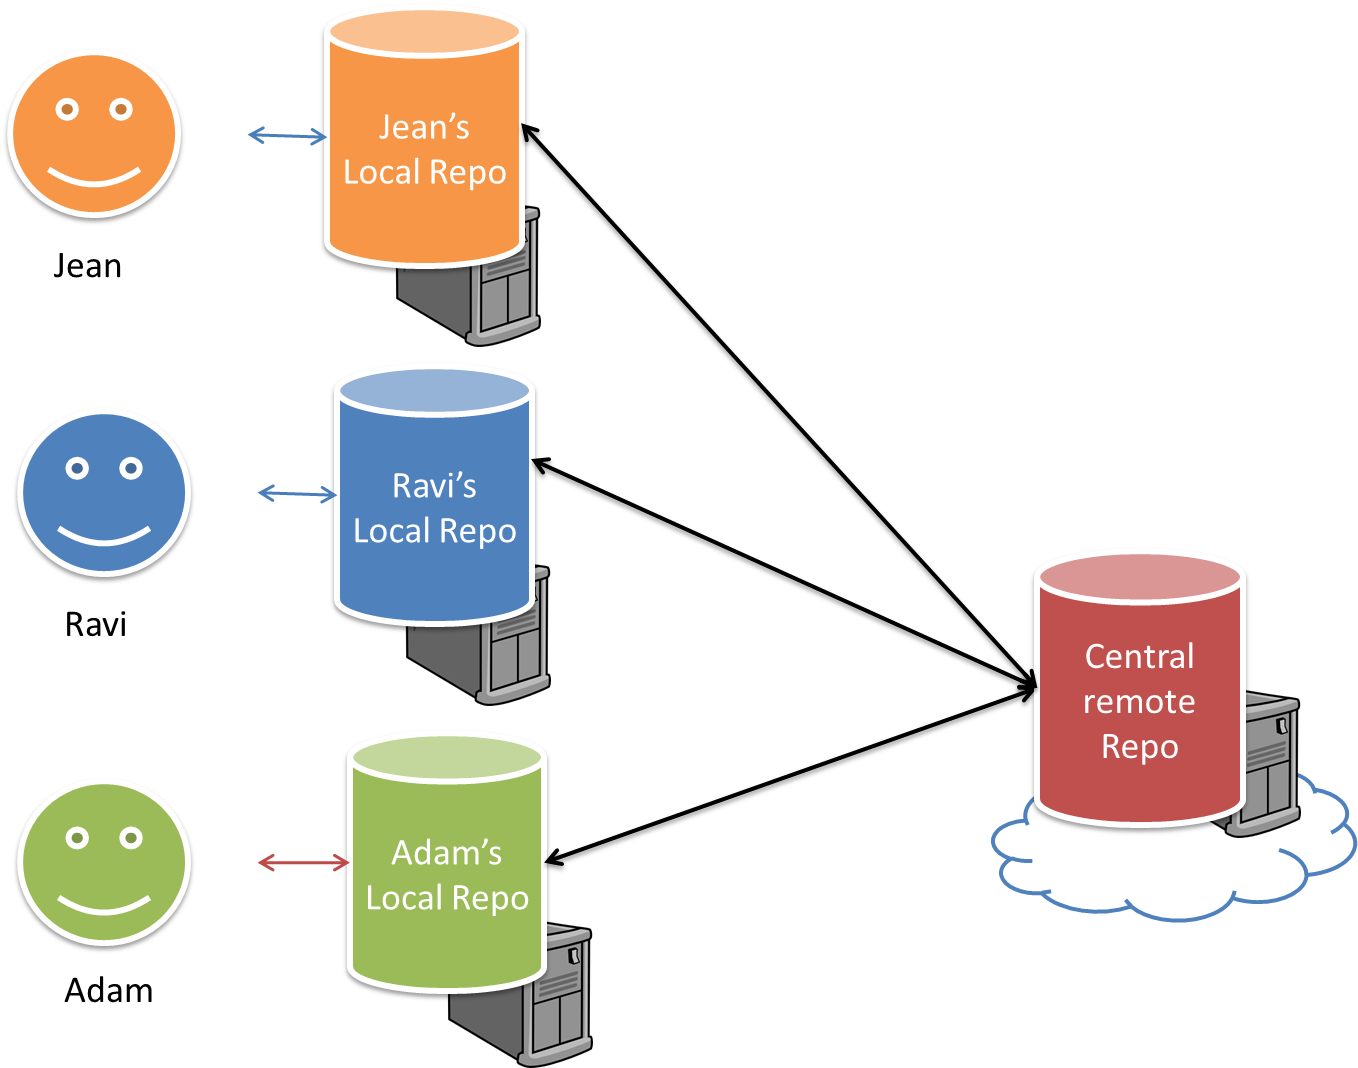
RCS can be done in two ways: the centralized way and the distributed way.
Centralized RCS (CRCS for short)uses a central remote repo that is shared by the team. Team members download (‘pull’) and upload (‘push’) changes between their own local repositories and the central repository. Older RCS tools such as CVS and SVN support only this model. Note that these older RCS do not support the notion of a local repo either. Instead, they force users to do all the versioning with the remote repo.
The centralized RCS approach without any local repos (e.g., CVS, SVN)
Distributed RCS (DRCS for short, also known as Decentralized RCS) allows multiple remote repos and pulling and pushing can be done among them in arbitrary ways. The workflow can vary differently from team to team. For example, every team member can have his/her own remote repository in addition to their own local repository, as shown in the diagram below. Git and Mercurial are some prominent RCS tools that support the distributed approach.
The decentralized RCS approach
Can explain feature branch flow
Feature branch workflow is similar to forking workflow except there are no forks. Everyone is pushing/pulling from the same remote repo. The phrase feature branch is used because each new feature (or bug fix, or any other modification) is done in a separate branch and merged to master branch when ready.
- A detailed explanation of the Feature Branch Workflow - From Atlassian
Can explain centralized flow
The centralized workflow is similar to the feature branch workflow except all changes are done in the master branch.
- A detailed explanation of the Centralized Workflow - From Atlassian
[W3.4] Documentation Tools
Javadoc
Can explain JavaDoc
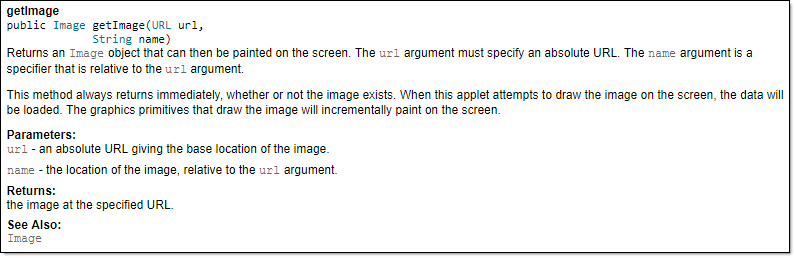
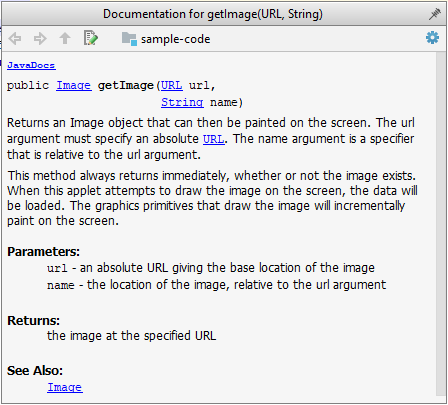
Javadoc is a tool for generating API documentation in HTML format from doc comments in source. In addition, modern IDEs use JavaDoc comments to generate explanatory tool tips.
An example method header comment in JavaDoc format (adapted from Oracle's Java documentation)
/**
 * Returns an Image object that can then be painted on the screen.
 * The url argument must specify an absolute {@link URL}. The name
 * argument is a specifier that is relative to the url argument.
 * <p>
 * This method always returns immediately, whether or not the
 * image exists. When this applet attempts to draw the image on
 * the screen, the data will be loaded. The graphics primitives
 * that draw the image will incrementally paint on the screen.
 *
 * @param url an absolute URL giving the base location of the image
 * @param name the location of the image, relative to the url argument
 * @return the image at the specified URL
 * @see Image
 */
 public Image getImage(URL url, String name) {
        try {
            return getImage(new URL(url, name));
        } catch (MalformedURLException e) {
            return null;
        }
 }
Generated HTML documentation:
Tooltip generated by Intellij IDE:
Can write Javadoc comments
In the absence of more extensive guidelines (e.g., given in a coding standard adopted by your project), you can follow the two examples below in your code.
A minimal javadoc comment example for methods:
/**
 * Returns lateral location of the specified position.
 * If the position is unset, NaN is returned.
 *
 * @param x  X coordinate of position.
 * @param y Y coordinate of position.
 * @param zone Zone of position.
 * @return Lateral location.
 * @throws IllegalArgumentException  If zone is <= 0.
 */
public double computeLocation(double x, double y, int zone)
    throws IllegalArgumentException {
  ...
}
A minimal javadoc comment example for classes:
package ...

import ...

/**
 * Represents a location in a 2D space. A <code>Point</code> object corresponds to
 * a coordinate represented by two integers e.g., <code>3,6</code>
 */
public class Point{
    //...
}
- A short tutorial on writing JavaDoc comments -- from tutorialspoint.com
- A more detailed description --from Oracle
Markdown
Can explain Markdown
Markdown is a lightweight markup language with plain text formatting syntax.
Can write documents in Markdown format
- A tutorial on Mastering Markdown --from GitHub
AsciiDoc
Can explain AsciiDoc
AsciiDoc is similar to Markdown but has more powerful (but also more complex) syntax.
Project Preparation: 1 KLoC
This task can earn you
To receive full 10 marks allocated for participation, earn at least 15 participation points.
There are 30+ available points to choose from:
-
Good peer ratings - Criteria for professional conduct (1 point for each criterion, max 7)
- Competency criteria (2 points for each, max 6)
Only those who submit peer evaluations can earn participation points from peer evaluations they receive.
- In-lecture quizzes (1 each, max 10 points)
- Module admin tasks done on time and as instructed
- Peer evaluations (1 points each, max 3)
- Pre-module survey (1 points)
- Enhanced AB1-AB3 (2 points each, max 6 points)
Relevant: [
Peer evaluation criteria: professional conduct
- Professional Communication :
- Communicates sufficiently and professionally. e.g. Does not use offensive language or excessive slang in project communications.
- Responds to communication from team members in a timely manner (e.g. within 24 hours).
- Punctuality: Does not cause others to waste time or slow down project progress by frequent tardiness.
- Dependability: Promises what can be done, and delivers what was promised.
- Effort: Puts in sufficient effort to, and tries their best to keep up with the module/project pace. Seeks help from others when necessary.
- Quality: Does not deliver work products that seem to be below the student's competence level i.e. tries their best to make the work product as high quality as possible within her competency level.
- Meticulousness:
- Rarely overlooks submission requirements.
- Rarely misses compulsory module activities such as pre-module survey.
- Teamwork: How willing are you to act as part of a team, contribute to team-level tasks, adhere to team decisions, etc.
Peer evaluation criteria: competency
- Technical Competency: Able to gain competency in all the required tools and techniques.
- Mentoring skills: Helps others when possible. Able to mentor others well.
- Communication skills: Able to communicate (written and spoken) well. Takes initiative in discussions.
Evidence:
Do an enhancement to [AddressBook - Level1] e.g. add a new command
- The size of the enhancement does not matter.
- Step 1: Fork address AddressBook - Level1 to your GitHub account.
- Step 2: Change the code in small steps and commit after each significant change. You may commit to the
masterbranch.- Try to stay within the procedural (not OOP) style of the code base. Reason: in this LO, we try to stretch ourselves to the limits of the procedural approach.
- Update all relevant tests. Ensure all tests pass.
- [Optional] Update all relevant documentation.
- [Optional] Try to follow our coding standard in your new code.
- Step 3: push the updated AB1 code to your fork
💡 Note that you can reuse the code you write here in your final project, if applicable.
Submission: No special submission required. Our scripts will check your fork automatically.
Project Milestone: Inception
Decide on a overall project direction (user profile, problem addressed, optimize or morph?).
It is not too early to set an overall direction for your project.
-
Set up a weekly project meeting time/venue with your team members
We recommend at least one face-to-face project meeting per week. The project meeting time can be used to discuss project related things, but also, can be used as a time for team members to work on the project tasks individually (having all members in the same place will facilitate easier collaboration and more peer-learning).
-
Play around with AB4
Download the latest released version (i.e., the jar file) of AB4 from its upstream repo and play around with it to familiarize with its current features.
-
Decide project direction, target user profile, and problem addressed
Use your first project meeting to discuss with your team members and decide your project direction, target user profile, and the value proposition of the product, as described in
[Admin Project Scope]
In general, each team is expected to take one of these two directions:
-
[Direction 1] Optimize AddressBook for a more specific target user group:
An AddressBook,
- for users in a specific profession e.g. doctors, salesmen, teachers, etc.
- based on the nature/scale of contacts e.g. huge number of contacts (for HR admins, user group admins), mostly incomplete contacts, highly volatile contact details, contacts become inactive after a specific period (e.g. contract employees)
- based on what users do with the contacts e.g. organize group events, share info, do business, do analytics
-
[Direction 2] Morph AddressBook into a different product: Given that AddressBook is a generic app that manages a type of elements (i.e. contacts), you can use it as a starting point to create an app that manages something else.
This is a high-risk high-reward option because morphing requires extra work but a morphed product may earn more marks than an optimized product of similar complexity.An app to manage,
- Bookmarks of websites
- Tasks/Schedule
- Location info
- Thing to memorize i.e. flash cards, trivia
- Forum posts, news feeds, Social media feeds
- Online projects or issue trackers that the user is interested in
- Emails, possibly from different accounts
- Multiple types of related things e.g. Contacts and Tasks (if Tasks are allocated to Contacts)
For either direction, you need to define a target user profile and a value proposition:
-
Target user profile: Define a very specific target user profile.
💡 We require you to narrow down the target user profile as opposed to trying to make it as general as possible. Here is an example direction of narrowing down target user: anybody → teachers → university teachers → tech savvy university teachers → CS2103/T instructors.
Be careful not to contradict given project constraints when defining the user profile e.g. the target user should still prefer typing over mouse actions.
It is expected that your product will be optimized for the chosen target users i.e., add features that are especially/only applicable for target users (to make the app especially attractive to them). w.r.t. the example above, there can be features that are applicable to CS2103/T instructors only, such as the ability to navigate to a student's project on GitHub
💡 Your project will be graded based on how well the features match the target user profile and how well the features fit-together.- It is an opportunity to exercise your product design skills because optimizing the product to a very specific target user requires good product design skills.
- It minimizes the overlap between features of different teams which can cause plagiarism issues. Furthermore, higher the number of other teams having the same features, less impressive your work becomes especially if others have done a better job of implementing that feature.
- Value proposition: Define a clear value proposition (what problem does the product solve? how does it make the the user's life easier?) that matches the target user profile.
Admin matters
Team forming: We will form teams at the beginning of the tutorial. Be sure to arrive on time.
All students:
- Confirm your team ID with the tutor. It should be of the form
TUTORIAL_ID-TEAM_NUMBERe.g.W09-1(Wed0900 slot, team1)
Suggested tutorial activities
Coding standards
Consider the code given below:
import java.util.*;

public class Task {
    public static final String descriptionPrefix = "description: ";
    private String description;
    private boolean important;
    List<String> pastDescription = new ArrayList<>(); // a list of past descriptions

    public Task(String d) {
      this.description = d;
      if (!d.isEmpty())
          this.important = true;
    }

    public String getAsXML() { return "<task>"+description+"</task>"; }

    /**
     * Print the description as a string.
     */
    public void printingDescription(){ System.out.println(this); }

    @Override
    public String toString() { return descriptionPrefix + description; }
}
Identify some basic coding standard violations.
Refactoring
In Addressbook Level 1, apply the following refactorings, where applicable. Use the IDE to aid refactoring.
Note that project grading is not competitive (not bell curved). CS2103T projects will be assessed separately from CS2103 projects. This is to account for the perceived difference in workload. Given below is the marking scheme.
Total: 50 marks ( 38 individual marks + 12 team marks)
See the sections below for details of how we assess each aspect.
1. Project Assessment: Product Design [ 5 marks]
Evaluates: how well your features fit together to form a cohesive product (not how many features or how big the features are) and how well does it match the target user
Evaluated by:
- tutors (based on product demo and user guide)
- peers from other teams (based on peer testing and user guide)
For reference, here are some grading instructions that will be given to peers/tutors grading this aspect:
Evaluate the product design based on how the product V2.0 (not V1.4) is described in the User Guide.
unable to judge: You are unable to judge this aspect for some reason e.g., UG is not available or does not have enough information.Target user:
target user specified and appropriate: The target user is clearly specified, prefers typing over other modes of input, and not too general (should be narrowed to a specific user group with certain characteristics).value specified and matching: The value offered by the product is clearly specified and matches the target user.Value to the target user:
value: low: The value to target user is low. App is not worth using.value: medium: Some small group of target users might find the app worth using.value: high: Most of the target users are likely to find the app worth using.Feature-fit:
feature-fit: low: Features don't seem to fit together.feature-fit: medium: Some features fit together but some don't.feature-fit: high: All features fit together.
polished: The product looks well-designed.
2. Project Assessment: Implementation [ 13 marks]
2A. Code quality
Evaluates: the quality of the code you have written yourself
Based on: the parts of the code you claim as written by you
Evaluation method:: manual inspection by tutors + automated-analysis by a script
For reference, here are some factors considered when grading this aspect:
At least some evidence of these (see here for more info)
- logging
- exceptions
- assertions
- defensive coding
No coding standard violations e.g. all boolean variables/methods sounds like booleans. Checkstyle can prevent only some coding standard violations; others need to be checked manually.
SLAP is applied at a reasonable level. Long methods or deeply-nested code are symptoms of low-SLAP.
No noticeable code duplications i.e. if there multiple blocks of code that vary only in minor ways, try to extract out similarities into one place, especially in test code.
Evidence of applying
code quality guidelines covered in the module .
Code Quality
Can explain the importance of code quality
Always code as if the person who ends up maintaining your code will be a violent psychopath who knows where you live. -- Martin Golding
Can explain the importance of readability
Programs should be written and polished until they acquire publication quality. --Niklaus Wirth
Among various dimensions of code quality, such as run-time efficiency, security, and robustness, one of the most important is understandability. This is because in any non-trivial software project, code needs to be read, understood, and modified by other developers later on. Even if we do not intend to pass the code to someone else, code quality is still important because we all become 'strangers' to our own code someday.
The two code samples given below achieve the same functionality, but one is easier to read.
|
Bad |
|
Good |
|
Bad |
|
Good |
Can improve code quality using technique: avoid long methods
Be wary when a method is longer than the computer screen, and take corrective action when it goes beyond 30 LOC (lines of code). The bigger the haystack, the harder it is to find a needle.
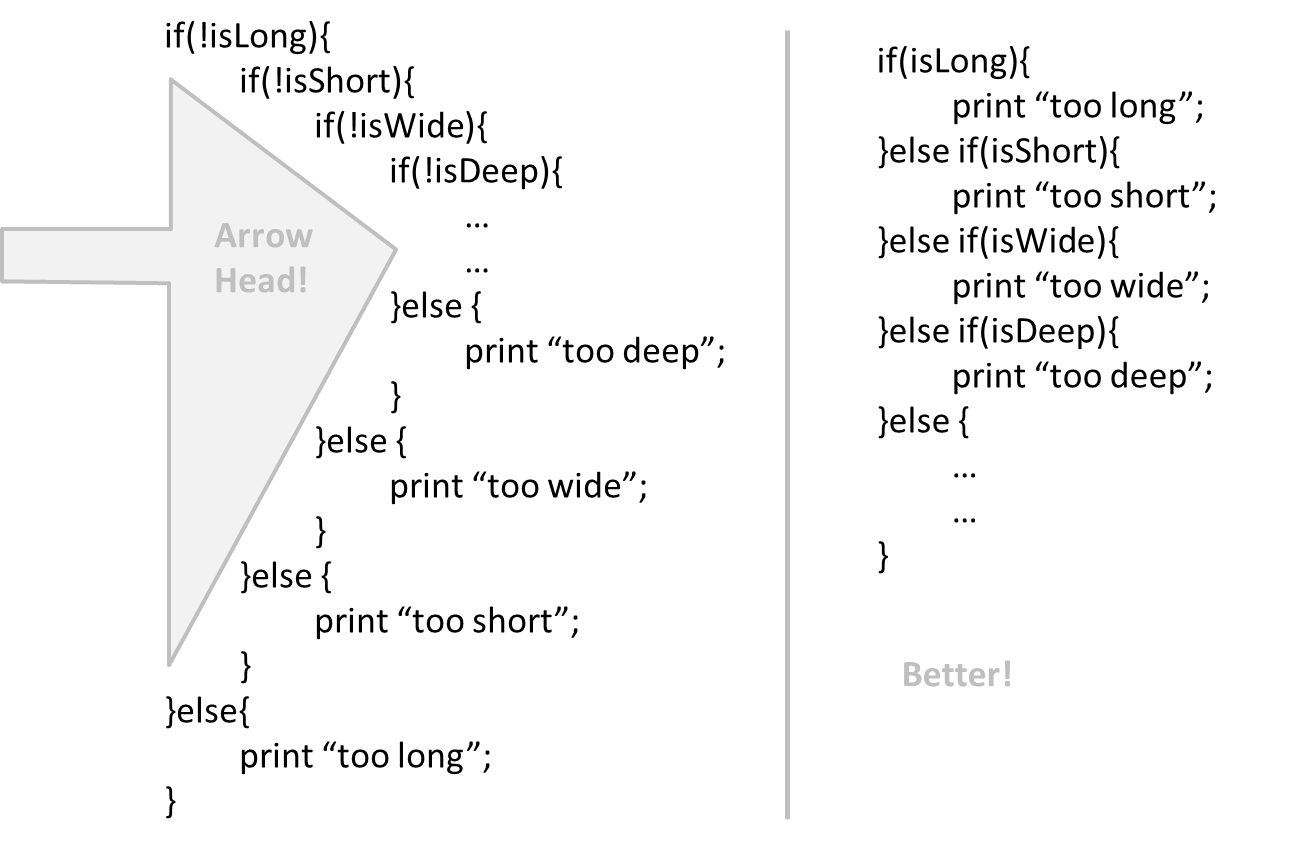
Can improve code quality using technique: avoid deep nesting
If you need more than 3 levels of indentation, you're screwed anyway, and should fix your program. --Linux 1.3.53 CodingStyle
In particular, avoid arrowhead style code.
Example:
Can improve code quality using technique: avoid complicated expressions
Avoid complicated expressions, especially those having many negations and nested parentheses. If you must evaluate complicated expressions, have it done in steps (i.e. calculate some intermediate values first and use them to calculate the final value).
Example:
Bad
return ((length < MAX_LENGTH) || (previousSize != length)) && (typeCode == URGENT);
Good
boolean isWithinSizeLimit = length < MAX_LENGTH;
boolean isSameSize = previousSize != length;
boolean isValidCode = isWithinSizeLimit || isSameSize;

boolean isUrgent = typeCode == URGENT;

return isValidCode && isUrgent;
Example:
Bad
return ((length < MAX_LENGTH) or (previous_size != length)) and (type_code == URGENT)
Good
is_within_size_limit = length < MAX_LENGTH
is_same_size = previous_size != length
is_valid_code = is_within_size_limit or is_same_size

is_urgent = type_code == URGENT

return is_valid_code and is_urgent
The competent programmer is fully aware of the strictly limited size of his own skull; therefore he approaches the programming task in full humility, and among other things he avoids clever tricks like the plague. -- Edsger Dijkstra
Can improve code quality using technique: avoid magic numbers
When the code has a number that does not explain the meaning of the number, we call that a magic number (as in “the number appears as if by magic”). Using a
Example:
|
Bad |
|
Good |
Note: Python does not have a way to make a variable a constant. However, you can use a normal variable with an ALL_CAPS name to simulate a constant.
|
Bad |
|
Good |
Similarly, we can have ‘magic’ values of other data types.
Bad
"Error 1432" // A magic string!
Can improve code quality using technique: make the code obvious
Make the code as explicit as possible, even if the language syntax allows them to be implicit. Here are some examples:
- [
Java] Use explicit type conversion instead of implicit type conversion. - [
Java,Python] Use parentheses/braces to show grouping even when they can be skipped. - [
Java,Python] Useenumerations when a certain variable can take only a small number of finite values. For example, instead of declaring the variable 'state' as an integer and using values 0,1,2 to denote the states 'starting', 'enabled', and 'disabled' respectively, declare 'state' as typeSystemStateand define an enumerationSystemStatethat has values'STARTING','ENABLED', and'DISABLED'.
Can improve code quality using technique: structure code logically
Lay out the code so that it adheres to the logical structure. The code should read like a story. Just like we use section breaks, chapters and paragraphs to organize a story, use classes, methods, indentation and line spacing in your code to group related segments of the code. For example, you can use blank lines to group related statements together. Sometimes, the correctness of your code does not depend on the order in which you perform certain intermediary steps. Nevertheless, this order may affect the clarity of the story you are trying to tell. Choose the order that makes the story most readable.
Can improve code quality using technique: do not 'trip up' reader
Avoid things that would make the reader go ‘huh?’, such as,
- unused parameters in the method signature
- similar things look different
- different things that look similar
- multiple statements in the same line
- data flow anomalies such as, pre-assigning values to variables and modifying it without any use of the pre-assigned value
Can improve code quality using technique: practice kissing
As the old adage goes, "keep it simple, stupid” (KISS). Do not try to write ‘clever’ code. For example, do not dismiss the brute-force yet simple solution in favor of a complicated one because of some ‘supposed benefits’ such as 'better reusability' unless you have a strong justification.
Debugging is twice as hard as writing the code in the first place. Therefore, if you write the code as cleverly as possible, you are, by definition, not smart enough to debug it. --Brian W. Kernighan
Programs must be written for people to read, and only incidentally for machines to execute. --Abelson and Sussman
Can improve code quality using technique: avoid premature optimizations
Optimizing code prematurely has several drawbacks:
- We may not know which parts are the real performance bottlenecks. This is especially the case when the code undergoes transformations (e.g. compiling, minifying, transpiling, etc.) before it becomes an executable. Ideally, you should use a profiler tool to identify the actual bottlenecks of the code first, and optimize only those parts.
- Optimizing can complicate the code, affecting correctness and understandability
- Hand-optimized code can be harder for the compiler to optimize (the simpler the code, the easier for the compiler to optimize it). In many cases a compiler can do a better job of optimizing the runtime code if you don't get in the way by trying to hand-optimize the source code.
A popular saying in the industry is make it work, make it right, make it fast which means in most cases getting the code to perform correctly should take priority over optimizing it. If the code doesn't work correctly, it has no value on matter how fast/efficient it it.
Premature optimization is the root of all evil in programming. --Donald Knuth
Note that there are cases where optimizing takes priority over other things e.g. when writing code for resource-constrained environments. This guideline simply a caution that you should optimize only when it is really needed.
Can improve code quality using technique: SLAP hard
Avoid varying the level of
Example:
Bad
readData();
salary = basic*rise+1000;
tax = (taxable?salary*0.07:0);
displayResult();
Good
readData();
processData();
displayResult();
Design → Design Fundamentals → Abstraction →
Abstraction is a technique for dealing with complexity. It works by establishing a level of complexity we are interested in, and suppressing the more complex details below that level.
The guiding principle of abstraction is that only details that are relevant to the current perspective or the task at hand needs to be considered. As most programs are written to solve complex problems involving large amounts of intricate details, it is impossible to deal with all these details at the same time. That is where abstraction can help.
Ignoring lower level data items and thinking in terms of bigger entities is called data abstraction.
Within a certain software component, we might deal with a user data type, while ignoring the details contained in the user data item such as name, and date of birth. These details have been ‘abstracted away’ as they do not affect the task of that software component.
Control abstraction abstracts away details of the actual control flow to focus on tasks at a simplified level.
print(“Hello”) is an abstraction of the actual output mechanism within the computer.
Abstraction can be applied repeatedly to obtain progressively higher levels of abstractions.
An example of different levels of data abstraction: a File is a data item that is at a higher level than an array and an array is at a higher level than a bit.
An example of different levels of control abstraction: execute(Game) is at a higher level than print(Char) which is at a higher than an Assembly language instruction MOV.
Abstraction is a general concept that is not limited to just data or control abstractions.
Some more general examples of abstraction:
- An OOP class is an abstraction over related data and behaviors.
- An architecture is a higher-level abstraction of the design of a software.
- Models (e.g., UML models) are abstractions of some aspect of reality.
Can improve code quality using technique: make the happy path prominent
The happy path (i.e. the execution path taken when everything goes well) should be clear and prominent in your code. Restructure the code to make the happy path unindented as much as possible. It is the ‘unusual’ cases that should be indented. Someone reading the code should not get distracted by alternative paths taken when error conditions happen. One technique that could help in this regard is the use of guard clauses.
Example:
Bad
if (!isUnusualCase) {  //detecting an unusual condition
    if (!isErrorCase) {
        start();    //main path
        process();
        cleanup();
        exit();
    } else {
        handleError();
    }
} else {
    handleUnusualCase(); //handling that unusual condition
}
In the code above,
- Unusual condition detection is separated from their handling.
- Main path is nested deeply.
Good
if (isUnusualCase) { //Guard Clause
    handleUnusualCase();
    return;
}

if (isErrorCase) { //Guard Clause
    handleError();
    return;
}

start();
process();
cleanup();
exit();
In contrast, the above code
- deals with unusual conditions as soon as they are detected so that the reader doesn't have to remember them for long.
- keeps the main path un-indented.
Can explain the need for following a standard
One essential way to improve code quality is to follow a consistent style. That is why software engineers follow a strict coding standard (aka style guide).
The aim of a coding standard is to make the entire code base look like it was written by one person. A coding standard is usually specific to a programming language and specifies guidelines such as the location of opening and closing braces, indentation styles and naming styles (e.g. whether to use Hungarian style, Pascal casing, Camel casing, etc.). It is important that the whole team/company use the same coding standard and that standard is not generally inconsistent with typical industry practices. If a company's coding standards is very different from what is used typically in the industry, new recruits will take longer to get used to the company's coding style.
💡 IDEs can help to enforce some parts of a coding standard e.g. indentation rules.
What is the recommended approach regarding coding standards?
c
What is the aim of using a coding standard? How does it help?
Can follow simple mechanical style rules
Learn basic guidelines of the Java coding standard (by OSS-Generic)
Sample coding standard: PEP 8 Python Style Guide -- by Python.org
Consider the code given below:
import java.util.*;

public class Task {
    public static final String descriptionPrefix = "description: ";
    private String description;
    private boolean important;
    List<String> pastDescription = new ArrayList<>(); // a list of past descriptions

    public Task(String d) {
      this.description = d;
      if (!d.isEmpty())
          this.important = true;
    }

    public String getAsXML() { return "<task>"+description+"</task>"; }

    /**
     * Print the description as a string.
     */
    public void printingDescription(){ System.out.println(this); }

    @Override
    public String toString() { return descriptionPrefix + description; }
}
In what ways the code violate the basic guidelines (i.e., those marked with one ⭐️) of the OSS-Generic Java Coding Standard given here?
Here are three:
descriptionPrefixis a constant and should be namedDESCRIPTION_PREFIX- method name
printingDescription()should be named asprintDescription() - boolean variable
importantshould be named to sound boolean e.g.,isImportant
There are many more.
Can follow intermediate style rules
Go through the provided Java coding standard and learn the intermediate style rules.
According to the given Java coding standard, which one of these is not a good name?
b
Explanation: checkWeight is an action. Naming variables as actions makes the code harder to follow. isWeightValid may be a better name.
Repeat the exercise in the panel below but also find violations of intermediate level guidelines.
Consider the code given below:
import java.util.*;

public class Task {
    public static final String descriptionPrefix = "description: ";
    private String description;
    private boolean important;
    List<String> pastDescription = new ArrayList<>(); // a list of past descriptions

    public Task(String d) {
      this.description = d;
      if (!d.isEmpty())
          this.important = true;
    }

    public String getAsXML() { return "<task>"+description+"</task>"; }

    /**
     * Print the description as a string.
     */
    public void printingDescription(){ System.out.println(this); }

    @Override
    public String toString() { return descriptionPrefix + description; }
}
In what ways the code violate the basic guidelines (i.e., those marked with one ⭐️) of the OSS-Generic Java Coding Standard given here?
Here are three:
descriptionPrefixis a constant and should be namedDESCRIPTION_PREFIX- method name
printingDescription()should be named asprintDescription() - boolean variable
importantshould be named to sound boolean e.g.,isImportant
There are many more.
Here's one you are more likely to miss:
* Print the description as a string.→* Prints the description as a string.
There are more.
Can explain the need for good names in code
Proper naming improves the readability. It also reduces bugs caused by ambiguities regarding the intent of a variable or a method.
There are only two hard things in Computer Science: cache invalidation and naming things. -- Phil Karlton
Can improve code quality using technique: use nouns for things and verbs for actions
Every system is built from a domain-specific language designed by the programmers to describe that system. Functions are the verbs of that language, and classes are the nouns. ― Robert C. Martin, Clean Code: A Handbook of Agile Software Craftsmanship
Use nouns for classes/variables and verbs for methods/functions.
Examples:
| Name for a | Bad | Good |
|---|---|---|
| Class | CheckLimit |
LimitChecker |
| method | result() |
calculate() |
Distinguish clearly between single-valued and multivalued variables.
Examples:
Good
Person student;
ArrayList<Person> students;
Good
student = Person('Jim')
students = [Person('Jim'), Person('Alice')]
Can improve code quality using technique: use standard words
Use correct spelling in names. Avoid 'texting-style' spelling. Avoid foreign language words, slang, and names that are only meaningful within specific contexts/times e.g. terms from private jokes, a TV show currently popular in your country
Can improve code quality using technique: use name to explain
A name is not just for differentiation; it should explain the named entity to the reader accurately and at a sufficient level of detail.
Examples:
| Bad | Good |
|---|---|
processInput() (what 'process'?) |
removeWhiteSpaceFromInput() |
flag |
isValidInput |
temp |
If the name has multiple words, they should be in a sensible order.
Examples:
| Bad | Good |
|---|---|
bySizeOrder() |
orderBySize() |
Imagine going to the doctor's and saying "My eye1 is swollen"! Don’t use numbers or case to distinguish names.
Examples:
| Bad | Bad | Good |
|---|---|---|
value1, value2 |
value, Value |
originalValue, finalValue |
Can improve code quality using technique: not too long, not too short
While it is preferable not to have lengthy names, names that are 'too short' are even worse. If you must abbreviate or use acronyms, do it consistently. Explain their full meaning at an obvious location.
Can improve code quality using technique: avoid misleading names
Related things should be named similarly, while unrelated things should NOT.
Example: Consider these variables
colorBlack: hex value for color blackcolorWhite: hex value for color whitecolorBlue: number of times blue is usedhexForRed: : hex value for color red
This is misleading because colorBlue is named similar to colorWhite and colorBlack but has a different purpose while hexForRed is named differently but has very similar purpose to the first two variables. The following is better:
hexForBlackhexForWhitehexForRedblueColorCount
Avoid misleading or ambiguous names (e.g. those with multiple meanings), similar sounding names, hard-to-pronounce ones (e.g. avoid ambiguities like "is that a lowercase L, capital I or number 1?", or "is that number 0 or letter O?"), almost similar names.
Examples:
| Bad | Good | Reason |
|---|---|---|
phase0 |
phaseZero |
Is that zero or letter O? |
rwrLgtDirn |
rowerLegitDirection |
Hard to pronounce |
right left wrong |
rightDirection leftDirection wrongResponse |
right is for 'correct' or 'opposite of 'left'? |
redBooks readBooks |
redColorBooks booksRead |
red and read (past tense) sounds the same |
FiletMignon |
egg |
If the requirement is just a name of a food, egg is a much easier to type/say choice than FiletMignon |
Can explain the need for avoiding error-prone shortcuts
It is safer to use language constructs in the way they are meant to be used, even if the language allows shortcuts. Some such coding practices are common sources of bugs. Know them and avoid them.
Can improve code quality using technique: use the default branch
Always include a default branch in case statements.
Furthermore, use it for the intended default action and not just to execute the last option. If there is no default action, you can use the 'default' branch to detect errors (i.e. if execution reached the default branch, throw an exception). This also applies to the final else of an if-else construct. That is, the final else should mean 'everything else', and not the final option. Do not use else when an if condition can be explicitly specified, unless there is absolutely no other possibility.
Bad
if (red) print "red";
else print "blue";
Good
if (red) print "red";
else if (blue) print "blue";
else error("incorrect input");
Can improve code quality using technique: don't recycle variables or parameters
- Use one variable for one purpose. Do not reuse a variable for a different purpose other than its intended one, just because the data type is the same.
- Do not reuse formal parameters as local variables inside the method.
Bad
double computeRectangleArea(double length, double width) {
    length = length * width;
    return length;
}
Good
double computeRectangleArea(double length, double width) {
    double area;
    area = length * width;
    return area;
}
Can improve code quality using technique: avoid empty catch blocks
Never write an empty catch statement. At least give a comment to explain why the catch block is left empty.
Can improve code quality using technique: delete dead code
We all feel reluctant to delete code we have painstakingly written, even if we have no use for that code any more ("I spent a lot of time writing that code; what if we need it again?"). Consider all code as baggage you have to carry; get rid of unused code the moment it becomes redundant. If you need that code again, simply recover it from the revision control tool you are using. Deleting code you wrote previously is a sign that you are improving.
Can improve code quality using technique: minimise scope of variables
Minimize global variables. Global variables may be the most convenient way to pass information around, but they do create implicit links between code segments that use the global variable. Avoid them as much as possible.
Define variables in the least possible scope. For example, if the variable is used only within the if block of the conditional statement, it should be declared inside that if block.
The most powerful technique for minimizing the scope of a local variable is to declare it where it is first used. -- Effective Java, by Joshua Bloch
Resources:
Can improve code quality using technique: minimise code duplication
Code duplication, especially when you copy-paste-modify code, often indicates a poor quality implementation. While it may not be possible to have zero duplication, always think twice before duplicating code; most often there is a better alternative.
This guideline is closely related to the
Supplmentary → Principles →
DRY (Don't Repeat Yourself) Principle: Every piece of knowledge must have a single, unambiguous, authoritative representation within a system The Pragmatic Programmer, by Andy Hunt and Dave Thomas
This principle guards against duplication of information.
The functionality implemented twice is a violation of the DRY principle even if the two implementations are different.
The value a system-wide timeout being defined in multiple places is a violation of DRY.
Can explain the need for commenting minimally but sufficiently
Good code is its own best documentation. As you’re about to add a comment, ask yourself, ‘How can I improve the code so that this comment isn’t needed?’ Improve the code and then document it to make it even clearer. --Steve McConnell, Author of Clean Code
Some think commenting heavily increases the 'code quality'. This is not so. Avoid writing comments to explain bad code. Improve the code to make it self-explanatory.
Can improve code quality using technique: do not repeat the obvious
If the code is self-explanatory, refrain from repeating the description in a comment just for the sake of 'good documentation'.
Bad
// increment x
x++;

//trim the input
trimInput();
Can improve code quality using technique: write to the reader
Do not write comments as if they are private notes to self. Instead, write them well enough to be understood by another programmer. One type of comments that is almost always useful is the header comment that you write for a class or an operation to explain its purpose.
Examples:
Bad Reason: this comment will only make sense to the person who wrote it
// a quick trim function used to fix bug I detected overnight
void trimInput(){
    ....
}
Good
/** Trims the input of leading and trailing spaces */
void trimInput(){
    ....
}
Bad Reason: this comment will only make sense to the person who wrote it
# a quick trim function used to fix bug I detected overnight
def trim_input():
    ...
Good
def trim_input():
"""Trim the input of leading and trailing spaces"""
    ...
Can improve code quality using technique: explain what and why, not how
Comments should explain what and why aspect of the code, rather than the how aspect.
What : The specification of what the code supposed to do. The reader can compare such comments to the implementation to verify if the implementation is correct
Example: This method is possibly buggy because the implementation does not seem to match the comment. In this case the comment could help the reader to detect the bug.
/** Removes all spaces from the {@code input} */
void compact(String input){
    input.trim();
}
Why : The rationale for the current implementation.
Example: Without this comment, the reader will not know the reason for calling this method.
// Remove spaces to comply with IE23.5 formatting rules
compact(input);
How : The explanation for how the code works. This should already be apparent from the code, if the code is self-explanatory. Adding comments to explain the same thing is redundant.
Example:
Bad Reason: Comment explains how the code works.
// return true if both left end and right end are correct or the size has not incremented
return (left && right) || (input.size() == size);
Good Reason: Code refactored to be self-explanatory. Comment no longer needed.
boolean isSameSize = (input.size() == size) ;
return (isLeftEndCorrect && isRightEndCorrect) || isSameSize;
2B. Feature Quality
Evaluates: how deep is your biggest feature, how complete is the feature, how well it solves the target user needs, etc.
Evaluation method:
- by peers from own team and other teams (based on peer testing session, PPP, RepoSense data) -- more weight for team members from own team than those from other teams
- by tutors (based on demo,
PPP , RepoSense data)
For reference, here are some grading instructions that will be given to peers/tutors grading this aspect:
Evaluate the biggest feature done by the student for difficulty, completeness, and testability. Note: examples given below assume that AB4 did not have the commands
edit,undo, andredo.
- Difficulty
Feature/ difficulty: unable to judge: You are unable to judge this aspect for some reason.Feature/ difficulty: low: e.g. make the existing find command case insensitive.Feature/ difficulty: medium: e.g. an edit command that requires the user to type all fields, even the ones that are not being edited.Feature/ difficulty: high: e.g., undo/redo command- Completeness
Feature/ completeness: unable to judge: You are unable to judge this aspect for some reason.Feature/ completeness: low: A partial implementation of the feature. Barely useful.Feature/ completeness: medium: The feature has enough functionality to be useful for some of the users.Feature/ completeness: high: The feature has all functionality to be useful to almost all users.- Other
Feature/ not hard to test: The feature was not too hard to test manually.Feature/ polished: The feature looks polished (as if done by a professional programmer).Evaluate the amount of work, on a scale of 0 to 30.
- Consider this PR (
historycommand) as 5 units of effort which means this PR (undo/redocommand) is about 15 points of effort. Given that 30 points matches an effort twice as that needed for theundo/redofeature (which was given as an example of anAgrade project), we expect most students to be have efforts lower than 20.- Count all implementation/testing/documentation work as mentioned in that person's PPP. Also look at the actual code written by the person.
- Do not give a high value just to be nice. You will be asked to provide a brief justification for your effort estimates.
3. Project Assessment: QA [ 2 + 10 = 12 marks]
3A. System/Acceptance Testing:
Evaluates: How well you can system-test/acceptance-test a product
Based on:
- bugs you found in the Practical Exam
- our own manual testing (when necessary)
Evaluated by: teaching team (in the capacity of moderators e.g., to verify if it is reasonable for you to reject a bug reported by others)
3B. Developer Testing:
Evaluates: How well you tested your own feature
Based on:
- bugs in your work found by others during the PE
- your test code (note
our expectations for automated testing )
Evaluated by: tutors (in the capacity of moderators e.g., to verify if it is reasonable for the team to downgrade the severity of a bug you reported)
- There is no requirement for a minimum coverage level. Note that in a production environment you are often required to have at least 90% of the code covered by tests. In this project, it can be less. The less coverage you have, the higher the risk of regression bugs, which will cost marks if not fixed before the final submission.
- You must write some tests so that we can evaluate your ability to write tests.
- How much of each type of testing should you do? We expect you to decide. You learned different types of testing and what they try to achieve. Based on that, you should decide how much of each type is required. Similarly, you can decide to what extent you want to automate tests, depending on the benefits and the effort required.
Notes on how marks are calculated based on bugs
- Bugs rejected by the dev team, if the rejection is approved by the teaching team, will not be affect marks of the tester or the developer.
- The penalty/credit for a bug varies based on,
- The severity of the bug:
severity.High>severity.Medium>severity.Low - The type of the bug:
type.FunctionalityBug>type.DocumentationBug>type.FeatureFlaw>type.DocTypo
- The severity of the bug:
- The penalty for a bug is divided equally among assignees.
- The developers are not penalized for the duplicate bug reports they received but the testers earn credit for the duplicate bug reports they submitted as long as the duplicates are not submitted by the same tester.
-
Obvious bugs earn slightly less credit for the tester and slightly more penalty for the developer. - If the team you tested has a low bug count i.e., total bugs found by all testers is low, we will fall back on other means (e.g., performance in mock PE) to calculate your marks for system/acceptance testing.
- Your marks for developer testing depends on the bug density rather than total bug count. Here's an example:
nbugs found in your feature; it is a difficult feature consisting of lot of code → 4/5 marksnbugs found in your feature; it is a small feature with a small amount of code → 1/5 marks
- You don't need to find all bugs in the product to get full marks. For example, finding half of the bugs of that product or 4 bugs, whichever the lower, could earn you full marks.
- Excessive incorrect downgrading/rejecting/
de-duplicating , if deemed an unethical attempt to game the system, may be penalized.
4. Project Assessment: Documentation [ 10 marks]
Evaluates: the quality of the sections you wrote for the user guide and the developer guide
Based on: the relevant sections of your PPP.
Feedback: Submit your UG in v1.1 amd your DG in v 1.3 to allow the tutors to provide feedback on these documents. This will give you a chance to improve for your final submission.
Evaluated by: tutors, peers from own team and other teams
For reference, here are some grading instructions that will be given to peers/tutors grading this aspect:
Evaluate the quality of user documentation based on the parts of the user guide written by the person, as reproduced in the project portfolio. Evaluate from an end-user perspective.
UG/ unable to judge: Less than 1 page worth of UG content written by the student or cannot find PPPUG/ good use of visuals: Uses visuals e.g., screenshots.UG/ good use of examples: Uses examples e.g., sample inputs/outputs.UG/ just enough information: Not too much information. All important information is given.UG/ easy to understand: The information is easy to understand for the target audience.UG/ polished: The document looks neat, well-formatted, and professional.Evaluate the quality of developer documentation based on the developer docs cited/reproduced in the respective project portfolio page. Evaluate from the perspective of a new developer trying to understand how the features are implemented.
DG/ unable to judge: Less than 0.5 pages worth of content OR other problems in the document e.g. looks like included wrong content.DG/ too little: 0.5 - 1 page of documentation- Diagrams:
DG/ types of UML diagrams: 1: Only one type of diagram used (types: Class Diagrams, Object Diagrams, Sequence Diagrams, Activity Diagrams, Use Case Diagrams)DG/ types of UML diagrams: 2: Two types of diagrams usedDG/ types of UML diagrams: 3+: Three or more types of diagrams usedDG/ UML diagrams suitable: The diagrams used for the right purposeDG/ UML notation correct: No more than one minor error in the UML notationDG/ diagrams not repetitive: No evidence of repeating the same diagram with minor differencesDG/ diagrams not too complicated: Diagrams don't cram too much information into themDG/ diagrams integrates with text: Diagrams are well integrated into the textual explanationsDG/ easy to understand: The document is easy to understand/followDG/ just enough information: Not too much information. All important information is given.DG/ polished: The document looks neat, well-formatted, and professional.
5. Project Assessment: Project Management [ 5 + 5 = 10 marks]
5A. Process:
Evaluates: How well you did in project management related aspects of the project, as an individual and as a team
Based on: tutor/bot observations of project milestones and GitHub data
Milestones need to be reached the midnight before of the tutorial for it to be counted as achieved. To get a good grade for this aspect, achieve at least 60% of the recommended milestone progress.
Other criteria:
- Good use of GitHub milestones
- Good use of GitHub release mechanism
- Good version control, based on the repo
- Reasonable attempt to use the forking workflow
- Good task definition, assignment and tracking, based on the issue tracker
- Good use of buffers (opposite: everything at the last minute)
- Project done iteratively and incrementally (opposite: doing most of the work in one big burst)
5B. Team-tasks:
Evaluates: How much you contributed to team-tasks
Based on: peer evaluations, tutor observations
To earn full marks, you should have done a fair share of the team tasks. You can earn bonus marks by doing more than your fair share.
Relevant: [
Here is a non-exhaustive list of team-tasks:
- Necessary general code enhancements e.g.,
- Work related to renaming the product
- Work related to changing the product icon
- Morphing the product into a different product
- Setting up the GitHub, Travis, AppVeyor, etc.
- Maintaining the issue tracker
- Release management
- Updating user/developer docs that are not specific to a feature e.g. documenting the target user profile
- Incorporating more useful tools/libraries/frameworks into the product or the project workflow (e.g. automate more aspects of the project workflow using a GitHub plugin)
Policy on following instructions
When working with others, especially in a large class such as CS2103/T, it is very important that you adhere to standards, policies, and instructions imposed on everyone. Not doing so creates unnecessary headaches for everyone and puts your work attitude in a negative light. That is why we penalize repeated violations of instructions. On the other hand we do understand that humans are liable to make mistakes. That is why we only penalize repeated or frequent mistakes.
We use the TEAMMATES online peer evaluation system to conduct several rounds of peer-evaluations. All peer evaluations will be taken into account when determining your participation marks. The system also allows you to give anonymous feedback to your teammates.
Extra Requirements: [considered for participation marks]
- Submitting peer evaluations is compulsory. If you routinely miss submitting peer evaluations, you can lose participation marks.
- 💡 TEAMMATES normally allows students to access it without using Google login. In this module, we encourage (but not require) you to login to TEAMMATES using your Google account and complete your profile with a
suitable profile photo . Reason: CS2103/T is a big class. This profile helps us to remember you better, even after the module is over.
-
The purpose of the profile photo is for the teaching team to identify you. Therefore, you should choose a recent individual photo showing your face clearly (i.e., not too small) -- somewhat similar to a passport photo. Some examples can be seen in the 'Teaching team' page. Given below are some examples of good and bad profile photos.
-
If you are uncomfortable posting your photo due to security reasons, you can post a lower resolution image so that it is hard for someone to misuse that image for fraudulent purposes. If you are concerned about privacy, you can request permission to omit your photo from the page by writing to prof.
Peer evaluation criteria: professional conduct
- Professional Communication :
- Communicates sufficiently and professionally. e.g. Does not use offensive language or excessive slang in project communications.
- Responds to communication from team members in a timely manner (e.g. within 24 hours).
- Punctuality: Does not cause others to waste time or slow down project progress by frequent tardiness.
- Dependability: Promises what can be done, and delivers what was promised.
- Effort: Puts in sufficient effort to, and tries their best to keep up with the module/project pace. Seeks help from others when necessary.
- Quality: Does not deliver work products that seem to be below the student's competence level i.e. tries their best to make the work product as high quality as possible within her competency level.
- Meticulousness:
- Rarely overlooks submission requirements.
- Rarely misses compulsory module activities such as pre-module survey.
- Teamwork: How willing are you to act as part of a team, contribute to team-level tasks, adhere to team decisions, etc.
Peer evaluation criteria: competency
- Technical Competency: Able to gain competency in all the required tools and techniques.
- Mentoring skills: Helps others when possible. Able to mentor others well.
- Communication skills: Able to communicate (written and spoken) well. Takes initiative in discussions.
Giving constructive feedback to others is a valuable skill for software engineers. It is also an intended learning outcome of this module. Half-hearted/trivial feedback will not earn participation marks.
Here are some things to keep in mind:
- Assume you are giving feedback to a colleague, not a friend. Keep the tone of your feedback reasonably professional. Do not use offensive language or slang.
- The feedback should be honest and consistent. Giving positive qualitative feedback (e.g.
Thanks for all the hard work!and negative ratings (e.g.Equal share - 40%) to the same team member is not being honest. - State your expectations early. All too often students give positive/neutral feedback early (hoping that the team member will improve later) and trash the team member in the final evaluation (because the he/she did not improve as expected). However, this could be confusing to the recipient. It is better to give negative feedback early so that the team member gets a clear signal that he/she needs to improve.
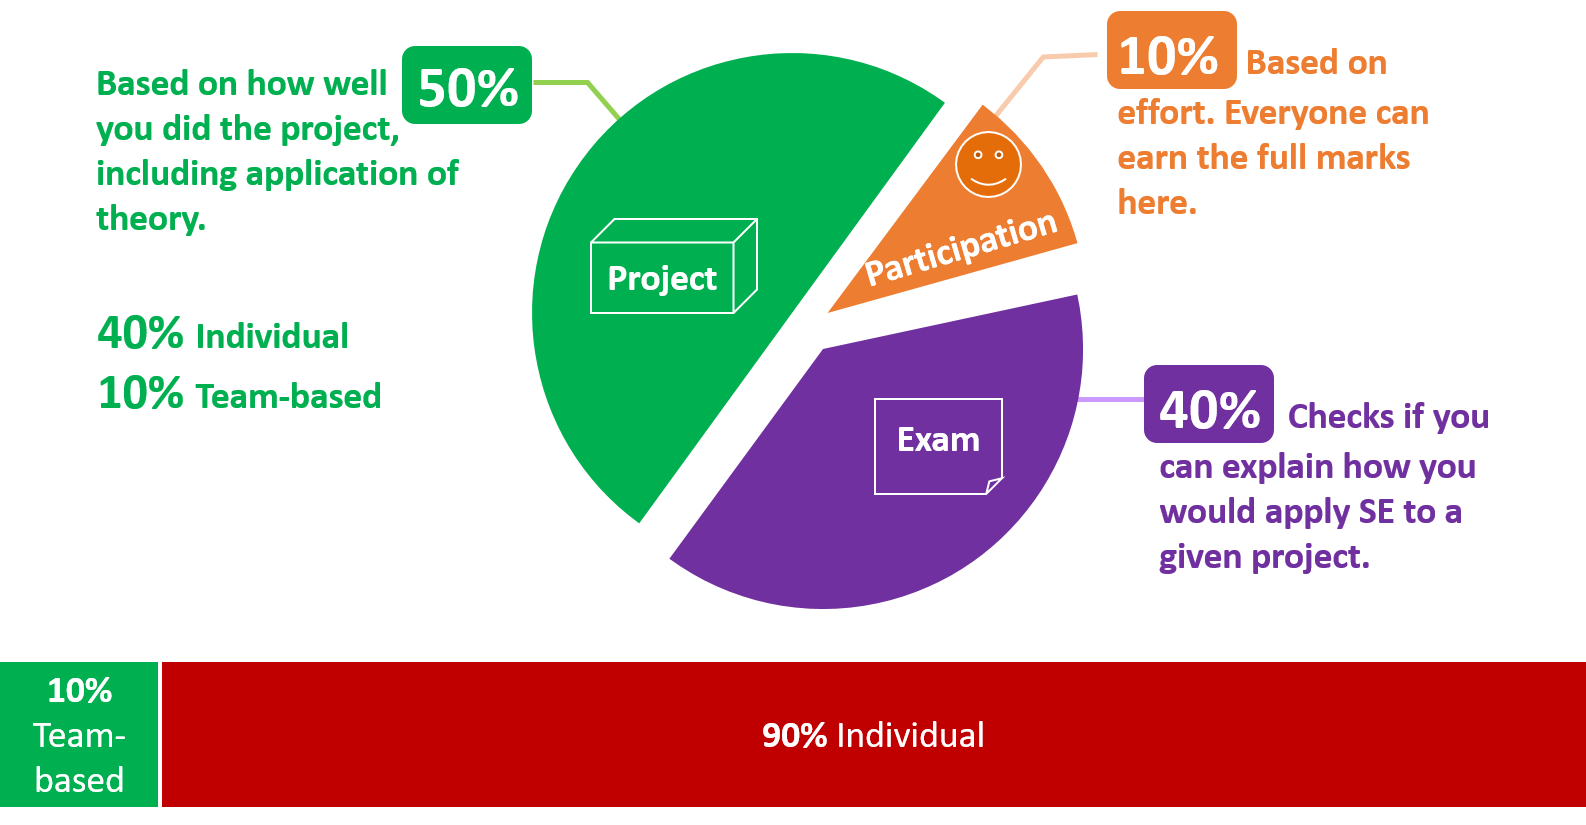
Relevant: [
To receive full 10 marks allocated for participation, earn at least 15 participation points.
There are 30+ available points to choose from:
-
Good peer ratings - Criteria for professional conduct (1 point for each criterion, max 7)
- Competency criteria (2 points for each, max 6)
Only those who submit peer evaluations can earn participation points from peer evaluations they receive.
- In-lecture quizzes (1 each, max 10 points)
- Module admin tasks done on time and as instructed
- Peer evaluations (1 points each, max 3)
- Pre-module survey (1 points)
- Enhanced AB1-AB3 (2 points each, max 6 points)
Relevant: [
Peer evaluation criteria: professional conduct
- Professional Communication :
- Communicates sufficiently and professionally. e.g. Does not use offensive language or excessive slang in project communications.
- Responds to communication from team members in a timely manner (e.g. within 24 hours).
- Punctuality: Does not cause others to waste time or slow down project progress by frequent tardiness.
- Dependability: Promises what can be done, and delivers what was promised.
- Effort: Puts in sufficient effort to, and tries their best to keep up with the module/project pace. Seeks help from others when necessary.
- Quality: Does not deliver work products that seem to be below the student's competence level i.e. tries their best to make the work product as high quality as possible within her competency level.
- Meticulousness:
- Rarely overlooks submission requirements.
- Rarely misses compulsory module activities such as pre-module survey.
- Teamwork: How willing are you to act as part of a team, contribute to team-level tasks, adhere to team decisions, etc.
Peer evaluation criteria: competency
- Technical Competency: Able to gain competency in all the required tools and techniques.
- Mentoring skills: Helps others when possible. Able to mentor others well.
- Communication skills: Able to communicate (written and spoken) well. Takes initiative in discussions.
Relevant: [
There is no midterm.
The final exam has two parts:
- Part 1: MCQ questions (1 hour, 20 marks)
- Part 2: Essay questions (1 hour, 20 marks)
Both papers will be given to you at the start but you need to answer Part 1 first (i.e. MCQ paper). It will be collected 1 hour after the exam start time (even if arrived late for the exam). You are free to start part 2 early if you finish Part 1 early.
Final Exam: Part 1 (MCQ)
Each MCQ question gives you a statement to evaluate.
An example statement
Testing is a Q&A activity
Unless stated otherwise, the meaning of answer options are
A: Agree. If the question has multiple statements, agree with all of them.
B: Disagree. If the question has multiple statements, disagree with at least one of them
C, D, E: Not used
Number of questions: 100
Note that you have slightly more than ½ minute for each question, which means you need to go through the questions fairly quickly.
Given the fast pace required by the paper, to be fair to all students, you will not be allowed to clarify doubts about questions (in Part 1) by talking to invigilators.
- If a question is not clear, you can circle the question number in the question paper and write your doubt in the question paper, near that question.
- If your doubt is justified (e.g. there is a typo in the question) or if many students found the question to be unclear, the examiner may decide to omit that question from grading.
Questions in Part 1 are confidential. You are not allowed to reveal Part 1 content to anyone after the exam. All pages of the assessment paper are to be returned at the end of the exam.
You will be given OCR forms (i.e., bubble sheets) to indicate your answers for Part 1. As each OCR form can accommodate only 50 answers, you will be given 2 OCR forms. Indicate your student number in both OCR forms.
To save space, we use the following notation in MCQ question. [x | y | z] means ‘x and z, but not y’
SE is [boring | useful | fun] means SE is not boring AND SE is useful AND SE is fun.
Consider the following statement:
- IDEs can help with [writing | debugging | testing] code.
The correct response for it is Disagree because IDEs can help with all three of the given options, not just writing and testing.
Some questions will use underlines or highlighting to draw your attention to a specific part of the question. That is because those parts are highly relevant to the answer and we don’t want you to miss the relevance of that part.
Consider the statement below:
Technique ABC can be used to generate more test cases.
The word can is underlined because the decision you need to make is whether the ABC can or cannot be used to generate more test cases; the decision is not whether ABC can be used to generate more or better test cases.
Markers such as the one given below appears at left margin of the paper to indicate where the question corresponds to a new column in the OCR form. E.g. questions 11, 21, 31, etc. (a column has 10 questions). Such markers can help you to detect if you missed a question in the previous 10 questions. You can safely ignore those markers if you are not interested in making use of that additional hint.
Some questions have tags e.g., the question below has a tag JAVA. These tags provide additional context about the question. In the example below, the tag indicates that the code given in the question is Java code.
The exam paper is open-book: you may bring any printed or written materials to the exam in hard copy format. However, given the fast pace required by Part 1, you will not have time left to refer notes during that part of the exam.
💡 Mark the OCR form as you go, rather than planning to transfer your answers to the OCR form near the end. Reason: Given there are 100 questions, it will be hard to estimate how much time you need to mass-transfer all answers to OCR forms.
💡 Write the answer in the exam paper as well when marking it in the OCR form. Reason: It will reduce the chance of missing a question. Furthermore, in case you missed a question, it will help you correct the OCR form quickly.
💡 We have tried to avoid deliberately misleading/tricky questions. If a question seems to take a very long time to figure out, you are probably over-thinking it.
You will be given a practice exam paper to familiarize yourself with this slightly unusual exam format.
Final Exam: Part 2 (Essay)
Unlike in part 1, you can ask invigilators for clarifications if you found a question to be unclear in part 2.
Yes, you may use pencils when answering part 2.
Relevant: [
Note that project grading is not competitive (not bell curved). CS2103T projects will be assessed separately from CS2103 projects. This is to account for the perceived difference in workload. Given below is the marking scheme.
Total: 50 marks ( 38 individual marks + 12 team marks)
See the sections below for details of how we assess each aspect.
1. Project Assessment: Product Design [ 5 marks]
Evaluates: how well your features fit together to form a cohesive product (not how many features or how big the features are) and how well does it match the target user
Evaluated by:
- tutors (based on product demo and user guide)
- peers from other teams (based on peer testing and user guide)
For reference, here are some grading instructions that will be given to peers/tutors grading this aspect:
Evaluate the product design based on how the product V2.0 (not V1.4) is described in the User Guide.
unable to judge: You are unable to judge this aspect for some reason e.g., UG is not available or does not have enough information.Target user:
target user specified and appropriate: The target user is clearly specified, prefers typing over other modes of input, and not too general (should be narrowed to a specific user group with certain characteristics).value specified and matching: The value offered by the product is clearly specified and matches the target user.Value to the target user:
value: low: The value to target user is low. App is not worth using.value: medium: Some small group of target users might find the app worth using.value: high: Most of the target users are likely to find the app worth using.Feature-fit:
feature-fit: low: Features don't seem to fit together.feature-fit: medium: Some features fit together but some don't.feature-fit: high: All features fit together.
polished: The product looks well-designed.
2. Project Assessment: Implementation [ 13 marks]
2A. Code quality
Evaluates: the quality of the code you have written yourself
Based on: the parts of the code you claim as written by you
Evaluation method:: manual inspection by tutors + automated-analysis by a script
For reference, here are some factors considered when grading this aspect:
At least some evidence of these (see here for more info)
- logging
- exceptions
- assertions
- defensive coding
No coding standard violations e.g. all boolean variables/methods sounds like booleans. Checkstyle can prevent only some coding standard violations; others need to be checked manually.
SLAP is applied at a reasonable level. Long methods or deeply-nested code are symptoms of low-SLAP.
No noticeable code duplications i.e. if there multiple blocks of code that vary only in minor ways, try to extract out similarities into one place, especially in test code.
Evidence of applying
code quality guidelines covered in the module .
Code Quality
Can explain the importance of code quality
Always code as if the person who ends up maintaining your code will be a violent psychopath who knows where you live. -- Martin Golding
Can explain the importance of readability
Programs should be written and polished until they acquire publication quality. --Niklaus Wirth
Among various dimensions of code quality, such as run-time efficiency, security, and robustness, one of the most important is understandability. This is because in any non-trivial software project, code needs to be read, understood, and modified by other developers later on. Even if we do not intend to pass the code to someone else, code quality is still important because we all become 'strangers' to our own code someday.
The two code samples given below achieve the same functionality, but one is easier to read.
|
Bad |
|
Good |
|
Bad |
|
Good |
Can improve code quality using technique: avoid long methods
Be wary when a method is longer than the computer screen, and take corrective action when it goes beyond 30 LOC (lines of code). The bigger the haystack, the harder it is to find a needle.
Can improve code quality using technique: avoid deep nesting
If you need more than 3 levels of indentation, you're screwed anyway, and should fix your program. --Linux 1.3.53 CodingStyle
In particular, avoid arrowhead style code.
Example:
Can improve code quality using technique: avoid complicated expressions
Avoid complicated expressions, especially those having many negations and nested parentheses. If you must evaluate complicated expressions, have it done in steps (i.e. calculate some intermediate values first and use them to calculate the final value).
Example:
Bad
return ((length < MAX_LENGTH) || (previousSize != length)) && (typeCode == URGENT);
Good
boolean isWithinSizeLimit = length < MAX_LENGTH;
boolean isSameSize = previousSize != length;
boolean isValidCode = isWithinSizeLimit || isSameSize;

boolean isUrgent = typeCode == URGENT;

return isValidCode && isUrgent;
Example:
Bad
return ((length < MAX_LENGTH) or (previous_size != length)) and (type_code == URGENT)
Good
is_within_size_limit = length < MAX_LENGTH
is_same_size = previous_size != length
is_valid_code = is_within_size_limit or is_same_size

is_urgent = type_code == URGENT

return is_valid_code and is_urgent
The competent programmer is fully aware of the strictly limited size of his own skull; therefore he approaches the programming task in full humility, and among other things he avoids clever tricks like the plague. -- Edsger Dijkstra
Can improve code quality using technique: avoid magic numbers
When the code has a number that does not explain the meaning of the number, we call that a magic number (as in “the number appears as if by magic”). Using a
Example:
|
Bad |
|
Good |
Note: Python does not have a way to make a variable a constant. However, you can use a normal variable with an ALL_CAPS name to simulate a constant.
|
Bad |
|
Good |
Similarly, we can have ‘magic’ values of other data types.
Bad
"Error 1432" // A magic string!
Can improve code quality using technique: make the code obvious
Make the code as explicit as possible, even if the language syntax allows them to be implicit. Here are some examples:
- [
Java] Use explicit type conversion instead of implicit type conversion. - [
Java,Python] Use parentheses/braces to show grouping even when they can be skipped. - [
Java,Python] Useenumerations when a certain variable can take only a small number of finite values. For example, instead of declaring the variable 'state' as an integer and using values 0,1,2 to denote the states 'starting', 'enabled', and 'disabled' respectively, declare 'state' as typeSystemStateand define an enumerationSystemStatethat has values'STARTING','ENABLED', and'DISABLED'.
Can improve code quality using technique: structure code logically
Lay out the code so that it adheres to the logical structure. The code should read like a story. Just like we use section breaks, chapters and paragraphs to organize a story, use classes, methods, indentation and line spacing in your code to group related segments of the code. For example, you can use blank lines to group related statements together. Sometimes, the correctness of your code does not depend on the order in which you perform certain intermediary steps. Nevertheless, this order may affect the clarity of the story you are trying to tell. Choose the order that makes the story most readable.
Can improve code quality using technique: do not 'trip up' reader
Avoid things that would make the reader go ‘huh?’, such as,
- unused parameters in the method signature
- similar things look different
- different things that look similar
- multiple statements in the same line
- data flow anomalies such as, pre-assigning values to variables and modifying it without any use of the pre-assigned value
Can improve code quality using technique: practice kissing
As the old adage goes, "keep it simple, stupid” (KISS). Do not try to write ‘clever’ code. For example, do not dismiss the brute-force yet simple solution in favor of a complicated one because of some ‘supposed benefits’ such as 'better reusability' unless you have a strong justification.
Debugging is twice as hard as writing the code in the first place. Therefore, if you write the code as cleverly as possible, you are, by definition, not smart enough to debug it. --Brian W. Kernighan
Programs must be written for people to read, and only incidentally for machines to execute. --Abelson and Sussman
Can improve code quality using technique: avoid premature optimizations
Optimizing code prematurely has several drawbacks:
- We may not know which parts are the real performance bottlenecks. This is especially the case when the code undergoes transformations (e.g. compiling, minifying, transpiling, etc.) before it becomes an executable. Ideally, you should use a profiler tool to identify the actual bottlenecks of the code first, and optimize only those parts.
- Optimizing can complicate the code, affecting correctness and understandability
- Hand-optimized code can be harder for the compiler to optimize (the simpler the code, the easier for the compiler to optimize it). In many cases a compiler can do a better job of optimizing the runtime code if you don't get in the way by trying to hand-optimize the source code.
A popular saying in the industry is make it work, make it right, make it fast which means in most cases getting the code to perform correctly should take priority over optimizing it. If the code doesn't work correctly, it has no value on matter how fast/efficient it it.
Premature optimization is the root of all evil in programming. --Donald Knuth
Note that there are cases where optimizing takes priority over other things e.g. when writing code for resource-constrained environments. This guideline simply a caution that you should optimize only when it is really needed.
Can improve code quality using technique: SLAP hard
Avoid varying the level of
Example:
Bad
readData();
salary = basic*rise+1000;
tax = (taxable?salary*0.07:0);
displayResult();
Good
readData();
processData();
displayResult();
Design → Design Fundamentals → Abstraction →
Abstraction is a technique for dealing with complexity. It works by establishing a level of complexity we are interested in, and suppressing the more complex details below that level.
The guiding principle of abstraction is that only details that are relevant to the current perspective or the task at hand needs to be considered. As most programs are written to solve complex problems involving large amounts of intricate details, it is impossible to deal with all these details at the same time. That is where abstraction can help.
Ignoring lower level data items and thinking in terms of bigger entities is called data abstraction.
Within a certain software component, we might deal with a user data type, while ignoring the details contained in the user data item such as name, and date of birth. These details have been ‘abstracted away’ as they do not affect the task of that software component.
Control abstraction abstracts away details of the actual control flow to focus on tasks at a simplified level.
print(“Hello”) is an abstraction of the actual output mechanism within the computer.
Abstraction can be applied repeatedly to obtain progressively higher levels of abstractions.
An example of different levels of data abstraction: a File is a data item that is at a higher level than an array and an array is at a higher level than a bit.
An example of different levels of control abstraction: execute(Game) is at a higher level than print(Char) which is at a higher than an Assembly language instruction MOV.
Abstraction is a general concept that is not limited to just data or control abstractions.
Some more general examples of abstraction:
- An OOP class is an abstraction over related data and behaviors.
- An architecture is a higher-level abstraction of the design of a software.
- Models (e.g., UML models) are abstractions of some aspect of reality.
Can improve code quality using technique: make the happy path prominent
The happy path (i.e. the execution path taken when everything goes well) should be clear and prominent in your code. Restructure the code to make the happy path unindented as much as possible. It is the ‘unusual’ cases that should be indented. Someone reading the code should not get distracted by alternative paths taken when error conditions happen. One technique that could help in this regard is the use of guard clauses.
Example:
Bad
if (!isUnusualCase) {  //detecting an unusual condition
    if (!isErrorCase) {
        start();    //main path
        process();
        cleanup();
        exit();
    } else {
        handleError();
    }
} else {
    handleUnusualCase(); //handling that unusual condition
}
In the code above,
- Unusual condition detection is separated from their handling.
- Main path is nested deeply.
Good
if (isUnusualCase) { //Guard Clause
    handleUnusualCase();
    return;
}

if (isErrorCase) { //Guard Clause
    handleError();
    return;
}

start();
process();
cleanup();
exit();
In contrast, the above code
- deals with unusual conditions as soon as they are detected so that the reader doesn't have to remember them for long.
- keeps the main path un-indented.
Can explain the need for following a standard
One essential way to improve code quality is to follow a consistent style. That is why software engineers follow a strict coding standard (aka style guide).
The aim of a coding standard is to make the entire code base look like it was written by one person. A coding standard is usually specific to a programming language and specifies guidelines such as the location of opening and closing braces, indentation styles and naming styles (e.g. whether to use Hungarian style, Pascal casing, Camel casing, etc.). It is important that the whole team/company use the same coding standard and that standard is not generally inconsistent with typical industry practices. If a company's coding standards is very different from what is used typically in the industry, new recruits will take longer to get used to the company's coding style.
💡 IDEs can help to enforce some parts of a coding standard e.g. indentation rules.
What is the recommended approach regarding coding standards?
c
What is the aim of using a coding standard? How does it help?
Can follow simple mechanical style rules
Learn basic guidelines of the Java coding standard (by OSS-Generic)
Sample coding standard: PEP 8 Python Style Guide -- by Python.org
Consider the code given below:
import java.util.*;

public class Task {
    public static final String descriptionPrefix = "description: ";
    private String description;
    private boolean important;
    List<String> pastDescription = new ArrayList<>(); // a list of past descriptions

    public Task(String d) {
      this.description = d;
      if (!d.isEmpty())
          this.important = true;
    }

    public String getAsXML() { return "<task>"+description+"</task>"; }

    /**
     * Print the description as a string.
     */
    public void printingDescription(){ System.out.println(this); }

    @Override
    public String toString() { return descriptionPrefix + description; }
}
In what ways the code violate the basic guidelines (i.e., those marked with one ⭐️) of the OSS-Generic Java Coding Standard given here?
Here are three:
descriptionPrefixis a constant and should be namedDESCRIPTION_PREFIX- method name
printingDescription()should be named asprintDescription() - boolean variable
importantshould be named to sound boolean e.g.,isImportant
There are many more.
Can follow intermediate style rules
Go through the provided Java coding standard and learn the intermediate style rules.
According to the given Java coding standard, which one of these is not a good name?
b
Explanation: checkWeight is an action. Naming variables as actions makes the code harder to follow. isWeightValid may be a better name.
Repeat the exercise in the panel below but also find violations of intermediate level guidelines.
Consider the code given below:
import java.util.*;

public class Task {
    public static final String descriptionPrefix = "description: ";
    private String description;
    private boolean important;
    List<String> pastDescription = new ArrayList<>(); // a list of past descriptions

    public Task(String d) {
      this.description = d;
      if (!d.isEmpty())
          this.important = true;
    }

    public String getAsXML() { return "<task>"+description+"</task>"; }

    /**
     * Print the description as a string.
     */
    public void printingDescription(){ System.out.println(this); }

    @Override
    public String toString() { return descriptionPrefix + description; }
}
In what ways the code violate the basic guidelines (i.e., those marked with one ⭐️) of the OSS-Generic Java Coding Standard given here?
Here are three:
descriptionPrefixis a constant and should be namedDESCRIPTION_PREFIX- method name
printingDescription()should be named asprintDescription() - boolean variable
importantshould be named to sound boolean e.g.,isImportant
There are many more.
Here's one you are more likely to miss:
* Print the description as a string.→* Prints the description as a string.
There are more.
Can explain the need for good names in code
Proper naming improves the readability. It also reduces bugs caused by ambiguities regarding the intent of a variable or a method.
There are only two hard things in Computer Science: cache invalidation and naming things. -- Phil Karlton
Can improve code quality using technique: use nouns for things and verbs for actions
Every system is built from a domain-specific language designed by the programmers to describe that system. Functions are the verbs of that language, and classes are the nouns. ― Robert C. Martin, Clean Code: A Handbook of Agile Software Craftsmanship
Use nouns for classes/variables and verbs for methods/functions.
Examples:
| Name for a | Bad | Good |
|---|---|---|
| Class | CheckLimit |
LimitChecker |
| method | result() |
calculate() |
Distinguish clearly between single-valued and multivalued variables.
Examples:
Good
Person student;
ArrayList<Person> students;
Good
student = Person('Jim')
students = [Person('Jim'), Person('Alice')]
Can improve code quality using technique: use standard words
Use correct spelling in names. Avoid 'texting-style' spelling. Avoid foreign language words, slang, and names that are only meaningful within specific contexts/times e.g. terms from private jokes, a TV show currently popular in your country
Can improve code quality using technique: use name to explain
A name is not just for differentiation; it should explain the named entity to the reader accurately and at a sufficient level of detail.
Examples:
| Bad | Good |
|---|---|
processInput() (what 'process'?) |
removeWhiteSpaceFromInput() |
flag |
isValidInput |
temp |
If the name has multiple words, they should be in a sensible order.
Examples:
| Bad | Good |
|---|---|
bySizeOrder() |
orderBySize() |
Imagine going to the doctor's and saying "My eye1 is swollen"! Don’t use numbers or case to distinguish names.
Examples:
| Bad | Bad | Good |
|---|---|---|
value1, value2 |
value, Value |
originalValue, finalValue |
Can improve code quality using technique: not too long, not too short
While it is preferable not to have lengthy names, names that are 'too short' are even worse. If you must abbreviate or use acronyms, do it consistently. Explain their full meaning at an obvious location.
Can improve code quality using technique: avoid misleading names
Related things should be named similarly, while unrelated things should NOT.
Example: Consider these variables
colorBlack: hex value for color blackcolorWhite: hex value for color whitecolorBlue: number of times blue is usedhexForRed: : hex value for color red
This is misleading because colorBlue is named similar to colorWhite and colorBlack but has a different purpose while hexForRed is named differently but has very similar purpose to the first two variables. The following is better:
hexForBlackhexForWhitehexForRedblueColorCount
Avoid misleading or ambiguous names (e.g. those with multiple meanings), similar sounding names, hard-to-pronounce ones (e.g. avoid ambiguities like "is that a lowercase L, capital I or number 1?", or "is that number 0 or letter O?"), almost similar names.
Examples:
| Bad | Good | Reason |
|---|---|---|
phase0 |
phaseZero |
Is that zero or letter O? |
rwrLgtDirn |
rowerLegitDirection |
Hard to pronounce |
right left wrong |
rightDirection leftDirection wrongResponse |
right is for 'correct' or 'opposite of 'left'? |
redBooks readBooks |
redColorBooks booksRead |
red and read (past tense) sounds the same |
FiletMignon |
egg |
If the requirement is just a name of a food, egg is a much easier to type/say choice than FiletMignon |
Can explain the need for avoiding error-prone shortcuts
It is safer to use language constructs in the way they are meant to be used, even if the language allows shortcuts. Some such coding practices are common sources of bugs. Know them and avoid them.
Can improve code quality using technique: use the default branch
Always include a default branch in case statements.
Furthermore, use it for the intended default action and not just to execute the last option. If there is no default action, you can use the 'default' branch to detect errors (i.e. if execution reached the default branch, throw an exception). This also applies to the final else of an if-else construct. That is, the final else should mean 'everything else', and not the final option. Do not use else when an if condition can be explicitly specified, unless there is absolutely no other possibility.
Bad
if (red) print "red";
else print "blue";
Good
if (red) print "red";
else if (blue) print "blue";
else error("incorrect input");
Can improve code quality using technique: don't recycle variables or parameters
- Use one variable for one purpose. Do not reuse a variable for a different purpose other than its intended one, just because the data type is the same.
- Do not reuse formal parameters as local variables inside the method.
Bad
double computeRectangleArea(double length, double width) {
    length = length * width;
    return length;
}
Good
double computeRectangleArea(double length, double width) {
    double area;
    area = length * width;
    return area;
}
Can improve code quality using technique: avoid empty catch blocks
Never write an empty catch statement. At least give a comment to explain why the catch block is left empty.
Can improve code quality using technique: delete dead code
We all feel reluctant to delete code we have painstakingly written, even if we have no use for that code any more ("I spent a lot of time writing that code; what if we need it again?"). Consider all code as baggage you have to carry; get rid of unused code the moment it becomes redundant. If you need that code again, simply recover it from the revision control tool you are using. Deleting code you wrote previously is a sign that you are improving.
Can improve code quality using technique: minimise scope of variables
Minimize global variables. Global variables may be the most convenient way to pass information around, but they do create implicit links between code segments that use the global variable. Avoid them as much as possible.
Define variables in the least possible scope. For example, if the variable is used only within the if block of the conditional statement, it should be declared inside that if block.
The most powerful technique for minimizing the scope of a local variable is to declare it where it is first used. -- Effective Java, by Joshua Bloch
Resources:
Can improve code quality using technique: minimise code duplication
Code duplication, especially when you copy-paste-modify code, often indicates a poor quality implementation. While it may not be possible to have zero duplication, always think twice before duplicating code; most often there is a better alternative.
This guideline is closely related to the
Supplmentary → Principles →
DRY (Don't Repeat Yourself) Principle: Every piece of knowledge must have a single, unambiguous, authoritative representation within a system The Pragmatic Programmer, by Andy Hunt and Dave Thomas
This principle guards against duplication of information.
The functionality implemented twice is a violation of the DRY principle even if the two implementations are different.
The value a system-wide timeout being defined in multiple places is a violation of DRY.
Can explain the need for commenting minimally but sufficiently
Good code is its own best documentation. As you’re about to add a comment, ask yourself, ‘How can I improve the code so that this comment isn’t needed?’ Improve the code and then document it to make it even clearer. --Steve McConnell, Author of Clean Code
Some think commenting heavily increases the 'code quality'. This is not so. Avoid writing comments to explain bad code. Improve the code to make it self-explanatory.
Can improve code quality using technique: do not repeat the obvious
If the code is self-explanatory, refrain from repeating the description in a comment just for the sake of 'good documentation'.
Bad
// increment x
x++;

//trim the input
trimInput();
Can improve code quality using technique: write to the reader
Do not write comments as if they are private notes to self. Instead, write them well enough to be understood by another programmer. One type of comments that is almost always useful is the header comment that you write for a class or an operation to explain its purpose.
Examples:
Bad Reason: this comment will only make sense to the person who wrote it
// a quick trim function used to fix bug I detected overnight
void trimInput(){
    ....
}
Good
/** Trims the input of leading and trailing spaces */
void trimInput(){
    ....
}
Bad Reason: this comment will only make sense to the person who wrote it
# a quick trim function used to fix bug I detected overnight
def trim_input():
    ...
Good
def trim_input():
"""Trim the input of leading and trailing spaces"""
    ...
Can improve code quality using technique: explain what and why, not how
Comments should explain what and why aspect of the code, rather than the how aspect.
What : The specification of what the code supposed to do. The reader can compare such comments to the implementation to verify if the implementation is correct
Example: This method is possibly buggy because the implementation does not seem to match the comment. In this case the comment could help the reader to detect the bug.
/** Removes all spaces from the {@code input} */
void compact(String input){
    input.trim();
}
Why : The rationale for the current implementation.
Example: Without this comment, the reader will not know the reason for calling this method.
// Remove spaces to comply with IE23.5 formatting rules
compact(input);
How : The explanation for how the code works. This should already be apparent from the code, if the code is self-explanatory. Adding comments to explain the same thing is redundant.
Example:
Bad Reason: Comment explains how the code works.
// return true if both left end and right end are correct or the size has not incremented
return (left && right) || (input.size() == size);
Good Reason: Code refactored to be self-explanatory. Comment no longer needed.
boolean isSameSize = (input.size() == size) ;
return (isLeftEndCorrect && isRightEndCorrect) || isSameSize;
2B. Feature Quality
Evaluates: how deep is your biggest feature, how complete is the feature, how well it solves the target user needs, etc.
Evaluation method:
- by peers from own team and other teams (based on peer testing session, PPP, RepoSense data) -- more weight for team members from own team than those from other teams
- by tutors (based on demo,
PPP , RepoSense data)
For reference, here are some grading instructions that will be given to peers/tutors grading this aspect:
Evaluate the biggest feature done by the student for difficulty, completeness, and testability. Note: examples given below assume that AB4 did not have the commands
edit,undo, andredo.
- Difficulty
Feature/ difficulty: unable to judge: You are unable to judge this aspect for some reason.Feature/ difficulty: low: e.g. make the existing find command case insensitive.Feature/ difficulty: medium: e.g. an edit command that requires the user to type all fields, even the ones that are not being edited.Feature/ difficulty: high: e.g., undo/redo command- Completeness
Feature/ completeness: unable to judge: You are unable to judge this aspect for some reason.Feature/ completeness: low: A partial implementation of the feature. Barely useful.Feature/ completeness: medium: The feature has enough functionality to be useful for some of the users.Feature/ completeness: high: The feature has all functionality to be useful to almost all users.- Other
Feature/ not hard to test: The feature was not too hard to test manually.Feature/ polished: The feature looks polished (as if done by a professional programmer).Evaluate the amount of work, on a scale of 0 to 30.
- Consider this PR (
historycommand) as 5 units of effort which means this PR (undo/redocommand) is about 15 points of effort. Given that 30 points matches an effort twice as that needed for theundo/redofeature (which was given as an example of anAgrade project), we expect most students to be have efforts lower than 20.- Count all implementation/testing/documentation work as mentioned in that person's PPP. Also look at the actual code written by the person.
- Do not give a high value just to be nice. You will be asked to provide a brief justification for your effort estimates.
3. Project Assessment: QA [ 2 + 10 = 12 marks]
3A. System/Acceptance Testing:
Evaluates: How well you can system-test/acceptance-test a product
Based on:
- bugs you found in the Practical Exam
- our own manual testing (when necessary)
Evaluated by: teaching team (in the capacity of moderators e.g., to verify if it is reasonable for you to reject a bug reported by others)
3B. Developer Testing:
Evaluates: How well you tested your own feature
Based on:
- bugs in your work found by others during the PE
- your test code (note
our expectations for automated testing )
Evaluated by: tutors (in the capacity of moderators e.g., to verify if it is reasonable for the team to downgrade the severity of a bug you reported)
- There is no requirement for a minimum coverage level. Note that in a production environment you are often required to have at least 90% of the code covered by tests. In this project, it can be less. The less coverage you have, the higher the risk of regression bugs, which will cost marks if not fixed before the final submission.
- You must write some tests so that we can evaluate your ability to write tests.
- How much of each type of testing should you do? We expect you to decide. You learned different types of testing and what they try to achieve. Based on that, you should decide how much of each type is required. Similarly, you can decide to what extent you want to automate tests, depending on the benefits and the effort required.
Notes on how marks are calculated based on bugs
- Bugs rejected by the dev team, if the rejection is approved by the teaching team, will not be affect marks of the tester or the developer.
- The penalty/credit for a bug varies based on,
- The severity of the bug:
severity.High>severity.Medium>severity.Low - The type of the bug:
type.FunctionalityBug>type.DocumentationBug>type.FeatureFlaw>type.DocTypo
- The severity of the bug:
- The penalty for a bug is divided equally among assignees.
- The developers are not penalized for the duplicate bug reports they received but the testers earn credit for the duplicate bug reports they submitted as long as the duplicates are not submitted by the same tester.
-
Obvious bugs earn slightly less credit for the tester and slightly more penalty for the developer. - If the team you tested has a low bug count i.e., total bugs found by all testers is low, we will fall back on other means (e.g., performance in mock PE) to calculate your marks for system/acceptance testing.
- Your marks for developer testing depends on the bug density rather than total bug count. Here's an example:
nbugs found in your feature; it is a difficult feature consisting of lot of code → 4/5 marksnbugs found in your feature; it is a small feature with a small amount of code → 1/5 marks
- You don't need to find all bugs in the product to get full marks. For example, finding half of the bugs of that product or 4 bugs, whichever the lower, could earn you full marks.
- Excessive incorrect downgrading/rejecting/
de-duplicating , if deemed an unethical attempt to game the system, may be penalized.
4. Project Assessment: Documentation [ 10 marks]
Evaluates: the quality of the sections you wrote for the user guide and the developer guide
Based on: the relevant sections of your PPP.
Feedback: Submit your UG in v1.1 amd your DG in v 1.3 to allow the tutors to provide feedback on these documents. This will give you a chance to improve for your final submission.
Evaluated by: tutors, peers from own team and other teams
For reference, here are some grading instructions that will be given to peers/tutors grading this aspect:
Evaluate the quality of user documentation based on the parts of the user guide written by the person, as reproduced in the project portfolio. Evaluate from an end-user perspective.
UG/ unable to judge: Less than 1 page worth of UG content written by the student or cannot find PPPUG/ good use of visuals: Uses visuals e.g., screenshots.UG/ good use of examples: Uses examples e.g., sample inputs/outputs.UG/ just enough information: Not too much information. All important information is given.UG/ easy to understand: The information is easy to understand for the target audience.UG/ polished: The document looks neat, well-formatted, and professional.Evaluate the quality of developer documentation based on the developer docs cited/reproduced in the respective project portfolio page. Evaluate from the perspective of a new developer trying to understand how the features are implemented.
DG/ unable to judge: Less than 0.5 pages worth of content OR other problems in the document e.g. looks like included wrong content.DG/ too little: 0.5 - 1 page of documentation- Diagrams:
DG/ types of UML diagrams: 1: Only one type of diagram used (types: Class Diagrams, Object Diagrams, Sequence Diagrams, Activity Diagrams, Use Case Diagrams)DG/ types of UML diagrams: 2: Two types of diagrams usedDG/ types of UML diagrams: 3+: Three or more types of diagrams usedDG/ UML diagrams suitable: The diagrams used for the right purposeDG/ UML notation correct: No more than one minor error in the UML notationDG/ diagrams not repetitive: No evidence of repeating the same diagram with minor differencesDG/ diagrams not too complicated: Diagrams don't cram too much information into themDG/ diagrams integrates with text: Diagrams are well integrated into the textual explanationsDG/ easy to understand: The document is easy to understand/followDG/ just enough information: Not too much information. All important information is given.DG/ polished: The document looks neat, well-formatted, and professional.
5. Project Assessment: Project Management [ 5 + 5 = 10 marks]
5A. Process:
Evaluates: How well you did in project management related aspects of the project, as an individual and as a team
Based on: tutor/bot observations of project milestones and GitHub data
Milestones need to be reached the midnight before of the tutorial for it to be counted as achieved. To get a good grade for this aspect, achieve at least 60% of the recommended milestone progress.
Other criteria:
- Good use of GitHub milestones
- Good use of GitHub release mechanism
- Good version control, based on the repo
- Reasonable attempt to use the forking workflow
- Good task definition, assignment and tracking, based on the issue tracker
- Good use of buffers (opposite: everything at the last minute)
- Project done iteratively and incrementally (opposite: doing most of the work in one big burst)
5B. Team-tasks:
Evaluates: How much you contributed to team-tasks
Based on: peer evaluations, tutor observations
To earn full marks, you should have done a fair share of the team tasks. You can earn bonus marks by doing more than your fair share.
Relevant: [
Here is a non-exhaustive list of team-tasks:
- Necessary general code enhancements e.g.,
- Work related to renaming the product
- Work related to changing the product icon
- Morphing the product into a different product
- Setting up the GitHub, Travis, AppVeyor, etc.
- Maintaining the issue tracker
- Release management
- Updating user/developer docs that are not specific to a feature e.g. documenting the target user profile
- Incorporating more useful tools/libraries/frameworks into the product or the project workflow (e.g. automate more aspects of the project workflow using a GitHub plugin)
To receive full 10 marks allocated for participation, earn at least 15 participation points.
There are 30+ available points to choose from:
-
Good peer ratings - Criteria for professional conduct (1 point for each criterion, max 7)
- Competency criteria (2 points for each, max 6)
Only those who submit peer evaluations can earn participation points from peer evaluations they receive.
- In-lecture quizzes (1 each, max 10 points)
- Module admin tasks done on time and as instructed
- Peer evaluations (1 points each, max 3)
- Pre-module survey (1 points)
- Enhanced AB1-AB3 (2 points each, max 6 points)
Relevant: [
Peer evaluation criteria: professional conduct
- Professional Communication :
- Communicates sufficiently and professionally. e.g. Does not use offensive language or excessive slang in project communications.
- Responds to communication from team members in a timely manner (e.g. within 24 hours).
- Punctuality: Does not cause others to waste time or slow down project progress by frequent tardiness.
- Dependability: Promises what can be done, and delivers what was promised.
- Effort: Puts in sufficient effort to, and tries their best to keep up with the module/project pace. Seeks help from others when necessary.
- Quality: Does not deliver work products that seem to be below the student's competence level i.e. tries their best to make the work product as high quality as possible within her competency level.
- Meticulousness:
- Rarely overlooks submission requirements.
- Rarely misses compulsory module activities such as pre-module survey.
- Teamwork: How willing are you to act as part of a team, contribute to team-level tasks, adhere to team decisions, etc.
Peer evaluation criteria: competency
- Technical Competency: Able to gain competency in all the required tools and techniques.
- Mentoring skills: Helps others when possible. Able to mentor others well.
- Communication skills: Able to communicate (written and spoken) well. Takes initiative in discussions.
Your tutor will serve as your project supervisor too.
The supervisor's main job is to observe, facilitate self/peer learning, evaluate, and give feedback.
Tutorial time is the main avenue for meeting your supervisor. In addition, you can meet the supervisor before/after the tutorial, or any other time, as many times you need, subject to availability in his/her schedule.
Note that it is not the supervisor’s job to chase you down and give help. It is up to you to get as much feedback from them as you need. You are free to request more feedback from the supervisor as necessary. Similarly, it is not the job of the supervisor to lead your project to success.
What if I don’t carry around a laptop?
If you do not have a laptop or prefer not to bring the laptop, it is up to you to show your work to the tutor in some way (e.g. by connecting to your home PC remotely), without requiring extra time/effort from the tutor or team members.
Reason: As you enjoy the benefits of not bring the laptop; you (not others) should bear the cost too.