Week 10 [Mar 25]
RepoSense
-
We use a new tool called
RepoSenseto identify your contributions to the project.- The tool is setup for the module and the report is available under the project-dashboard link.
-
Ensure your code is RepoSense compatible. Instructions here.
-
Follow the user guide for RepoSense and fix the issues, if you don't see your contributions detected.
FAQ:
-
My contributions are not detected in the Reposense report, why?
- Check:
- Have you set the
user.nameto your GitHub user name that you provided in the premodule survey? - Have you used different git user name while doing the work? Run
git logcommand on the command line/terminal and look for theAuthorfield.
- Have you set the
- If the above are correct, you may want to provide a config file to give additional details to Reposense (check the Reposense documentation mentioned above)
- You need to commit the config file before running Reposense, else the config won't be picked up by the tool.
- Do note: if you include a config file, entries pertaining to all members of the team must be in the config file.
- Check:
-
I have done everything given in 1, but I still can't see my contributions. How to resolve?
- Use
@@authortags to identify your code contribution in the source files. - Follow the instructions given in the Reposense documentation for this
- Use
-
I did 1 & 2, however, I cannot still see my contributions. Help!!
- Usually, most cases will be taken care of by 1 and 2 above.
- In case your contributions are still not detected, please post the issue on this forum, we will get the reposense team to take a look.
-
How frequently is the Reposense report generated?
- Reposense is configured to run the report every Monday. i.e., the report is generated weekly.
-
My friend and I worked on a piece of code together, but only my friend committed. Now how?
- Use
@@authortags to indicate chunks of the file that is your contribution. Arrive at a consensus with your friend/teammate before claiming part of the code as yours.
- Use
-
What is considered good contribution?
- Speaking from code-quality evaluation perspective, you need to have contiguous code chunks in your contribution (e.g., some full classes, some significantly long full methods).
- If the code is fragmented (e.g., you only added one additional field to a class, and entire code has fragmented one-two lines that work with the additional field you creates) it becomes hard to grade the code quality.
[W10.1] Design Principles: Intermediate-Level
How Polymorphism Works
Can explain substitutability
Every instance of a subclass is an instance of the superclass, but not vice-versa. As a result, inheritance allows substitutability : the ability to substitute a child class object where a parent class object is expected.
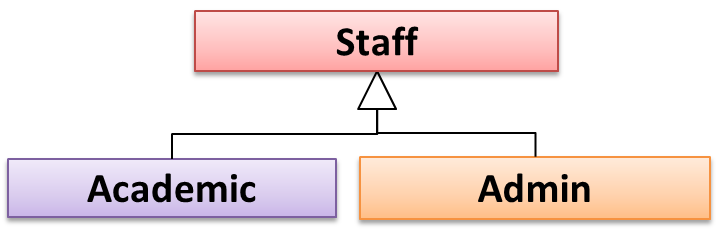
an Academic is an instance of a Staff, but a Staff is not necessarily an instance of an Academic. i.e. wherever an object of the superclass is expected, it can be substituted by an object of any of its subclasses.
The following code is valid because an AcademicStaff object is substitutable as a Staff object.
Staff staff = new AcademicStaff (); // OK
But the following code is not valid because staff is declared as a Staff type and therefore its value may or may not be of type AcademicStaff, which is the type expected by variable academicStaff.
Staff staff;
...
AcademicStaff academicStaff = staff; // Not OK
Can explain dynamic and static binding
Dynamic Binding (
Paradigms → Object Oriented Programming → Inheritance →
Method overriding is when a sub-class changes the behavior inherited from the parent class by re-implementing the method. Overridden methods have the same name, same type signature, and same return type.
Consider the following case of EvaluationReport class inheriting the Report class:
Report methods |
EvaluationReport methods |
Overrides? |
|---|---|---|
print() |
print() |
Yes |
write(String) |
write(String) |
Yes |
read():String |
read(int):String |
No. Reason: the two methods have different signatures; This is a case of |
Paradigms → Object Oriented Programming → Inheritance →
Method overloading is when there are multiple methods with the same name but different type signatures. Overloading is used to indicate that multiple operations do similar things but take different parameters.
Type Signature: The type signature of an operation is the type sequence of the parameters. The return type and parameter names are not part of the type signature. However, the parameter order is significant.
| Method | Type Signature |
|---|---|
int add(int X, int Y) |
(int, int) |
void add(int A, int B) |
(int, int) |
void m(int X, double Y) |
(int, double) |
void m(double X, int Y) |
(double, int) |
In the case below, the calculate method is overloaded because the two methods have the same name but different type signatures (String) and (int)
calculate(String): voidcalculate(int): void
Which of these methods override another method? A is the parent class. B inherits A.
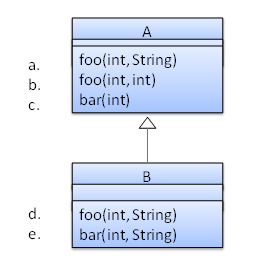
- a
- b
- c
- d
- e
d
Explanation: Method overriding requires a method in a child class to use the same method name and same parameter sequence used by one of its ancestors
Consider the code below. The declared type of s is Staff and it appears as if the adjustSalary(int) operation of the Staff class is invoked.
void adjustSalary(int byPercent) {
    for (Staff s: staff) {
        s.adjustSalary(byPercent);
    }
}
However, at runtime s can receive an object of any subclass of Staff. That means the adjustSalary(int) operation of the actual subclass object will be called. If the subclass does not override that operation, the operation defined in the superclass (in this case, Staff class) will be called.
Static binding (aka early binding): When a method call is resolved at compile time.
In contrast,
Paradigms → Object Oriented Programming → Inheritance →
Method overloading is when there are multiple methods with the same name but different type signatures. Overloading is used to indicate that multiple operations do similar things but take different parameters.
Type Signature: The type signature of an operation is the type sequence of the parameters. The return type and parameter names are not part of the type signature. However, the parameter order is significant.
| Method | Type Signature |
|---|---|
int add(int X, int Y) |
(int, int) |
void add(int A, int B) |
(int, int) |
void m(int X, double Y) |
(int, double) |
void m(double X, int Y) |
(double, int) |
In the case below, the calculate method is overloaded because the two methods have the same name but different type signatures (String) and (int)
calculate(String): voidcalculate(int): void
Note how the constructor is overloaded in the class below. The method call new Account() is bound to the first constructor at compile time.
class Account {

    Account () {
        // Signature: ()
        ...
    }

    Account (String name, String number, double balance) {
        // Signature: (String, String, double)
        ...
    }
}
Similarly, the calcuateGrade method is overloaded in the code below and a method call calculateGrade("A1213232") is bound to the second implementation, at compile time.
void calculateGrade (int[] averages) { ... }
void calculateGrade (String matric) { ... }
Can explain how substitutability operation overriding, and dynamic binding relates to polymorphism
Three concepts combine to achieve polymorphism: substitutability, operation overriding, and dynamic binding.
- Substitutability: Because of substitutability, you can write code that expects object of a parent class and yet use that code with objects of child classes. That is how polymorphism is able to treat objects of different types as one type.
- Overriding: To get polymorphic behavior from an operation, the operation in the superclass needs to be overridden in each of the subclasses. That is how overriding allows objects of different subclasses to display different behaviors in response to the same method call.
- Dynamic binding: Calls to overridden methods are bound to the implementation of the actual object's class dynamically during the runtime. That is how the polymorphic code can call the method of the parent class and yet execute the implementation of the child class.
Which one of these is least related to how OO programs achieve polymorphism?
(c)
Explanation: Operation overriding is the one that is related, not operation overloading.
More Design Principles
Can explain Liskov Substitution Principle
Liskov Substitution Principle (LSP): Derived classes must be substitutable for their base classes. -- proposed by Barbara Liskov
LSP sounds same as
Paradigms → Object Oriented Programming → Inheritance →
Every instance of a subclass is an instance of the superclass, but not vice-versa. As a result, inheritance allows substitutability : the ability to substitute a child class object where a parent class object is expected.
an Academic is an instance of a Staff, but a Staff is not necessarily an instance of an Academic. i.e. wherever an object of the superclass is expected, it can be substituted by an object of any of its subclasses.
The following code is valid because an AcademicStaff object is substitutable as a Staff object.
Staff staff = new AcademicStaff (); // OK
But the following code is not valid because staff is declared as a Staff type and therefore its value may or may not be of type AcademicStaff, which is the type expected by variable academicStaff.
Staff staff;
...
AcademicStaff academicStaff = staff; // Not OK
Suppose the Payroll class depends on the adjustMySalary(int percent) method of the Staff class. Furthermore, the Staff class states that the adjustMySalary method will work for all positive percent values. Both Admin and Academic classes override the adjustMySalary method.
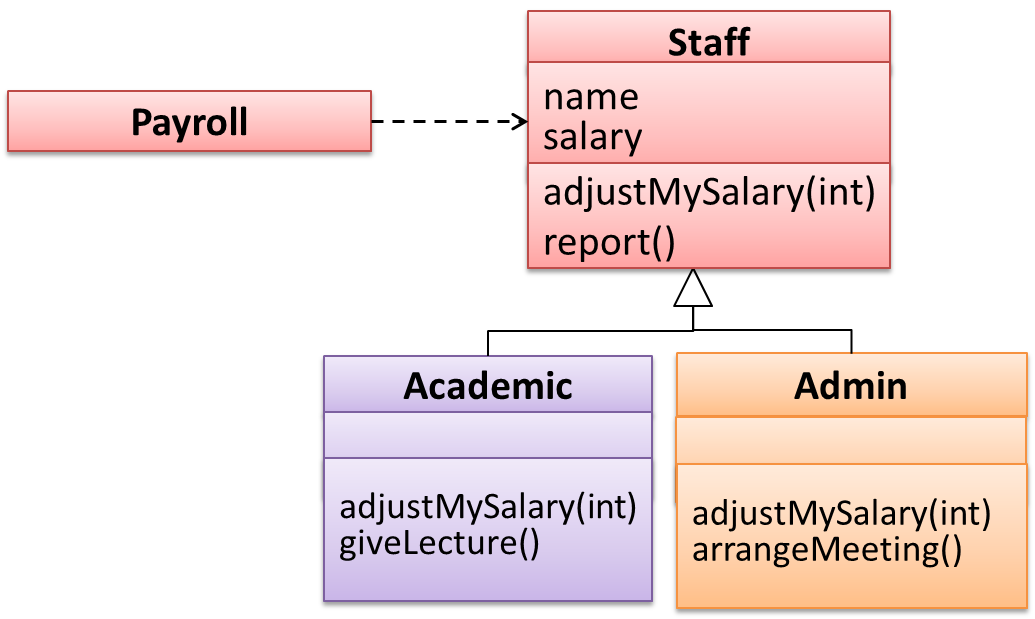
Now consider the following:
Admin#adjustMySalarymethod works for both negative and positive percent values.Academic#adjustMySalarymethod works for percent values1..100only.
In the above scenario,
Adminclass follows LSP because it fulfillsPayroll’s expectation ofStaffobjects (i.e. it works for all positive values). SubstitutingAdminobjects for Staff objects will not break thePayrollclass functionality.Academicclass violates LSP because it will not work for percent values over100as expected by thePayrollclass. SubstitutingAcademicobjects forStaffobjects can potentially break thePayrollclass functionality.
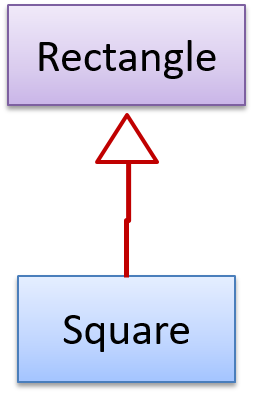
The Rectangle#resize() can take any integers for height and width. This contract is violated by the subclass Square#resize() because it does not accept a height that is different from the width.
class Rectangle {
    ...
    /** sets the size to given height and width*/
    void resize(int height, int width){
        ...
    }
}


class Square extends Rectangle {

    @Override
    void resize(int height, int width){
        if (height != width) {
            //error
       }
    }
}
Now consider the following method that is written to work with the Rectangle class.
void makeSameSize(Rectangle original, Rectangle toResize){
    toResize.resize(original.getHeight(), original.getWidth());
}
This code will fail if it is called as maekSameSize(new Rectangle(12,8), new Square(4, 4)) That is, Square class is not substitutable for the Rectangle class.
If a subclass imposes more restrictive conditions than its parent class, it violates Liskov Substitution Principle.
True.
Explanation: If the subclass is more restrictive than the parent class, code that worked with the parent class may not work with the child class. Hence, the substitutability does not exist and LSP has been violated.
Can explain the Law of Demeter
Law of Demeter (LoD):
- An object should have limited knowledge of another object.
- An object should only interact with objects that are closely related to it.
Also known as
- Don’t talk to strangers.
- Principle of least knowledge
More concretely, a method m of an object O should invoke only the methods of the following kinds of objects:
- The object
Oitself - Objects passed as parameters of
m - Objects created/instantiated in
m(directly or indirectly) - Objects from the
direct association of O
The following code fragment violates LoD due to the reason: while b is a ‘friend’ of foo (because it receives it as a parameter), g is a ‘friend of a friend’ (which should be considered a ‘stranger’), and g.doSomething() is analogous to ‘talking to a stranger’.
void foo(Bar b) {
    Goo g = b.getGoo();
    g.doSomething();
}
LoD aims to prevent objects navigating internal structures of other objects.
An analogy for LoD can be drawn from Facebook. If Facebook followed LoD, you would not be allowed to see posts of friends of friends, unless they are your friends as well. If Jake is your friend and Adam is Jake’s friend, you should not be allowed to see Adam’s posts unless Adam is a friend of yours as well.
Explain the Law of Demeter using code examples. You are to make up your own code examples. Take Minesweeper as the basis for your code examples.
Let us take the Logic class as an example. Assume that it has the following operation.
setMinefield(Minefiled mf):void
Consider the following that can happen inside this operation.
mf.init();: this does not violate LoD since LoD allows calling operations of parameters received.mf.getCell(1,3).clear();: //this violates LoD becauseLogicis handlingCellobjects deep insideMinefield. Instead, it should bemf.clearCellAt(1,3);timer.start();: //this does not violate LoD becausetimerappears to be an internal component (i.e. a variable) ofLogicitself.Cell c = new Cell();c.init();: // this does not violate LoD becausecwas created inside the operation.
This violates Law of Demeter.
void foo(Bar b) {
    Goo g =  new Goo();
    g.doSomething();
}
False
Explanation: The line g.doSomething() does not violate LoD because it is OK to invoke methods of objects created within a method.
Pick the odd one out.
- a. Law of Demeter.
- b. Don’t add people to a late project.
- c. Don’t talk to strangers.
- d. Principle of least knowledge.
- e. Coupling.
(b)
Explanation: Law of Demeter, which aims to reduce coupling, is also known as ‘Don’t talk to strangers’ and ‘Principle of least knowledge’.
Can explain interface segregation principle
Interface Segregation Principle (ISP): No client should be forced to depend on methods it does not use.
The Payroll class should not depend on the AdminStaff class because it does not use the arrangeMeeting() method. Instead, it should depend on the SalariedStaff interface.
public class Payroll {
    //...
    private void adjustSalaries(AdminStaff adminStaff){ //violates ISP
        //...
    }

}
public class Payroll {
    //...
    private void adjustSalaries(SalariedStaff staff){ //does not violate ISP
        //...
    }
}

Can explain dependency inversion principle (DIP)
The Dependency Inversion Principle states that,
- High-level modules should not depend on low-level modules. Both should depend on abstractions.
- Abstractions should not depend on details. Details should depend on abstractions.
Example:

In design (a), the higher level class Payroll depends on the lower level class Employee, a violation of DIP. In design (b), both Payroll and Employee depends on the Payee interface (note that inheritance is a dependency).
Design (b) is more flexible (and less coupled) because now the Payroll class need not change when the Employee class changes.
Which of these statements is true about the Dependency Inversion Principle.
- a. It can complicate the design/implementation by introducing extra abstractions, but it has some benefits.
- b. It is often used during testing, to replace dependencies with mocks.
- c. It reduces dependencies in a design.
- d. It advocates making higher level classes to depend on lower level classes.
Explanation: Replacing dependencies with mocks is Dependency Injection, not DIP. DIP does not reduce dependencies, rather, it changes the direction of dependencies. Yes, it can introduce extra abstractions but often the benefit can outweigh the extra complications.
Can explain SOLID Principles
The five OOP principles given below are known as SOLID Principles (an acronym made up of the first letter of each principle):
Supplmentary → Principles →
Single Responsibility Principle (SRP): A class should have one, and only one, reason to change. -- Robert C. Martin
If a class has only one responsibility, it needs to change only when there is a change to that responsibility.
Consider a TextUi class that does parsing of the user commands as well as interacting with the user. That class needs to change when the formatting of the UI changes as well as when the syntax of the user command changes. Hence, such a class does not follow the SRP.
Gather together the things that change for the same reasons. Separate those things that change for different reasons. ―Agile Software Development, Principles, Patterns, and Practices by Robert C. Martin
- An explanation of the SRP from www.oodesign.com
- Another explanation (more detailed) by Patkos Csaba
- A book chapter on SRP - A book chapter on SRP, written by the father of the principle itself Robert C Martin.
Supplmentary → Principles →
The Open-Close Principle aims to make a code entity easy to adapt and reuse without needing to modify the code entity itself.
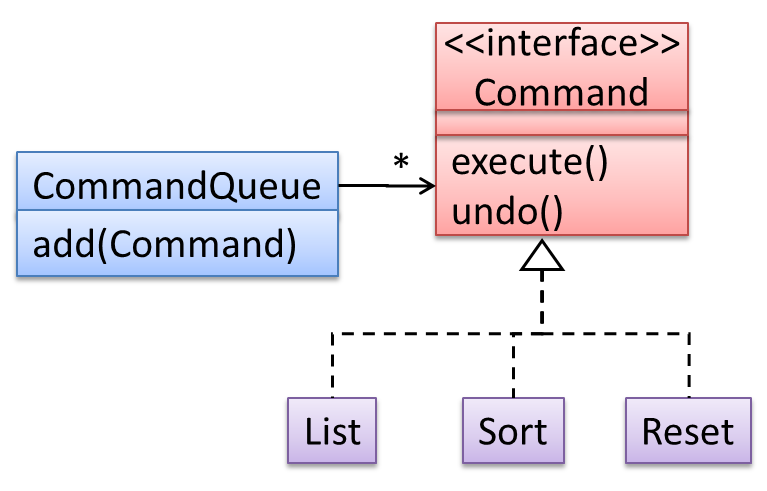
Open-Closed Principle (OCP): A module should be open for extension but closed for modification. That is, modules should be written so that they can be extended, without requiring them to be modified. -- proposed by Bertrand Meyer
In object-oriented programming, OCP can be achieved in various ways. This often requires separating the specification (i.e. interface) of a module from its implementation.
In the design given below, the behavior of the CommandQueue class can be altered by adding more concrete Command subclasses. For example, by including a Delete class alongside List, Sort, and Reset, the CommandQueue can now perform delete commands without modifying its code at all. That is, its behavior was extended without having to modify its code. Hence, it was open to extensions, but closed to modification.
The behavior of a Java generic class can be altered by passing it a different class as a parameter. In the code below, the ArrayList class behaves as a container of Students in one instance and as a container of Admin objects in the other instance, without having to change its code. That is, the behavior of the ArrayList class is extended without modifying its code.
ArrayList students = new ArrayList< Student >();
ArrayList admins = new ArrayList< Admin >();
Which of these is closest to the meaning of the open-closed principle?
(a)
Explanation: Please refer the handout for the definition of OCP.
Supplmentary → Principles →
Liskov Substitution Principle (LSP): Derived classes must be substitutable for their base classes. -- proposed by Barbara Liskov
LSP sounds same as
Paradigms → Object Oriented Programming → Inheritance →
Every instance of a subclass is an instance of the superclass, but not vice-versa. As a result, inheritance allows substitutability : the ability to substitute a child class object where a parent class object is expected.
an Academic is an instance of a Staff, but a Staff is not necessarily an instance of an Academic. i.e. wherever an object of the superclass is expected, it can be substituted by an object of any of its subclasses.
The following code is valid because an AcademicStaff object is substitutable as a Staff object.
Staff staff = new AcademicStaff (); // OK
But the following code is not valid because staff is declared as a Staff type and therefore its value may or may not be of type AcademicStaff, which is the type expected by variable academicStaff.
Staff staff;
...
AcademicStaff academicStaff = staff; // Not OK
Suppose the Payroll class depends on the adjustMySalary(int percent) method of the Staff class. Furthermore, the Staff class states that the adjustMySalary method will work for all positive percent values. Both Admin and Academic classes override the adjustMySalary method.
Now consider the following:
Admin#adjustMySalarymethod works for both negative and positive percent values.Academic#adjustMySalarymethod works for percent values1..100only.
In the above scenario,
Adminclass follows LSP because it fulfillsPayroll’s expectation ofStaffobjects (i.e. it works for all positive values). SubstitutingAdminobjects for Staff objects will not break thePayrollclass functionality.Academicclass violates LSP because it will not work for percent values over100as expected by thePayrollclass. SubstitutingAcademicobjects forStaffobjects can potentially break thePayrollclass functionality.
The Rectangle#resize() can take any integers for height and width. This contract is violated by the subclass Square#resize() because it does not accept a height that is different from the width.
class Rectangle {
    ...
    /** sets the size to given height and width*/
    void resize(int height, int width){
        ...
    }
}


class Square extends Rectangle {

    @Override
    void resize(int height, int width){
        if (height != width) {
            //error
       }
    }
}
Now consider the following method that is written to work with the Rectangle class.
void makeSameSize(Rectangle original, Rectangle toResize){
    toResize.resize(original.getHeight(), original.getWidth());
}
This code will fail if it is called as maekSameSize(new Rectangle(12,8), new Square(4, 4)) That is, Square class is not substitutable for the Rectangle class.
If a subclass imposes more restrictive conditions than its parent class, it violates Liskov Substitution Principle.
True.
Explanation: If the subclass is more restrictive than the parent class, code that worked with the parent class may not work with the child class. Hence, the substitutability does not exist and LSP has been violated.
Supplmentary → Principles →
Interface Segregation Principle (ISP): No client should be forced to depend on methods it does not use.
The Payroll class should not depend on the AdminStaff class because it does not use the arrangeMeeting() method. Instead, it should depend on the SalariedStaff interface.
public class Payroll {
    //...
    private void adjustSalaries(AdminStaff adminStaff){ //violates ISP
        //...
    }

}
public class Payroll {
    //...
    private void adjustSalaries(SalariedStaff staff){ //does not violate ISP
        //...
    }
}
Supplmentary → Principles →
The Dependency Inversion Principle states that,
- High-level modules should not depend on low-level modules. Both should depend on abstractions.
- Abstractions should not depend on details. Details should depend on abstractions.
Example:
In design (a), the higher level class Payroll depends on the lower level class Employee, a violation of DIP. In design (b), both Payroll and Employee depends on the Payee interface (note that inheritance is a dependency).
Design (b) is more flexible (and less coupled) because now the Payroll class need not change when the Employee class changes.
Which of these statements is true about the Dependency Inversion Principle.
- a. It can complicate the design/implementation by introducing extra abstractions, but it has some benefits.
- b. It is often used during testing, to replace dependencies with mocks.
- c. It reduces dependencies in a design.
- d. It advocates making higher level classes to depend on lower level classes.
- a. It can complicate the design/implementation by introducing extra abstractions, but it has some benefits.
- b. It is often used during testing, to replace dependencies with mocks.
- c. It reduces dependencies in a design.
- d. It advocates making higher level classes to depend on lower level classes.
Explanation: Replacing dependencies with mocks is Dependency Injection, not DIP. DIP does not reduce dependencies, rather, it changes the direction of dependencies. Yes, it can introduce extra abstractions but often the benefit can outweigh the extra complications.
Can explain YAGNI principle
YAGNI (You Aren't Gonna Need It!) Principle: Do not add code simply because ‘you might need it in the future’.
The principle says that some capability we presume our software needs in the future should not be built now because the chances are "you aren't gonna need it". The rationale is that we do not have perfect information about the future and therefore some of the extra work we do to fulfill a potential future need might go to waste when some of our predictions fail to materialize.
- Yagni -- A detailed article explaining YAGNI, written by Martin Fowler.
Can explain DRY principle
DRY (Don't Repeat Yourself) Principle: Every piece of knowledge must have a single, unambiguous, authoritative representation within a system The Pragmatic Programmer, by Andy Hunt and Dave Thomas
This principle guards against duplication of information.
The functionality implemented twice is a violation of the DRY principle even if the two implementations are different.
The value a system-wide timeout being defined in multiple places is a violation of DRY.
Can explain Brooks' law
Brooks' Law: Adding people to a late project will make it later. -- Fred Brooks (author of The Mythical Man-Month)
Explanation: The additional communication overhead will outweigh the benefit of adding extra manpower, especially if done near to a deadline.
Do the Brook’s Law apply to a school project? Justify.
Yes. Adding a new student to a project team can result in a slow-down of the project for a short period. This is because the new member needs time to learn the project and existing members will have to spend time helping the new guy get up to speed. If the project is already behind schedule and near a deadline, this could delay the delivery even further.
Which one of these (all attributed to Fred Brooks, the author of the famous SE book The Mythical Man-Month), is called the Brook’s law?
- a. All programmers are optimists.
- b. Good judgement comes from experience, and experience comes from bad judgement.
- c. The bearing of a child takes nine months, no matter how many women are assigned.
- d. Adding more manpower to an already late project makes it even later.
(d)
[W10.2] Design Patterns
Introduction
Can explain design patterns
Design Pattern : An elegant reusable solution to a commonly recurring problem within a given context in software design.
In software development, there are certain problems that recur in a certain context.
Some examples of recurring design problems:
| Design Context | Recurring Problem |
|---|---|
| Assembling a system that makes use of other existing systems implemented using different technologies | What is the best architecture? |
| UI needs to be updated when the data in application backend changes | How to initiate an update to the UI when data changes without coupling the backend to the UI? |
After repeated attempts at solving such problems, better solutions are discovered and refined over time. These solutions are known as design patterns, a term popularized by the seminal book Design Patterns: Elements of Reusable Object-Oriented Software by the so-called "Gang of Four" (GoF) written by Eric Gamma, Richard Helm, Ralph Johnson,and John Vlissides.
Which one of these describes the ‘software design patterns’ concept best?
(b)
Can explain design patterns format
The common format to describe a pattern consists of the following components:
- Context: The situation or scenario where the design problem is encountered.
- Problem: The main difficulty to be resolved.
- Solution: The core of the solution. It is important to note that the solution presented only includes the most general details, which may need further refinement for a specific context.
- Anti-patterns (optional): Commonly used solutions, which are usually incorrect and/or inferior to the Design Pattern.
- Consequences (optional): Identifying the pros and cons of applying the pattern.
- Other useful information (optional): Code examples, known uses, other related patterns, etc.
When we describe a pattern, we must also specify anti-patterns.
False.
Explanation: Anti-patterns are related to patterns, but they are not a ‘must have’ component of a pattern description.
Singleton pattern
Can explain the Singleton design pattern
Context
A certain classes should have no more than just one instance (e.g. the main controller class of the system). These single instances are commonly known as singletons.
Problem
A normal class can be instantiated multiple times by invoking the constructor.
Solution
Make the constructor of the singleton class private, because a public constructor will allow others to instantiate the class at will. Provide a public class-level method to access the single instance.
Example:
We use the Singleton pattern when
(c)
Can apply the Singleton design pattern
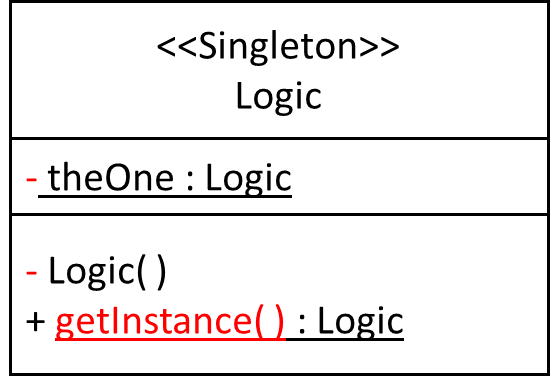
Here is the typical implementation of how the Singleton pattern is applied to a class:
class Logic {
    private static Logic theOne = null;

    private Logic() {
        ...
    }

    public static Logic getInstance() {
        if (theOne == null) {
            theOne = new Logic();
        }
        return theOne;
    }
}
Notes:
- The constructor is
private, which prevents instantiation from outside the class. - The single instance of the singleton class is maintained by a
privateclass-level variable. - Access to this object is provided by a
publicclass-level operationgetInstance()which instantiates a single copy of the singleton class when it is executed for the first time. Subsequent calls to this operation return the single instance of the class.
If Logic was not a Singleton class, an object is created like this:
Logic m = new Logic();
But now, the Logic object needs to be accessed like this:
Logic m = Logic.getInstance();
Can decide when to apply Singleton design pattern
Pros:
- easy to apply
- effective in achieving its goal with minimal extra work
- provides an easy way to access the singleton object from anywhere in the code base
Cons:
- The singleton object acts like a global variable that increases coupling across the code base.
- In testing, it is difficult to replace Singleton objects with stubs (static methods cannot be overridden)
- In testing, singleton objects carry data from one test to another even when we want each test to be independent of the others.
Given there are some significant cons, it is recommended that you apply the Singleton pattern when, in addition to requiring only one instance of a class, there is a risk of creating multiple objects by mistake, and creating such multiple objects has real negative consequences.
Facade pattern
Can explain the Facade design pattern
Context
Components need to access functionality deep inside other components.
The UI component of a Library system might want to access functionality of the Book class contained inside the Logic component.
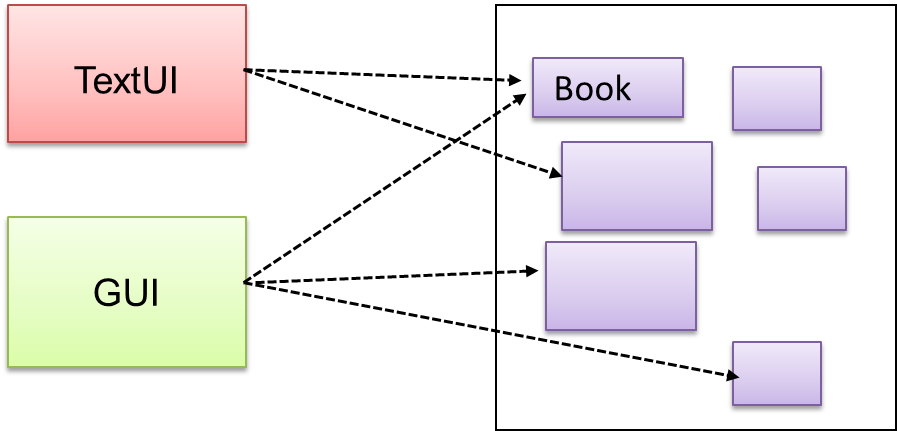
Problem
Access to the component should be allowed without exposing its internal details. e.g. the UI component should access the functionality of the Logic component without knowing that it contained a Book class within it.
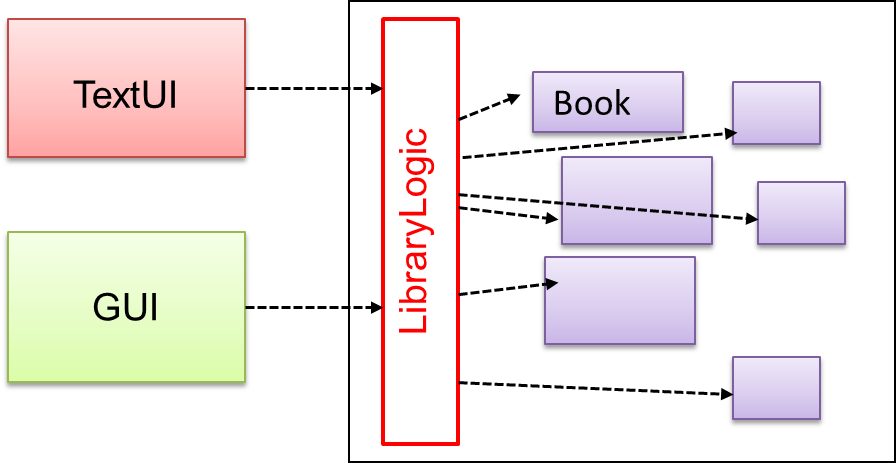
Solution
Include a
The following class diagram applies the Façade pattern to the Library System example. The LibraryLogic class is the Facade class.
Does the design below likely to use the Facade pattern?
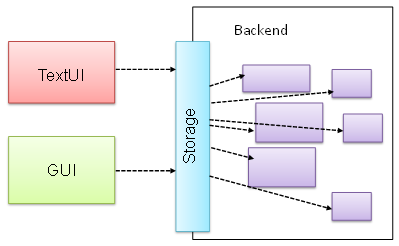
True.
Facade is clearly visible (Storage is the << Facade >> class).
Command pattern
Can explain the Command design pattern
Context
A system is required to execute a number of commands, each doing a different task. For example, a system might have to support Sort, List, Reset commands.
Problem
It is preferable that some part of the code executes these commands without having to know each command type. e.g., there can be a CommandQueue object that is responsible for queuing commands and executing them without knowledge of what each command does.
Solution
The essential element of this pattern is to have a general <<Command>> object that can be passed around, stored, executed, etc without knowing the type of command (i.e. via polymorphism).
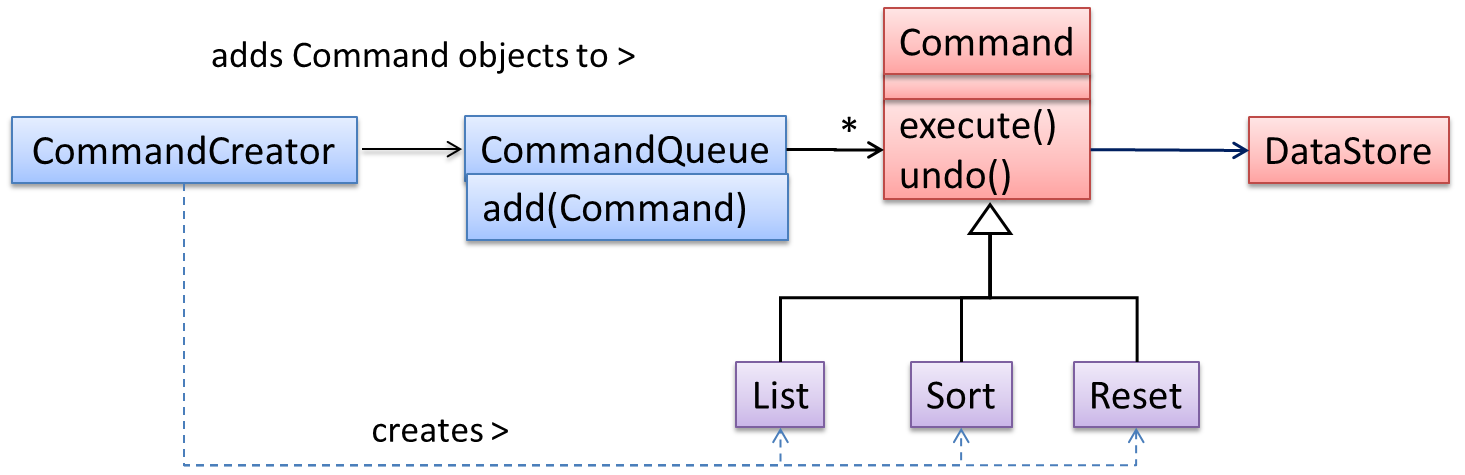
Let us examine an example application of the pattern first:
In the example solution below, the CommandCreator creates List, Sort, and Reset Command objects and adds them to the CommandQueue object. The CommandQueue object treats them all as Command objects and performs the execute/undo operation on each of them without knowledge of the specific Command type. When executed, each Command object will access the DataStore object to carry out its task. The Command class can also be an abstract class or an interface.
The general form of the solution is as follows.
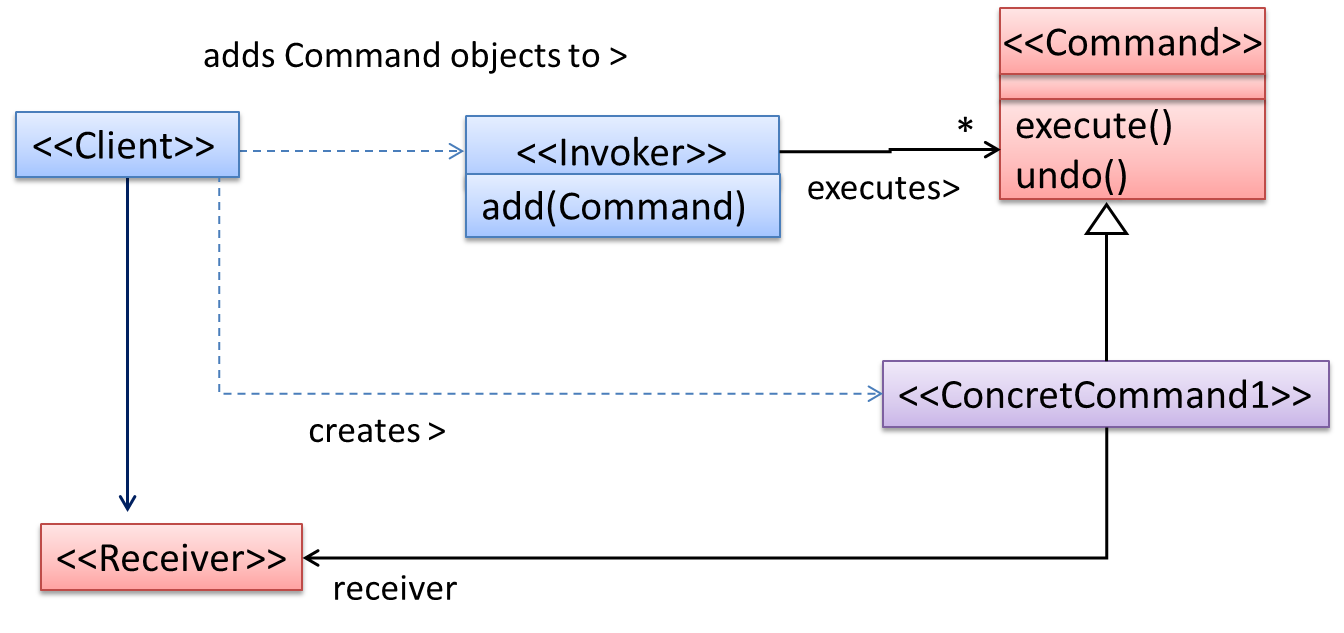
The <<Client>> creates a <<ConcreteCommand>> object, and passes it to the <<Invoker>>. The <<Invoker>> object treats all commands as a general <<Command>> type. <<Invoker>> issues a request by calling execute() on the command. If a command is undoable, <<ConcreteCommand>> will store the state for undoing the command prior to invoking execute(). In addition, the <<ConcreteCommand>> object may have to be linked to any <<Receiver>> of the command (<<Invoker>>. Note that an application of the command pattern does not have to follow the structure given above.
Abstraction Occurrence pattern
Can explain the Abstraction Occurrence design pattern
Context
There is a group of similar entities that appears to be ‘occurrences’ (or ‘copies’) of the same thing, sharing lots of common information, but also differing in significant ways.
In a library, there can be multiple copies of same book title. Each copy shares common information such as book title, author, ISBN etc. However, there are also significant differences like purchase date and barcode number (assumed to be unique for each copy of the book).
Other examples:
- Episodes of the same TV series
- Stock items of the same product model (e.g. TV sets of the same model).
Problem
Representing the objects mentioned previously as a single class would be problematic because it results in duplication of data which can lead to inconsistencies in data (if some of the duplicates are not updated consistently).
Take for example the problem of representing books in a library. Assume that there could be multiple copies of the same title, bearing the same ISBN number, but different serial numbers.
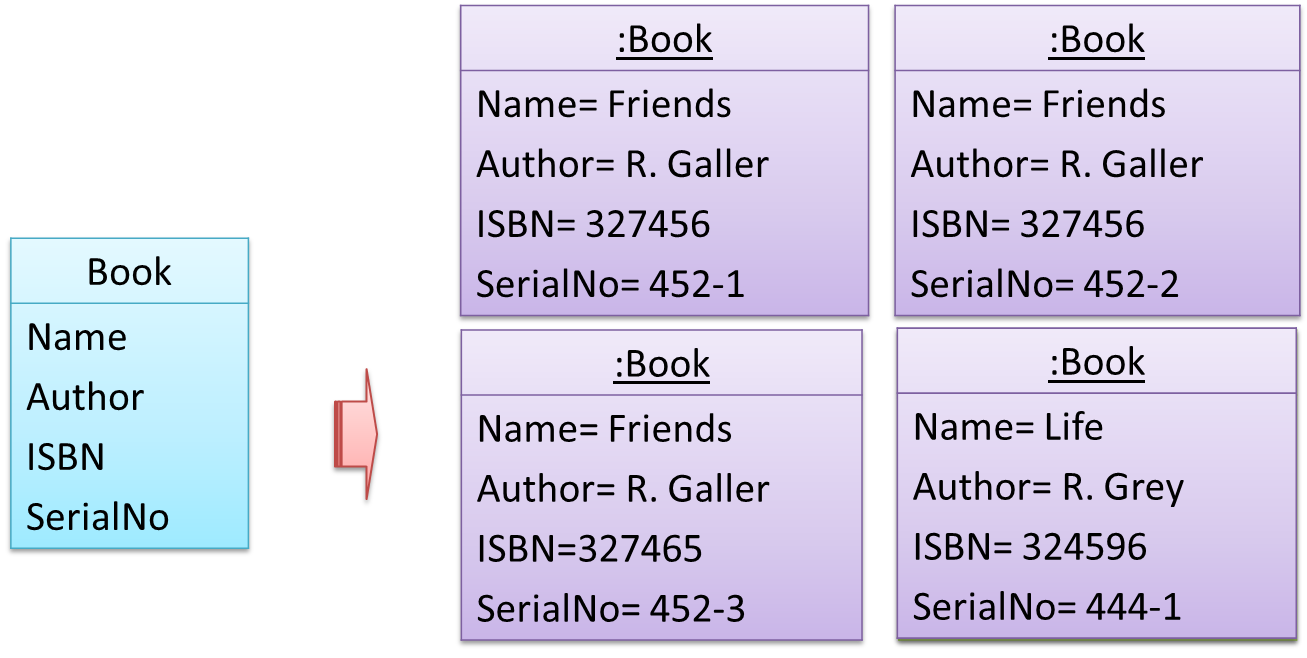
The above solution requires common information to be duplicated by all instances. This will not only waste storage space, but also creates a consistency problem. Suppose that after creating several copies of the same title, the librarian realized that the author name was wrongly spelt. To correct this mistake, the system needs to go through every copy of the same title to make the correction. Also, if a new copy of the title is added later on, the librarian (or the system) has to make sure that all information entered is the same as the existing copies to avoid inconsistency.
Anti-pattern
Refer to the same Library example given above.
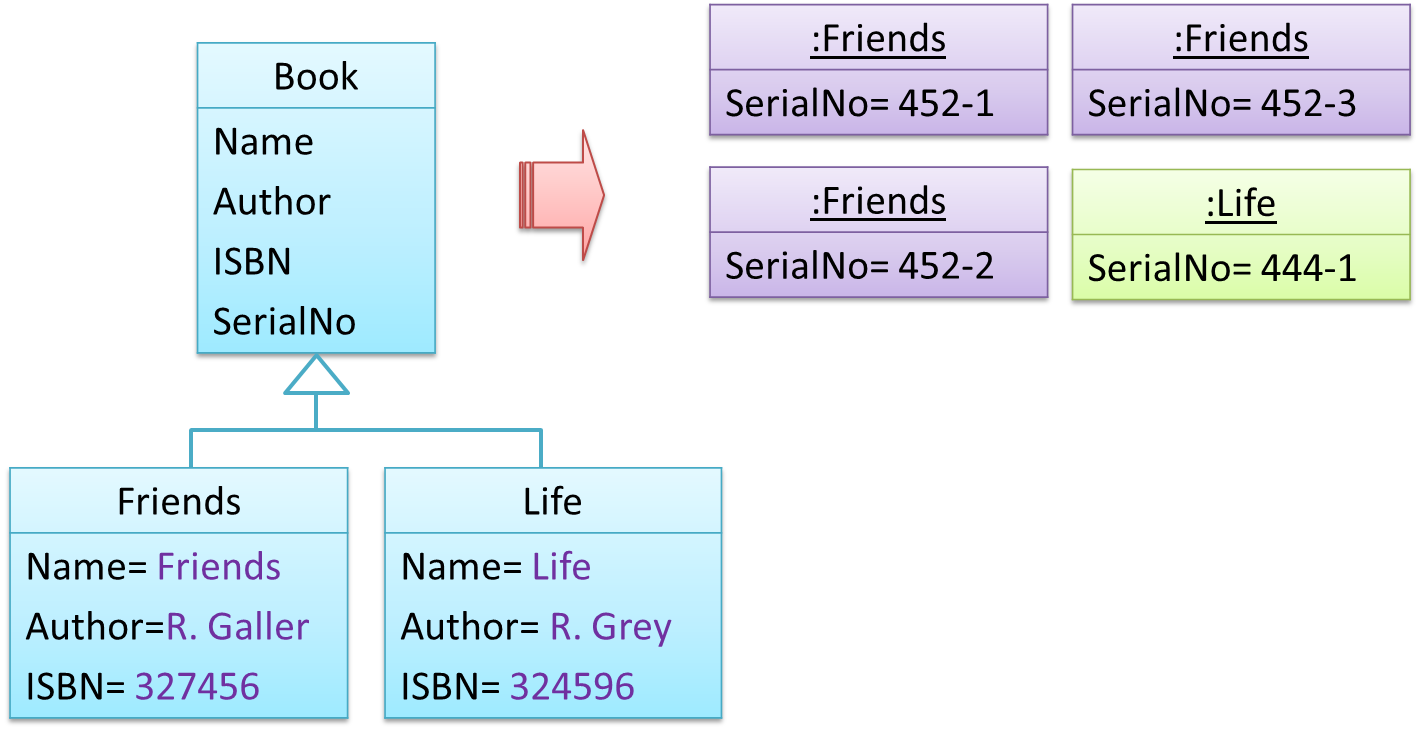
The design above segregates the common and unique information into a class hierarchy. Each book title is represented by a separate class with common data (i.e. Name, Author, ISBN) hard-coded in the class itself. This solution is problematic because each book title is represented as a class, resulting in thousands of classes (one for each title). Every time the library buys new books, the source code of the system will have to be updated with new classes.
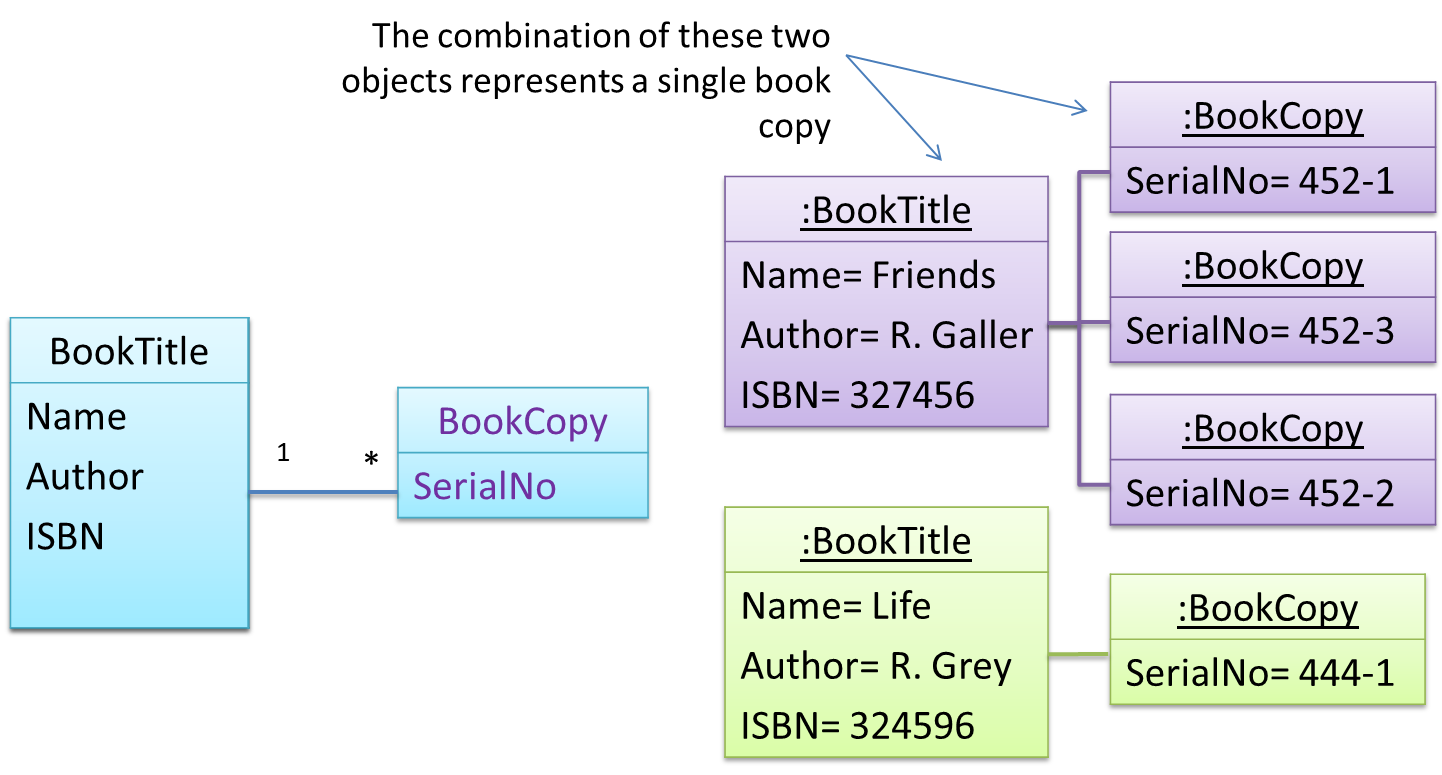
Solution
Let a copy of an entity (e.g. a copy of a book)be represented by two objects instead of one, separating the common and unique information into two classes to avoid duplication.
Given below is how the pattern is applied to the Library example:
Here's a more generic example:

The general solution:
The << Abstraction >> class should hold all common information, and the unique information should be kept by the << Occurrence >> class. Note that ‘Abstraction’ and ‘Occurrence’ are not class names, but roles played by each class. Think of this diagram as a meta-model (i.e. a ‘model of a model’) of the BookTitle-BookCopy class diagram given above.
Which pairs of classes are likely to be the << Abstraction >> and the << Occurrence >> of the abstraction occurrence pattern?
- CarModel, Car. (Here CarModel represents a particular model of a car produced by the car manufacturer. E.g. BMW R4300)
- Car, Wheel
- Club, Member
- TeamLeader, TeamMember
- Magazine (E.g. ReadersDigest, PCWorld), MagazineIssue
One of the key things to keep in mind is that the << Abstraction >> does not represent a real entity. Rather, it represents some information common to a set of objects. A single real entity is represented by an object of << Abstraction >> type and << Occurrence >> type.
Before applying the pattern, some attributes have the same values for multiple objects. For example, w.r.t. the BookTitle-BookCopy example given in this handout, values of attributes such as book_title, ISBN are exactly the same for copies of the same book.
After applying the pattern, the Abstraction and the Occurrence classes together represent one entity. It is like one class has been split into two. For example, a BookTitle object and a BookCopy object combines to represent an actual Book.
- CarModel, Car: Yes
- Car, Wheel: No. Wheel is a ‘part of’ Car. A wheel is not an occurrence of Car.
- Club, Member: No. this is a ‘part of’ relationship.
- TeamLeader, TeamMember: No. A TeamMember is not an occurrence of a TeamLeader or vice versa.
- Magazine, MagazineIssue: Yes.
Which one of these is most suited for an application of the Abstraction Occurrence pattern?
(a)
Explanation:
(a) Stagings of a drama are ‘occurrences’ of the drama. They have many attributes common (e.g., Drama name, producer, cast, etc.) but some attributes are different (e.g., venue, time).
(b) Students are not occurrences of a Teacher or vice versa
(c) Module, Exam, Assignment are distinct entities with associations among them. But none of them can be considered an occurrence of another.
MVC pattern
Can explain the Model View Controller (MVC) design pattern
Context
Most applications support storage/retrieval of information, displaying of information to the user (often via multiple UIs having different formats), and changing stored information based on external inputs.
Problem
The high coupling that can result from the interlinked nature of the features described above.
Solution
Decouple data, presentation, and control logic of an application by separating them into three different components: Model, View and Controller.
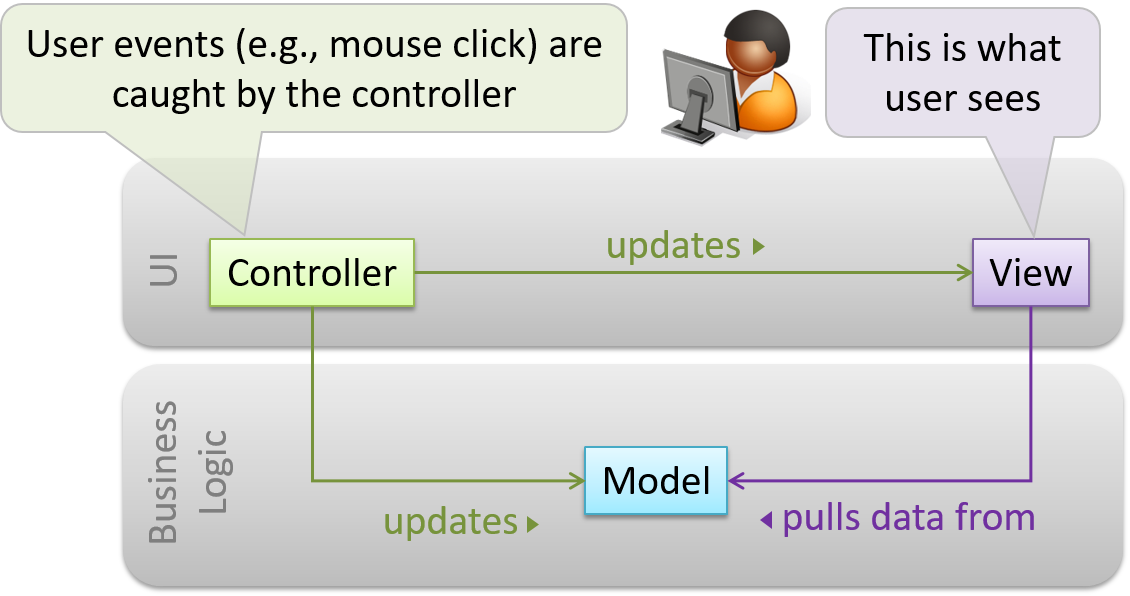
- View: Displays data, interacts with the user, and pulls data from the model if necessary.
- Controller: Detects UI events such as mouse clicks, button pushes and takes follow up action. Updates/changes the model/view when necessary.
- Model: Stores and maintains data. Updates views if necessary.
The relationship between the components can be observed in the diagram below. Typically, the UI is the combination of view and controller.
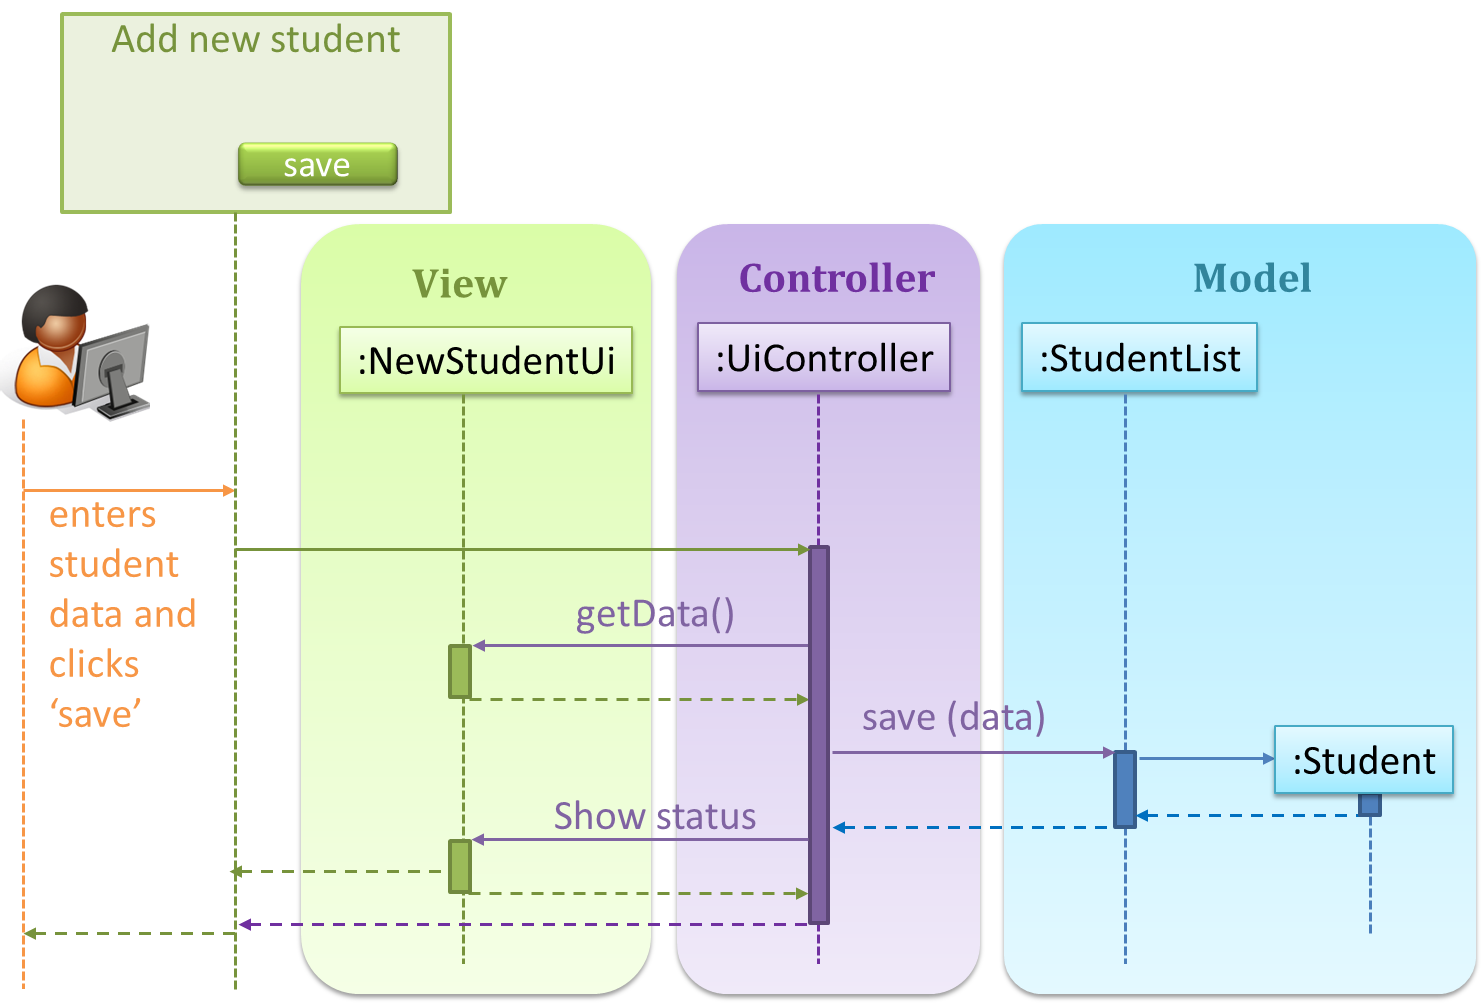
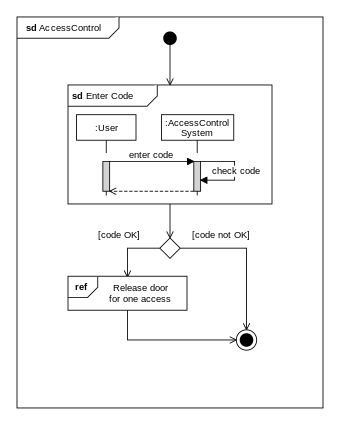
Given below is a concrete example of MVC applied to a student management system. In this scenario, the user is retrieving data of one student.
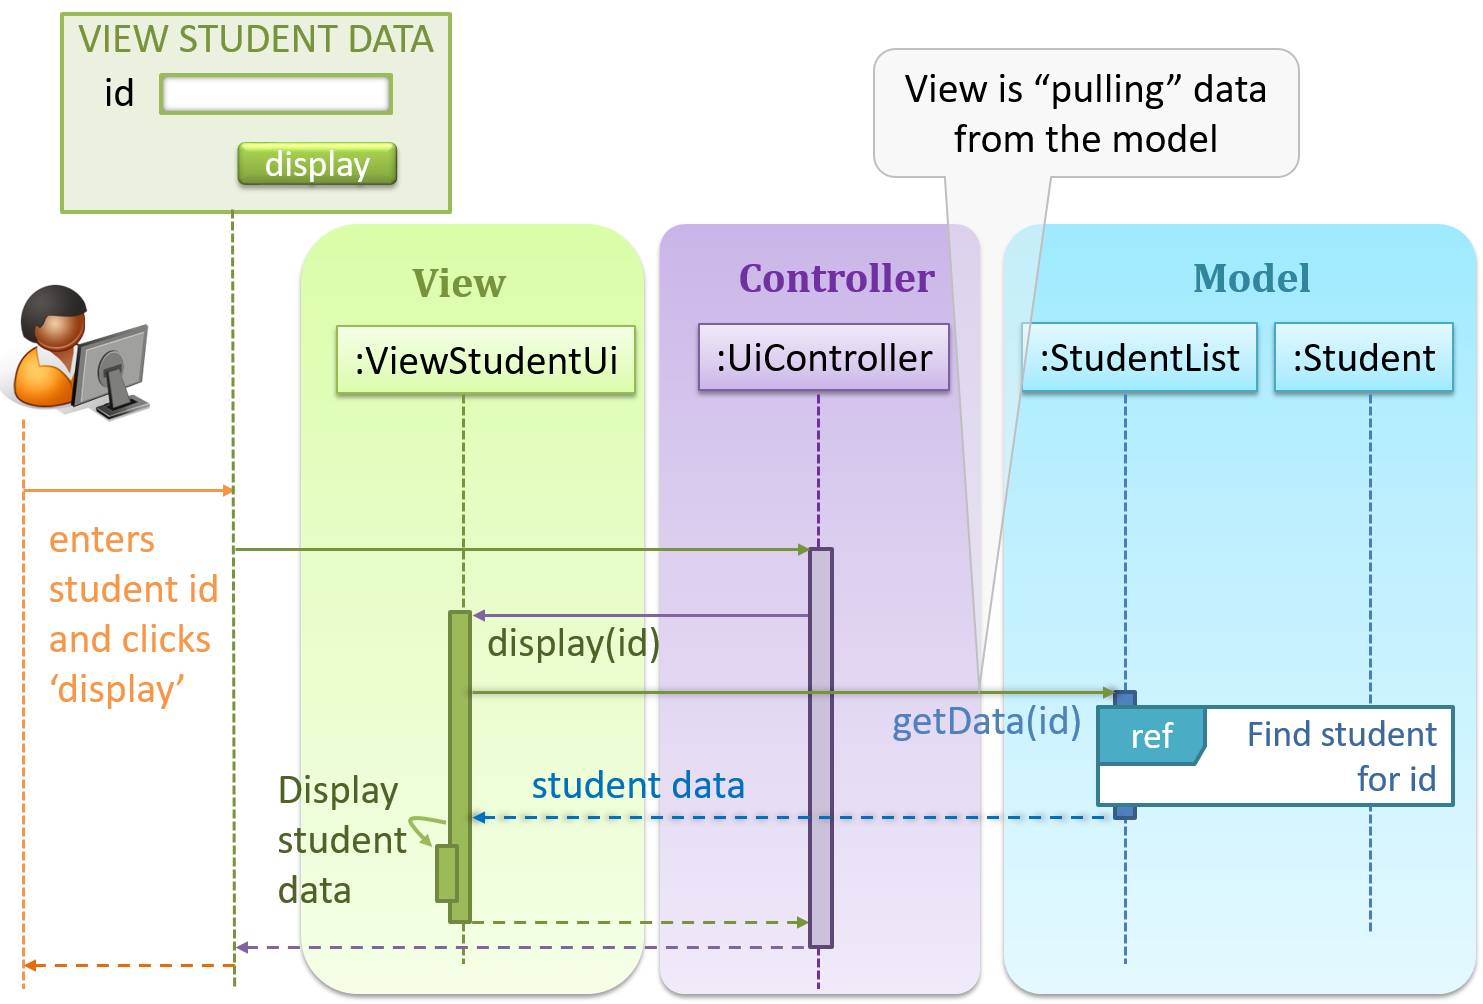
In the diagram above, when the user clicks on a button using the UI, the ‘click’ event is caught and handled by the UiController. The ref frame indicates that the interactions within that frame have been extracted out to another separate sequence diagram.
Note that in a simple UI where there’s only one view, Controller and View can be combined as one class.
There are many variations of the MVC model used in different domains. For example, the one used in a desktop GUI could be different from the one used in a Web application.
Observer pattern
Can explain the Observer design pattern
Context
An object (possibly, more than one) is interested to get notified when a change happens to another object. That is, some objects want to ‘observe’ another object.
Consider this scenario from the a student management system where the user is adding a new student to the system.
Now, assume the system has two additional views used in parallel by different users:
StudentListUi: that accesses a list of students andStudentStatsUi: that generates statistics of current students.
When a student is added to the database using NewStudentUi shown above, both StudentListUi and StudentStatsUi should get updated automatically, as shown below.
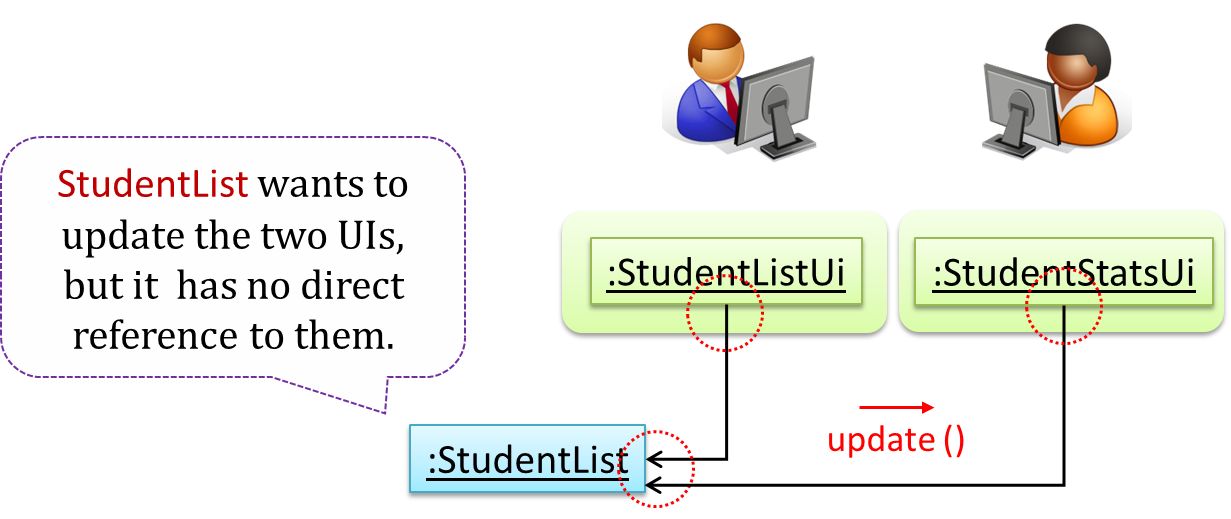
However, the StudentList object has no knowledge about StudentListUi and StudentStatsUi (note the direction of the navigability) and has no way to inform those objects. This is an example of the type of problem addressed by the Observer pattern.
Problem
The ‘observed’ object does not want to be coupled to objects that are ‘observing’ it.
Solution
Force the communication through an interface known to both parties.
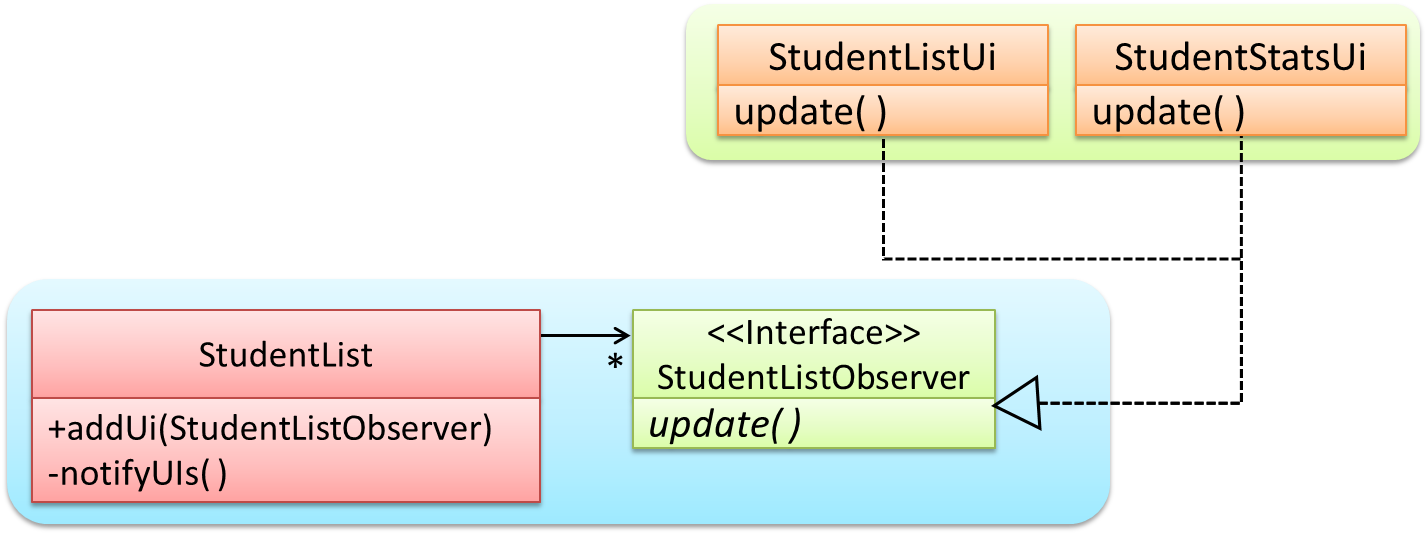
Here is the Observer pattern applied to the student management system.
During the initialization of the system,
-
First, create the relevant objects.
StudentList studentList = new StudentList(); StudentListUi listUi = new StudentListUi(); StudentStatusUi statusUi = new StudentStatsUi(); -
Next, the two UIs indicate to the
StudentListthat they are interested in being updated wheneverStudentListchanges. This is also known as ‘subscribing for updates’.studentList.addUi(listUi); studentList.addUi(statusUi); -
Within the
addUioperation ofStudentList, all Observer objects subscribers are added to an internal data structure calledobserverList.//StudentList class public void addUi(Observer o) { observerList.add(o); }
Now, whenever the data in StudentList changes (e.g. when a new student is added to the StudentList),
-
All interested observers are updated by calling the
notifyUIsoperation.//StudentList class public void notifyUIs() { //for each observer in the list for(Observer o: observerList){ o.update(); } } -
UIs can then pull data from the
StudentListwhenever theupdateoperation is called.//StudentListUI class public void update() { //refresh UI by pulling data from StudentList }Note that
StudentListis unaware of the exact nature of the two UIs but still manages to communicate with them via an intermediary.
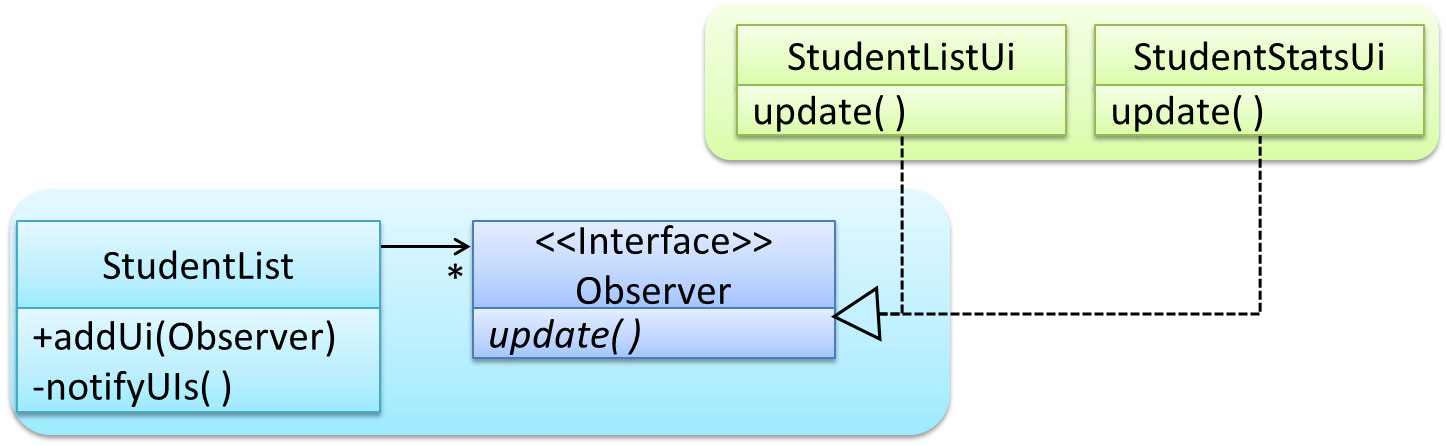
Here is the generic description of the observer pattern:

<<Observer>>is an interface: any class that implements it can observe an<<Observable>>. Any number of<<Observer>>objects can observe (i.e. listen to changes of) the<<Observable>>object.- The
<<Observable>>maintains a list of<<Observer>>objects.addObserver(Observer)operation adds a new<<Observer>>to the list of<<Observer>>s. - Whenever there is a change in the
<<Observable>>, thenotifyObservers()operation is called that will call theupdate()operation of all<<Observer>>sin the list.
In a GUI application, how is the Controller notified when the “save” button is clicked? UI frameworks such as JavaFX has inbuilt support for the Observer pattern.
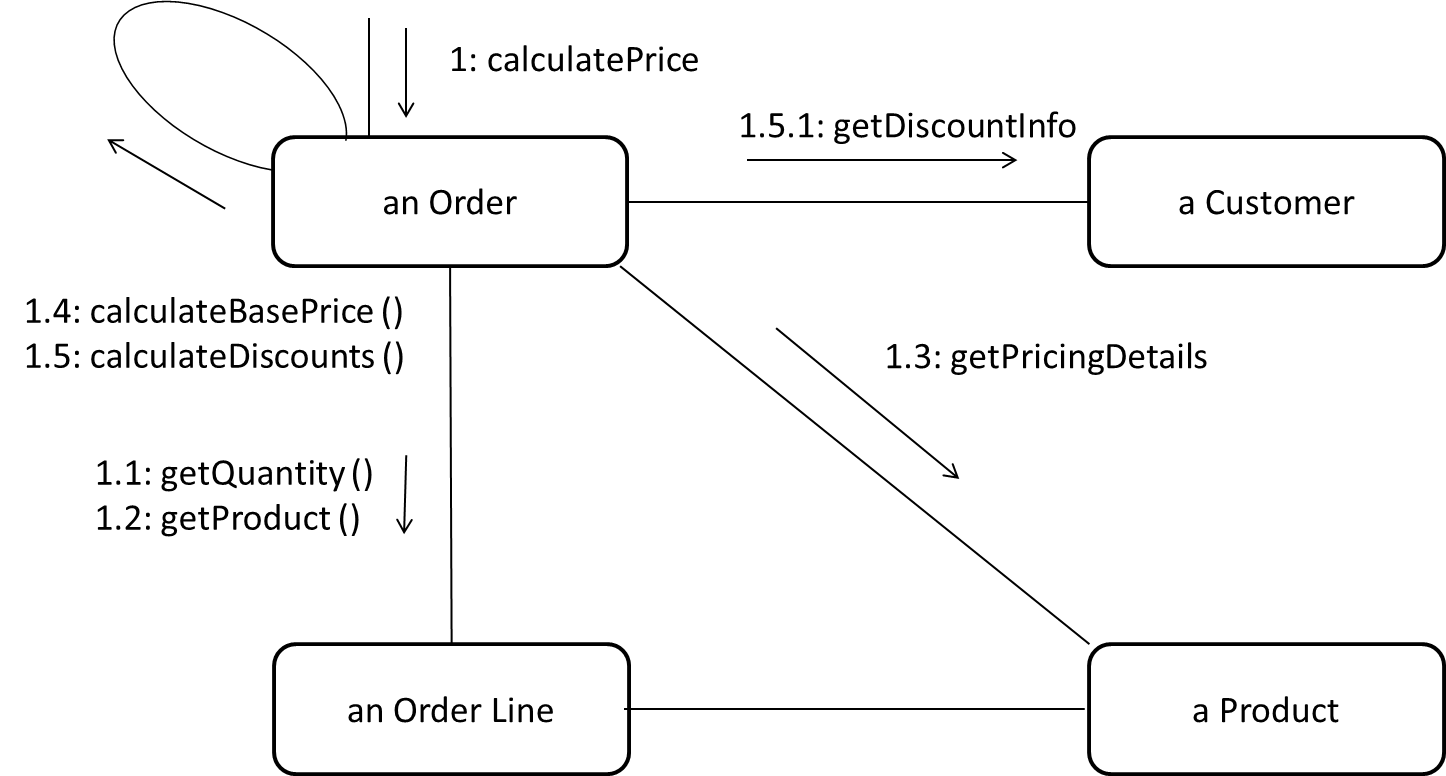
Explain how polymorphism is used in the Observer pattern.

With respect to the general form of the Observer pattern given above, when the Observable object invokes the notifyObservers() method, it is treating all ConcreteObserver objects as a general type called Observer and calling the update() method of each of them. However, the update() method of each ConcreteObserver could potentially show different behavior based on its actual type. That is, update() method shows polymorphic behavior.
In the example given below, the notifyUIs operation can result in StudentListUi and StudentStatsUi changing their views in two different ways.
The Observer pattern can be used when we want one object to initiate an activity in another object without having a direct dependency from the first object to the second object.
True
Explanation: Yes. For example, when applying the Observer pattern to an MVC structure, Views can get notified and update themselves about a change to the Model without the Model having to depend on the Views.
Other design pattern
Can recognize some of the GoF design patterns
The most famous source of design patterns is the "Gang of Four" (GoF) book which contains 23 design patterns divided into three categories:
- Creational: About object creation. They separate the operation of an application from how its objects are created.
- Abstract Factory, Builder, Factory Method, Prototype, Singleton
- Structural: About the composition of objects into larger structures while catering for future extension in structure.
- Adapter, Bridge, Composite, Decorator, Façade, Flyweight, Proxy
- Behavioral: Defining how objects interact and how responsibility is distributed among them.
- Chain of Responsibility, Command, Interpreter, Template Method, Iterator, Mediator, Memento, Observer, State, Strategy, Visitor
Can combine multiple patterns to fit a context
Design patterns are usually embedded in a larger design and sometimes applied in combination with other design patterns.
Let us look at a case study that shows how design patterns are used in the design of a class structure for a Stock Inventory System (SIS) for a shop. The shop sells appliances, and accessories for the appliances. SIS simply stores information about each item in the store.
Use Cases:
- Create a new item
- View information about an item
- Modify information about an item
- View all available accessories for a given appliance
- List all items in the store
SIS can be accessed using multiple terminals. Shop assistants use their own terminals to access SIS, while the shop manager’s terminal continuously displays a list of all items in store. In the future, it is expected that suppliers of items use their own applications to connect to SIS to get real-time information about current stock status. User authentication is not required for the current version, but may be required in the future.
A step by step explanation of the design is given below. Note that this is one out of many possible designs. Design patterns are also applied where appropriate.
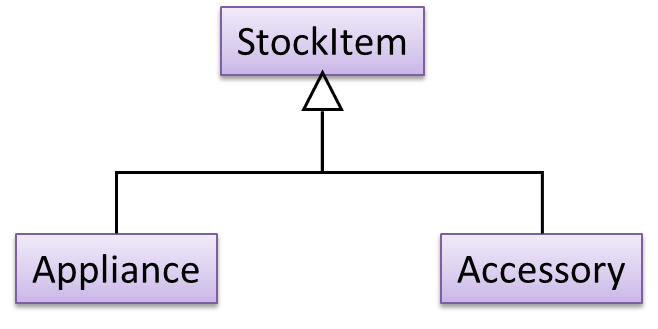
A StockItem can be an Appliance or an Accessory.
To track that each Accessory is associated with the correct Appliance, consider the following alternative class structures.
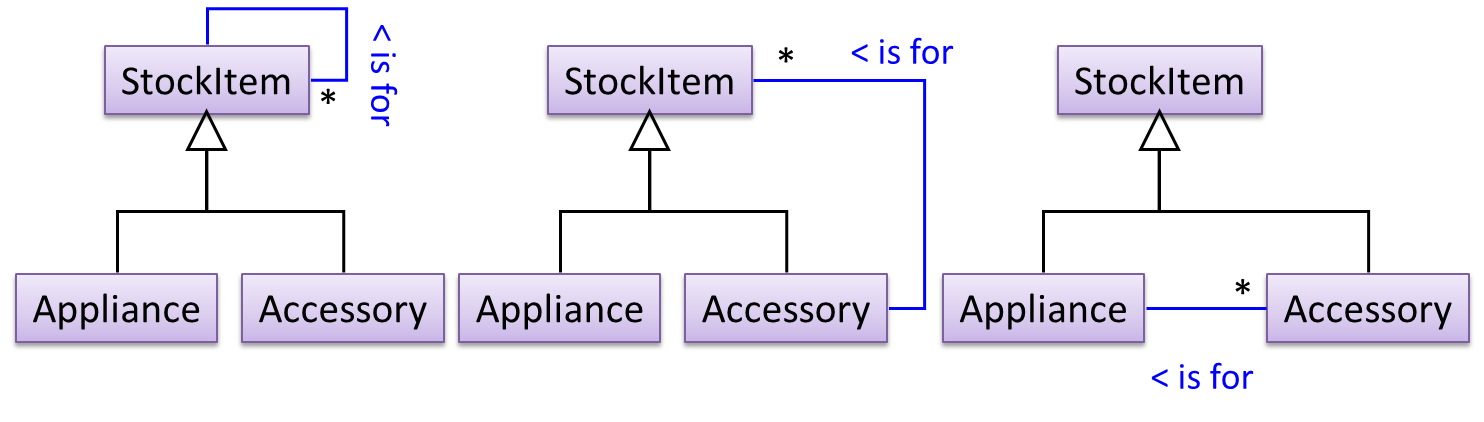
The third one seems more appropriate (the second one is suitable if accessories can have accessories). Next, consider between keeping a list of Appliances, and a list of StockItems. Which is more appropriate?
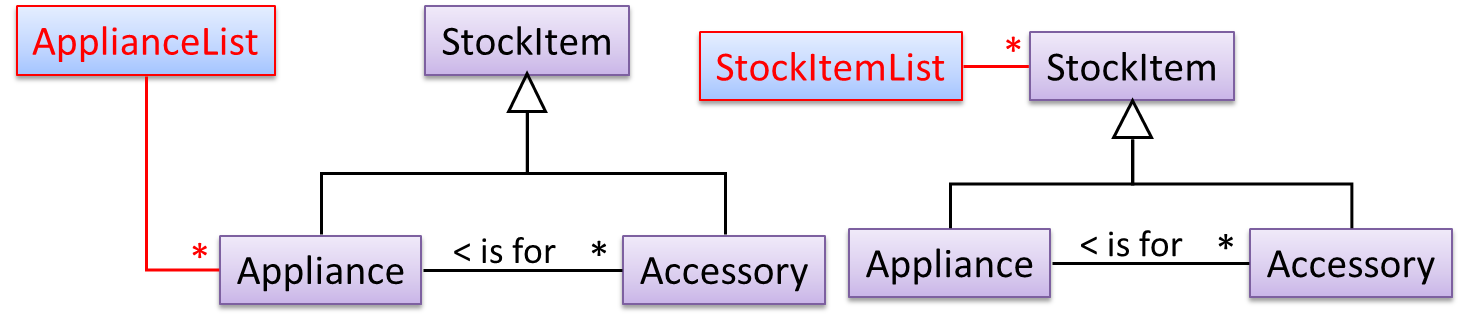
The latter seems more suitable because it can handle both appliances and accessories the same way. Next, an abstraction occurrence pattern is applied to keep track of StockItems.
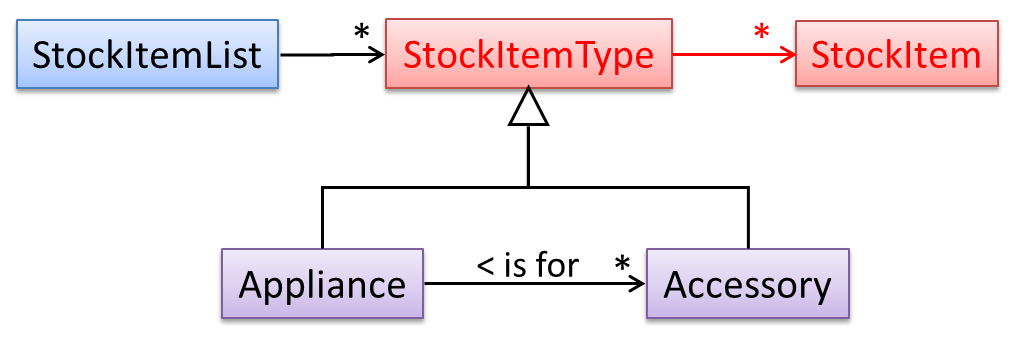
Note the inclusion of navigabilities. Here’s a sample object diagram based on the class model created thus far.
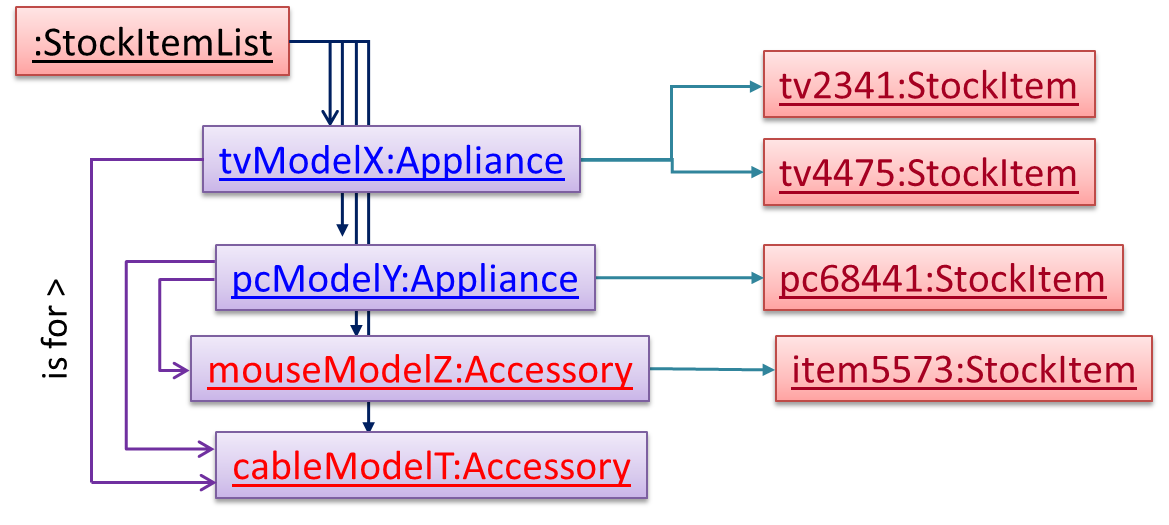
Next, apply the façade pattern to shield the SIS internals from the UI.
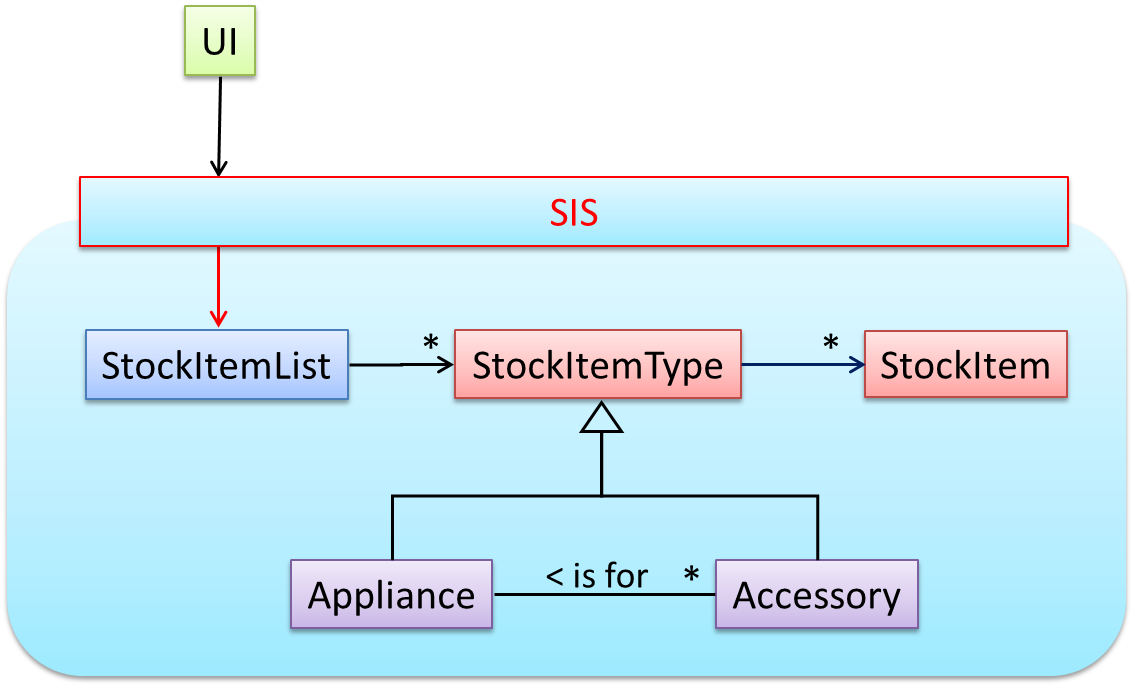
As UI consists of multiple views, the MVC pattern is applied here.
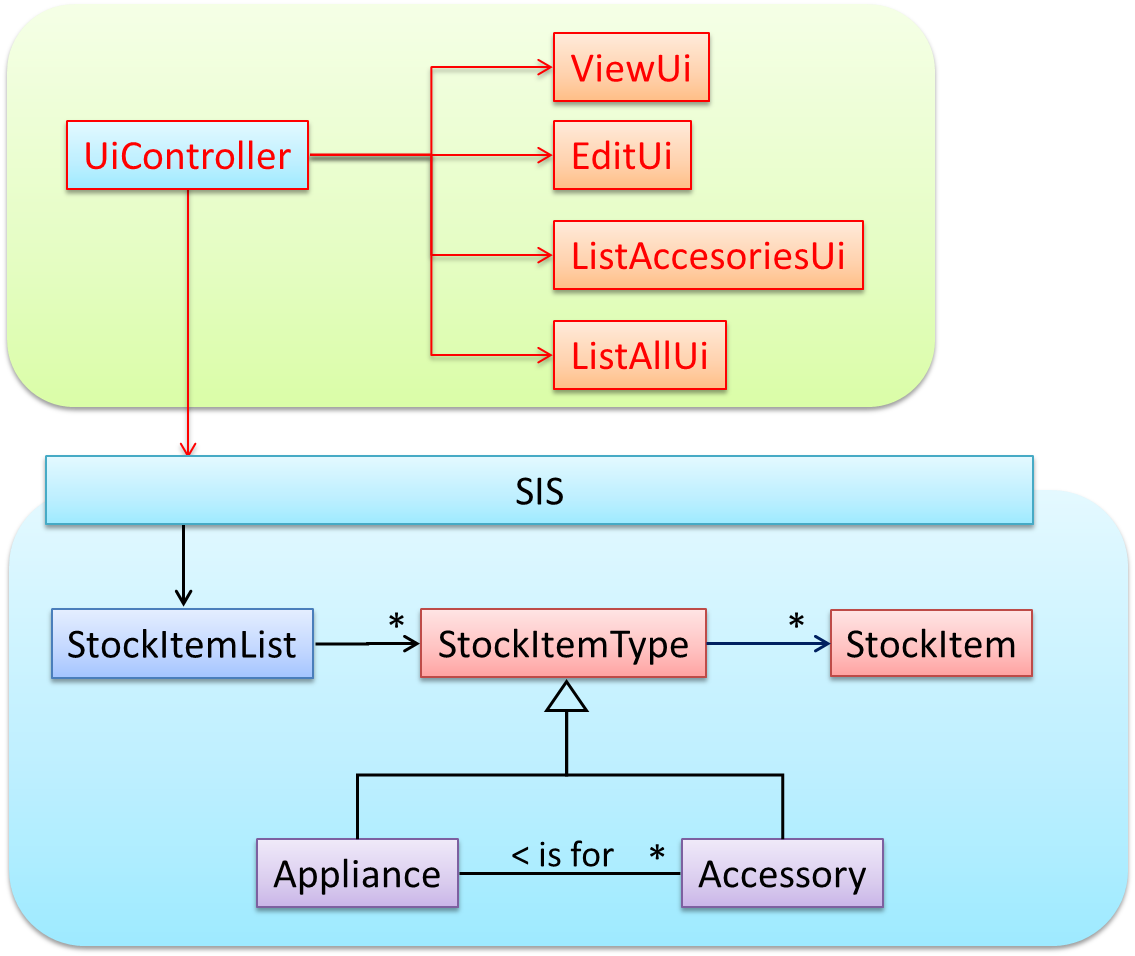
Some views need to be updated when the data change; apply the Observer pattern here.
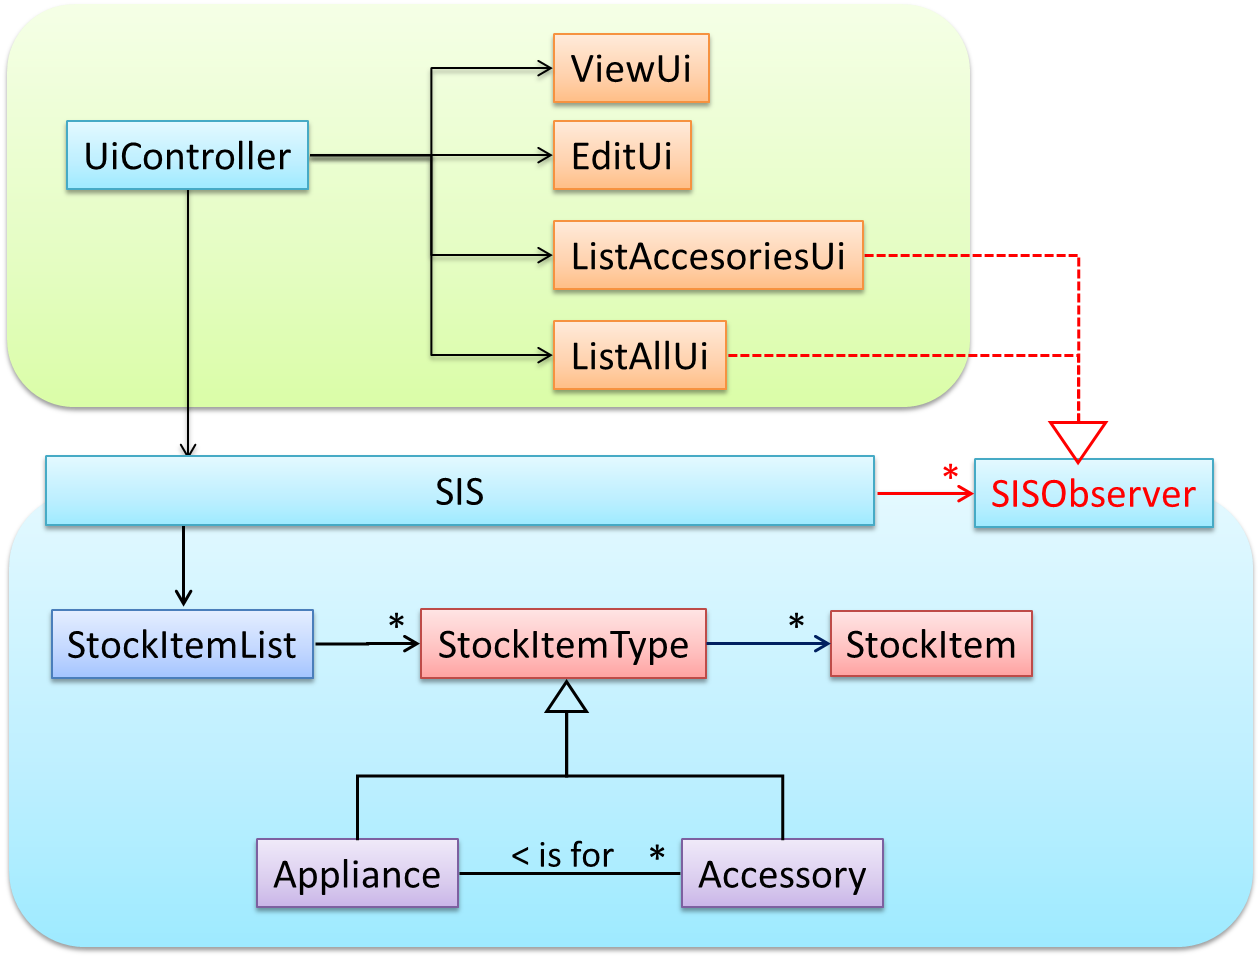
In addition, the Singleton pattern can be applied to the façade class.
Can explain pros and cons of design patterns
Design pattern provides a high-level vocabulary to talk about design.
Someone can say 'apply Observer pattern here' instead of having to describe the mechanics of the solution in detail.
Knowing more patterns is a way to become more ‘experienced’. Aim to learn at least the context and the problem of patterns so that when you encounter those problems you know where to look for a solution.
Some patterns are domain-specific e.g. patterns for distributed applications, some are created in-house e.g. patterns in the company/project and some can be self-created e.g. from past experience.
Be careful not to overuse patterns. Do not throw patterns at a problem at every opportunity. Patterns come with overhead such as adding more classes or increasing the levels of abstraction. Use them only when they are needed. Before applying a pattern, make sure that:
- there is substantial improvement in the design, not just superficial.
- the associated tradeoffs are carefully considered. There are times when a design pattern is not appropriate (or an overkill).
Can differentiate between design patterns and principles
Design principles have varying degrees of formality – rules, opinions, rules of thumb, observations, and axioms. Compared to design patterns, principles are more general, have wider applicability, with correspondingly greater overlap among them.
Can explain how patterns exist beyond software design domain
The notion of capturing design ideas as "patterns" is usually attributed to Christopher Alexander. He is a building architect noted for his theories about design. His book Timeless way of building talks about "design patterns" for constructing buildings.
Here is a sample pattern from that book:
When a room has a window with a view, the window becomes a focal point: people are attracted to the window and want to look through it. The furniture in the room creates a second focal point: everyone is attracted toward whatever point the furniture aims them at (usually the center of the room or a TV). This makes people feel uncomfortable. They want to look out the window, and toward the other focus at the same time. If you rearrange the furniture, so that its focal point becomes the window, then everyone will suddenly notice that the room is much more “comfortable”
Apparently, patterns and anti-patterns are found in the field of building architecture. This is because they are general concepts applicable to any domain, not just software design. In software engineering, there are many general types of patterns: Analysis patterns, Design patterns, Testing patterns, Architectural patterns, Project management patterns, and so on.
In fact, the abstraction occurrence pattern is more of an analysis pattern than a design pattern, while MVC is more of an architectural pattern.
New patterns can be created too. If a common problem needs to be solved frequently that leads to a non-obvious and better solution, it can be formulated as a pattern so that it can be reused by others. However, don’t reinvent the wheel; the pattern might already exist.
Here are some common elements of a design pattern: Name, Context, Problem, Solution, Anti-patterns (optional), Consequences (optional), other useful information (optional).
Using similar elements, describe a pattern that is not a design pattern. It must be a pattern you have noticed, not a pattern already documented by others. You may also give a pattern not related to software.
Some examples:
- A pattern for testing textual UIs.
- A pattern for striking a good bargain at a mall such as Sim-Lim Square.
[W10.3] OO Domain Models
Can explain object oriented domain models
The analysis process for identifying objects and object classes is recognized as one of the most difficult areas of object-oriented development. --Ian Sommerville, in the book Software Engineering
Class diagrams can also be used to model objects in the
OO domain model of a snakes and ladders game is given below.
Description: Snakes and ladders game is played by two or more players using a board and a die. The board has 100 squares marked 1 to 100. Each player owns one piece. Players take turns to throw the die and advance their piece by the number of squares they earned from the die throw. The board has a number of snakes. If a player’s piece lands on a square with a snake head, the piece is automatically moved to the square containing the snake’s tail. Similarly, a piece can automatically move from a ladder foot to the ladder top. The player whose piece is the first to reach the 100th square wins.
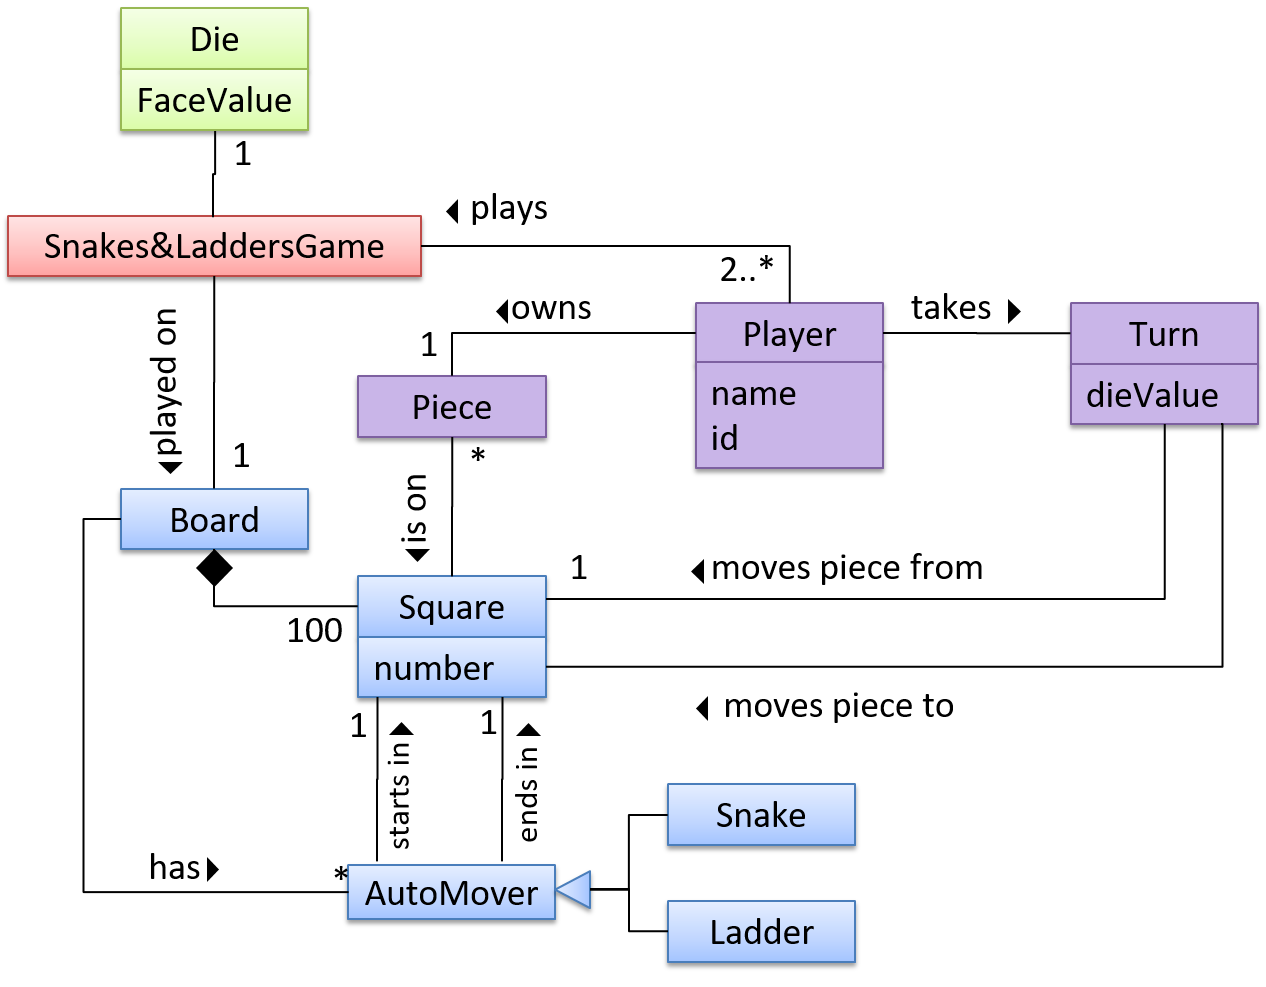
The above OO domain model omits the ladder class for simplicity. It can be included in a similar fashion to the Snake class.
OODMs do not contain solution-specific classes (i.e. classes that are used in the solution domain but do not exist in the problem domain). For example, a class called DatabaseConnection could appear in a class diagram but not usually in an OO domain model because DatabaseConnection is something related to a software solution but not an entity in the problem domain.
OODMs represents the class structure of the problem domain and not their behavior, just like class diagrams. To show behavior, use other diagrams such as sequence diagrams.
OODM notation is similar to class diagram notation but typically omit methods and navigability.
This diagram is,
- a. A class diagram.
- b. An object diagram.
- c. An OO domain model, also known as a conceptual class diagram.
- d. Can be either a class diagram or an OO domain model.
(a)
Explanation: The diagram shows navigability which is not shown in an OO domain model. Hence, it has to be a class diagram.
What is the main difference between a class diagram and and an OO domain model?
(a)
Explanation: Both are UML diagrams, and use the class diagram notation. While it is true that often a class diagram may have more classes and more details, the main difference is that the OO domain model describes the problem domain while the class diagram describes the solution.
[W10.4] Activity Diagrams
Can use basic-level activity diagrams
Software projects often involve workflows. Workflows define the
Some examples in which a certain workflow is relevant to software project:
A software that automates the work of an insurance company needs to take into account the workflow of processing an insurance claim.
The algorithm of a price of code represents the workflow (i.e. the execution flow) of the code.
Which of these sequence of actions is not allowed by the given activity diagram?
- i. start a b c d end
- ii. start a b c d e f g c d end
- iii. start a b c d e g f c d end
- iv. start a b c d g c d end
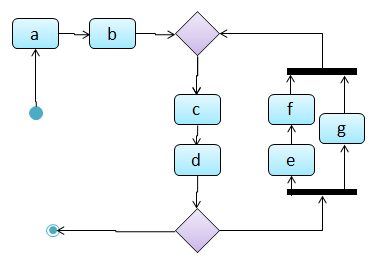
(iv)
Explanation: -e-f- and -g- are parallel paths. Both paths should complete before the execution reaches c again.
Draw an activity diagram to represent the following workflow a burger shop uses when processing an order by a customer.
- First, a cashier takes the order.
- Then, three workers start preparing the order at the same time; one prepares the drinks, one prepares the burgers, and one prepares the desserts.
- In the meantime, the customer pays for the order. If the customer has a voucher, she pays using the voucher; otherwise she pays using cash.
- After paying, the customer collects the food after all three parts of the order are ready.

Can use intermediate-level activity diagrams
[W10.5] Other UML Models
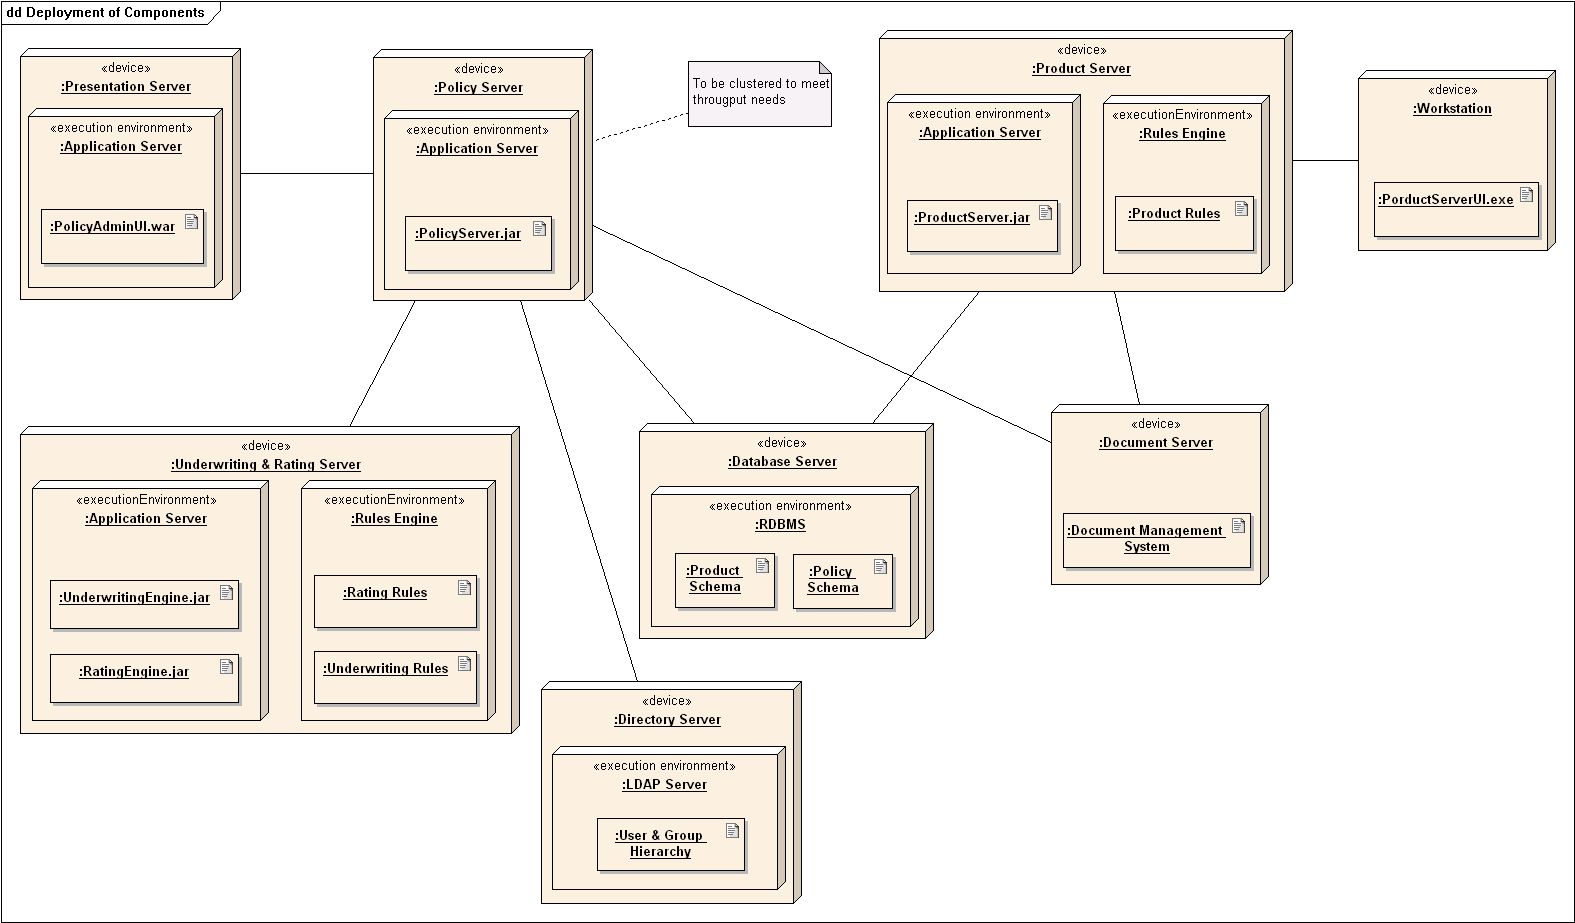
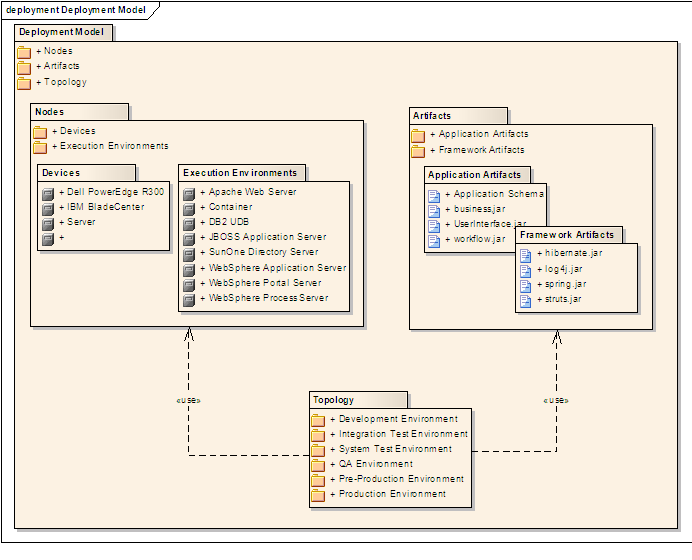
Can explain deployment diagrams
A deployment diagram shows a system's physical layout, revealing which pieces of software run on which pieces of hardware.
An example deployment diagram:
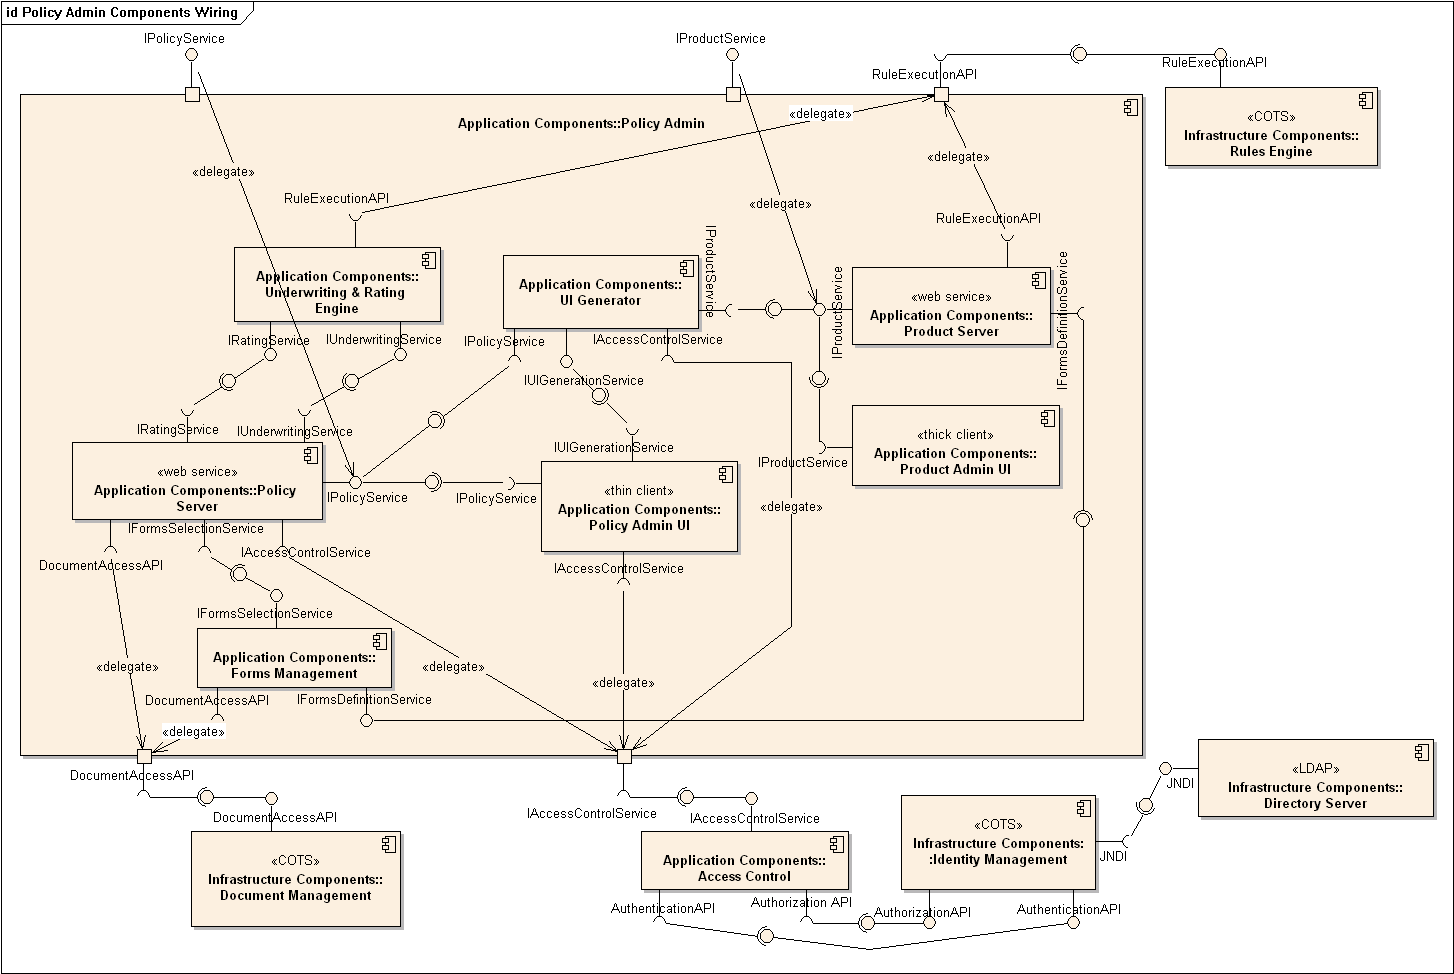
Can explain component diagrams
A component diagram is used to show how a system is divided into components and how they are connected to each other through interfaces.
An example component diagram:
Can explain package diagrams
A package diagram shows packages and their dependencies. A package is a grouping construct for grouping UML elements (classes, use cases, etc.).
Here is an example package diagram:
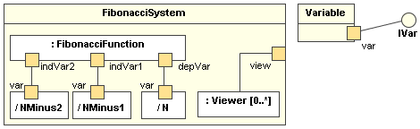
Can explain composite structure diagrams
A composite structure diagram hierarchically decomposes a class into its internal structure.
Here is an example composite structure diagram:
Can explain timing diagrams
A timing diagram focus on timing constraints.
Here is an example timing diagram:
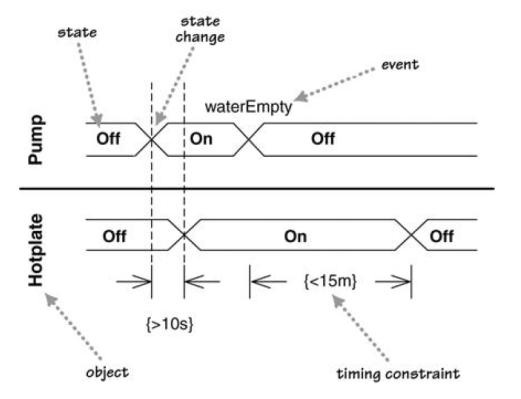
Adapted from: UML Distilled by Martin Fowler
Can explain interaction overview diagrams
An Interaction overview diagrams is a combination of activity diagrams and sequence diagrams.
An example:
Can explain communication diagrams
A Communication diagrams are like sequence diagrams but emphasize the data links between the various participants in the interaction rather than the sequence of interactions.
An example:
Adapted from: UML Distilled by Martin Fowler
Can explain state machine diagrams
A State Machine Diagram models state-dependent behavior.
Consider how a CD player responds when the “eject CD” button is pushed:
- If the CD tray is already open, it does nothing.
- If the CD tray is already in the process of opening (opened half-way), it continues to open the CD tray.
- If the CD tray is closed and the CD is being played, it stops playing and opens the CD tray.
- If the CD tray is closed and CD is not being played, it simply opens the CD tray.
- If the CD tray is already in the process of closing (closed half-way), it waits until the CD tray is fully closed and opens it immediately afterwards.
What this means is that the CD player’s response to pushing the “eject CD” button depends on what it was doing at the time of the event. More generally, the CD player’s response to the event received depends on its internal state. Such a behavior is called a state-dependent behavior.
Often, state-dependent behavior displayed by an object in a system is simple enough that it needs no extra attention; such a behavior can be as simple as a conditional behavior like if x>y, then x=x-y.
Occasionally, objects may exhibit state-dependent behavior that is complex enough such that it needs to be captured into a separate model. Such state-dependent behavior can be modelled using UML state machine diagrams (SMD for short, sometimes also called ‘state charts’, ‘state diagrams’ or ‘state machines’).
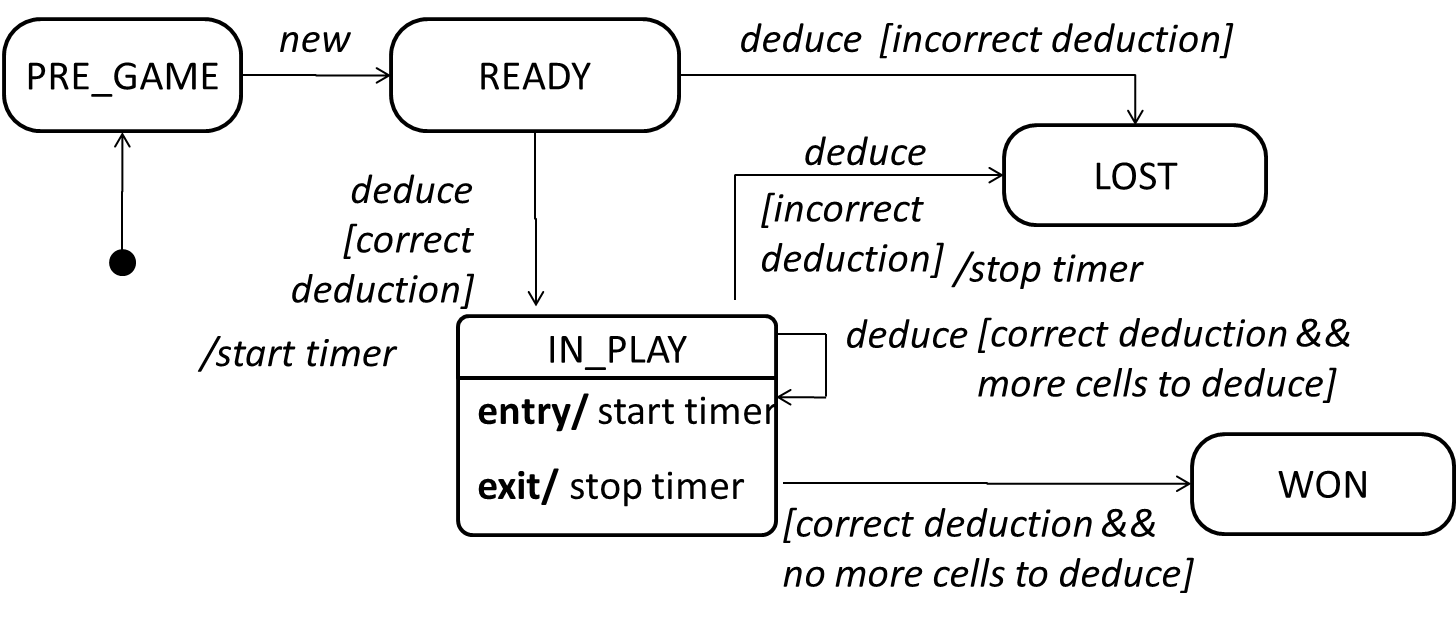
An SMD views the life-cycle of an object as consisting of a finite number of states where each state displays a unique behavior pattern. An SMD captures information such as the states an object can be in, during its lifetime, and how the object responds to various events while in each state and how the object transits from one state to another. In contrast to sequence diagrams that capture object behavior one scenario at a time, SMDs capture the object’s behavior over its full life cycle.
An SMD for the Minesweeper game.
Project Milestone: mid-v1.3
Continue to enhance features. Make code RepoSense-compatible. Try doing a proper release. Update DG in the repo.
Project Management:
- Continue to do deliberate project management using GitHub issue tracker, milestones, labels, etc. as you did in v1.2.
- 💡 We recommend that each PR also updates the relevant parts of documents and tests. That way, your documentation/testing work will not pile up towards the end.
- 💡 There is a way to get GitHub to auto-close the relevant issue when a PR is merged (example).
Ensure your code is
In previous semesters we asked students to annotate all their code using special @@author tags so that we can extract each student's code for grading. This semester, we are trying out a tool called RepoSense that is expected to reduce the need for such tagging, and also make it easier for you to see (and learn from) code written by others.
1. View the current status of code authorship data:
- The report generated by the tool is available at Project Code Dashboard. The feature that is most relevant to you is the Code Panel (shown on the right side of the screenshot above). It shows the code attributed to a given author. You are welcome to play around with the other features (they are still under development and will not be used for grading this semester).
- Click on your name to load the code attributed to you (based on Git blame/log data) onto the code panel on the right.
- If the code shown roughly matches the code you wrote, all is fine and there is nothing for you to do.
2. If the code does not match:
-
Here are the possible reasons for the code shown not to match the code you wrote:
- the git username in some of your commits does not match your GitHub username (perhaps you missed our instructions to set your Git username to match GitHub username earlier in the project, or GitHub did not honor your Git username for some reason)
- the actual authorship does not match the authorship determined by git blame/log e.g., another student touched your code after you wrote it, and Git log attributed the code to that student instead
-
In those cases,
- Install RepoSense (see the Getting Started section of the RepoSense User Guide)
- Use the two methods described in the RepoSense User Guide section Configuring a Repo to Provide Additional Data to RepoSense to provide additional data to the authorship analysis to make it more accurate.
- If you add a
config.jsonfile to your repo (as specified by one of the two methods),- Please use the template json file given in the module website so that your display name matches the name we expect it to be.
- If your commits have multiple author names, specify all of them e.g.,
"authorNames": ["theMyth", "theLegend", "theGary"] - Update the line
config.jsonin the.gitignorefile of your repo as/config.jsonso that it ignores theconfig.jsonproduced by the app but not the_reposense/config.json.
- If you add
@@authorannotations, please follow the guidelines below:
Adding @@author tags indicate authorship
-
Mark your code with a
//@@author {yourGithubUsername}. Note the double@.
The//@@authortag should indicates the beginning of the code you wrote. The code up to the next//@@authortag or the end of the file (whichever comes first) will be considered as was written by that author. Here is a sample code file://@@author johndoe method 1 ... method 2 ... //@@author sarahkhoo method 3 ... //@@author johndoe method 4 ... -
If you don't know who wrote the code segment below yours, you may put an empty
//@@author(i.e. no GitHub username) to indicate the end of the code segment you wrote. The author of code below yours can add the GitHub username to the empty tag later. Here is a sample code with an emptyauthortag:method 0 ... //@@author johndoe method 1 ... method 2 ... //@@author method 3 ... method 4 ... -
The author tag syntax varies based on file type e.g. for java, css, fxml. Use the corresponding comment syntax for non-Java files.
Here is an example code from an xml/fxml file.<!-- @@author sereneWong --> <textbox> <label>...</label> <input>...</input> </textbox> ... -
Do not put the
//@@authorinside java header comments.
👎/** * Returns true if ... * @@author johndoe */👍
//@@author johndoe
/**
  * Returns true if ...
  */
What to and what not to annotate
-
Annotate both functional and test code There is no need to annotate documentation files.
-
Annotate only significant size code blocks that can be reviewed on its own e.g., a class, a sequence of methods, a method.
Claiming credit for code blocks smaller than a method is discouraged but allowed. If you do, do it sparingly and only claim meaningful blocks of code such as a block of statements, a loop, or an if-else statement.- If an enhancement required you to do tiny changes in many places, there is no need to annotate all those tiny changes; you can describe those changes in the Project Portfolio page instead.
- If a code block was touched by more than one person, either let the person who wrote most of it (e.g. more than 80%) take credit for the entire block, or leave it as 'unclaimed' (i.e., no author tags).
- Related to the above point, if you claim a code block as your own, more than 80% of the code in that block should have been written by yourself. For example, no more than 20% of it can be code you reused from somewhere.
- 💡 GitHub has a blame feature and a history feature that can help you determine who wrote a piece of code.
-
Do not try to boost the quantity of your contribution using unethical means such as duplicating the same code in multiple places. In particular, do not copy-paste test cases to create redundant tests. Even repetitive code blocks within test methods should be extracted out as utility methods to reduce code duplication. Individual members are responsible for making sure code attributed to them are correct. If you notice a team member claiming credit for code that he/she did not write or use other questionable tactics, you can email us (after the final submission) to let us know.
-
If you wrote a significant amount of code that was not used in the final product,
- Create a folder called
{project root}/unused - Move unused files (or copies of files containing unused code) to that folder
- use
//@@author {yourGithubUsername}-unusedto mark unused code in those files (note the suffixunused) e.g.
//@@author johndoe-unused
method 1 ...
method 2 ...
Please put a comment in the code to explain why it was not used.
- Create a folder called
-
If you reused code from elsewhere, mark such code as
//@@author {yourGithubUsername}-reused(note the suffixreused) e.g.//@@author johndoe-reused method 1 ... method 2 ... -
You can use empty
@@authortags to mark code as not yours when RepoSense attribute the to you incorrectly.-
Code generated by the IDE/framework, should not be annotated as your own.
-
Code you modified in minor ways e.g. adding a parameter. These should not be claimed as yours but you can mention these additional contributions in the Project Portfolio page if you want to claim credit for them.
-
- After you are satisfied with the new results (i.e., results produced by running RepoSense locally), push the
config.jsonfile you added and/or the annotated code to your repo. We'll use that information the next time we run RepoSense (we run it at least once a week). - If you choose to annotate code, please annotate code chunks not smaller than a method. We do not grade code snippets smaller than a method.
- If you encounter any problem when doing the above or if you have questions, please post in the forum.
We recommend you ensure your code is RepoSense-compatible by v1.3
Product:
-
Do a
proper product release as described in the Developer Guide. You can name it something likev1.2.1. Ensure that the jar file works as expected by doing some manual testing. Reason: You are required to do a proper product release for v1.3. Doing a trial at this point will help you iron out any problems in advance. It may take additional effort to get the jar working especially if you use third party libraries or additional assets such as images.
Documentation:
-
User Guide: Update where the document does not match the current product.
-
Developer Guide: Have a draft of the requirements of your project, as described in
v1.2 progress guide .
Move code towards v2.0 in small steps, start documenting design/implementation details in DG.
v1.2 Summary of Milestone
| Milestone | Minimum acceptable performance to consider as 'reached' |
|---|---|
| Contributed code to the product as described in mid-v1.2 progress guide | some code merged |
| Described implementation details in the Developer Guide | some text and some diagrams added to the developer guide (at least in a PR), comprising at least one page worth of content |
| Issue tracker set up | As explained in |
| v1.2 managed using GitHub features (issue tracker, milestones, etc.) | Milestone v1.2 managed as explained in |
Issue tracker setup
We recommend you configure the issue tracker of the main repo as follows:
- Delete existing labels and add the following labels.
💡 Issue type labels are useful from the beginning of the project. The other labels are needed only when you start implementing the features.
Issue type labels:
type.Epic: A big feature which can be broken down into smaller stories e.g. searchtype.Story: A user storytype.Enhancement: An enhancement to an existing storytype.Task: Something that needs to be done, but not a story, bug, or an epic. e.g. Move testing code into a new folder)type.Bug: A bug
Status labels:
status.Ongoing: The issue is currently being worked on. note: remove this label before closing an issue.
Priority labels:
priority.High: Must dopriority.Medium: Nice to havepriority.Low: Unlikely to do
Bug Severity labels:
severity.Low: A flaw that is unlikely to affect normal operations of the product. Appears only in very rare situations and causes a minor inconvenience only.severity.Medium: A flaw that causes occasional inconvenience to some users but they can continue to use the product.severity.High: A flaw that affects most users and causes major problems for users. i.e., makes the product almost unusable for most users.
-
Create following milestones :
v1.0,v1.1,v1.2,v1.3,v1.4, -
You may configure other project settings as you wish. e.g. more labels, more milestones
Project Schedule Tracking
In general, use the issue tracker (Milestones, Issues, PRs, Tags, Releases, and Labels) for assigning, scheduling, and tracking all noteworthy project tasks, including user stories. Update the issue tracker regularly to reflect the current status of the project. You can also use GitHub's Projects feature to manage the project, but keep it linked to the issue tracker as much as you can.
Using Issues:
During the initial stages (latest by the start of v1.2):
-
Record each of the user stories you plan to deliver as an issue in the issue tracker. e.g.
Title: As a user I can add a deadline
Description: ... so that I can keep track of my deadlines -
Assign the
type.*andpriority.*labels to those issues. -
Formalize the project plan by assigning relevant issues to the corresponding milestone.
From milestone v1.2:
-
Define project tasks as issues. When you start implementing a user story (or a feature), break it down to smaller tasks if necessary. Define reasonable sized, standalone tasks. Create issues for each of those tasks so that they can be tracked.e.g.
-
A typical task should be able to done by one person, in a few hours.
- Bad (reasons: not a one-person task, not small enough):
Write the Developer Guide - Good:
Update class diagram in the Developer Guide for v1.4
- Bad (reasons: not a one-person task, not small enough):
-
There is no need to break things into VERY small tasks. Keep them as big as possible, but they should be no bigger than what you are going to assign a single person to do within a week. eg.,
- Bad:
Implementing parser(reason: too big). - Good:
Implementing parser support for adding of floating tasks
- Bad:
-
Do not track things taken for granted. e.g.,
push code to reposhould not be a task to track. In the example given under the previous point, it is taken for granted that the owner will also (a) test the code and (b) push to the repo when it is ready. Those two need not be tracked as separate tasks. -
Write a descriptive title for the issue. e.g.
Add support for the 'undo' command to the parser- Omit redundant details. In some cases, the issue title is enough to describe the task. In that case, no need to repeat it in the issue description. There is no need for well-crafted and detailed descriptions for tasks. A minimal description is enough. Similarly, labels such as
prioritycan be omitted if you think they don't help you.
- Omit redundant details. In some cases, the issue title is enough to describe the task. In that case, no need to repeat it in the issue description. There is no need for well-crafted and detailed descriptions for tasks. A minimal description is enough. Similarly, labels such as
-
-
Assign tasks (i.e., issues) to the corresponding team members using the
assigneesfield. Normally, there should be some ongoing tasks and some pending tasks against each team member at any point. -
Optionally, you can use
status.ongoinglabel to indicate issues currently ongoing.
Using Milestones:
We recommend you do proper milestone management starting from v1.2. Given below are the conditions to satisfy for a milestone to be considered properly managed:
Planning a Milestone:
-
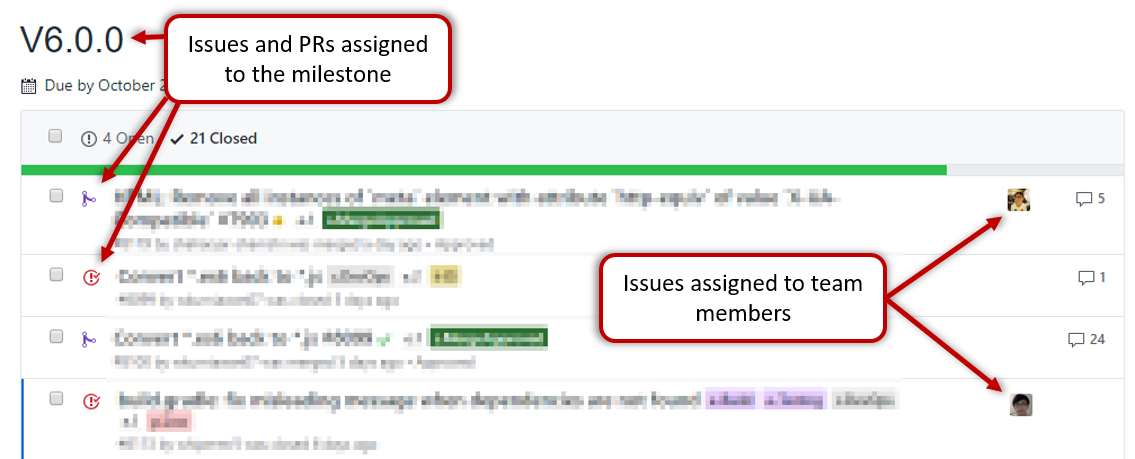
Issues assigned to the milestone, team members assigned to issues: Used GitHub milestones to indicate which issues are to be handled for which milestone by assigning issues to suitable milestones. Also make sure those issues are assigned to team members. Note that you can change the milestone plan along the way as necessary.
-
Deadline set for the milestones (in the GitHub milestone). Your internal milestones can be set earlier than the deadlines we have set, to give you a buffer.
Wrapping up a Milestone:
-
A working product tagged with the correct tag (e.g.
v1.2) and is pushed to the main repo
or a product release done on GitHub. A product release is optional for v1.2 but required from from v1.3. Click here to see an example release. -
All tests passing on Travis for the version tagged/released.
-
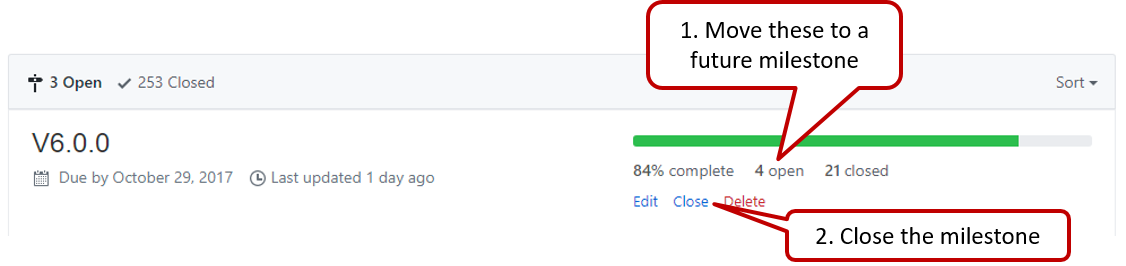
Milestone updated to match the product i.e. all issues completed and PRs merged for the milestone should be assigned to the milestone. Incomplete issues/PRs should be moved to a future milestone.
-
Milestone closed.
-
If necessary, future milestones are revised based on what you experienced in the current milestone e.g. if you could not finish all issues assigned to the current milestone, it is a sign that you overestimated how much you can do in a week, which means you might want to reduce the issues assigned to future milestones to match that observation.
v1.2 Project Management
- Manage the milestone v1.2 as explained in
[Admin Appendix E: GitHub: Project Schedule Tracking] .
v1.2 Product
- Merge some code into the
masterbranch of your team repo. This is expected to be a user-visible enhancement.
v1.2 Documentation
-
User Guide: Update as necessary.
- If a feature has been released in this version, remove the
Coming in v2.0annotation from that feature. Also replace UI mock-ups with actual screenshots. - If a feature design has changed, update the descriptions accordingly.
- If a feature has been released in this version, remove the
-
Developer Guide:
- Each member should describe the implementation of at least one enhancement she has added (or planning to add).
Expected length: 1+ page per person in v1.2 and 3 pages per person in v1.3/v1.4 - The description can contain things such as,
- How the feature is implemented.
- Why it is implemented that way.
- Alternatives considered.
- The stated objective is to explain the implementation to a future developer, but a hidden objective is to show evidence that you can document deeply-technical content using prose, examples, diagrams, code snippets, etc. appropriately. To that end, you may also describe features that you plan to implement in the future, even beyond v1.4 (hypothetically).
- For an example, see the description of the undo/redo feature implementation in the AddressBook-Level4 developer guide.
- Each member should describe the implementation of at least one enhancement she has added (or planning to add).
v1.2 Demo
Do an informal demo of the new feature during the tutorial. To save time, we recommend that one member demos all new features, using the commit tagged as v1.2 in the master branch i.e. only features included in the current release should be demoed.
Questions to discuss during tutorial:
Whole team: do this question together, using the whiteboard:
Q1
Draw an OODM for the description below, about how
A course has a name and a code. A course is read by 10 or more students, and taught by one instructor. A course can have a number tasks which can be assignments or tests. Some assignments are compulsory. When a student attempts a task, a grade and an optional feedback is given.
Q2
Draw an activity diagram to represent the following workflow a burger shop uses when processing an order by a customer.
- First, a cashier takes the order.
- Then, three workers start preparing the order at the same time; one prepares the drinks, one prepares the burgers, and one prepares the desserts.
- In the meantime, the customer pays for the order. If the customer has a voucher, she pays using the voucher; otherwise she pays using cash.
- After paying, the customer collects the food after all three parts of the order are ready.
Divide these questions among team members and get ready to answer them.
Q3
- How does an OO Domain Model differ from a class diagram?
- What's the relationship between an OODM and a class diagram for a software? e.g., exactly the same?, one is a sub-set of the other?
- Which diagram can we use to show
classobject structures in a problem domain?
Q4
- What’s a design pattern?
- When do you use the Singleton pattern, Facade pattern, Command pattern?
- Which of the three patterns are used in AB4? Hint: See [AB4 Learning Outcomes: LO-DesignPatterns]
- When do you use MVC pattern? Do we have MVC in AB4?
- When do you use the Observer pattern? Do we have the Observer pattern in AB4?
Q5
- What is Liskov Substitution Principle?
Give an example from the project where LSP is followed and explain how to change the code to break LSP.
Q6
- Explain how Law of Demeter affects coupling
a. Add a line to this code that violates LoDvoid foo(P p){ //... } - Give an example in the project code that violates the Law of Demeter.
- What’s the problem with the architecture diagram on the right?
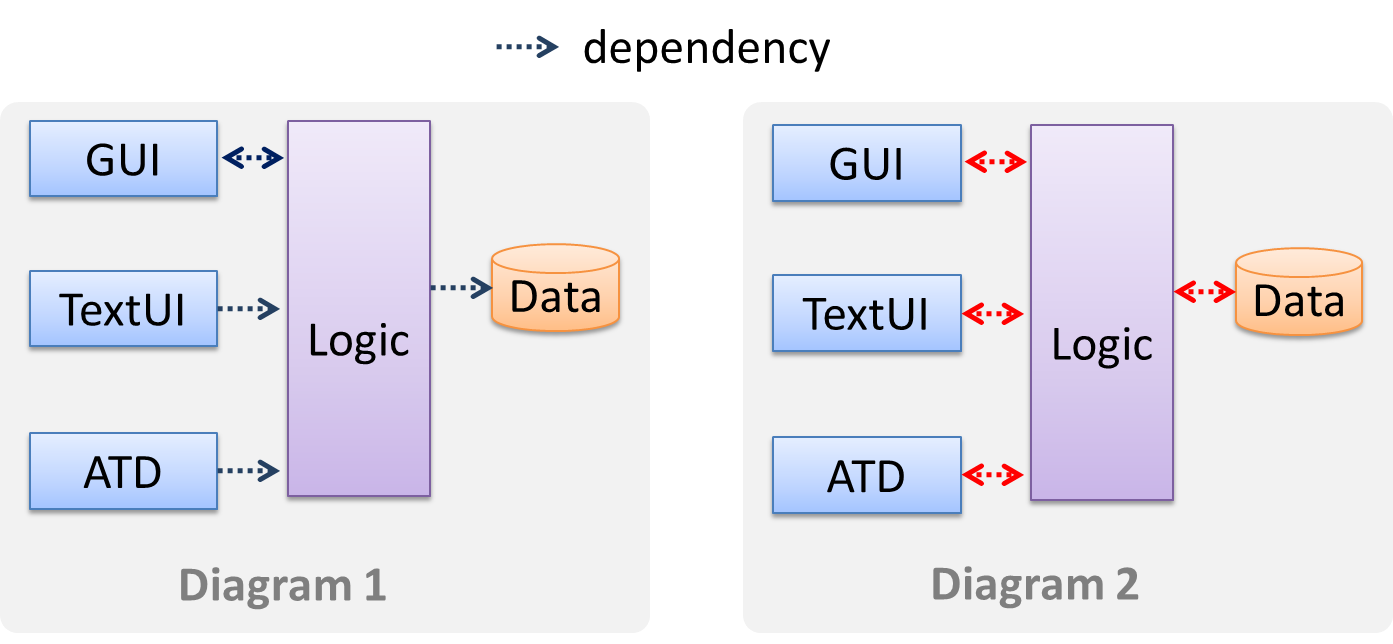
Continue to enhance features. Make code RepoSense-compatible. Try doing a proper release. Update DG in the repo.
Project Management:
- Continue to do deliberate project management using GitHub issue tracker, milestones, labels, etc. as you did in v1.2.
- 💡 We recommend that each PR also updates the relevant parts of documents and tests. That way, your documentation/testing work will not pile up towards the end.
- 💡 There is a way to get GitHub to auto-close the relevant issue when a PR is merged (example).
Ensure your code is
In previous semesters we asked students to annotate all their code using special @@author tags so that we can extract each student's code for grading. This semester, we are trying out a tool called RepoSense that is expected to reduce the need for such tagging, and also make it easier for you to see (and learn from) code written by others.
1. View the current status of code authorship data:
- The report generated by the tool is available at Project Code Dashboard. The feature that is most relevant to you is the Code Panel (shown on the right side of the screenshot above). It shows the code attributed to a given author. You are welcome to play around with the other features (they are still under development and will not be used for grading this semester).
- Click on your name to load the code attributed to you (based on Git blame/log data) onto the code panel on the right.
- If the code shown roughly matches the code you wrote, all is fine and there is nothing for you to do.
2. If the code does not match:
-
Here are the possible reasons for the code shown not to match the code you wrote:
- the git username in some of your commits does not match your GitHub username (perhaps you missed our instructions to set your Git username to match GitHub username earlier in the project, or GitHub did not honor your Git username for some reason)
- the actual authorship does not match the authorship determined by git blame/log e.g., another student touched your code after you wrote it, and Git log attributed the code to that student instead
-
In those cases,
- Install RepoSense (see the Getting Started section of the RepoSense User Guide)
- Use the two methods described in the RepoSense User Guide section Configuring a Repo to Provide Additional Data to RepoSense to provide additional data to the authorship analysis to make it more accurate.
- If you add a
config.jsonfile to your repo (as specified by one of the two methods),- Please use the template json file given in the module website so that your display name matches the name we expect it to be.
- If your commits have multiple author names, specify all of them e.g.,
"authorNames": ["theMyth", "theLegend", "theGary"] - Update the line
config.jsonin the.gitignorefile of your repo as/config.jsonso that it ignores theconfig.jsonproduced by the app but not the_reposense/config.json.
- If you add
@@authorannotations, please follow the guidelines below:
Adding @@author tags indicate authorship
-
Mark your code with a
//@@author {yourGithubUsername}. Note the double@.
The//@@authortag should indicates the beginning of the code you wrote. The code up to the next//@@authortag or the end of the file (whichever comes first) will be considered as was written by that author. Here is a sample code file://@@author johndoe method 1 ... method 2 ... //@@author sarahkhoo method 3 ... //@@author johndoe method 4 ... -
If you don't know who wrote the code segment below yours, you may put an empty
//@@author(i.e. no GitHub username) to indicate the end of the code segment you wrote. The author of code below yours can add the GitHub username to the empty tag later. Here is a sample code with an emptyauthortag:method 0 ... //@@author johndoe method 1 ... method 2 ... //@@author method 3 ... method 4 ... -
The author tag syntax varies based on file type e.g. for java, css, fxml. Use the corresponding comment syntax for non-Java files.
Here is an example code from an xml/fxml file.<!-- @@author sereneWong --> <textbox> <label>...</label> <input>...</input> </textbox> ... -
Do not put the
//@@authorinside java header comments.
👎/** * Returns true if ... * @@author johndoe */👍
//@@author johndoe
/**
  * Returns true if ...
  */
What to and what not to annotate
-
Annotate both functional and test code There is no need to annotate documentation files.
-
Annotate only significant size code blocks that can be reviewed on its own e.g., a class, a sequence of methods, a method.
Claiming credit for code blocks smaller than a method is discouraged but allowed. If you do, do it sparingly and only claim meaningful blocks of code such as a block of statements, a loop, or an if-else statement.- If an enhancement required you to do tiny changes in many places, there is no need to annotate all those tiny changes; you can describe those changes in the Project Portfolio page instead.
- If a code block was touched by more than one person, either let the person who wrote most of it (e.g. more than 80%) take credit for the entire block, or leave it as 'unclaimed' (i.e., no author tags).
- Related to the above point, if you claim a code block as your own, more than 80% of the code in that block should have been written by yourself. For example, no more than 20% of it can be code you reused from somewhere.
- 💡 GitHub has a blame feature and a history feature that can help you determine who wrote a piece of code.
-
Do not try to boost the quantity of your contribution using unethical means such as duplicating the same code in multiple places. In particular, do not copy-paste test cases to create redundant tests. Even repetitive code blocks within test methods should be extracted out as utility methods to reduce code duplication. Individual members are responsible for making sure code attributed to them are correct. If you notice a team member claiming credit for code that he/she did not write or use other questionable tactics, you can email us (after the final submission) to let us know.
-
If you wrote a significant amount of code that was not used in the final product,
- Create a folder called
{project root}/unused - Move unused files (or copies of files containing unused code) to that folder
- use
//@@author {yourGithubUsername}-unusedto mark unused code in those files (note the suffixunused) e.g.
//@@author johndoe-unused
method 1 ...
method 2 ...
Please put a comment in the code to explain why it was not used.
- Create a folder called
-
If you reused code from elsewhere, mark such code as
//@@author {yourGithubUsername}-reused(note the suffixreused) e.g.//@@author johndoe-reused method 1 ... method 2 ... -
You can use empty
@@authortags to mark code as not yours when RepoSense attribute the to you incorrectly.-
Code generated by the IDE/framework, should not be annotated as your own.
-
Code you modified in minor ways e.g. adding a parameter. These should not be claimed as yours but you can mention these additional contributions in the Project Portfolio page if you want to claim credit for them.
-
- After you are satisfied with the new results (i.e., results produced by running RepoSense locally), push the
config.jsonfile you added and/or the annotated code to your repo. We'll use that information the next time we run RepoSense (we run it at least once a week). - If you choose to annotate code, please annotate code chunks not smaller than a method. We do not grade code snippets smaller than a method.
- If you encounter any problem when doing the above or if you have questions, please post in the forum.
We recommend you ensure your code is RepoSense-compatible by v1.3
Product:
-
Do a
proper product release as described in the Developer Guide. You can name it something likev1.2.1. Ensure that the jar file works as expected by doing some manual testing. Reason: You are required to do a proper product release for v1.3. Doing a trial at this point will help you iron out any problems in advance. It may take additional effort to get the jar working especially if you use third party libraries or additional assets such as images.
Documentation:
-
User Guide: Update where the document does not match the current product.
-
Developer Guide: Have a draft of the requirements of your project, as described in
v1.2 progress guide .
Move code towards v2.0 in small steps, start documenting design/implementation details in DG.
v1.2 Summary of Milestone
| Milestone | Minimum acceptable performance to consider as 'reached' |
|---|---|
| Contributed code to the product as described in mid-v1.2 progress guide | some code merged |
| Described implementation details in the Developer Guide | some text and some diagrams added to the developer guide (at least in a PR), comprising at least one page worth of content |
| Issue tracker set up | As explained in |
| v1.2 managed using GitHub features (issue tracker, milestones, etc.) | Milestone v1.2 managed as explained in |
Issue tracker setup
We recommend you configure the issue tracker of the main repo as follows:
- Delete existing labels and add the following labels.
💡 Issue type labels are useful from the beginning of the project. The other labels are needed only when you start implementing the features.
Issue type labels:
type.Epic: A big feature which can be broken down into smaller stories e.g. searchtype.Story: A user storytype.Enhancement: An enhancement to an existing storytype.Task: Something that needs to be done, but not a story, bug, or an epic. e.g. Move testing code into a new folder)type.Bug: A bug
Status labels:
status.Ongoing: The issue is currently being worked on. note: remove this label before closing an issue.
Priority labels:
priority.High: Must dopriority.Medium: Nice to havepriority.Low: Unlikely to do
Bug Severity labels:
severity.Low: A flaw that is unlikely to affect normal operations of the product. Appears only in very rare situations and causes a minor inconvenience only.severity.Medium: A flaw that causes occasional inconvenience to some users but they can continue to use the product.severity.High: A flaw that affects most users and causes major problems for users. i.e., makes the product almost unusable for most users.
-
Create following milestones :
v1.0,v1.1,v1.2,v1.3,v1.4, -
You may configure other project settings as you wish. e.g. more labels, more milestones
Project Schedule Tracking
In general, use the issue tracker (Milestones, Issues, PRs, Tags, Releases, and Labels) for assigning, scheduling, and tracking all noteworthy project tasks, including user stories. Update the issue tracker regularly to reflect the current status of the project. You can also use GitHub's Projects feature to manage the project, but keep it linked to the issue tracker as much as you can.
Using Issues:
During the initial stages (latest by the start of v1.2):
-
Record each of the user stories you plan to deliver as an issue in the issue tracker. e.g.
Title: As a user I can add a deadline
Description: ... so that I can keep track of my deadlines -
Assign the
type.*andpriority.*labels to those issues. -
Formalize the project plan by assigning relevant issues to the corresponding milestone.
From milestone v1.2:
-
Define project tasks as issues. When you start implementing a user story (or a feature), break it down to smaller tasks if necessary. Define reasonable sized, standalone tasks. Create issues for each of those tasks so that they can be tracked.e.g.
-
A typical task should be able to done by one person, in a few hours.
- Bad (reasons: not a one-person task, not small enough):
Write the Developer Guide - Good:
Update class diagram in the Developer Guide for v1.4
- Bad (reasons: not a one-person task, not small enough):
-
There is no need to break things into VERY small tasks. Keep them as big as possible, but they should be no bigger than what you are going to assign a single person to do within a week. eg.,
- Bad:
Implementing parser(reason: too big). - Good:
Implementing parser support for adding of floating tasks
- Bad:
-
Do not track things taken for granted. e.g.,
push code to reposhould not be a task to track. In the example given under the previous point, it is taken for granted that the owner will also (a) test the code and (b) push to the repo when it is ready. Those two need not be tracked as separate tasks. -
Write a descriptive title for the issue. e.g.
Add support for the 'undo' command to the parser- Omit redundant details. In some cases, the issue title is enough to describe the task. In that case, no need to repeat it in the issue description. There is no need for well-crafted and detailed descriptions for tasks. A minimal description is enough. Similarly, labels such as
prioritycan be omitted if you think they don't help you.
- Omit redundant details. In some cases, the issue title is enough to describe the task. In that case, no need to repeat it in the issue description. There is no need for well-crafted and detailed descriptions for tasks. A minimal description is enough. Similarly, labels such as
-
-
Assign tasks (i.e., issues) to the corresponding team members using the
assigneesfield. Normally, there should be some ongoing tasks and some pending tasks against each team member at any point. -
Optionally, you can use
status.ongoinglabel to indicate issues currently ongoing.
Using Milestones:
We recommend you do proper milestone management starting from v1.2. Given below are the conditions to satisfy for a milestone to be considered properly managed:
Planning a Milestone:
-
Issues assigned to the milestone, team members assigned to issues: Used GitHub milestones to indicate which issues are to be handled for which milestone by assigning issues to suitable milestones. Also make sure those issues are assigned to team members. Note that you can change the milestone plan along the way as necessary.
-
Deadline set for the milestones (in the GitHub milestone). Your internal milestones can be set earlier than the deadlines we have set, to give you a buffer.
Wrapping up a Milestone:
-
A working product tagged with the correct tag (e.g.
v1.2) and is pushed to the main repo
or a product release done on GitHub. A product release is optional for v1.2 but required from from v1.3. Click here to see an example release. -
All tests passing on Travis for the version tagged/released.
-
Milestone updated to match the product i.e. all issues completed and PRs merged for the milestone should be assigned to the milestone. Incomplete issues/PRs should be moved to a future milestone.
-
Milestone closed.
-
If necessary, future milestones are revised based on what you experienced in the current milestone e.g. if you could not finish all issues assigned to the current milestone, it is a sign that you overestimated how much you can do in a week, which means you might want to reduce the issues assigned to future milestones to match that observation.
v1.2 Project Management
- Manage the milestone v1.2 as explained in
[Admin Appendix E: GitHub: Project Schedule Tracking] .
v1.2 Product
- Merge some code into the
masterbranch of your team repo. This is expected to be a user-visible enhancement.
v1.2 Documentation
-
User Guide: Update as necessary.
- If a feature has been released in this version, remove the
Coming in v2.0annotation from that feature. Also replace UI mock-ups with actual screenshots. - If a feature design has changed, update the descriptions accordingly.
- If a feature has been released in this version, remove the
-
Developer Guide:
- Each member should describe the implementation of at least one enhancement she has added (or planning to add).
Expected length: 1+ page per person in v1.2 and 3 pages per person in v1.3/v1.4 - The description can contain things such as,
- How the feature is implemented.
- Why it is implemented that way.
- Alternatives considered.
- The stated objective is to explain the implementation to a future developer, but a hidden objective is to show evidence that you can document deeply-technical content using prose, examples, diagrams, code snippets, etc. appropriately. To that end, you may also describe features that you plan to implement in the future, even beyond v1.4 (hypothetically).
- For an example, see the description of the undo/redo feature implementation in the AddressBook-Level4 developer guide.
- Each member should describe the implementation of at least one enhancement she has added (or planning to add).
v1.2 Demo
Do an informal demo of the new feature during the tutorial. To save time, we recommend that one member demos all new features, using the commit tagged as v1.2 in the master branch i.e. only features included in the current release should be demoed.